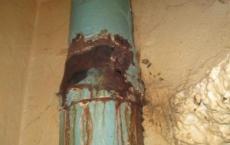
We make a well in the country house with our own hands - detailed instructions for summer residents. The well itself.
A few superficial signs that the place under the well is chosen correctly:
- Presence of dense, juicy, green grass in the dry period;
- Moss on the surface of the earth;
- Presence of other wells nearby (it is necessary to specify the information about the structure, depth, arrangement of the well with neighbors);
- Near the country plot there is a natural lake or a pond;
- The presence of dense fog in the absence of water reservoirs near the dacha;
- Raising the water level in the basement of the house or in the cellar during floods (melting snow in the spring).
In some regions, a geodetic survey is required to equip one's own well. You should learn about this nuance from local authorities.
All these details must be taken into account when selecting a site and constructing a well at the dacha. After analyzing all the nuances, you can choose a good place for a dacha well.
Well at the cottage of concrete rings
Works on digging a well with their own hands are made only with the use of a special tool that is prepared in advance:
- Two types of shovels (with a short and long handle);
- Several metal buckets for 15 liters (preferably three units);
- The ladder is metal long for the initial digging process;
- Ladder rope for a deeper dive;
- A reliable equipped device for lifting buckets with earth from the depth of the well;
- Pump for pumping water, so that it was possible to equip the water collector;
- Extension piece with lamp or lamp at the end;
- Additional equipment (puncher) for overcoming more difficult obstacles.
Usually, the walls of the well shaft are reinforced with special concrete rings. To equip such wells at the dacha from concrete rings best with the use of grooves. They are safer and more convenient to use, they are also easier to mount.
There are two ways of installing concrete rings:
- Mine, deep-submerged;
- Dial-up superficial.
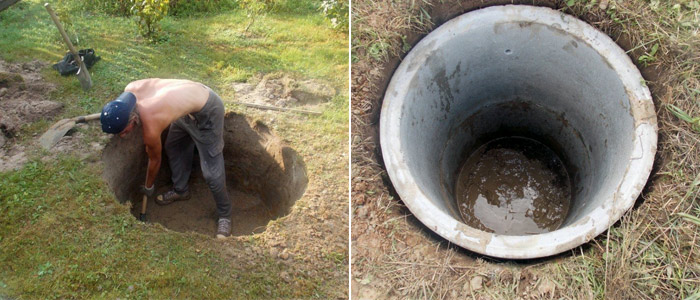
 In the first variant, the shaft - round, with a diameter of 1.25 m, or a square one, 125х125 cm in size - until the appearance of water is pulled out completely. Then the rings are plunged into the well in order. Using the mine method, it is necessary to take into account the high danger of collapse of the ground. Therefore, it can be used, mainly, on a stable soil. In the case of the slightest spillage of the earth layer immediately go to the second method.
The second way, dial-up superficial, is safer. The concrete ring is installed in a pit, a depth of one meter. Then make a dig for another meter. As a result, the first ring sinks down on its own using the pressure of its weight, making room for the next one. Then put the second ring, undermine, making room for the third. A third ring is installed. Thus, the entire structure is undermined and installed to the required depth.  After the well is excavated, it is necessary to create a filter layer so that a silt ball does not form, which later can stop the renewal of spring water. For this, the bottom of the well is covered with small pebbles or gravel with sand.
Important to remember! The deeper you fall when digging a well, the less oxygen will become. Therefore, when working at depth, you should use an oxygen mask with a long tube outward.
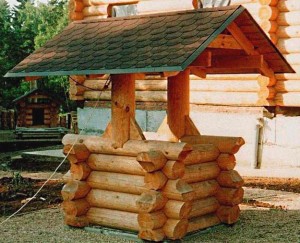
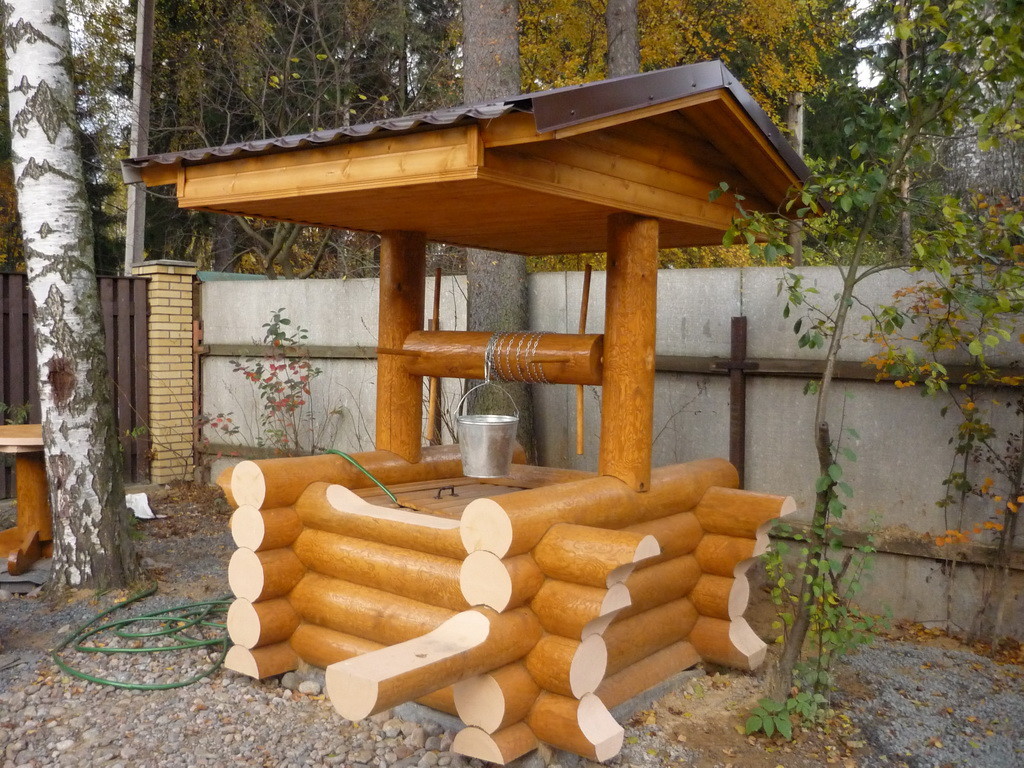
Well at the cottage made of wood
Despite the tendencies in the development of technologies for the arrangement of the upper part of the wells, the classical tree is not inferior to its leadership, occupying former positions of popularity among summer residents. Widely used materials for the upper part of the well are pine and linden.
 A wooden well at the dacha from the log house is quite expensive. Not every summer resident will be able to afford such wells. In addition, the installation itself is very difficult.
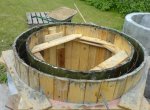
For the construction of a well from a log house, it is first necessary to excavate a pit equal to the average human height.
Then the following work is done on the development of the well:
- At the bottom of the foundation pit formed crowns of larch.
- Prepared log house is collected in order. Slots of joints must be treated with a sealing substance with the use of a pack. This should be done for the lower layers up to 3 m high.
- After laying the first part of the well, you need to dig the ground from under the middle of the beams, the resulting structure.
- When all the earth is cleaned, spacers are installed and the earth is cleaned from the corners of the well.
- After cleaning the well from the ground, you need to fix the safety ropes to the base of the log house in the well. To do this, you can use a winch.
- The spacers are removed, as a result of which the construction begins to dive into its own well under its own weight. If there is any distortion, you can tap the top with a sledge hammer to level the structure.
- Thus, the frame is topped from above and lowered to the bottom. So you can install a log house to a depth of 6 meters. At this level, the construction is jammed by spacers, which are made 50 cm longer. They need to be inserted into the prepared grooves from the bottom.
 If the well is planned to be made below the 6-meter mark, it is necessary to select the ground before the appearance of the first water. The first signs that the aquifer is close is the increased humidity of the air and the soil itself (it is becoming more saturated with water).
To equip the mine wells, specially processed and prepared wood is used. The construction of such wells does not require additional strengthening elements. The structure of the tree is quite strong and durable. As a material for the beams used solid wood (mainly oak, alder, aspen, elm, hornbeam).
It is highly discouraged to use birch, spruce, and a number of other coniferous trees that have water-absorbing properties for the arrangement of wells. Their use in the future will lead to the appearance of the bitterness of water. They will quickly lose their strength and soon begin to deteriorate.
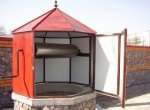
Wells made of wood at the dacha are an excellent element of the decorative design of the yard, emphasizing the delicate taste of the owner. A wooden well is an excellent protection against ingress of dust, dirt, foreign objects, sewage storm water. To summer residents who have such wells, it should be remembered that from time to time they need to be serviced (treated with a protective layer of waterproofing materials).
Water from the well
The presence of a well in the dacha allows the owner to think about carrying water into the house. The installation of a water pipe is best done together with the installation of the well itself.
To start, you need to build a highway from the well to the house. For this, a trench is digging, at least 80 cm deep, with a spade-wide shovel.
At the bottom of the trench a 7-centimeter cushion of sand is poured out and a pipe is laid (plastic, metal-plastic, metal can be laid). Experts recommend laying plastic pipe section 32 mm. After laying the pipe, a 5-centimeter ball of sand is poured, then you can cover the entire trench.

In the ring of the well, a hole is punched, into which a pipe is wound. In the house, a foundation breaks through and a pipe is inserted inside, where it must be connected to. In the well, the pipe joins with another pipe, which reaches the bottom of the well.
As a power unit for supplying water from the well to the dacha, it is possible to apply a submersible deep-water pump, the power of which must be calculated depending on the length of the water main.
Arrangement of the well at the dacha - a source of fresh water - is one of the main elements of life support and comfort of the summer resident. Make a well at the dacha with your own hands is very real, but you should remember about security measures and, in no case, do not neglect them.
How to make a well in the country (video)
Own water source in your favorite summer residence will significantly increase the level of comfort. Eliminate the need for buckets to carry water to care for the treasured plants, to fill the tanks in the bath or shower. The construction of a water intake structure can be entrusted to a team of workers specializing in this field. But it is better to dig and equip a well in the dacha with your own hands, investing in it a minimum of funds.
Any enterprise requires thorough future preparation from the future artist. All the more so laborious as digging a well.
Errors in planning, distribution of forces and working stages will necessarily affect the outcome. In the best case, the construction will last for a long, but not known, term, at worst - will end with the device of a useless tunnel "to nowhere."
Image Gallery


![]()
Research of an independent hydrogeologist
In order to exclude the meaningless costs of funds and muscular efforts, it is necessary to conduct preliminary hydrogeological studies. The best option Exploration - drilling, but to perform it on their own before building a well is at least unreasonable, and hiring drillers is expensive and unprofitable. It is better then to drill a well at once.
Independent hydrogeological investigations are concluded in a banal survey of neighbors who have their own well or well. Find out from them you need:
- At what depth is the mirror of the water in the high water and in the droughty period.
- How many meters have been drilled or excavated for the installation of water intake facilities.
- Does not the property "leave" water from water intake, if summer is not happy with the precipitation of two / three weeks, but exhausts with heat.
- Which soil was extracted from the wellbore or well during their development: it was clayey or sandy.
- It was not necessary for the drillers to break a boulder or builders of a well to lift a large heavy stone from a well.
Traditionally, suburban land allotments and suburban areas are located in a flat area without pronounced relief structures. Wells are digging into sedimentary deposits that are easy to develop. Work is carried out to the first aquifer, trying to pass and close the vadose, if it is located at a depth of about 3-4 m from the surface.
Most of the country cottages are located in a flat area, for which the horizontal occurrence of the ground layers is characteristic. Groundwater in the flat areas is almost at the same level
Underground water, containing pores of sedimentary rocks, usually lies in the form of a kind of basin. According to the gravitational prescriptions and the law of communicating vessels, the surface of this basin is practically at one depth at all points. This means that the geological and hydrogeological situation on your site will be almost the same as that of a neighbor.
Some deviations in the level are fixed in the course of groundwater movement. For example, if it is unloaded in the form of a spring in a ravine located 3-5 km from the site of work. Then the level in the point closer to the spring will be somewhat lower than in the far analog. However, these deviations can be neglected in the well of the well; their meaning is usually unimportant.
A significant difference in the height of the groundwater level (groundwater level) will be if the well is placed on a hillside. Water will always drain to the side of easy discharge, which the slope provides to it. Therefore, on such sites they try not to build wells, since Natural drainage significantly reduces the amount of water produced.
If there is a perch in the area, the level of which in the spring-autumn period will be 3-4 m on average, it is recommended to cover it with the trunk of the well and reach the underlying aquifer. The level and water content of the perch are unstable, the water is most often polluted by domestic sewage
By neighboring sources, you can determine the depth of the mirror with a fairly high accuracy, using a barometer. Its scale is marked by divisions with a price of 0.1 mm, which translates to a height of 1 m. So if the device shows 831.7 mm above the neighbor's output, and the point of the planned well is 831.5 mm, then the depth of your water intake the construction will be 2 m more.
Information on the composition of soils will help evaluate your own strengths for self-digging. If neighbors are assured of the complexity of development and the availability of a large number of boulders, it is better to delegate work to the shabashniki team. They still have to follow their actions, which means that the technologies for building a well need to be read.
The approximate water level in the well planned for construction can be determined from the mirror of the nearby reservoir. The water in the well will be approximately at the same elevations
In addition to the "testimony" of owners of existing water intake facilities, organizations that conducted drilling or construction near your site can provide information on the hydrogeological conditions of the area. The information can be provided by a local meteorological service, which has a complete package of data on climatic conditions, natural phenomena and geological situation in the region.
How to identify a place for digging a well
For a water intake facility, it is necessary to choose a suitable place in advance. It is undesirable to arrange it there, where garden plants were planted for several decades and fertilized the earth with chemical compounds. Note that well water is rarely drunk. If the plans do not include extraction of the drinking category, then the previous cycles of fertilizer application can be ignored.
Due to the small size of the suburban areas, it is difficult to find a place for a well drinking water. Due to the insufficient distance from the possible pollutants of groundwater to the source, it can only be used for cleaning and watering (+)
Let's list the main factors of influence on the selection of a site for the construction of a well:
- Pollution elimination. Remoteness from the places of possible entry of negative components: from household and household buildings, pens for cattle, cesspools, compost heaps of not less than 20 m. In the case of a well with drinking water in the suburban area, there should not be any such objects at all.
- Reduce costs. The shortest possible maximum pipeline route, if a water supply system is to be installed. The smaller the length of the trunk, the less money will be spent.
- Optimal location. Between the foundation of the cottage and the well should be at a minimum of 5 m. The water intake structure will "draw" in itself groundwater on the principle of water. He will constantly strive to replenish the depleted reserves, attracting not only water, but also soil particles, which will then wash the soil under the foundation at close location well.
Vast dacha for our realities is rare, because choosing a place in the direction of groundwater movement on the site is strange, at least. However, if the earth's surface of the allotment has a certain slope, then it is best to choose a place under the well at the lowest point, if possible. There, and the thickness of the soil to be extracted, will be smaller, and the flow of water is greater.
According to the requirements of SanPiN under the number 2.1.4.544-96 between the source drinking water and objects of probable pollution of groundwater ( cesspools, compost piles, cattle pens, etc.) should be at least 50 m
Specificity of well design
The maximum depth of a traditional well with a shaft-trunk is 30 m. It is dangerous to dig lower, too heavy, it is impractical for costs and labor. At the dacha you can make a very shallow well, the height of the mine will be 6 - 8 m.
Dig a shallow shaft is easy, to extract water, a standard bucket or inexpensive surface pump. However, the extracted water of shallow workings is applicable only in irrigation and other economic purposes.
Water intake can be made with a mine of 15 - 20 m. From such a depth, it is more likely to get water coming to drink. The chances are especially high if the aquifer is covered by loam or sandy loam - clayey rocks that do not allow water to pass through. They prevent the penetration of atmospheric and flood waters together with domestic sewage, technical oils, chemicals.
The task of the builder of the well is not only to extract the soil from the mine, but also to form the walls of the well mine. They are built of stone, bricks, logs, wood plates, timber, monolithic reinforced concrete, embedded in the formwork in the pit. The most common variant of material for wall construction at the moment is factory concrete rings or self-made analogues, filled in the form directly on the site of works.
Regardless of the material used to construct the walls of the shaft, its design includes three main elements: 1 - water intake, 2 - barrel, head (+)
Regardless of the material used to construct the walls of the well, they are constructed in accordance with a single constructive scheme. Its main parts are:
- Headline. Part of the mine, towering above the earth's surface. Standard height 0,7 - 0,8 m, but with variations. It is equipped with a well house for protection against atmospheric negativity. For manual lifting water is equipped with a collar or a crane.
- Trunk. Part of the mine, measured from the mark of the earth's surface to the water's mirror. It serves to strengthen the walls of the mine and to protect it from soil collapses.
- Water intake part. A section of the mine submerged in the aquifer. The main working element of the well, providing the supply of water to the structure, if necessary, creating its stock.
In addition to geometric parameters, there are no significant differences in the device of the head and trunk. Different is the width with height, but the shape of the mine in terms of: square or round. The main constructive difference, which determines the division of wells into species, is set by the principle of the device of the water intake part.
By differences in the device of the water intake part, the wells are divided into:
- Imperfect. The water receiving part of this type is immersed in the water-saturated layer by approximately 70% of the water-carrier capacity. The shaft is not installed on the water retainer, therefore the inflow of water into it occurs both through the bottom and through the walls of the water intake part.
- Perfect. The water intake is completely buried in the aquifer. The base of the shaft rests on the waterproof layer, because of which the inflow of water is carried out exclusively through the side walls.
- Perfect with a sump. The water intake part rests on the waterproof layer, water enters the shaft laterally through the walls. The reservoir is supplemented by a kind of reservoir formed in the underlying water-bearing waterproof layer.
Sumpf is arranged to form a reserve of water. Therefore, its volume is calculated based on the actual daily flow rate. If necessary, to increase the volume of water that can be pumped at a time, the sump is arranged in the form of a bell with an extension to the base.
The construction of the well is selected in accordance with the geological situation in the area of work, the experience of neighbors in the construction of similar sources and the real need for water in future owners
In a reasonable choice of the optimal well design, a survey of neighbors can also help. You may be approached by a similar imperfect or augmented by a sump perfect scheme. It all depends on the real need for water.
It should be remembered that well water can not be "stagnated" in the mine. In the case of a long stay there, it will bloom or become rot. If you do not plan permanent residence in the country with a copious reception of water procedures, then an adequate amount of water will give an imperfect design. At the bottom, it is arranged with a bottom filter made of gravel or crushed stone, to retain grains of sand.
Construction of a well of concrete rings
The construction of the water source in the villa area is the simplest option available for independent execution. The use of ready-made rings will allow you to excavate an excellent well at the dacha with the least loss of power and expense, and if desired, decorate the headland with a stone or a log. However, the most economical will still be a method that presupposes the independent pouring of concrete well elements.
Image Gallery
![]()

Technology of construction from finished rings
In the construction of wells from concrete rings, the lowering method is mainly used. Although you can go another way: install concrete elements in a previously dug mine, but the down method is more practical and safe. With it, the walls of the shaft are strengthened simultaneously with the extraction of soil, which excludes the collapse of loose rocks into the trunk during operation.
For the construction of the well, both concrete and reinforced concrete rings with a chamfer facings at the end edge are suitable. Note that for equal sizes, the first and second versions differ in mass. For example, for a concrete ring size of Ø 1 m, a height of 0.7 m, the weight will be 800 kg on average. A similar reinforced concrete element will weigh only about 500 kg.
The use of reinforced concrete factory rings is the simplest method and convenient material for the construction of a pit
In addition, the thickness of the walls of the concrete ring for the construction of the well should be no less than 10 cm, preferably 12 cm. And when using rings of reinforced concrete, a minimum of 6 cm is allowed, but the average thickness is 7-8 cm.
The size of the walls is largely reflected in the size of the internal diameter, and it in turn affects the convenience during the development of the mine and the subsequent use of the well.
The construction of a well of concrete rings does not require the mandatory use of lifting equipment
The wellbore is better to be built in a lowered way, but it is possible to install them in a previously excavated pit using the technology depicted in the diagram
A suitable diameter of the rings is selected with a reference to the comfortable position of the worker during the digging in the shaft. On average, it is from 1.0 m to a maximum of 1.5 m. It is not to be hoped that there will be more water in the wide well. If it is imperfect, then the influx will be equivalent to both a wide and narrow barrel.
In addition to the factory concrete rings, you also need to buy a shoe - a shortened concrete ring equipped with a tool along the bottom edge. It will accelerate the penetration and ensure a smooth immersion of a column of concrete elements in the ground. When the mine is constructed from self-made rings, the lower edge of the starting line is made in the form of a cone.
To significantly simplify the process of lifting the soil from the shaft of the well, a tripod with a hook block attached to its top will help. Descent and lifting can be done using a manual gate or electric winch
If loose soil was extracted from the well of the neighbor well, then there is a chance of clamping the upper part of the trunk with a collapsed rock. At the same time, the lower part continues to descend, the upper part remains clamped in place, and a gap appears between them, which is extremely difficult to eliminate. In order to avoid such a serious accident, it is better to stock up a 16 mm rod to make stapling rings or a strip of 5-10 mm thick.
To facilitate the procedure of lifting the soil from the mine, it is desirable to make a tripod and attach a block to its top. So it is more convenient and faster to proceed with the liberation of the trunk from the abandoned rock.
The stepped version of the shaft well assembly is made of tapered rings, which form outside the stiffeners from the outside, from within the step for lifting / lowering
The most common method of constructing a well from the rings is a descending method, according to which the trunk is built from above, and is submerged into the ground by digging in from below
Concrete or reinforced concrete elements for the construction of a well shaft are pre-purchased taking into account the height of a mine of neighbors or are poured on the construction site
Steps of the lowering method of constructing an imperfect shaft:
- We mark the outline of the mine by the actual dimensions of the rings. The simplest method of marking is to install a peg at the center with a string attached to it, equal to half the diameter of the ring. With this simplified compass it is necessary to delineate the boundaries.
- Tear out the circular foundation pit according to the layout. It can be a little wider than the outline, so it's easier to immerse the starter ring. We dig about ¾ of the height of the concrete element.
- We install a shoe with a cutter in the pit, check its position with a level. If necessary, align the position, so that there is no further distortion of the trunk.
- We load the starting ring into the shaft. We fasten it to the shoe in four places with staples or metal plates cut from the strip, if there is no certainty that the shoe does not separate from the concrete column when immersed.
- We choose the soil inside the mine, not digging it under the shoe.
- We dig under the shoe four or more cavities so that they can fit equal in height logs, bricks or similar temporary supports.
- We install the supports so that the assembled part of the well leans on them. We control the landing of the trunk level and plumb line, in order not to correct later the flaws that increase with depth.
- Underpass the remaining areas under the shoe and knock out the temporary supports.
- We put the ring in the ground, trying to observe the uniformity of immersion.
- We operate in accordance with the algorithm described above, while the upper edge of the ring does not align with the day surface.
- We lay along the chamfer of the installed ring the sealant - tarred hemp cord Ø 20 mm. Sealant is used for at least three to five lower rings. It is needed in the water intake and slightly higher in case of a rise in the level during the flood period.
- Set the next ring, if necessary, connect it with the previous one in 3 - 4 places along the circumference.
In this way, we deepen and build up the rings until water-saturated sand appears. We deepen into it as many meters of the mine as was the neighbors'. At this time, it will be necessary to continuously pump the water out of the mine so that it does not interfere with the worker.
The diagram shows the process of digging up the soil under the cutting shoe of the wellbore in steps
If there is no information on penetration into the aquifer, then after installing at least one concrete element, another simplified exploration should be done. Before digging the ground under the trunk, you need to dig in the center of something like a pit. If there are only sand and small stones in the pit, the mine development can be continued until the next ring is immersed.
Then reconnaissance is carried out until the roof of the waterproof layer - clay, clay-like rock - appears on the bottom of the pit. This is the signal to stop digging. Now work in the mine is only in the device of the bottom filter from a three-layer gravel backfill. Gravel is covered in three layers with a thickness of 15 - 20 cm. The fraction of each top layer should be larger than the lower one.
To exclude the displacement and displacement of concrete rings, they are joined by curved staples from reinforcing bars, welded staples or metal overlays with bolted fasteners (+)
At the device on a summer residence of the perfect type of a well, the shaft should be installed on the roof of the waterproof layer. Exploration, of course, to conduct during the period of digging is not necessary. The shaft is just gradually immersed until it is taut in the waterproof.
It should be borne in mind that one or more of the starting links of a perfect well must pass water through the walls. To do this, in the staggered rings, similarities are formed of windows filled with a fine mesh, cinder blocks or similar porous materials with filtering abilities. The number of rings must be such that it completely covers and slightly exceeds the capacity of the water-carrier.
Rings with side filters are used not only in the construction of perfect wells, but also in the construction of imperfect structures in beds with a weak inflow of water.
In order to increase the inflow of water into imperfect wells with a small production rate and to arrange the filtering water intake part of the perfect well, the starting ring is arranged with perforation. Its function can perform unique "windows" of large-pored concrete or holes filled with shallow mesh made of stainless steel
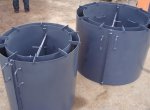
Method of the device from self-made rings
Construction technology is similar to the previous method, but is complicated by the procedure for manufacturing concrete rings. To do this, it is necessary in advance to stock up the dismountable formwork of planks or sheet metal connected to each other. It is clear that the formwork should be a pair: one part is obliged to repeat the outer surface of the ring, the second is internal. The size and shape of the formwork is better to choose according to the dimensions of the factory rings.
Image Gallery
To prepare the solution, portland cement of not less than 400 grade, river or quarry sand and gravel fractions of 30 to 70 will be required. In order for the rings to freely sink into the ground, the walls of the hand-made product should be as smooth as possible. Therefore, preference is given to gravel of fine fractions.
Water is needed with neutral acidity. Its volume is determined from the graphs of the CC, taking into account that the water-cement ratio for pouring the elements of the well can not be less than 0.7. Considering the consumption of cement with water, it is possible to calculate the volume of the initial components for the manufacture of rings.
For the hand-making of the rings, a formwork design must be developed. The optimum proportions of the concrete mixture are 1: 2.5: 4 and / or 1: 2: 3; VC from 0,5 to 0,7
Adhesion of elements of a concrete trunk will be carried out faster and with greater accuracy, if, when pouring, provide a facet chamfer
If it is supposed to install concrete rings in the pit with the use of construction equipment, it is necessary to lay the mounting loops in the reinforcement frame
It is necessary to consider in advance the type of the seam edge of the rings: the straight is a butt quarter or with a bevelled wall. To form the fold in the pouring period, two more ring-shaped parts will be required, one of which must be laid on the bottom of the formwork, the second one on top of the pouring. These parts must be combined so that the manufactured elements of the well can be tightly connected.
At the stage of preparing the formwork a decision is made to use the reinforcement. If the reinforcing skeleton is applied, the consumption of the grouting solution will be reduced. It is possible that the cost of the ring will increase somewhat, but at the same time the rigidity and strength of the structure will increase.
The armature is constructed from vertically mounted rods and horizontally arranged rings of rod 10 - 12 mm. The diameter of the rings should be smaller than the size of the outer part of the formwork assembly, but more internal, so that the structure can fit freely into the gap formed by them.
Between the vertical elements of the reinforcing cage should be of the order of 25 cm, between the horizontal rings of 10 -20 cm. To create a single system, the reinforcing bars and rings are held together by a binding wire.
Formwork is filled with layers of 100-150 mm in thickness. As the mortar is filled, the mortar is rammed until the cement milks come out on the surface. The grinding should be carried out necessarily, the denser the mortar is laid, the higher the strength characteristics of the product.
After placing the mixture in the formwork, care must be taken to ensure that it is properly cured. The first 10 days of the ring should be protected from possible freezing and drying. The surface should be periodically wetted or covered with wet sawdust.
The starting ring is made with the lower cutting edge. If you do not want to bother with the edge device, you can buy or pour a shoe separately. The formation of filtering windows in the walls of concrete rings, as in the previous case, depends on the constructive type of the well. The technology of constructing a mine from self-made rings does not differ at all.
The bottom of a well of imperfect type should be equipped with a bottom filter. It is covered with three layers of rocks with good filtration properties. The first layer is about 10 cm from the sand, then 15 cm each of small and upper gravel (+)
Having completed the work on the construction of a well mine, it is possible to proceed safely to the arrangement of its own source. At the bottom of an imperfect structure, the trunk of which is buried in a water-carrier, but does not rely on waterproof rock, a bottom filter should be built. Around the trunk, a clay lock should be organized to protect against the ingress of domestic sewage into the mine. The head should be at least equipped with a lid or a canopy and a device for lifting well water.
After completing work on the construction of the mine, it is necessary to equip the wellhead and arrange an earthen lock - a ring made of crushed compacted clay. The width of the castle is 0.5 m, its depth is from 1.0 to 1.5 m (+)
Video about building a well with your own hands
Roller with a step-by-step demonstration of the process of the self-made device of the mine shaft:
Building your own well is not an easy, but quite feasible, task that home master can easily solve without attracting hired workers. True, he will need at least two assistants to extract soil to the surface and to monitor the worker's condition at the bottom of the mine. In case of dizziness, it should immediately be raised to the surface, and before work, regularly check the fumes with a burning candle or gas analyzer.
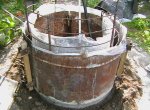
To equip the mine pond, concrete rings are used, which are designed to protect water from contamination.
It also makes a log house of reliable tree species: pine, alder or larch. It is best to make a frame of a well from a bar of aspen. This material does not rot.
The tree for the construction is selected with a diameter of at least 15 cm.
To the country you want to do. To do this, a trench half a meter wide and a depth of one and a half meters is excavated along the perimeter. Deepening is covered with rubble, sand and clay. The filling is carefully tamped, poured with concrete with a slope outward. This design protects the reservoir from polluted water.

The bottom of the source is covered with gravel. The framework for the well near the bottom is made in the form of a tent, which facilitates the collection of water. The top of the well is equipped with a canopy and a lid.
Do not install a pond near cesspools and manure piles.
There are the following types of wells:
- Monolithic reservoir is installed on the formwork, which is concreted. The fastenings are above the ground surface.
- A well made of concrete rings is made of finished elements. Clamps are used to connect parts.
- A mine is being constructed from concrete plates, which are installed using standard masonry.
- In the construction of a well, a stone is used. The material is laid on the solution, and pebbles are poured from the outside.
- The structures of wood have the form of a square. The log is assembled from the top or bottom. When building from the bottom, a crown is made, which is pressed against the previous element.
Pumping out water and filling the bottom filter
The bottom filter ensures the pond filling clean water. It is made of several layers. For the lower interlayer, materials of a coarse fraction are selected. The size of the layer is 15-25 cm. Two more layers are then laid. Of medium and small stones.
Before installing, you need to pump out the water. A pump is used for this. Remains of slurry are selected buckets. The bottom is leveled and sand is poured on top.
After installing the filter, water is selected. The liquid must be pumped out once a day for a few days, until the clean water goes.
The roof of the well must be made by one's own hands, and the following rules are observed:
- A guardrail is installed so that children and pets do not approach the pond.
- The roof on the well closes on the lock so that the children do not look down.
- The mine closes so that no garbage gets into it.
- In the well mine you can go down with special insurance. Before going down, the gas content is checked.
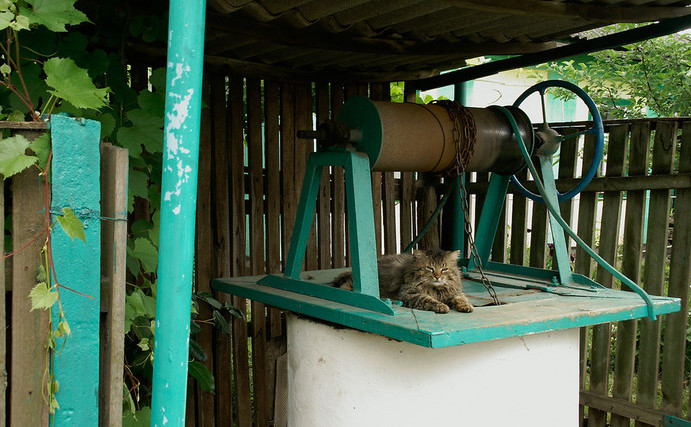
Arrangement of the well head
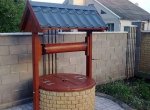
Completion of the installation of the reservoir is considered a precondition for the well. It is installed above the surface of the earth for 60-80 cm. The construction of this part provides an opportunity to perform a beautiful design of the well at the dacha. Often the head is made in the form of a frame from a bar.
The basis for a wooden structure is a concrete block. A gate for a well, a special cable and a bucket for lifting water are installed.
The decoration of the well at the dacha is made of decorative elements. Looks beautiful roof of metal. The roof is installed on the support posts.
The gate for the well with its own hands is made of a log, a suitable size. Metal washers are used as fasteners. At the gate of the well is attached a chain or cable with a bucket.
The design of the wells will complement the equipped area around the reservoir. For this, a material such as stone, paving slab or wood flooring is used.
The original design of the pond will beautify country cottage area.
For permanent or temporary residence in a suburban area requires a source of water, preferably functioning all year round. One of the simplest and inexpensive in the construction of water supply sources is a well, which you can dig out with your own hands, almost without resorting to the services of special equipment.
First, let us consider the basic requirements for the location of the well.
- It should be as close as possible to the house, but not close to the walls.
- Also the utmost remoteness from all possible sources of pollution - cesspools, dumps, etc. is also important.
- In the chosen place there should not be the upper waters (they are found in the swampy terrain), capable of contaminating the water in the well.
Despite this low cost of building a well, certain costs and efforts are still required. Therefore, it is so important to choose the right place for this well to provide constant water supply in the required volumes.
There are many ways to find a place for a well - with the help of aluminum frames, willow vines, glass jars, by observing natural phenomena or the behavior of animals. But one of the most effective and at the same time accessible methods is studying the features of the landscape. We definitely will not find water (or find, but in a small amount) on those sites that:
- have significant relief elevations;
- are located near wells or other water intake points;
- are at the steep bank of the pond;
- densely planted with acacia or pine.
Note! There are also places where the well will give low-quality water. Such places include low coastlines and dried bogs - the water here often contains a large amount of manganese and iron.
Various depressions and depressions are our areas of search. Some kind of indicators of the availability of underground aquifers are such plants as willow, cowberry, birch and so on. A specific place for digging should be selected there, where the crowns of these plants are tilted. Finally, if the fruits of the recently planted apple tree rot, and she herself is sick, it means that nearby lie groundwater, since this garden tree is susceptible to a moisture-saturated soil.
From the diagram below, you can get acquainted with the types of plants, as well as the depth of the corresponding groundwater.
Note! Another effective indicator may be fog. In the hot summer in the evening or in the morning, where the water is very close to the surface, fog grows. The density of the latter is directly related to the proximity of the aquifer. It is characteristic that monitoring the fog makes it possible to calculate the site for the construction of a well with an accuracy of 75%.
Where does the water come from?
At the bottom of the constructed well, water begins to accumulate (it comes from an aquifer, which is also called the horizon) from several tens of meters to several kilometers of square. The horizon, whose "power" is sufficient to fill a well, usually lies at a depth of 4 to 20 m. If at 20 m the aquifer is still not found, further digging of the well is unprofitable - it is easier to equip the well.
Stage two. We prepare everything necessary
The procedure for the construction of wells is not standardized by any state regulations and standards. The classical device was formed not one century, until it acquired a modern look.
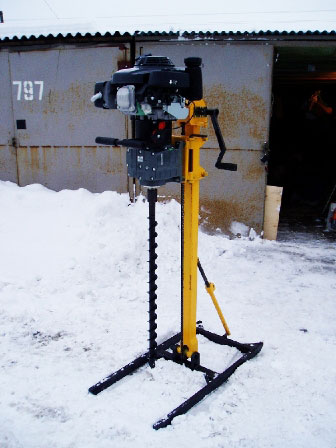
To make a well with your own hands, you need to prepare:
- tripod of metal corners or wooden poles;
- winch;
- rope ladder;
- shovel;
- material for strengthening the mine.
As for the last point, the most promising material is the concrete rings. They are strong (reinforced with steel bars ø1 cm and more), durable (the service life is 50 years), frost-proof and waterproof.
| product name | Height x Wall thickness, cm | Internal diameter, cm | Weight, kg |
|---|---|---|---|
| COP-7-1 | 10x8 | 70 | 46 |
| КС-7-1,5 | 15x8 | 70 | 68 |
| COP-7-3 | 35х8 | 70 | 140 |
| COP-7-5 | 50x8 | 70 | 230 |
| COP-7-9 | 90x8 | 70 | 410 |
| КС-7-10 | 100x8 | 70 | 457 |
| COP-10-5 | 50x8 | 100 | 320 |
| COP-10-6 | 60х8 | 100 | 340 |
| COP-10-9 | 90x8 | 100 | 640 |
| КС-12-10 | 100x8 | 120 | 1050 |
| COP-15-6 | 60x9 | 150 | 900 |
| KS-15-9 | 90x9 | 150 | 1350 |
| COP-20-6 | 60x10 | 200 | 1550 |
| KS-20-9 | 90x10 | 200 | 2300 |
| KO-6 | 7x12 | 58 | 60 |
| COP-7-6 | 60x10 | 70 | 250 |
Concrete rings can be:
- wall (abbreviation - CS), which are used for equipping the neck and suitable for all types of wells;
- additional - are used in those cases when the standard options are not suitable, because these non-standard sizes;
- W / B rings - used for drainage and sewerage wells, communication systems, gas and water supply.
There are other types - with an overlapping plate, with a bottom, prefabricated and so on. To avoid displacement of the rings after installation, they are equipped with special grooves, which prevent the moment of displacement.
Note! For a well on a countryside site, it is best to use wall products KS-10 or KS-15 (the numbers are the inner diameter in decimeters).
After choosing the place and preparing all that is needed, we can start building.
Stage three. Construction of a well
Immediately specify that it will not work alone - we need at least one more person.

We perform all the actions in this sequence.
Step 1. We lay the first concrete ring in place of the future mine. "Slaughter" digs through the walls of the ring, as it goes deeper, it goes down deeper. It is advisable to use for the first ring a product with pins or conical tapers to facilitate downward movement.
Step 2. After the upper edge of the ring reaches one level with the ground, put the top one more and continue the work. The weight of each ring is approximately 600-700 kg.
Step 3. Two people are quite enough to put the ring to the place of work. But if there is a possibility to use the crane, then it is better not to neglect it, because with such special equipment it is possible to lower the ring more precisely to the seat.
If the soil is dry and strong, then it is possible to go deeper by 2-3 meters, and after that, using a crane to install several rings in a row.
Step 4. Similarly, continue the procedure until the aquifer is reached. As practice shows, for a standard work shift (8 hours), you can lay 3 concrete rings.
Note! The proximity of the aquifer can be seen from small springs, hitting from the walls, and rapidly dropping temperature.
After the appearance of the fontanelles, we go a few meters further, after which we cover the bottom with a "pillow" made of crushed stone (it will serve as a water filter).
Step 5. The mine is pumped by drainage submersible pump. The more water is pumped out of the well, the greater will be its debit.
Stage four. We protect the structure from surface water
To maintain the cleanliness of the well, it must be properly protected. Water must enter the shaft only from the bottom, so that the walls must be securely insulated. To do this, firmly connect the rings with each other, resorting to one of two possible ways.
- We drill the walls of the rings and fix them with metal brackets, which are bolted.
- We twist the rings with steel wire, clinging it to the loading lugs. To twist the wire, use a metal rod, for example, scrap.
Pay attention to the waterproofing of the seams between the rings! If water seeps through seams, it will lead to contamination of the well. To close the seams, you should use a substance that does not affect the quality of water.
The stitches are strengthened according to the following scheme.
Step 1 . We lay in the voids between the rings pieces of linen rope (excellent material - natural and environmentally safe).
Step 2. The cables are covered with a solution of sand, cement and liquid glass. This we will achieve a reliable waterproofing, which, moreover, will be completely neutral in contact with water.
Step 3. Above the upper rings, the swath is a pit of a meter deep.
Step 4. Waterproof the outer surface of the rings, using a liquid bituminous mastic.
Step 5. We put a thermo-insulating layer around the upper rings (we can use any foamed polymer, for example, foam).
Warming of the well head
Around the well we equip a blind area - a small area of concrete or carefully compacted rubble. The blind area should leave at least 1 m from the mine on each side and, importantly, it is constructed after a certain time after the construction is completed, when the soil settles.
Blinds of mixed crushed clay and rubble
Also over the structure we build a canopy to avoid falling into the mine of atmospheric precipitation. If a pump is used to pump water, it is best to close the shaft completely, leaving a small hole for the hose and cable.
As a conclusion. We protect the well from frosts
If the aquifer is too close to the surface, then in winter the water can freeze. In such cases, a "house" is built over the structure, and any available material (for example, polystyrene or mineral wool) can be used for insulation. Moreover, the water supply pipe should be introduced into the mine below the freezing level of the soil.
In the scheme below, two wells are used for the system - one directly for water supply, the other for water supply to the intermediate tank.
Video - Construction of a well
Groundwater is present almost under the entire earth's surface. In one place the pools of water pass close to the surface, in the other - far away. The owner of the suburban area only needs to determine the depth at which the underground aquifer passes, and then carry out appropriate measures for the development of the well.
Correctly dug and well-designed well will provide its owner with clean drinking water for many years. At the same time with the implementation of all measures for the development of the well in the suburban area you can manage on your own.

First of all, determine the optimal site for the arrangement of the well. There are several methods.
Try to find a suitable place with the help of the simplest devices - frames made of brass wire. Take a wire with a diameter of about 3 mm, a length of 0.5 m. Bend the wire at a right angle so that the length of the short part is approximately 100 mm.
Make two such frames. Take them in both hands. You do not need to tighten the frames too tightly - they should be able to rotate without unnecessary difficulties.

Go around with such a framework of the whole country plot. Mark the places where the frames crossed - in these areas the aquifer is located closest to the surface of the earth. If there are several such places, choose the most convenient and suitable for the current requirements.

There is a more effective, but much more costly way of determining suitable place for arrangement of the well. In accordance with this method, it is necessary to dig a well. It will allow us to establish the depth of occurrence of groundwater.
Ask your neighbors beforehand what depth their wells have. In the neighboring areas the groundwater in most situations are at the same level.
Also you can establish that the water passes at a small distance from the ground surface according to the following features:

The traditional scheme of a private well
In the vast majority of situations, dacha wells are constructed in the same way. The main components of the considered design of the well are the water basin, the main trunk and the upper head.
In the header, water accumulates and stores, the bar prevents soil from sinking into the water basin, and the head is the highest part of the well, designed to protect it from rain and debris.

With what to begin?
The well is best done in the autumn. At this time, groundwaters descend as low as possible, which will make the digging of the well easier and will determine the optimal depth of the structure.
Excavation is performed manually. Prepare the following tools for this:

Pre-purchase the right amount of concrete rings to equip the well walls. The most convenient and easy to install rings with special chamfers for docking, but they are somewhat more expensive than their simplified counterparts.
Guide to the development of the well
Most often, two main options are used for self-improvement of the well. Familiarize yourself with the features of each method, choose the most suitable method and get to work.
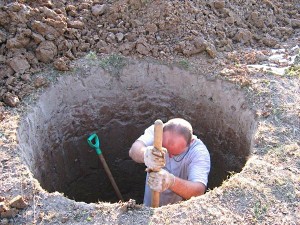
The first method
First step. Dig a hole with dimensions of 1.25 x 1.25 m. Determine the depth - dig it until the aquifer is reached. Dig very carefully, not forgetting the precautionary requirements.
If the ground is heavily crumbling, immediately go to the second method of equipping the well at the dacha.
The second step. Alternately, lower the concrete rings into the shaft that has been dug, and set them straight on each other. Then deepen the mine by digging through a pair of rings.


At this the main stage of the completion of the well is over. You just have to perform additional protective measures and equip the head, as will be discussed later.
If you want, you can equip a rectangular well. To do this, it is enough to dig a suitable foundation pit, install a strong formwork along its perimeter and pour concrete.
This method of self-arrangement of the well is the most convenient and fastest, but it is suitable exclusively for non-free-flowing soils.
The second method
First step. Dig a foundation pit depth of about 1 m and install the first ring in it. It is better if you manage to buy a ring with pins on the bottom rim or with a tapered point. Such a ring will simply be easier to push down, and it will settle under its own weight.
The second step. Continue to dig a hole until the first concrete ring will not go down another 100 cm. Install the second ring.
The third step. Lay the seams between the rings with a tarred cord or other suitable material and seal with a simple cement mortar. Also, the seams can be sealed with clay mortar, but it does not have a particularly long life and requires periodic renewal.

Continue to equip the well according to the above algorithm, until you reach the aquifer.
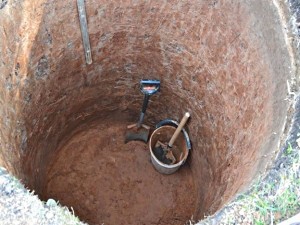
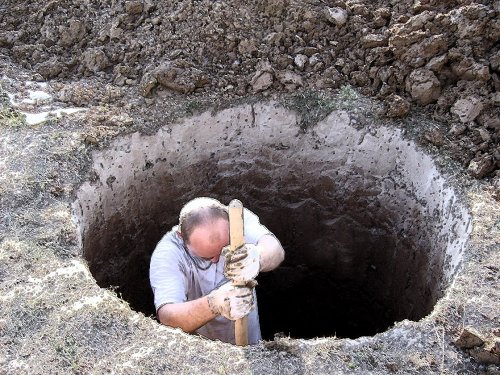
In conclusion, you will dig a aquifer. Doing this work manually will not give you any positive emotions - the ground will mix with water, turning into a dirty liquid mass. Therefore, to facilitate the task, pre-purchase a high-quality and efficient drain pump.
Your task is to get rid of the ground from the bottom 2-3 m of the mine in the shortest possible time.
Fill the prepared bottom with a layer of crushed rock with a thickness of 10 cm. The mound will serve as a filter.

For maximum hardening of the construction, fasten the rings with the staples. Cover the metal products with an anti-rust agent.

Arrangement of soft blind area
For external moisture insulation of the dacha well, you must make a soft blind.
To build a blind, first remove the top layer of the soil along the perimeter of the well that you have constructed, and then make a depression. The depth of the pit should be selected individually - it should slightly exceed the depth of freezing of the soil.

Fill the prepared area with sifted sand. Thoroughly pound the backfill, and from above lay a dense polyethylene film and wind its edges on the upper concrete ring. Firmly press polyethylene to the concrete ring and fix it with a metal adhesive tape.
Over cover the blind area with gravel, lawn or stone of your choice.
Video - Clay castle of the well
Recommendations for the arrangement of the upper part of the structure
In the end, the well is completed. There will be enough sheathing of planks. This kind of design will perfectly cope with its main tasks, but it can hardly be called an aesthetic one.

Much more interesting are the original houses over the summer cottages. The house is built using bricks. It is necessary to overlay them with the head of the well, and from above to mount the roof of a suitable material, for example, metal rolling or boards.
In addition, a wide range of finished houses for wells from different materials is available for sale. You can buy a finished product or you can do it yourself, based on available examples.
In addition to its main protective function, the house will become an additional decoration of your summer residence.
Video - House for a well
To ensure that your dacha well continues to perform its work irreproachably for as long as possible, take time to maintain and maintain the structure.
After each use, turn the water bucket upside down to prevent any debris from entering the container.
Protect the perimeter around the well so that pets can not enter it. Periodically inspect the interior of the well. If you find animals or birds in it, pump out water, discard the found objects and disinfect the object.
To remove various debris from the water, use convenient and suitable devices, for example, a net with a handle.
Every 4-6 months, perform a full cleaning of the well. Start with a thorough cleaning of concrete walls with a metal brush or broom from birch branches. After the wall you need to rinse with clean water, and pump the water out of the well.

Video - Cleaning of wells
Take the gravel backfill from the bottom of the dacha well. Rinse the backfill elements and put them back. For final disinfection, apply a 3% solution of chlorine to the walls of the well. Also, the chlorine solution must be added to the incoming water. Close the well for a day, and then rinse the walls of the structure and pump the water the right number of times until the smell of bleach completely disappears.
Successful work!