Shower tray in the dacha with their own hands. Shower in the dacha with their own hands: the choice of the place. Installation of the water disposal system, installation of the base and frame. Features of the equipment
Dacha for many - a favorite place where you can relax from the city bustle. But here, far from civilization, people are not accustomed to give up the benefits that this civilization gives. And one of them is the opportunity to splash on a hot afternoon under a cool shower. Therefore, the summer shower refers to the economic facilities necessary for a comfortable pastime on a suburban site. Moreover, it is relevant if there is no natural reservoir nearby. To feel like a man and at the dacha, it is necessary to build a solid structure, capable of serving more than one season. Have you thought about how to build a summer shower? Photos and video you will clearly demonstrate the main stages of the process.
Start implementing your idea with careful design. As they say, measure seven times, but only one - cut it off. First, look at the ready-made projects of the summer soul and make your own on their basis. We take into account the place taken for the shower, the availability of building materials and the desired dimensions. Here you need to take into account the volumes of the owners themselves.
Even a beginner can easily design a shower by himself. A simple drawing or a small drawing will help calculate the amount of building materials, avoid some mistakes and unnecessary costs.
Summer shower should be spacious and comfortable. It is necessary to provide a place for clothes and bath accessories - at least 40-60 cm. The height of the shower should be about 2.50 m. The dimensions of the inner room, which are most common - 160x100 mm and 190x140 mm. All this must be taken into account when drawing up a draft or a project.
Now you need to determine the location of the summer shower. Naturally, it is better to build it in a well-lit sunny place, away from other buildings. Then the water in the tank will be heated all day long from the sun's heat. But if you plan to build a heated summer shower, you do not have to adhere to this condition.
The distance from the house, too, should not be too large, so that you can quickly move after water procedures into the room. It will be wise to take care of the water flow in advance. It is better to divert it to a septic tank or a settler. It is worth paying attention to the convenience of water supply and, if possible, to ensure the automatic filling of the tank. After making the choice of location, you must prepare the site: remove the top layer, level the base under the shower and fill the area with sand.
Framing works
A summer shower can be a capital structure, or it can be a light frame structure. Therefore, the main stages of the construction of such souls are different.
Laying the foundation for the capital construction

The foundation is a solid foundation for the shower cabin, but sometimes it does not need anything at all
To the base under the shower turned out to be correct and for convenience it is necessary to make an elementary layout: for this, pegs are clogged at the outer corners of the site. After this, it is necessary to check the diagonal and pull the cord.
The size of the foundation depends on the materials that will be used in the construction of the shower. For the building of a brick or cinder block the foundation is filled with a depth of 30 cm. If a metal or wooden frame for a summer shower is used as a basis, the foundation will differ slightly. Before pouring it is necessary to prepare a place for pipes - lay a log or a branch of the desired diameter, wound with a ruberoid.
If you use a summer shower the family plans for more than one year, it is better to make a formwork - to raise the level of the foundation above the ground by 10-15 cm, increasing the height of the trench due to the boards reinforced with pegs and spacers.
When pouring the base under the shower with concrete it is extremely important to ensure a flat surface. Do this the same way as with a floor screed, using a level and two guides. The guides are leveled, poured with concrete, along the guides, level the floor. Only a horizontal surface can serve as a reliable basis for further construction. After the leveling is done, proceed to brick laying.
Shower installation using frame
As a basis for the shower, you can use a metal frame (it is durable). Building a summer shower will be much more economical if you use a tree. But this material is not durable. Taking into account the peculiarities of our climate and the increased humidity due to the exploitation of the structure, it is better to treat it with bio-impregnation to protect it from insects and fungus.
After determining the number of building materials and the size of the building, proceed to install the frame. The first stage is marking. On the ground there is a rectangle, the sides of which will correspond to the parameters of the future design. To ensure that the design of the summer shower was stable, it is necessary to make a pile foundation. Therefore, at the corners of the marking holes are drilled with the necessary depth (130-170 cm, the depth depends on the length of the pipes). Then, the installation of the foundation of the pipes is carried out directly. Use for this better metal pipes length of 1.5 -2 m (diameter - 9-10 cm), but in the course can even go to railway sleepers. In the ground, the piles are deepened so that they protrude 20 cm beyond the ground. Then the pipes are poured with concrete. After its solidification in the pipes should be installed wooden beams. The width of the bar used for the frame should not be more than 10 cm.

That's how we will tighten the frame with a pvc film and get an excellent construction
The next step of the installation is dressing: starting from the top, the entire structure is bolted together. If the calculation is correct and all dimensions are met correctly - the design will be reliable. This will make it possible to install a large water tank. Its volume should be calculated according to the formula: 40 l × 1 person and not more than 200 l. Heavy capacity design can simply not withstand. It is desirable that the tank was flat and corresponded to the roof area, that is, rested against the bearing structures.
The dressing inside the frame will serve as a lag in the shower room. Now cut the joists of the walls between each other. Install them should be in the thickness of the wall, but not in the overlay.

But the option, trimmed with plastic slate
As the walls for such a shower can serve as slate sheets, OSB boards, boards, plastic panels and even PVC film.
Responsible stage - communication
Build a summer shower with your own hands can be from the building materials left on the site after the construction of the dacha, but with the communication of the situation is somewhat different. Here you can not do without financial investments.
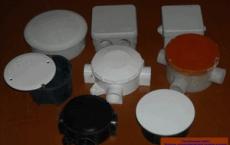
- Piping, tank installation. After the construction of the structure, a water pipe is installed. The conclusion for the hose of the shower head must be made above the level of the head. Otherwise, the pressure will be too small. Now you need to put the tank. You can install a purchased plastic tank. Although, for the sake of economy, a barrel or any other container is usually used. Before the tank rises to the top, you need to make a tap with a thread, and also install a valve with a nozzle. Now the tank or barrel should be securely fixed on the roof. As a rule, water in a tub or a tank is heated with the help of sunlight. In order to quickly heat the tank, it is pre-painted black. It is good to equip the tank around the tank with a film: cover it to reduce the heat transfer of the foil from the north side.

Metal shower tank will never go out of fashion, but now more often plastic options are used
- Lighting. When wiring for lighting, do not forget about the rules of wiring. After all, the humidity in the shower is increased. Of course, without electric lighting, you can do without using a shower only in the summer. It will be enough and a stream of light emanating from a small window (above the level of the head) with frosted glass. In the spring, the day is somewhat shorter, so only daylight will not be enough.
- Ventilation. To improve the circulation of air currents and to protect against the appearance of condensation, it is desirable to make a hole in the ceiling and cover it with a decorative grating.
- Shower drain. How to build a summer shower, make a distribution of pipes, bring lighting - we figured out. Now let's deal with the problem of draining. With an increase in the average daily temperature, the workload of summer residents increases significantly and the load on the shower increases. But only the temperature of the soil does not affect its drainage properties. Well, if it is possible to combine the sink from the shower and the drain pipe at home.
For quick disposal and good outflow of sewage, the summer shower must be installed on a hill. The walls of the pit should be further strengthened in order to avoid shedding. Please note that the volume of the discharge pit must be at least 2 cubic meters. meters.

The simplest scheme of the device of the pallet
A common mistake of beginning builders is the location of the septic tank near the wall of the shower cubicle or under the shower itself. If the water volumes are large, the septic tank may be flooded. Over time, drainage works worse, an unpleasant smell appears. With constant underflooding, it is possible not only shrinkage of the ground, but even the destruction of the foundation, which is extremely dangerous. Therefore, the drain of the summer shower must be taken away a few meters from the structure.
Drain the water with a waterproof layer, using PVC-foil, roofing material or hydro-glass. As an option, make a concrete screed reinforced with a metal mesh.
You can not use clay as the waterproof layer. After a while, it will wash out and may contaminate the drainage ditch.
We install the pallet
To equip the summer shower with their own hands and provide for it an outflow of sewage will allow a pallet. This can be a purchase pallet, a sheet of stainless steel or the cheapest option - a wooden pallet. Instead of the pallet, the boards are laid, but not tightly, but leaving cracks for water. The grate from the boards is preliminarily well sanded with sandpaper and treated with an antiseptic. For convenience, you can put a rubber mat on top.

The simplest shower tray is made from ordinary boards
Between the floor of the summer shower and the pallets it is necessary to lay waterproofing. For this use ruberoid. When installing the pallet, it must be ensured that the slope is formed towards the drain for unhindered drainage of water. Screw the pallet to the walls with screws.
For a more comfortable washing, so you do not have to stand on a metal pallet, it is advisable to put plastic grills.
Facing the structure
The summer shower should harmoniously fit into the overall design of your yard. Any designer will say that for outdoor upholstery it is better to use materials that complement the ensemble of nearby buildings.
Facing the summer shower is not only decorative, it is necessary to protect the walls from the effects of weather phenomena. The surface of the walls can be plastered and dyed or painted with vinyl siding, it all depends on the owner's fantasy, financial capabilities and construction features. For example, a summer shower made of polycarbonate on a frame and does not need to be lined at all.

Left - polycarbonate version; on the right - a shower, lined with wood
A good option is to sew the walls and ceiling with a lining. If you visit the dacha the family will be only in the warm season, then as a material for the facing of the summer shower it is better to choose a PVC film, dense colored (opaque) polyethylene or tarpaulin. If the shower skin is removable, it can be easily removed to the storeroom for the winter period.
How to make an outdoor shower comfortable?
It is very convenient when the building is divided into two zones: a shower room and a cloakroom. To prevent water from entering the cloakroom area, the floor of this zone should be made a few centimeters taller. Protect clothes from spray and help a small decorative curtain made of polyethylene.
If you want to use the shower and in a colder period of time, the walls will have to be insulated. To do this, use expanded polystyrene. This material is necessary to fill the inner space of the frame. Further, the structure is covered with PVC film with a stapler and decorative rails. Already on top of the film, the interior is finished.
If you choose materials to design a summer shower (photos and on the Internet, and in the catalogs abound), try to pay attention not only to aesthetic data, but also to practicality. To finish the interior of the shower only suitable for moisture-resistant materials.

Modern summer shower in the form of an extension to the house - what is not an option?
For interior decoration, you can use thin linoleum, plastic panels, oilcloth or wood. If you stop at the wood, then do not forget to cover each board with hot linseed oil separately, and then start finishing work. When facing internal walls, the material is launched under the sides of the pallet.
To improve the drainage of the soil near the shower, several hygrophilous plants can be planted. Green plantations absorb water. They will not only decorate, but also protect the space around the shower from swamping.
Thus, the summer shower, made by own hands, will become an indispensable hozpostroyka on the garden.
Summer - the time when it's time to go to the country and do full gardening. Shower - an indispensable device in the suburban area, it can be cooled after work in the garden, as well as cleaned of dust and dirt. Just imagine how you go under the shower at sunset after a hard garden work.
Before you install a street shower you need to take into account a lot of nuances, if you want it to bring pleasure and served you more than one season. Of course, one can turn to specialists and not watch training videos and articles, but this material is for those who have firmly decided to build a summer shower for their own dacha.
Shower can be made from almost all materials
Before construction
Before you begin to build a skeleton for the shower in the country, you need to carefully study the territory of your site in order to avoid further inconvenience. Typically, the cabin is located next to the main building in a well-lit place.
- It is necessary to avoid drafts and deciduous trees, the branches of which can hang over the open structure, which can lead to contamination and clogging of drainage elements.
- Just do not forget about the drain, you need to create optimal conditions for the withdrawal of used water, otherwise you run into unpleasant consequences: the smell of stagnant water, the appearance of midges and mosquitoes, softening of the soil. We must not forget about the soil, too moist and soft soil will promote deformation and destruction of the stall.
According to the future design of the shower cubicle, the following rules should be adhered to:
- The choice of design is the second step in creating a summer shower for giving yourself. First of all, you need to figure out what materials you will use, whether they are left over from repair or specially bought in the store, and then sketch out the blueprints.
- It is necessary to take into account the weight of the tank with water and the strength of the structure and proceed from this selection of materials, otherwise the cabin will not last long, which is even worse, the use of such a shower can be dangerous for human health.
- The design of a street shower is best performed in accordance with the proportions of the user. It should not be too low and narrow, so as not to restrict movement. The optimum dimensions of the shower in length are 1900 mm (calculation without a water tank), and in width - 900 mm.
- The structure should be well ventilated so that the remaining water can evaporate. For convenience, you can attach a locker room, where you can put things and bath accessories, this part should be well protected from water curtain or fence.

Example of a shower cabin
It is not necessary to build a foundation, but if the means and capabilities allow, it is better to make a solid base, then the design will last much longer, and the comfort from using the shower will be greater, the alternative can be brick flooring with your own hands, on top of which you can put wooden pallets.

The future foundation
Usually the frame for the shower in the dacha is built of metal or plastic construction, less often the tree is used since it is not durable, most often the tree is used for an open summer shower resembling a conventional fence, moisture from such a structure will evaporate faster.
To swim not only in the summer, you can build a shower in the dacha with your own hands with heating. The toilet and shower in the villa area are important elements of a comfortable pastime.
Types of shower cabins
Of wood

Of wood (photo)
If you decide to make a wooden shower for your own dacha, you need to know that the tree will start to rot and become moldy if it is not handled and treated properly.
If a shower is installed from polycarbonate to give, it should be remembered that wooden doors are deformed from moisture and eventually cease to close.
In such designs it is better to use a curtain or a plastic door made of polycarbonate, but if you still decide to put a wooden one - you can leave a gap between the door and the wall, then if the tree starts to deform the door, you can close it. The floor can be made from pallets.
Despite all the nuances, the tree is the most profitable and attractive material, boards and timber can be on each site, and the price in the store is comparatively lower than analogues. If you process the tree correctly, it will serve you no less than plastic or metal.

From the barrel
You decided to make a garden shower for your own dacha, but the means of communication are not brought to the site? Remember, do not you have barrels in the country, because the simplest option for you is to make a shower from a barrel.
The barrel will serve as an excellent reservoir for water. The volume is enough for 100 or 200 liters. Such facilities should be located on the sunny side, so that the water could heat up.
It is best that the sun falls on the barrel in the afternoon, then the water will not have time to cool down to your arrival from the garden. The barrel can be installed on absolutely any cabin, since it has not a big weight.
A tank from a barrel will save you money, but you need to remember that it's best to install a metal barrel, since plastic does not withstand frost.

Shower scheme from the barrel
From the eurocube
Eurocube is almost the same as the shower from the barrel. The main differences are volume and shape. Eurocube has a metal frame and a plastic cube, this design is easy enough to insulate for the winter, the metal frame will hold the heater
Since the volume of the eurocube is about 1000 liters, the construction must be reliable and durable, and the foundation is concrete or brick. It is best to make a frame to order.
The water in such a tank will heat up longer due to the volume, but if you paint the surface of the eurocube with black paint, the water will heat up faster. If the use of the shower is not frequent, then the water in the eurocube can bloom and stagnate, which will lead to a clogging. See how the summer shower looks like for a dacha with your own hands on the photo:

Approximate view of the shower from the eurocube
Of polycarbonate
If you are thinking how to make a shower in the country with your own hands quickly and for many years, but do not know what material to choose, then we advise you to choose your polycarbonate.
Polycarbonate is the most high-quality and comfortable option. It can be used not only in summer, but also in autumn. This design isolates sound and withstands temperatures from +120 to -40, it is flexible and shockproof, it is easy to mount and create complex structures.
Polycarbonate itself looks much better than other facing materials and almost does not require care, it is much easier to insulate and it is not afraid of water.
So it looks like a summer shower for a holiday with your own hands, here's a photo:

Polycarbonate shower
In order to collect a shower for the dacha with your own hands you will need a step-by-step instruction.
Shower made of wood
- Foundation. We make a marking and dig a ground depth of 40 cm. We fill the pit with gravel and sand, fill it with cement. Concrete should stand for 1-2 days depending on the weather. When the color becomes light gray, you can proceed to the second item.
- Cabin. We establish 4 support posts, we connect them by horizontal beams by means of bolts. We install the door, we remember that the wooden doors have the feature of deforming, therefore we leave the gap between the door and the wall.
- Floor. We make a rack and floor. Stock is done under a slope so that the water quickly drains, and the bottom of the rack allows the cabin to dry quickly.
- Water accumulator. If necessary, install a tank with water, it is important that it was fixed firmly. A hole is made for the hose on the side, through which the barrel fills.
- Heating. Want to swim in the spring and autumn and wonder how to make a shower in the country with their own hands with heated water? You will need a heating element and warming. Usually, a column or an electric boiler is used to heat water, and special boilers are also installed.
- Warming.To fall and not to be cold in the spring, the cab can be sewed with a lining, fiberboard or even a film. As you have already understood the warm shower in the dacha with your own hands, it is quite easy to do, but in this case everything needs to be thought out more precisely, because the installation of additional equipment requires investments.

The scheme of a shower from a tree
Summer shower at the cottage from the barrel

- Foundation. If the volume of the barrel is less than 300 liters of concrete can not be poured. Brick laying on its own will save you on the foundation, empty space can be covered with sand or gravel.
- Cabin. Using metal bars, we weld a metal box, we make lateral beams that will hold the barrel, do not forget to leave a hole for the door
- Floor. Install the drain and rack floor.
- Water accumulator. We install the barrel on the roof of the cabin.
- Sheathing. You can cover the cabin with any material, for a hot summer, and an oilcloth for a shower.

Example of a shower from a barrel
Shower from the eurocube
- Foundation. The larger the volume of the tank, the volume should be stronger than the structure. Be sure to build a shower on the concrete foundation, so that the surface does not settle and the structure does not bend.
- Water storage. We set the eurocube.
- Sheathing. We sew the frame, install the drain and the floor panel.
- We connect the hose to the eurocube, install the shower.
- The upper side of the tank is covered with black paint if necessary.
- In cold weather, you will have to warm the surface of the eurocube so that the plastic does not crack. For such purposes, any insulation, covered with a film.

The scheme of the installation from the eurocube
Polycarbonate Shower
- Foundation. Choose a place, make a layout and set the columnar foundation, fill the ground.
- Kabinka. Begin to create a design, do not forget about the horizontal bars to hold the tank, install the cross bars, do not forget to leave a place for the door.
- Floor. We set the bottom at a level of 15-20 cm above ground level.
- After the welding work is finished, we install the door
- Water accumulator. The water reservoir is installed lastly in the roof opening, it is important that it is fixed firmly. A hole is made for the hose on the side, through which the barrel fills. During frosts, a plastic tank with water can be insulated by wrapping a barrel with foam rubber, crushing polycarbonate will not pass moisture, so do not wrap foam with a water-repellent film.
- The installation is completely completed, it remains to equip the space inside the cabin. It is desirable to install shelves on suckers, since drilling holes in plastic hi to penetration of cold in frosty time.

Schematic sketch of the shower of polycarbonate
0
Progress has gone so far that you can buy a single module of a street shower in a building supermarket for about ten thousand rubles. However, you can save at least twice and make the same with your own hands. Before you start building a shower in the dacha you need to carefully work out the details, such as the project itself, in which part of the site the shower will be located, and decide what materials it will consist of. In addition, you need to take into account the convenience of use in both use and maintenance.
- Hygiene is the main goal and nothing should stop it
- Ecological - waste water is harmful and can cause damage to the environment. Place the sink in a safe place.
- Practicality - in any weather should be convenient and accessible to freshen up or wash.
- Aesthetics - the appearance should fit into the general picture of the suburban area.
- Alternative - this is even a separate item - demountable or "invisible" souls.
- Savings - the cost of labor and finance to minimize, but not at a loss to construction.
Select a location
The water should not stagnate, so for the location of the shower you need a small hill. Do not start building a shower in a hollow or lowland, as water will have nowhere to drain.
 Choosing the right place for a shower will help to avoid problems in the future
  Gravel padding promotes the rapid absorption of water into the soil
 If you have a barrel as a source of water, then it will be more appropriate to build a building in a place where it will be maximally accessible to the sun, in order to ensure a good warming up of the water. If you need artificial heating, then choose a location based on the location of the water pipe.
Another factor for convenience is not too distant location, so that you can quickly get home after water procedures.
Sizing
It is important that it is convenient to be inside almost any person. On average, the parameters can be:
- height - 200-300 cm;
- length - 150-200 cm;
- width - 120-150 cm.
Such dimensions will require a minimum area and consumption of materials, since it is adapted to the standard dimensions of building materials.
 Optimal comfortable dimensions for the shower in the cottage
 Necessary tools and materials
To perform the work you will need typical tools: tape measure, hammer, level, screwdriver and saw.
 Tools that will be needed for a shower
 What you need materials depends on what you decide to build a shower in the suburban area. But in any case, a stock of nails, screws, and plumbing materials, such as pipes, a tank, taps, a watering can is necessary.
Regardless of whether you build a shower for polycarbonate dacha, brick, slate or some other material, you will need cement sand and filler for the foundation. Try to calculate the amount of loose materials so that there is no excess.
In the final stage, do not forget to please yourself with decor elements and necessary accessories, for example, hooks and curtains.
Variants of shower designs for giving
In addition to complex designs, you can use minimal versions.
Shower portable - the name speaks for itself. To use it you will need a capacity of 20 liters (it will last about 10 minutes). With a water tank, it is left in the sun to heat the water. At the right moment, just place it at the desired height and use it.
 Inexpensive shower option, which can be used anywhere
 This option will work well if you are in a place where there is no access to a stationary shower. And to everything else you can use a portable shower to give anywhere.
 Portable shower
 Simple and comfortable there will be a shower in the house, or rather directly next to it. Shower of this type can be located at the wall of the building. The installation is quite simple.
- Pulling the water pipe out of the wall
- Waste water drainage or drainage
- Installing the watering can and connecting it with hoses
- Screen mounting
This type of shower is convenient in that it does not require much effort to install and can be disassembled during the cold season.
In addition, the water does not need to heat up in the sun, it comes from a common water pipe. As a result, you get a warm or even hot shower in the country without much effort. The shower walls can be made of polycarbonate or other fast-mounted material. However, be careful that the drainage water does not begin to wash away the foundation of the house.
 In such a summer shower a hot water is used from home
 One of the most popular versions of the shower is an autonomous version, combined with a cabins. It can be either a partitioned whole room, or made up of different modules.
 Combined construction of a cabins with a shower
 Summer souls of this type - temporary use and require a frame, as unlike the brickwork, it is fairly easy to disassemble. The frame can be both wooden and metal. In both cases special treatment is required to avoid deterioration from moisture.
To collect this construction much work will not be required. Mark the territory and level it. It is desirable to create a pillow-mound of sand and granulation. Then we lay the boards and install the assembled structure or collect it in place.

Portable shower in the case. There can be many such kinds of soul. But the essence remains the same everywhere - the volume of water is maximum for two, problems with heating the water. But the drainage pit is not needed for this soul - with a couple of dozen liters of dirty water, the ecology is exactly to manage.
No doubt, the most convenient is not far from the site and with all the amenities. Nevertheless, such versions can be a good help in the field.
Preparation of the basis
Different types of construction of country showers require different levels of preparation. This means that the foundation is also needed differently.
For a portable shower, you only need to remove about 15 centimeters of the earth's layer and fill it with sand mixed with gravel.
For more complex buildings, a foundation is needed. Its depth depends on the load that building materials will give. For a vertical shower height of 300 centimeters of brick, you need 30 centimeters of the foundation.
 Capital construction of the shower in the country
 The bookmarking algorithm is quite simple, namely:
- Determine the area by means of a peg at the corners of the shower
- Using pegs, draw a cord to indicate the perimeter
- We expose the formwork if it is necessary
- In order to leave room for the pipe inserted any cylindrical object, wrapped in a ruberoid
- At the end, fill in the solution
Equipment of a drain hole
For the normal operation of the sinkhole, an average of 2 m 3 of cubic is required. That it was durable and served you as long as possible is desirable to strengthen the walls of the pit. This will help to avoid scree of soil. In addition, it is desirable that the sink was located in a couple of meters from the shower itself. This is necessary for two reasons: prevention of undermining and destruction of the foundation and the formation of unwanted odors.
Given the above, make a personal calculation of the volume of the pit based on how much water will go there at a time.
Also, you should make sure that the pit does not dry out and does not overfill - both will damage the pit's work. It is not necessary to make a sink in a common pit as this will adversely affect the microflora, and quickly fill the pit.
 The drainage pit for the shower can be made from old tires and placed directly under the building
 The choice of a tank for collecting water is very large. In stores there are tanks of all kinds of shapes and volumes, it all depends on your needs. The most convenient is a flat tank, black color, because the narrow layer of water does not have to penetrate far from the rays, and the black color absorbs more heat - as a result, the water heats up faster. Such tanks are equipped with special water outlets that simplify the installation of the system.
 A flat black tank heats up faster in the sun
 You can artificially heat water with a heater. Here you should be careful - the insulation can pass and in the toga will result in a short circuit or water will be beaten by current.
 Shower tray with built-in tenon
 If there is no possibility to buy a container in the store, you can make from improvised materials, for example, a barrel or weld it from sheets of metal.
When purchasing and installing the tank, consider how it will be distributed and how much water it will take for your family. To simplify the intake of water, you can bring the hose to the tank.
Lighting and ventilation of the country shower
Lighting will be useful, because you have to take a shower and in the dark. However, when laying and wiring, observe the safety rules:
- Work with wires without damage to the insulation
- Do wiring so that it does not interfere with movement both indoors and outdoors
- Carefully isolate the connection points
- Provide waterproof for switches and lamps
For ventilation, make a window or a special hole with a grill or net so that debris and insects can not get inside. Airing will help to avoid the debate and bad smells in the shower.
 For good ventilation it is necessary to make an opening window
 Logically, it is best to trim the materials that are not spoiled because of moisture on them, it can be plastic, plastic, oilcloth and even linoleum. If you decide to shower for a wooden house, then all the material must be primed before painting, and then covered with hot linseed oil (each board separately).
It is worth taking care of the floor covering. On the concrete or sand floor, you can lay a wooden grill, also treated with linseed oil, and on top a rubber mat.
 As a floor it is possible to use a wooden lattice
 Inside the dressing room with various accessories will also be useful. A shelf in the shower can be made together with hooks to conveniently fold or hang clothes and accessories. Preservation in the locker room of dryness is also important, so you can raise the floors by using any improvised means that will ensure the stability of the grill.
On the exterior finish you can leave the remaining materials from the building of the house. If the shower in the country house is winter, then for its insulation it is possible to use a brick in order to provide thermal insulation, it will also be appropriate to use expanded polystyrene. Materials and tones similar to finishing the residential building will look organic.
 You can decorate the summer shower with a decorative stone
If there is no possibility to conduct hot water in a private house or in a cottage, then it will be advisable to build a summer shower.
How to build a summer shower with your own hands made of wood?
To build a wooden shower in the country house with your own hands, you can follow the following instructions:
First you need to pick up appropriate place for erection of a structure. When choosing, it should be borne in mind that such a dacha douche will be constantly exposed to moisture both inside and outside.
Advice: it is better to erect such a structure in a well-ventilated area. This is necessary in order for the wood to dry faster. Also, do not put bushes, trees and tall plants near the shower, as they retain moisture, do not allow air to circulate, and as a result, prevent drying of the wood from which the dacha douche is made.
Production excavation works. For the shower, dig a hole 1x1 m in size, 40 cm deep. At the bottom of the pit lay a layer of rubble, which will help soap water to soak into the soil faster. Further on the corners it is necessary to lay out the slag blocks. They necessarily expose on level.

Further we proceed to fabrication of carcass. To do this, we take boards with a thickness of 30 mm and a width of 15 cm. A base of 1x1 m will be made of them. Four planks with a section of 70x100 mm are attached to this base. For lining the frame, lateral and two transverse bridges are used, which are inserted into the grooves. They also serve as a reinforcement for the roof, on which a tank of one hundred liters will be installed.


![]()

Works on carcass plating. For these purposes, you can use a lining, blockhouse or false beam. Clearances between grooves should be two to three millimeters. This is necessary to ensure that timber can expand freely with regular wetting. In our case, material used for imitation of logs was used for the skin of the shower.


shower to give their own hands step by step instruction. A photo


Finishing work. Before painting, it is necessary to perform the priming of wood. For these purposes, a bioprotective anti-fungal impregnation is suitable, after drying, the surface is painted with a facade acrylic water-borne varnish of at least 3 layers.

The next stage of building a shower in the country is tank installation for water.

building a shower in the country. A photo

![]()
Tip: for a summer shower it is advisable to use a tank with a minimum volume of one hundred liters.
You can build such a wooden shower in the dacha with your own hands in one or two days.
building a shower in the country with their own hands. Video
Summer shower with own hands
For the erection it is necessary to prepare the following materials:
- timber;
- fasteners (self-tapping screws);
- shower set, which includes a bracket, a mixer, a bent pipe, an adapter and a nozzle;
- rubber hose.
How to build a summer shower in the country with their own hands?
The order of construction of the structure:
Compilation drawings. For such a construction it will be necessary to make a wooden pallet in the form of a circle of dense wood. As a template, we will have the required cardboard size. First, put the cardboard on a flat surface and fix it with adhesive tape. Next, use the measuring devices to draw a circle with two squares located inside. This template will be used to build a wooden floor.
![]()


summer shower with own hands drawings
Designing pallet. Paul we will have a three-layer. The order of the basis for the floor is as follows:

Works on installation of a pipe. Connect all the elements that are in the shower set.


year-old shower with their own hands step by step instruction. Video
year-old shower with their own hands step by step instruction. Video instruction
Summer shower for cottages made of pipes and polycarbonate
This option attracts its low cost, the stability of materials to the action of sunlight and moisture, as well as the ease of processing.

The order of erecting the foundation and floor
Before you begin to build a summer shower from polycarbonate, you need to determine its location. For such a structure, an inconspicuous place with an even surface, far from wells and wells, is suitable.
Site Preparation. To do this, we pour it into the sand and compact it.

Drill or dig four holes in which the pillars for the foundation will be inserted.

At the bottom of the pit lay the layer crushed stone thickness of 10-12 cm.

Install pipes Plastic, used for sewerage. We make them pouring inside and out.

year-old shower with their own hands step by step instruction. A photo

In the central part it is necessary to dig drainage pit and fill it with rubble.


The area around the blind area is also covered with rubble.

From a bar section 100h150 mm do basefor the construction and attach it to the pillars of the foundation. For these purposes, the holes in the cement must be drilled and plugs inserted into them.


To the frame it is also necessary to screw the jumpers with screws and strengthen the structure with steel corners. Between the pipe and the beam we lay waterproofing.


Tip: Before installing the jumpers, you need to try on the pallet, as it will later be installed between them. Therefore, if necessary, it will be necessary to fit the frame to the dimensions of the pallet.


Next, it is necessary to display the height of the floor from the 50x50 beam along the perimeter and after that you can proceed to the device floor covering. The result should be a base with a built-in pallet.


The order of erection of walls and a roof
Let's start erection wooden shower frame. At this stage, it is necessary to provide a doorway. In our case, the height of the walls will be 2.5 meters.


summer shower of polycarbonate step by step instruction. A photo

The rafters are fixed solid crate.

Make a layer waterproofing from roofing or bicrot.

From the sides we produce plating processed by a board.

For coating roofing we use soft tiles.

After that we process the entire wooden frame stainin two layers, and then varnish in two or three layers. On such a construction, as a summer shower from polkarbonata need about 7.5 liters of stain.


Facing the frame polycarbonate from the outside. For these purposes, it is recommended to use special thermowells, for which a hole must be cut using a polycarbonate cutter.


Door is made in the form of a wooden frame. Its height is two meters. To make stiffness using jumper and jib. Next, the frame of the door is painted, hanging on hinges and polycarbonate.

![]()
After this hang water heating systemto, mixers, curtains, hooks, rugs and other accessories.


At the bottom of the pallet, you need to drain the drainage pipe, inserted on 20-30 cm in a crushed stone base.


At the final stage we produce improvement of the entrance in the country shower. To do this, we dig a pit, fill the concrete with concrete and lay the reinforcement in it. After the concrete has gained strength, we lay bricks on it, on which the steps of wood will be installed. If desired, you can make a decor. This will require cement and stones.
![]()


![]()
We fasten the steps.

Shower for your own dacha
The first thing that needs to be done before starting construction is to decide on the location year-old soul. For such a building a well-lit, quiet, slightly elevated place will suit.

Advice: it is desirable that the shower is not located too close to the buildings and was built in one style with them.
Stages of building a shower in the country
Compilation project. It is planned to build a shower consisting of two small rooms. The minimum size of the bathing compartment should be 100x100 cm, changing rooms - 60x100 cm. In our case, the optimal shower size is 200х150 cm.
At the selected site mark the rectangle dimensions 140x190 cm. In the corners we drive pipes. The foundation for the shower will be a pile of two-meter asbestos-cement pipes, the diameter of which is 90-100 mm. They need to be cut into dug pits to a depth of about 1.5 m. There should be 20-30 cm above the surface of the earth. After that, drainage and drainage system are arranged.

Summer shower project. A photo
To organize the flow of water is done waterproof layer. It can be made from a PVC film or roofing material, which must be laid on an inclined surface. Alternatively, you can make an iron-concrete screed.

The upper and lower tying skeleton.

The device of a floor covering from boards.
Tip: to ensure that the water flows out of the shower, the floorboards are recommended to be installed with gaps, the width of which is 10 mm.

The shower room should be separated from the changing room by a high threshold and shutter.
Finishing work. Outside, the dacha shower is lined with lining or siding, waterproof plywood, fiberboard, etc. Inside for finishing, you should also use materials that are not afraid of moisture.
On the roof you need to install a water tank, the water heater is installed inside the room.

Hozblok with a shower for dacha own hands

The order of erection of the structure:
After you have chosen a suitable place for building a shower, you can start earthworks: dig out pit, fill it with ASG and lay out point brick foundation.


Once the foundation is ready, you can proceed to the device wooden frame structure. For this purpose, a bar is used.


For plating the shower on the sides and behind in this project was used board thickness of 10 mm. From the front, there should be a window and doorway.


Device of the roof frame from a wooden beam. In this project, window openings on the folding-folding roof should be provided.


Angles should be faced with boards.


To cover the roof you can use bituminous shingles.


The door is made of boards. Handles for doors and steps can also be cut from wood.


All wooden elements needed dyepaint or varnish.
The arrangement of benches, the installation of a shower tray, the plating of walls with plastic, the fastening of hooks, etc.


Summer shower projects for summer cottages
Project No. 1
For the shower, you can also use not only a wooden frame, but also a metal frame. This design can be installed directly on the ground. As a door in this project, a curtain is used.

Project No. 2
The shower can be made from a wavy metal sheet that can be bent in a semicircle. For such an option, there is no need to install a water heating tank. It will be enough to connect to the water supply.

Project No. 3
Such a summer shower of pipes outside is lined with white plastic, and inside - brown. A shower booth can be erected on a paved concrete floor. For this option, you need a water heating tank.

Project No. 4
In the quality of the floor in this shower you can use wooden flooring. Inside the room is lined with blue plastic. Instead of the roof, a wooden grid is used.

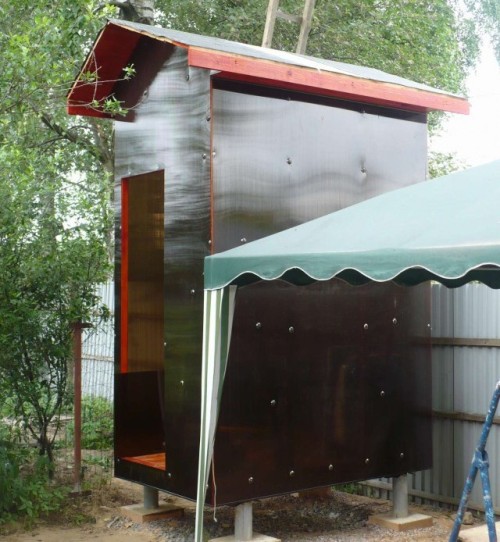
Project No. 5
The base of this shower is made of metal pipes. A brown corrugated sheet was used for facing the walls. The roof is also made of corrugated board. Light in the shower room gets through the openings between the wall and the roof.

Project No. 6
To make this shower, polycarbonate was used in red color. For this option, there is no need to install the tank on the roof. To use such a shower booth, it will be necessary to connect it to the water supply.

Project No. 7
The frame of this shower is made of metal pipes, painted in blue. For the wall covering, white plastic was used. A metal construction was made for the tank.

Example No. 8
Rural-style shower. The frame is made of dry tree trunks. For facing apply branches. On top of the construction fix logs on which a water tank is installed.

Project No. 9
The frame for this shower is made of metal elements. The floor and the lining of the walls are lacquered wood. In such a summer shower there is no door and a water tank.