Wiring diagram of hot water meter. Installation of water meters by one's own hands: technology, rules, scheme.
The need to install a water meter against the backdrop of a regular increase in tariffs is not in anyone's doubt. After all, with its help you can not only determine the consumption of natural resources, but also significantly reduce the cost of payment for its use. Let's consider in the article how to independently install water meters and what rules should be observed when putting it into operation.
The installation of a water meter is the first step towards rational consumption of communal resources and the competent management of the family budget. After all, the amount indicated in the receipt will directly depend on the volume of the saved cubic meters.
The widespread installation of metering devices also discourages workers of the water canal, not allowing them to uncontrolledly write off the losses arising from the exploitation of worn out networks.
Installation of a flowmeter allows not only to significantly reduce the cost item, but also to act as a disciplining element for the reasonable use of natural resources
As the experience of people who have already installed water meters with their own hands shows that connection of a water meter makes it possible to save expenses for payment up to 30%, provided that the number of residents corresponds to the number of residents registered in the house. Accepted norms of water consumption do not correspond to the volumes of consumed liquid in real life.
Significantly reduce the cost of water will help install the meter, and in the event that the number of residents in the apartment does not match the number registered in this housing. For example, if two households live in it, and five people are registered, the payment will be calculated from the "average" monthly consumption for each registered member of the family.

Unsuitable installation individual device accounting only if the apartment actually lives more people than it is registered
Some owners in multi-family houses with centralized water supply do not want to install meters for hot water. And the reason for this is that many people are close to the situation when, in the early morning or late evening, hot water, it takes a few minutes to chill the cooled liquid in anticipation of a hot stream.
In this case, if you install the flowmeter on hot water, in addition to the time spent on a weary wait hot water It is necessary also to overpay for the cold water flowing from the tap at hot rates.
So, if you systematically encounter the need to long grind water - think about whether to put a water meter on it. Maybe it's enough to just limit the meter to a pipe with cold water.
Self-Installation: The Legal Aspect
The legislation does not provide for categorical prohibitions on the manifestation of such independence. The main thing is to be guided by common sense and observe the regulatory requirements when installing.
But in most cases, they are connected by specialized organizations that have the appropriate admission to this type of work.
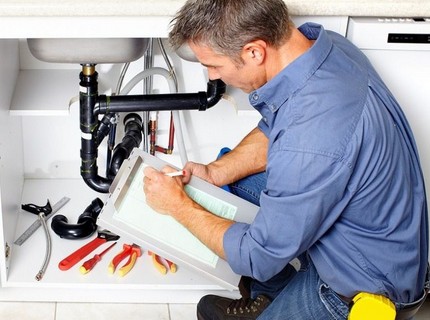
Licensed organizations perform the installation of metering devices, strictly observing the requirements and order of commissioning of installed metering devices in operation
If you impose the services of specialized companies, be aware that this is illegal. The procedure for tapping into the installed water supply system can be done on your own.
When installing the equipment it is worth taking into account a number of points:
- Instruments should be purchased only from licensed companies. The device must be accompanied by a technical passport.
- Installing the equipment involves shutting off the water supply to the riser, which is quite problematic to perform on its own.
- When installing and connecting the device, it is important to follow the connection diagram of the water meter and strictly observe the technology. Otherwise, if the pipeline breaks, all losses must be compensated from their wallet.
In order for the testimony of the water meter installed by the in-house to be taken at calculation of utility payments, it is necessary that they be sealed and placed on the balance of the local branch of Vodokanal.
Registration and registration
Before putting counters in the water in your bathroom, you need to contact the local water canal in order to get the technical requirements for the water meter on your hands. This is the responsibility of the project coordination department for water metering.
Having obtained permission, you can safely buy the meter. When purchasing a product, make sure of two parameters:
- The serial number on the water meter must match what is stated in the passport.
- On the seal device must have an imprint of the State Standard.
- In the passport to the device, the date of the factory inspection must be fixed.
At the time of purchase, the seller must deliver the stamp of the store and specify the date of sale.
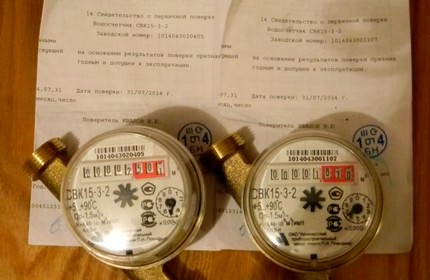
Most the best option - if between the date of the factory check of the meter and its sale is not too long interval
The purchased device must be checked by contacting one of the organizations listed below:
- department housing department;
- water channel management;
- a private licensed firm.
For verification, the device is handed over together with a technical passport. Upon completion of the procedure, the passport will be stamped by the auditing organization and all relevant fields are filled out. In parallel with this, the date of sealing will be appointed.
Take into account that it is forbidden to damage the KIP sealing, otherwise it will not be accepted in the water canal. If you accidentally damaged the factory seal, the agency can still take the device. But, if there is no CIP seal, the meter data is considered invalid.
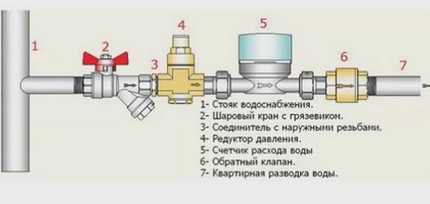
For self-tapping of the water meter, the Housing Administration will provide a drawing and the necessary technical conditions that are most likely to be required for installation
In the plan-scheme of connection of equipment the sequence of installation of details will be clearly indicated. Nothing complicated in this. Traditionally, the "garland" looks like this: the first is a stopcock, after it a collapsible filter, followed by the water meter and completes the "chain" check valve.
Mounting the water meter yourself
In advance, on the day when the water meter is supposed to be cut, it is necessary in the name of the organization servicing your house to write a statement in order to cause the plumbing to temporarily shut off the water supply in the riser.
Choice of a place for accommodation
When choosing a location for installation, it is necessary to assess the current state of the pipelines and determine whether there is any wiring from the risers. Accounting devices may be placed both in a horizontal and vertical position. The task of the master is to provide free access for inspection of the device.
The counter is placed as close as possible to the place where the trunk is inserted into the bathroom. For private houses, this parameter is 20 cm from the exit point of the pipeline.
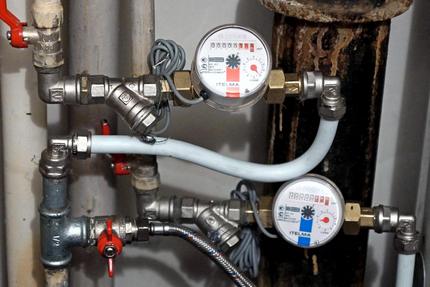
In most cases, the meters are mounted on branch pipes that divert water from the common riser, trying to place them immediately after the cutoff valves
Most often the device is placed near the toilet or under the washbasin. The distance of the straight section, which must be diverted before the insertion of the device, is prescribed in the meter's data sheet.
According to the requirements for the installation of meters, if the shut-off valve is old, it must necessarily be replaced by more reliable ones ball Valves. For hot water pipelines, ball valves DN25 are used, and for cold pipes DN15.
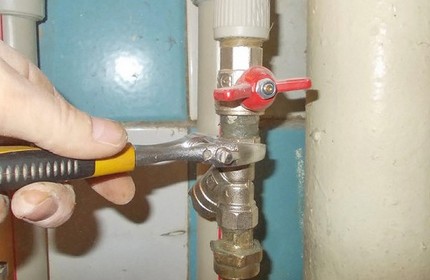
The ball valve on one side is equipped with internal thread, and on the other - external; it is used for screwing the filter coarse cleaning
For installation, it is better to use quality cranes of proven manufacturers that are able to withstand operating temperatures reaching 100 ° C or higher and high operating pressures.
Acquisition of necessary components
The number of water meters is calculated based on the number of risers in the apartment.
In order to simplify the task of tie-ins by the scheme, it is necessary to clearly understand the purpose of each node of the system:
- Shut-off valve - "advanced" intra-apartment pipeline. To cover polypropylene pipes, plastic cranes are cut, for metal and metal-plastic pipes - brass models.
- Cleaning filter - protects the equipment from large suspensions and therefore requires periodic washing. Available in two versions: straight and oblique.
- Non-return valve - prevents rewinding of the device back when the water supply stops suddenly.
The ball valve can only be in two positions: open / closed.
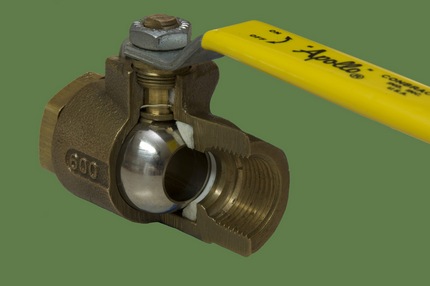
The semi-open position of the ball valve, regardless of the type of its execution, is the correct way to fast exit of the locking mechanism
Availability check valve immediately after the meter - an obligatory condition when connecting a water meter. Placement of this device immediately after the meter allows you to prevent the possibility of starting the flow of air against the movement of water, which is often used by some unscrupulous "craftsmen" when unwinding the device.
Vodokanal inspectors always check the presence of this valve and without it never allow the device to be put into operation.
From the tools for the work will be required:
- bulgarian;
- soldering iron;
- scissors or hacksaw;
- gas and adjustable wrench;
- FUM tape or tow;
- corners and drifts;
- couplings (for transition to another size).
Drives and corners will be needed to connect the device to the water pipe. If desired, they can be replaced by flexible hoses made of rubber or rubber, the outer walls of which are covered with an aluminum or nylon braid.
In the kit with the flowmeter should go "American" and o-rings.
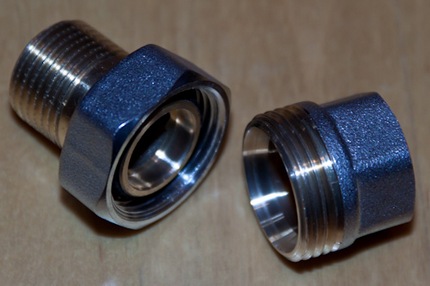
"American" is a connecting fitting equipped with a union nut, the main purpose of which is to remove the device without harm to the elements of the water supply system
When planning to cut a counter for hot water, you will additionally need to purchase paranitic gaskets, and if the water meter for cold water is rubber seals. Ensure the tightness of the "American" connections with a non-return valve will help the tow and FUM tape.
Installation and connection of water meter
It is easiest to install a water meter on a water pipe system made of metal-plastic or polypropylene pipes. The polymer is easily cut with special scissors, the upper part of which is equipped with a sharp knife, and the lower part with a pipe holder.
Connection of the elements of the pipeline made of a polymeric material is carried out by means of a soldering iron, the technology of application of which is rather simple.
When dealing with a water pipe made of metal pipes, it is rather problematic to mount water meters without using special tools. Therefore, the independent connection of metering devices to metal pipes in most cases is combined with full or partial replacement of the intra-apartment pipeline.
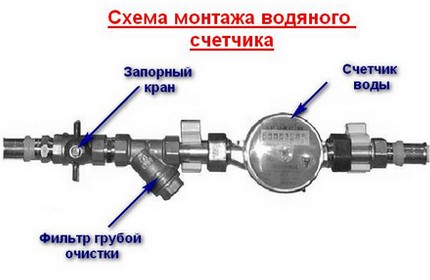
All parts of the plumbing system are connected in accordance with the scheme attached to the product and the drawing received in the Housing and Utilities Department
To simplify the assembly process, the elements of the "garland" are pre-arranged on a flat surface in the same sequence as you will connect them. And to correctly calculate the number of turns, perform a "dry" connection. To do this, turn the filter on the tap, parallel with this counting turns. Traditionally, there are no more than five.
Performing a "dry" connection, note on which of the turns the sump settles down. After this, untwist the connection, and on the grooves of the thread of the filter of the shut-off valve wind the seal.
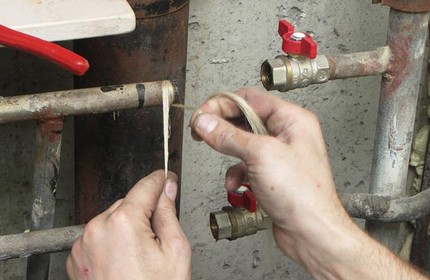
Threaded grooves are wrapped with a sealant, trying to drown it as much as possible in turns, then cover with a thin layer of sanitary paste, and on top tighten the stopcock
When twisting the stopcock, the main thing is not to overdo it, otherwise the connection can just burst.
In the assembled form, the structure will look like this: the stopcock switch, the filter sump and the counter face "look" upwards, and the impeller - down. Measuring the length of the resulting "garland", measure the worker in the section of the frame in the pipeline the same distance.
Overlapping of the riser in apartment house It should be agreed with the workers of the water canal in advance.
Sequence of action during installation:
- The pipe, previously disconnected from the water head, is cut. When cutting a section, it is better to replace the basin, since the probability is that a little water will drain off a little.
- A valve or ball shut-off valve is connected to the pipeline with a screen filter installed on it.
- To the cutoff tap with a filter connect a pre-assembled water meter block, not forgetting to lay a rubber or paranitic gasket of the appropriate diameter.
- The arrow on the instrument is oriented in the direction from the cut-off tap that is cut into the pipeline. On the side of the sharp end of the print of the arrow to the filter, screw the "American", and on the side of the tail - a check valve.
- By connecting the meter to the tap, measure the exact location of the return thread.
- Cut off the excess pipes. At the end of the pipe, make a thread and mount the fitting.
- From the collected water meter, unscrew the check valve and fix it to the prepared counter thread.
- After the installation is complete, reconnect the "American" to the body of the flowmeter.
When assembling the water flow meter, carefully monitor the direction of the arrows on each component. The marks' marks in the form of arrows serve as a guide, indicating the direction in which water should flow through the meter.
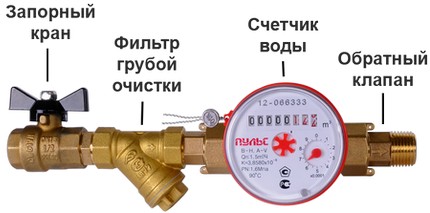
Ignore the labels indicating the direction, it is impossible, because in this case it is impossible to guarantee the correct operation of the equipment
If, during the assembly of the system, you confuse the direction of the arrows on the body of the device, the return valve and the filter, then during the inspection the water canal worker will not be able to seal the meter. After all, you can only start up a system in which each element of the unit is correctly installed.
System health check
To verify the correct installation, the assembled structure is connected to a water pipe. To do this, slowly open the ball valve, which cuts off the common riser system of intra-apartment water supply. After starting the system, check all screw connections for leaks and determine if there is a leak.
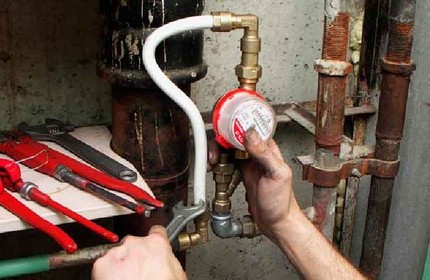
The absence of leaks in the places of the tapping into the water supply system indicates that the work on the tie-in and connection of the device was carried out successfully
If everything is in order, you can only write an application and wait for the vodka inspector's visit. The controller will check the connection, perform a test run and see if the device is working. After that, it will seal the counter with a seal and make up an act of commissioning.
Payment according to the testimony of the water meter will be accrued from the month following the date of commissioning of the connected meter. To do this, the owner of the apartment needs only to transfer the document in a timely manner to the SEC.
Video: the subtleties of competent editing
Video tips of the wizard for installing the device:
Video: water meter installation option:
Self-installation of the meter is a simple procedure. Its main problem is only in the bureaucratic vicissitudes: the submission of applications, the receipt and approval of permits. But in the future it is only necessary every four years to take the meter for verification and enjoy the benefits of civilization, without overpaying significant sums.
It is not a secret for anyone that so-called hydrometers allow not only to control the flow of water, but also to pay only for consumed natural resources. Actual Savings family budget is noticeable after a month of operation of the water meter - as a rule, the fee for tap water is reduced by two or even three times. Profitability of these devices on the face, so their installation in your apartment - it's only a matter of time.
Want to bring this hour closer and save today? Then read on this article and study the question of how to install water meters yourself.
Vodokanal requirements for the installation of water meters
Strangely enough, but the water canal puts forward only three basic requirements for the installation of water meters.
Firstly, it is the availability of protection of meters from mechanical damage by large and small debris, which is abundant in tap water. To prevent foreign particles from entering the meter and thereby prevent it from premature failure, a coarse filter must be installed in front of the water meter. It is necessary to put it in your own interests - most modern plumbing fixtures also need such protection.
Secondly, the installation of water meters in the apartment, in order to avoid unwinding them by some irresponsible persons, must be accompanied by the installation of a so-called check valve. It is installed immediately after the meter and does not allow some craftsmen to let the flow of air against the movement of water through the counter and release it through the filter. At one time, there were many such precedents.
Thirdly, this is the sealing of the counters. Immediately after their installation, an application is submitted to the local water canal, whose specialists carry out seals. In the meantime, they also check how correctly the water meter setup was followed in your case.
How to install the water meter yourself
Independent installation of water meters, as a rule, is combined with full or partial - it is almost impossible to insert water meters into the existing water pipe made of metal pipes without special tools.
First you need to determine the correct location of the water meter. Usually it is placed on the branch pipes that divert water from the riser. But it is not important - by and large, the counters can be carried to any place in the apartment. Another thing, is it necessary? And it is easier to install them directly on the nozzles immediately after the cutoff valves - in this case, you do not even have to disconnect and deprive all residents of the entrance to the water supply.
But if the tap is old and requires replacement, then you can not do without disconnecting. To do this, we call the plumbing and turn off the water supply. After that, boldly dismantle the whole water pipe or part of it, screw the old valve and in its place install a brand new ball valve, which on one side has an internal thread, and on the other - the outer one. Please note that for cold water The crane with DN15 marking is used, and for hot DN25. At first glance, there is no difference between them, but if you look into it, it will be found in the materials used in their manufacture - on hot water, the DN15 marking valve will not last very long.
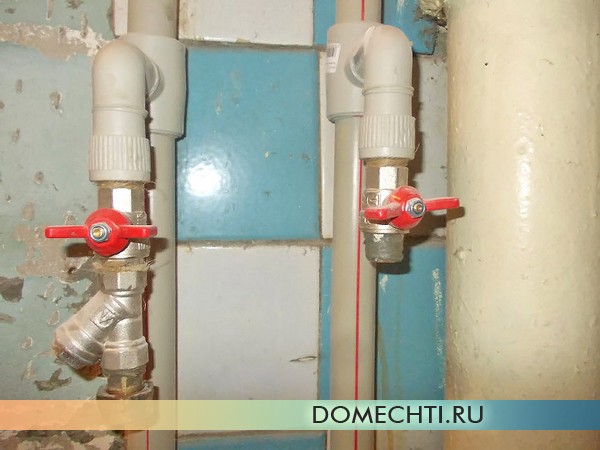
We go further, and on the external thread of the crane we screw the coarse filter. Pay attention to the arrow on this product - it indicates the direction of the water flow. The filter should be installed in accordance with this arrow - the point from the tap. This is what the proper installation of water meters requires. To seal the threaded joints, either a tow, or a FSM tape, or a special thread is used. The seal is wound clockwise.
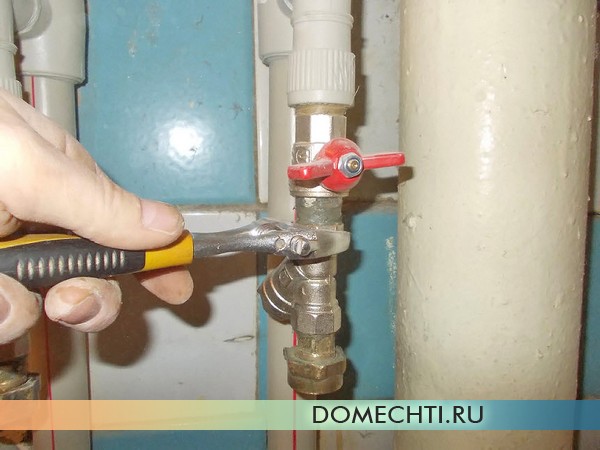
Self-installation of water meters
After the filter is installed a branch pipe with a union nut - as a rule, two such products come complete with a counter. Like the filter, the socket with the union nut is installed with the help of the pakli.
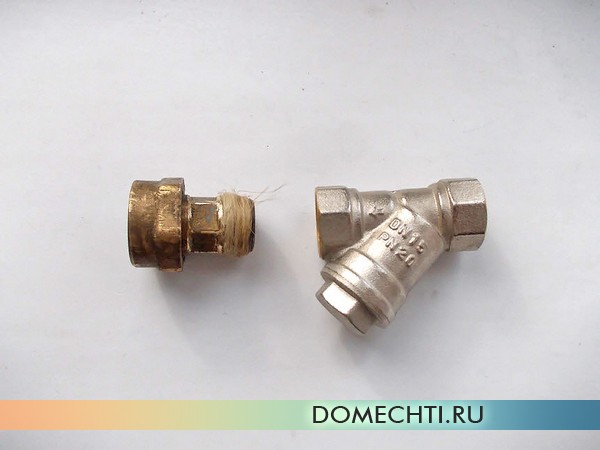
Water meter installation technology
Further, by means of a cap nut and a rubber or paranitic gasket, a counter is attached to the already assembled fittings. As in the case of a filter, it has an arrow indicating the direction of water movement.
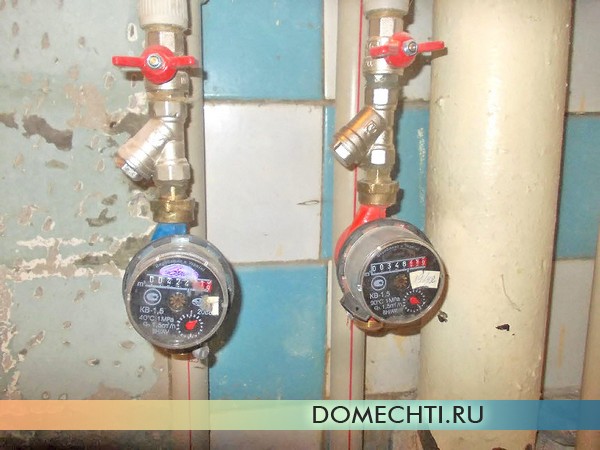
Now we take in hands the second branch pipe with the union nut and connect it with the non-return valve. The valve also has a certain installation direction - screw it with a union nut, pay attention to the arrow indicating the direction from the nut.
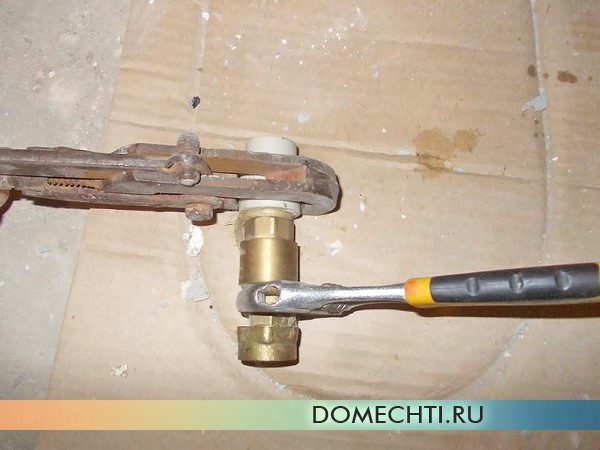
Tariffs for utility services and water supply differ in different regions, but grow at an incredible pace everywhere. If before all, without hesitation, paid "on average" and were happy, but today they are increasingly making the decision to save and pay strictly for the used water. This requires the installation of water meters on the supply lines of cold and hot water, which must necessarily seal the representative management company, otherwise you simply will not accept payment according to their testimony. In favor of installing water meters, the government plans to oblige all users of central water supply to install meters for water and heating, of course, at their own expense. So, sooner or later, but you still have to do it.
Feasibility of installing water meters
If you are still tormented by doubts, whether the installation of counters will result in savings or vice versa, unnecessary waste, calculate all expenses, weigh all the pros and cons.
For an apartment in which 2 people live, and registered (registered) 4 - 5, charging for water is calculated based on the "average" consumption for the number of registered. So it turns out that about 6 cubic meters per month are spent, and there are 20-25 m3. In this case, the installation of meters will reduce costs by several times.
If the apartment lives the same as it is prescribed, then the savings are usually 20-30%, of course, in the case of a reasonable consumption of water. When the water flows all the night from a tap or toilet, there is no question of saving money.
But in a situation where there is actually more people living in the apartment than what is prescribed, which also happens, you will have to pay much more on the meter than "on average", for obvious reasons. After all, the actual consumption will differ from calculated for those registered.
Great importance also has apartment layout. For example, if several highways are suitable for the apartment: two pipes (hot and cold water) - in the bathroom and two pipes - into the kitchen, then the owner will have to install a counter on each pipe. And if a separate main line also approaches the toilet, then in total 5 counters will be obtained. Such a Soviet planning is not uncommon, because when such houses were erected, it was planned that everyone would pay "ridiculous" money at the "average rate". Naturally, for one tenant in an apartment with such a layout, the installation of 4 to 5 meters, considering how much is the installation of a water meter, is simply unprofitable and will not pay off even after 15 years.
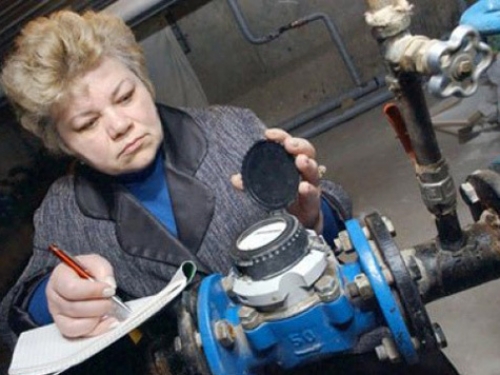
It is also worthwhile to find out exactly how your house is going charge for water consumption. For example, there are such situations: after entering the trunk into the house, a counter is installed on it, the so-called common house water meter, according to the indications of which the calculation is made. All those who have meters are paid only for the consumed amount at a rate of 1 m3 in a particular populated area. This amount is subtracted from what the common water meter counted, the balance is divided equally among all other tenants. If there are a lot of leaks in the house and old pipes, then this layout is extremely disadvantageous for those who do not have meters. Since all the leaks they pay. At the same time, if the pipelines are in good condition, this can be beneficial, since it will be possible to boldly release water from a hot tap (in the mornings it runs cold), not being afraid that it will have to be lowered for the whole house and to pay too for the whole house .
There are also situations directly opposite, when the order of the local governing body establishes the maximum limit on payment "on average", i.e. tenants without counters can not be charged more than a certain amount, then the water company distributes the leakage between those who have counters. Here such lawlessness.
Conclusion such: before you install water meters, be sure to calculate everything and find out everything so that later this is not unexpected for you. Well, do not forget that you still have to install them in the near future. You can still save money.
Rules for installing water meters
The first thing to do if you decided to install meters for water, is to contact the local management company. To find out whether it is possible to carry out the installation on its own, in some regions it is forbidden, and it is allowed to do this only to housing and communal services employees and licensed contractors. If self-installation it is necessary to write an application for the permission of the installation, in response, the management company must provide in writing the technical conditions for this. In the technical conditions, the order of assembly of the elements must be specified, which elements should be included, the metric characteristics. Specify which counters can be installed. In some companies, only counters from a certain list of certified are accepted for sealing. If you install another one, you will either have to quarrel with company representatives, or give your meter for certification, which will take time and will be worth the money.
General requirements for the installation of water meters are:
- Water meters should be installed as close as possible to the input of the pipeline of the input line, preferably on a horizontal section, so that it is not possible to equip it with an unauthorized water intake. In other words, it is necessary to arrange it so that the management company does not have suspicions that you can drain the water past the meter.
- Before the water meter, a coarse (mechanical) filter must be installed. Despite the fact that the same filter, only a large one, is installed on a common house meter, there is still scaling or flakes of rust in the pipes, which can damage or jam the counter if they enter the impeller. Even if the garbage miraculously passed through the counter without damaging it, it will get stuck in the mixer filter. So do not save on the mechanical filter, it keeps the debris particles on its mesh.
- In some regions, it is required to install a non-return valve after the counter, in order to exclude the possibility of using the vacuum cleaner to unwind the counter in the opposite direction.
- The temperature in the room where the meter is installed must be more than +5 ° C.
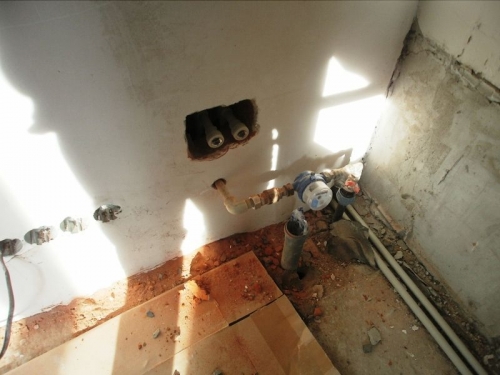
- In a private house, the water meter must be installed at the outer wall of the house, not more than 20 cm from the exit point of the pipe from the wall or floor. The room should be illuminated using an artificial light source or in a natural way.
- If a well is installed on the territory of a private manor with a branch of the pipe from the central highway, then the construction must be capital, the well is covered with a metal lid, with locks. The lid of the well is also sealed. It is allowed to disassemble it only to extinguish a fire or in case of an accident. In other cases, it is required to call the water canal inspector to remove the seal.
- After installation, the counters must be sealed. It is performed by the representative of the management company, in no case is the contractor. Without a seal, your meter will not be accepted.
More detailed nuances should be specified in the management company. Do not forget to also ask what is the price of installing water meters. Perhaps it does not make sense to do it yourself, but to give this opportunity to a professional. Moreover, in this case there will be much fewer problems with bureaucratic red tape and fewer claims. On average, the installation of one water meter with all components costs 90 - 100 cu, but sometimes it is more expensive than 150 cu.
Water meter installation scheme
The sequence of installation of the elements associated with the water meter may differ from the starting conditions: horizontal or vertical section of the pipeline, if vertical, then downwards or upwards there is a supply of water, how many free space remains after installing the counter and other nuances.
The universal scheme for installing water meters is as follows:
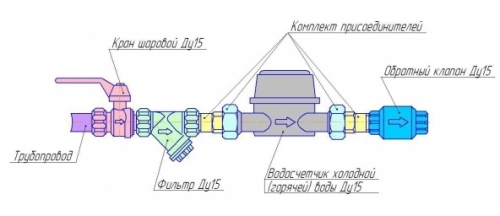
- Stop valves. A tap that blocks the flow of water to the apartment.
- Coarse filter.
- Water meter (counter).
- Check valve.
This sequence is suitable for horizontal and vertical sections with water supply from top to bottom. If the meter is mounted on a vertical section with water supply from the bottom up, then the non-return valve must be installed up to the counter. This is due to the fact that according to the passport requirements of the meter its impeller should always be in the water. If the check valve is behind it, then during the period when the water in the riser is shut off, the remaining water from the pipeline section to the non-return valve (tap, filter, counter) will merge back into the line and the meter will remain dry.
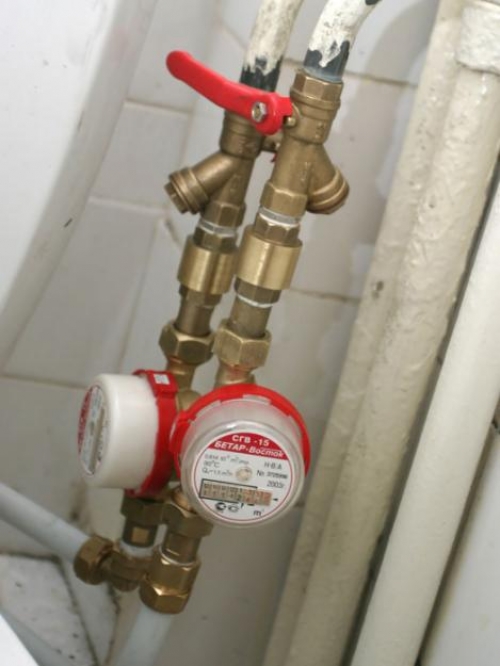
Important! Do not forget that you need to mount the elements so that the arrow indicating the direction of the water flow coincides with the actual course of the water. If you set the counter incorrectly, it will "wind" in the opposite direction.
What will it take to install water meters?
When ordering the installation of water meters in the management company, you can hope for honesty and conscientiousness of the representative who comes to you, and do not buy accessories yourself. The amount that is voiced in such cases already includes the cost of everything necessary. The plumber will come to you with a full "ammunition". But there is a very important nuance: in order to save on materials and put more in your pocket, he can buy cheap substandard components.
Secure yourself by choosing and buying everything you need yourself, and inviting the plumbing only to install and seal the counters. It will be cheaper.
Installation of water meters can be free of charge only if you install it yourself. Although there are exceptions for the poor category of the population: disabled people, pensioners, etc. For them, there may be privileges or even installation at the expense of the budget of the settlement.
So, let's stop in detail on what we need from the components.
Stopcock
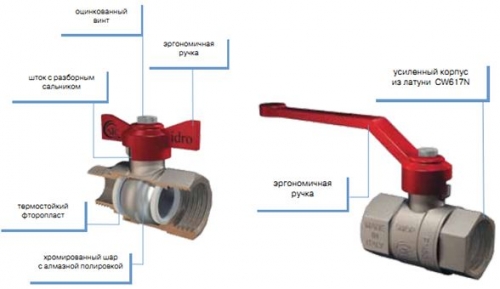
The stopcock on the incoming highway is the first outpost. In case of its malfunction there will be a real flood. So you need to choose a reliable and proven fixture. If you changed the faucet before, just check its serviceability and inspect for microcracks. If the tap is still in the Soviet period, it is better not to take risks and replace it with a new one.
Most often, ball valves of brass or other durable metal are used as shut-off valves. For polypropylene pipes, plastic cranes are allowed. Do not buy a faucet that seems too light, most likely, it's substandard. Well, if it breaks right away during installation, and if during operation?
The handle of ball valves is a "butterfly" and a lever. You can install any, just by estimating the convenience of using both.
Important! The ball valve can not be used in a semi-open position. So it will very quickly fail. It is designed to work only in two positions: open and closed. If there is a need to limit the flow of water in part, it is necessary to install a valve type valve.
Coarse filter
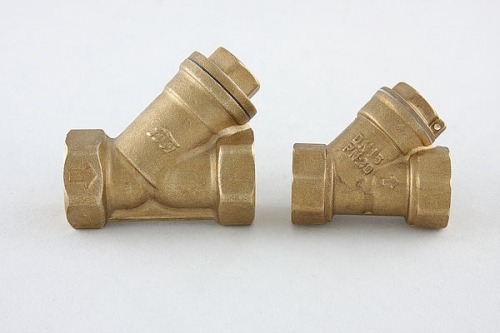
Filters mechanical cleaning they are straight and oblique, the latter is also called the "oblique" filter. Straight or perpendicular filters are only for use in horizontal lines, and oblique - in both horizontal and vertical.
In the filter of mechanical cleaning there is a reticulum, which catches large suspensions. From time to time it must be cleaned. To ensure that the dirt does not fall back into the pipeline, the oblique filter is always installed by the settler (cover) down. It is also more convenient to disassemble and clean it.
Important! Some models of shut-off valves are already equipped with a coarse filter. You can use this.
Water meter (counter)
According to the principle of operation, it is possible to distinguish such water meters: mechanical, electromagnetic, vortex and ultrasonic. To account for water in the apartment it is enough to use a mechanical counter, it is more reliable and durable.
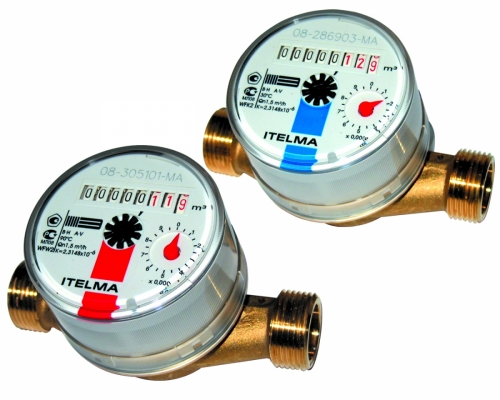
Mechanical counters differ for cold (with blue marking) and hot (with red marking) water. On some it is written up to + 40 ° С, and on others - up to +130 ° С.
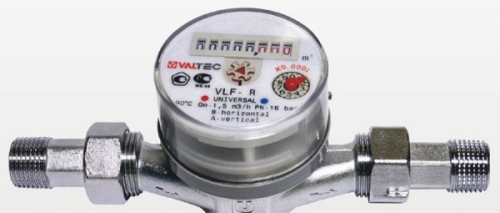
Although there are modern universal models that differ in the gray color of the cover.
You must purchase a certified meter with a passport. To avoid getting trapped, do not buy on flea markets, where you can get a photocopy instead of a passport. Check the number of the counter with the number specified in the passport, it must match.
In addition to all of the above, it is necessary to buy a check valve for each pipe, the materials for sealing the joints (flax, tow, Unipack and Multipack sealing or "Tangit Unilok" polyamide threads with silicone grease) for fitting water meters, fittings for switching with metal pipe for metal-plastic.
Installation of water meters with own hands
After you have purchased everything you need to install the meters, you must first of all read the instructions of the purchased devices and components. In the passport, the meter always indicates the length of the straight section, which must be before the counter and after the counter. Observance of these conditions will ensure more correct operation of the device.
Connecting Elements
![]()
Before installation, in order not to confuse anything in a hurry, put all the components in line: a stopcock, a mechanical cleaning filter, a counter and a check valve. Pay attention to the arrows (they are on each device), indicating the direction of movement of water. They should be in one line.
Then we begin to connect the elements "on dry" to calculate the number of turns. Screw the filter on the stopcock. Usually the number of turns is not more than 5. We note, in which account the last coil the filter is located settling down. For example, at 4. Then unscrew the connection and wind the seal on the thread of the filter. For this you can use a linen tow. We stretch their hank strand, level it, removing small villi, we wind in a string with a diameter of up to 1 mm. Tightly reel it on the thread so that the groove was completely closed. We take the plumbing paste and spread it with rotary movements on the flax. We screw the filter into the tap tightly, but not too much, so that the connection does not burst.
Important! Do not use silicone sealant instead of paste, as it dries up and can burst inside. Plumbing pastes are not able to wither and change their properties. This is also convenient in that the connection can be unscrewed with little effort.
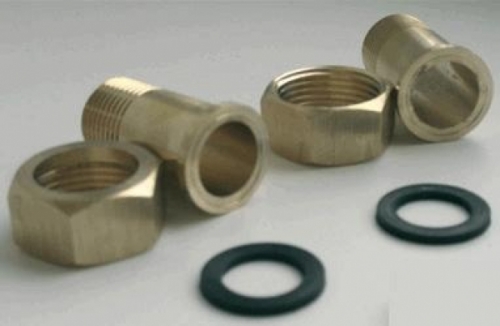
The counter is most often already sold in bundle with so-called American women (nipples with union nut) and o-rings. It is better to throw out the last ones and buy new ones. Installation of a cold water meter is done using rubber gaskets, and installing a hot water meter using paronit (they are more durable but less bent) or quality rubber. First, on the filter, wind with a flax and paste the pipe in the union nut, and then wind the counter using only the gasket.
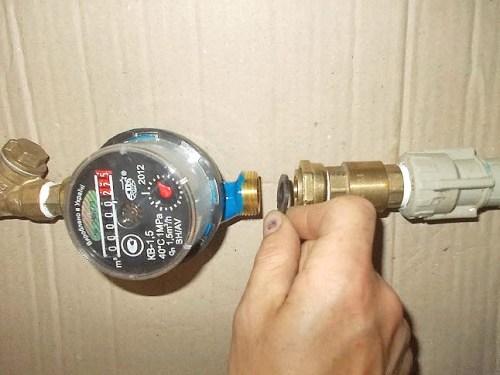
And already after the received design we attach to the counter (only on the gasket).
We should get so that the handle of the shut-off valve was on top, the sump of the coarse filter on top, the counter with the dial up, the impeller down.
Counter entry into the main
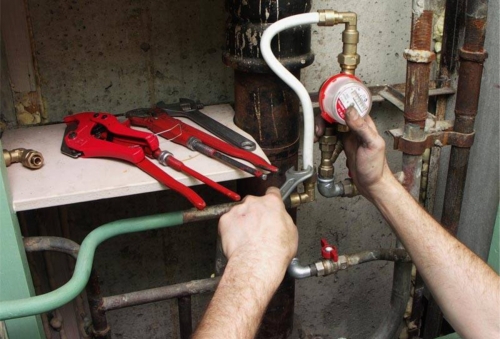
When planning to replace the shut-off valve, care must be taken to pre-disconnect the water supply to the riser. Do it yourself in an apartment building You do not have the right. It is necessary to call a representative of the management company. Most often, if the tap is working and there is no accident, the riser is switched off strictly on certain days of the week for internal repairs.
We measure the length of the resulting structure from a tap, filter, counter and check valve. We postpone this distance from the connection point of the supply pipe (where the old shut-off valve stands) towards the internal water supply. We plan and cut off the pipe. We substitute the basin, most likely, water will flow from the pipe, though not under pressure.
We unscrew a piece of pipe from the thread on the old tap. We unscrew the old tap.
Important! If the old tap is screwed tight and does not move from old age, you'll have to cut it off, and then cut the thread on the remaining pipe.
We twist our design with a supply pipe. But the connection with the continuation of the pipeline can be associated with a number of problems. If the pipe is metal, it is necessary to cut the thread on it using a linter. But this is not the most difficult, the most difficult - to accurately calculate the required area, because the metal pipe does not bend, unlike plastic ones. It would be more reasonable to replace the entire internal water supply with modern metal-plastic pipes or polypropylene pipes, or at least only the section to the nearest thread. Then we need fittings for the transition from a metal pipe to a plastic pipe.
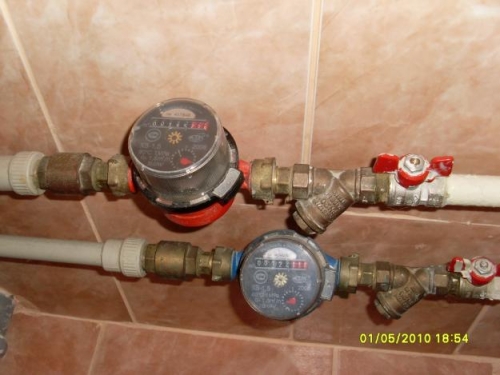
After the installation is completed, it is necessary to check the operation of the system. Turn on the water supply. First time ball valve open slowly, so as not to damage the head of the counter. We watch if there is a leak. If all is well, the counter is correct, then you can call the representative of the management company. He must come, examine what you did and seal the counter by making a note on the passport. Sometimes not only the counter is sealed, but also the coarse filter, so to speak, just in case. On hands you should receive a paper that the meter is sealed and accepted into operation, and also the passport with marks. From now you can perform calculations according to the meter reading.
The installation of meters in the apartment is not too difficult and does not take much time. Much more is spent on bureaucratic reconciliation, writing applications, obtaining permits, etc. Do not forget that the counter must be regularly turned over to a special organization, suddenly he already thinks wrong. The cold water meter should be checked every 4 years, and hot water every 6 years.

