Installation of acrylic shower trays. Step-by-step instruction for self-installation of a shower tray
The purchase of commercially available monoblock shower enclosures is not always suitable: usually it is not satisfied with its dimensions, technical characteristics or cost. It is easier to install the shower enclosure yourself. This will require a minimum set of tools, a little effort and imagination. The construction of walls or curtains does not cause questions, so we will consider in more detail how the shower tray is installed.
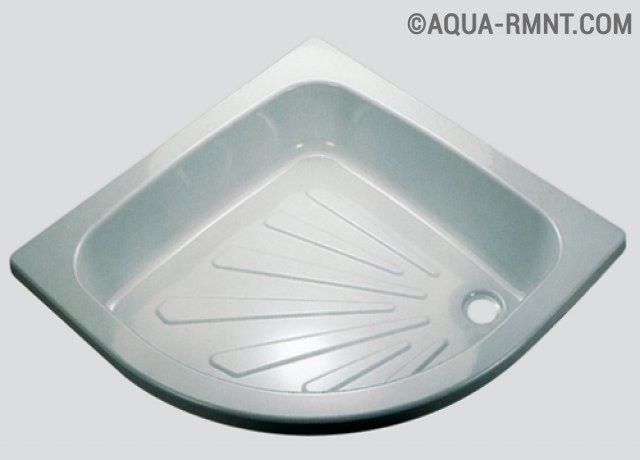
Option # 1 - installation of a tray of acrylic
The fact is that acrylic pallets for shower cabins are sold ready-made, so it is not difficult to install them.
The main attention should be paid to leveling the level of the structure and hermetic connection to the drain pipe.

The choice of the shape and dimensions of the acrylic shower tray depends on the size of the room
Important! For the pallet equipment, special tools are not required, only those that are in any house are useful: a hammer, a jig saw, a screwdriver, pliers, a wrench.
Stages of installation of acrylic construction:
- Mounting the legs. They usually come bundled, but sometimes the pallet is sold already assembled, on legs.

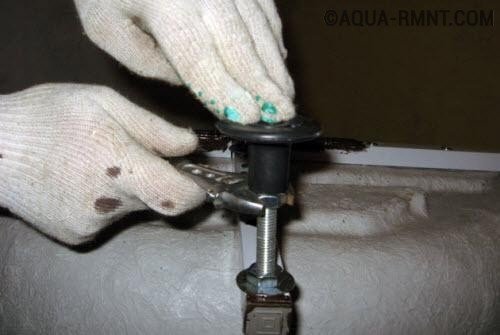
In addition to adjusting the legs, at this stage of installation in the hole, fix the drain and attach the siphon to it - to protect it from sewage odors
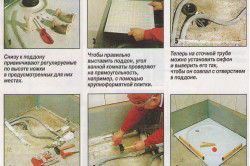
- Adjusting the legs. A wrench is used for this.
An ideally flat floor is a rarity, that's why it is possible to adjust the length of the supports so that the bottom is horizontal and the water does not accumulate in any corner
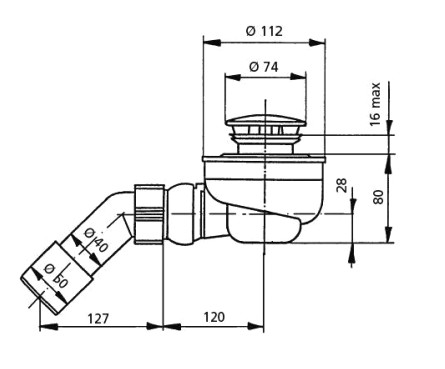
- Connecting the siphon to the drain outlet pipe.
Installation decorative panels, covering the bottom of the structure along the perimeter. To create additional tightness, joints with panels and joints with walls and floor are smeared with a special sanitary sealant on a silicone base (with additives against mold).

The instruction and the scheme which go in the complete set with acrylic pallets, will help not to be mistaken in calculations
To verify the correct installation, simply stand on the structure from above. Deflections and sharp crackling are a sign of an incorrect installation. Many products, especially of Chinese production, do not withstand a lot of weight and bend, so often use shower cabins with a reinforced pallet. As an intensifying material used brickwork, mounting foam, plates of expanded polystyrene, even ordinary boards. But the easiest option is to fill the space under the product with concrete.
In the same way install shower cabins with a steel pallet, which is characterized by inexpensive cost, but it is considered quite "noisy".
Steel shower tray - a low-cost option, suitable for showering in the house, bath or on the cottage site
Important! To eliminate loud noise from the pouring water, traditionally use a mounting foam, which is flooded under the bottom of the pallet.
Option # 2- mounting of the ceramic variant
Sanfayans has an attractive appearance, besides ceramic pans for showers serve for a long time and do not cause problems with caring for them.

Pallets from sanitary ware and sanfarfor are resistant to dirt and scratches, but can split from impact by a heavy object
A rigid pallet of ceramics and synthetic resins differs from acrylic in that it does not have free space under the construction, that is, it is simply installed on the bathroom floor (or bath). This excludes work to strengthen it. But there is a slight difficulty with the device access to the drain pipe. This problem is solved as follows:
- The pallet is positioned so that the drainage hole is as close as possible to the supplied drain pipe. The marker indicates the perimeter boundaries and the location of the discharge.
- An electric jigsaw cut that part of the floor where the siphon will be.
- Outside the structure, not far from the first cutout, the second section of the floor is cut out. This is necessary for laying the pipe and siphon under the floor and free access to communications. From the cut out piece of floor make an observation panel, equipping the edges of the cutout with racks.
- On the place where the pallet will stand, apply the composition of PVA, slightly diluted with water. When it dries, a thin layer is added from above.
- Mount the siphon to drain, then install the sump on the prepared mortar, trying to observe a strictly horizontal position.
- After drying the solution (about a day) through the inspection panel, the siphon is connected to the pipe.
Places of connection of the pallet with walls and a floor cover an equal band of silicone sealant.
Ceramic pallets are varied in color and style of design
Important! Sanfayans, despite its apparent strength, is a fragile material, therefore it requires careful handling.
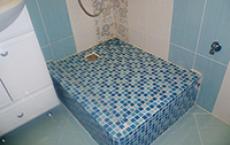
Option # 3 - independent production of a pallet
Inexpensive shower tray in your house or bath is suitable for those who want to save money, or people who prefer original projects. Self-installation shower tray allows you to choose any shape of the design, color and cladding material.
The base is prepared from concrete screed (or plastered bricks), lined with ceramic tiles. As the walls of the shower cubicle, special semi-transparent panels are used, which can be bought ready-made, or ordinary curtains for the shower.
- You need to start with laying the drain pipe and installing the discharge neck. It is better to take plastic products: they are easy to assemble and serve for a long time.
Important! The water leaves naturally, therefore a slight inclination towards the sewer pipe is necessary.
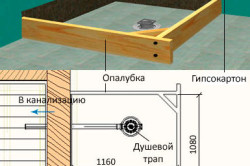
- The original concrete floor screed. You can use two options: pour the entire area of the shower room or just the area under the planned pallet.
Installation of enclosing rails. They are necessary so that water does not spread throughout the room.

As side walls can be either a concrete pouring with formwork, or brickwork, several times plastered. In any case, the resulting construction will have to be tiled with ceramic tiles
- Concrete screed inside the pallet.

- Materials and Tools
- Mounting procedure
- Helpful Tips
A modern shower enclosure is a wonderful addition to a familiar bath, making pleasant and useful water treatments as diverse as possible. Here you can place both a whirlpool system, and an exotic shower, connect light music and create light and sound effects.
However, without a quality pallet - the basis of any soul - all this is simply impossible. Therefore, you should know how to install a metal shower tray with your own hands.
Why is it better to choose, for example, not a ceramic shower tray, but a metal shower tray, and why is it better to install by oneself, and not with the help of qualified installers? A metal shower tray is an excellent choice, and its installation is not particularly difficult. In addition, so you can save.
Materials and Tools

In order to quickly and correctly install a metal pallet, you need to stock up the following materials, tools and devices:
- finished shower tray;
- drain pipe;
- mixer with siphon;
- cement;
- sand;
- a waterproofing mixture (silicone sealant);
- brick stock;
- sheet rubber;
- FSM tape;
- trowel for stone works;
- spatula for plastering;
- paint brush;
- a hammer;
- building level.
Back to contents
Mounting procedure

There are many ways to quickly and efficiently install a metal tray in the shower room (chamber). Consider one of the simplest and most common options for installing a waste tray.
Before you start the process of installing this design with your own hands, you should definitely study the technical instruction, which is usually attached to it when selling. It is worth noting that experts recommend doing this in a similar manner, regardless of the material from which the shower tray is made.
First of all, the shower cubicle should have such dimensions, which generally correspond to the dimensions of the metal base. Thus it is necessary to adjust the size and finish so that the facing tiles, if it is not laid out the whole wall of the room, its lower edge down slightly below the level of the pallet, put to the wall. If there is a gap between the wall and the base of the car, it must be sealed with a waterproofing compound (sealant).
Starting to exhibit by all the rules a pallet, it is recommended to immediately monitor the construction level with a clear horizontality of its upper plane.
Such a situation should not prevent the effective removal of water in the future, since modern waste products are manufactured with ready-made cone-shaped funnels.
To fix the structure in a certain position and to ensure its horizontal, the legs attached to the pallet are used. Usually they are regulated, so that with their help you can easily and quickly install the base in the given position. At the end of the adjustment, the feet are rigidly fixed with locking bolts.
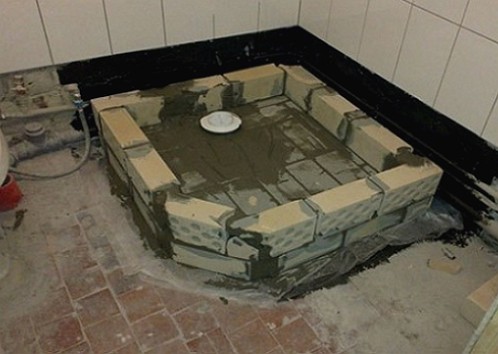
In some cases, instead of legs, special plastic supports are used, which are supplied with a pallet. However, very often builders mount these products, resting them not on legs, but on specially constructed stands made of bricks or assembly cinder blocks.

Said support (or, as it is called, well) is formed in accordance with such dimensions to her freely fit the future of the bottom of the shower, leaning his bumpers on the edge of a brick (shlakoblochnogo) masonry. To fix the pallet, its sides are either glued to the cladding with a special glue mixture, or planted on cement mortar.
By setting the camera to the base of the shower stone well-support, we can not ignore the fact that the bottom of the neck to drain pan must be connected to a siphon. The fact that the height of the well was sufficient for him (output sewer pipe should be above the floor at a height of 12-15 cm), care must be taken in advance in the design of bathrooms. By the time of the final fixation of the entire structure on the brick support, the mixer must be assembled and its component parts tightly fastened to each other according to the scheme.
For better stability of the pallet, the space between it and the floor can be filled with ordinary sand. So he will be created additional support. If there is no sand near the hand, the foam may partly replace it.
It should be borne in mind that the shower is a place where by definition there should be a lot of water. Therefore, all the smallest seams, cracks and places of interfaces - between the bumpers and the brick on which they are based, between the edges of the tray and tiles on the walls, between the dense swirl element mixer and pan - should be carefully fluff silicone sealant and pave FUM-tape.
Each time, having performed this or that stage of the installation procedure, it is recommended to check the quality of the done immediately. In particular, afterwards, it is suggested to make sure of its stability on the supporting well (but without its final fixation). To do this, it is enough to just stand on the pallet with the utmost care, and, most likely, the shortcomings of balancing will immediately manifest themselves.
It must also be ensured that the connection between the pipe and the neck of the pallet and the siphon sewage pipe. To this end, water is supplied to the pallet with a small head. If there is no leakage of liquid, the shower can be used for its intended purpose. If leakage of water is detected, it will be necessary to work on additional sealing of the connected components.
The efficiency of shower cabins is achieved by a well-balanced combination of heat and the beneficial effects of water. The design of shower cabins is not an end in itself, but is designed to provide water circulation. Everything should correspond to harmony, and especially convenient shower tray, from the correct setting of which depends a lot.
We select the shower tray for the cabin
A significant element in the installation of the shower is the shower tray, the main function of which is to ensure drainage. Selection for the subsequent installation of a drainage element should be based on such parameters:
Size and shape
Material of manufacture
Siphon hole diameter
Presence of support or front panel with fastening.
Therefore, the correct installation will depend on the complete compatibility of the plumbing fixture with the declared characteristics. Naturally, for different shapes and sizes of shower trays it will be necessary to select and correctly connect the drain siphon.
dimensions and shape
There are the following types of pallets:
Narrow, from 80 to 90 cm in size
Medium - sizes from 90 to 105 cm
Wide, the sizes from above 105 see.
In height, there are deep and low shower trays. The height of the deep pallet can reach from 15 to 39 cm.

The shape of shower trays can be:
Square
Round and semicircular
Rectangular
Rectangular-asymmetric
Pentagonal
In the form of a quarter of a circle.

Some models of deep pallets can be equipped with bumps and represent a mini-bath.
Dimensions and shape of the pallet should be oriented to the parameters of the shower and its location (in the center or corner of the bathroom). Corner shower trays allow you to save a small space, where the cabin will be installed.
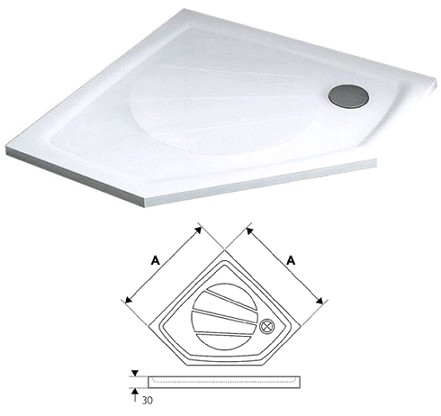
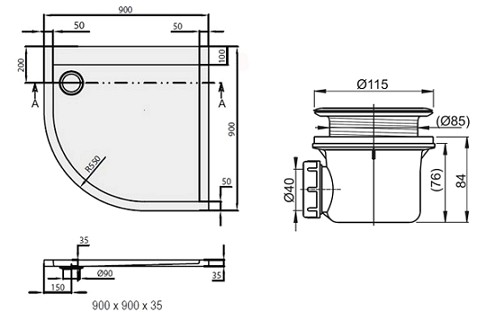
For example, shower tray Ravak Genta Pro 90 trapezoidal shape designed for installation directly on the floor or on the legs on the tiles. Specifications this suggests:
extra flat tray, depth 15 cm, dimensions 90x90 cm, with anti-slip coating. Material - artificial cast marble, the owner of increased wear resistance.
Let's say that shallow shower trays are mounted without a skeleton, and deep pallets with high sides on a frame made of metal.
What materials are used to make a shower tray
Manufacturers of sanitary products produce pallets made of such materials:
Ceramics
Steel.
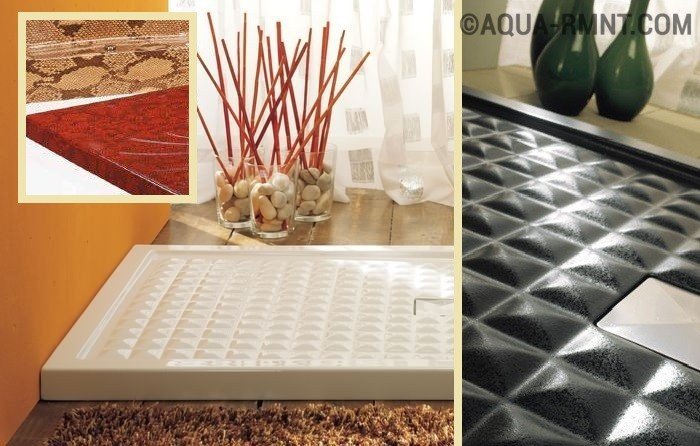
The most popular are shower trays made of acrylic. Attractive durable color and gloss acrylic, as well as surface quality, resistance to UV radiation and good noise-damping properties. Installation of a pallet made of acrylic is produced on a metal frame, which is supplied together in a complete set.
Ceramic pallets are the most durable. The shower trays are not noisy under the elastic water jet and the surface is not slippery.
Compared with other kinds of pallets, steel pallets are considered to be lighter in weight. Therefore, the installation must be carried out on a metal frame.
How to install the shower tray by hand
installation of a shallow pallet
Depending on the model of the pallet and the presence of legs, you can install a low pallet on the foundation (podium) and on the floor level.
The installation of the pallet will consist of the following stages:
Surface marking in the form of a pallet
Installation and fixing of internal supports under the bottom
Connection of water and drain siphon in place
The erection of the base (podium) under the pallet
Sizing around the perimeter of brick supports
Pallet installation on stands
Ensuring the tightness of the side joints
Installing the top siphon and o-ring insert in the pallet
Carrying out of external furnish of the base.
The shower tray is collected and installed without fixing. After carrying out the control check for absence of a leak, the pallet is fixed definitively.
In more detail, the process of assembling a shallow tray is shown in the video.
installation of a deep pallet
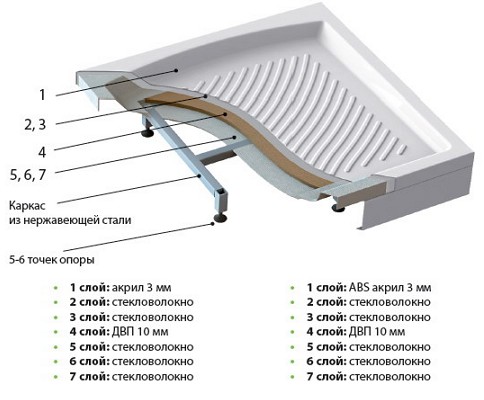
Installation of the pallet with high sides produces on the frame by a special technology, which consists in assembling the frame and simultaneously fixing it directly on the bottom of the pallet.
The support consists of steel guides and 4 legs.

For the deep tray, it is necessary to connect the front panel with the fastening with the steel guides on the legs located on the support.
For example, the bottom shower tray SWAN AVARO reinforced with a 15 mm thick chipboard with four stiffeners.

What will be necessary to undertake:
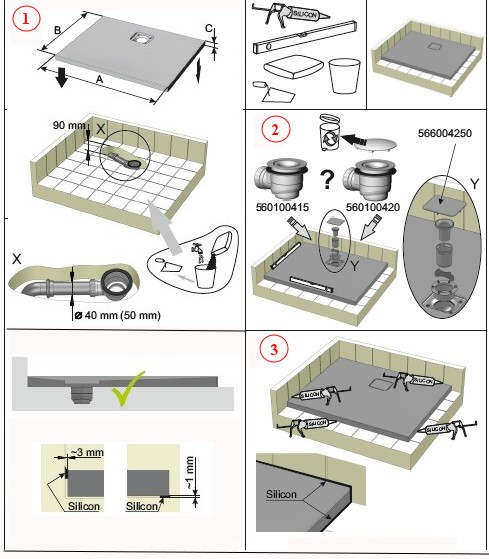
Turn the pallet upside down to attach the metal supporting beams. Bearing beams are included in the kit and are pipes with a section of 10x10 mm. According to the assembly instructions, the carcass tubes are screwed in parallel or crosswise.
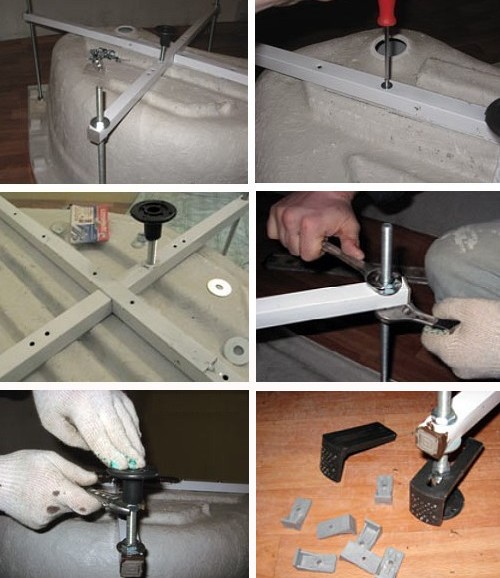
Then the pins are inserted into the ends of the pipes, which will serve as legs of the pallet and provide the necessary rigidity to the frame. The studs are equipped with adjustable thrusts on one side and washers with nuts on the other side. With the help of thrusts, we make leveling of the corners of the pallet body.
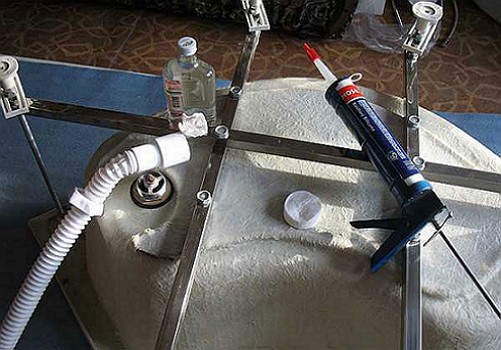
After assembling the frame of the pallet, install the siphon. The tray is turned over and set in place. After installing a deep pallet, we seal the edges near the joint of the walls.
Recall that the peculiarity of siphon models for the pallet is a universal flange, which can be used in conjunction with waterproofing composite and clamping flange, fixing the film of waterproofing.
How to install a deep pan, shown in the video.
Bookmark this site
Mount the shower gangway (sink spout) and the discharge pipe. Ladder and shower tubes should be placed on stands, whose role can be played by wooden chocks, since they can have different heights and are able to ensure the slope of the discharge pipes. Experts recommend using plastic pipesbecause they fit well, are easy to install and durable than metal pipes.
Make a primary concrete screed, which can be performed both for the entire room, and only under the pallet. Next, the enclosing walls are formed with the help of a formwork filled with concrete mortar. The advantage of installing such a design in the shower is that it can be easily laid with tiles. The second option involves the installation of a wall of bricks with the subsequent application of several layers of plaster and the laying of tiles.
After the walls are ready, make the installation of a concrete screed bottom of the pallet with a slope towards the drain neck. Water should flow from the bottom to the drain from any point of the surface. Especially carefully align the screed is not worth it, since full alignment will be carried out when laying the tiles. The level of the screed must be such that the drain hole is located exactly at the level of the laid ceramic tiles. Dry the screed and walls primed and treated with a waterproofing compound. On the base of the pallet, apply reinforced fiber reinforcements. It should be noted that in urban apartments a massive pallet is not recommended, since it will create an excessive load on the slabs.
- Features of choice
- Preparatory stage
- Installation of the pallet
- Installation from ceramics
Shower cabins both in an ordinary apartment and in a a country house Smoratsya stylish and presentable. The modern market offers shower designs of a various complete set and a price range, therefore each buyer can pick up completely suiting its variant.
Before installation shower tray it is necessary to finish all finishing work: the platform under the pallet should be flat and ideally horizontal.
The main advantages of shower cabins include:
- Compactness of products, which is a significant plus for Russian small bathrooms.
- Significant savings in water, ranging from 300 to 500% compared to taking a bath.
- Shower procedures take less time.
- The use of running water increases the hygiene of the bath process, since the dirt instantly goes into the washout.
- Installation of the shower design in-house is available even for non-professionals.
But buying a quality shower enclosure is only half the battle. The key point is the assembly and connection. And the most difficult and time-consuming process can be called installation and installation of a pallet. Modern technologies allow to simplify installation works. Such a design, as a shower box, is already assembled cabin, which must only be connected to the water supply, electrical network and diversions to the sewage system. But this option, due to the design features of the room is not always beneficial, acceptable and optimal. Therefore, the question itself or with the involvement of specialists is still topical.
Features of choice
The pallet is one of the most important elements of the design. It depends on it depends on the shape and size of the shower, and the material of the pallet significantly affects the comfort and convenience of hygiene procedures. Dimensions of standard shower trays are varied and range from 70x70 to 130x130 cm.
In depth, all pallets can be divided into:
- deep (from 100 cm);
- average (from 50 to 100 cm);
- small (up to 50 cm).
It should be borne in mind that under the shower tray is installed siphon, which increases the overall height of the shower by 10-20 cm. If you have not yet decided on the depth of the tray, note the following nuances. Cabins with a deep pallet outwardly resemble a bath and allow you to enjoy water procedures in comfortable conditions. There are also such drawbacks: when leaving the box, you should raise your legs high, so they are not suitable for people of advanced age or with diseases of the musculoskeletal system. Although this defect can be eliminated by equipping additional stages.
The shapes of pallets are very diverse:
- round;
- square;
- polygonal;
- angular.
Before buying a shower tray, you should determine the location of its future location. To install a shower in the center of the room, there is a possibility of supplying all necessary communications. In the reverse situation, you should stop at the installation of a pallet in the corner of the room or mount the product in a niche. For miniature bathrooms, it makes sense to choose angular variants, which often have a semi-circular or pentagonal shape.

Materials for pallets are not very diverse. Each of them has its own advantages and disadvantages. As a rule, constructions are made of:
- acrylic;
- cast iron;
- ceramics;
- become;
- artificial or natural marble.
Cast-iron pallets with enameled coatings are widely used due to their relatively low cost, high durability and good durability. In addition, they are absolutely not subject to deformation. The cheapest are the designs of enamelled steel. But their essential disadvantages are slow heating, high noise, unstable coating.
In addition, steel pallets are the most slippery. More expensive models of steel shower trays are devoid of these drawbacks, since they have a reinforced coating and are equipped with rubber gaskets absorbing noise. Ceramic pallets also deserve their popularity. They are attractive and hygienic, but require very careful handling because of the risk of chipping, as they are afraid of even weak blows.
Acrylic is one of the most practical materials for the production of pallets. Such pallets are beautiful, durable, pleasant to the touch. Minor damage can be easily eliminated by yourself using a special formulation that is applied to the damaged area and then subjected to grinding.
The acrylic pallets are able to bend under the weight, so they are equipped with special frame mounting brackets and adjustable legs, which ensure the correct installation of the structure. The great variety of shapes, sizes and colors of acrylic will allow you to choose the perfect pallet for any interior. Recently, excellent pallets of quark have appeared - acrylic and quartz compounds, which have high strength and wear resistance.
Marble shower trays have a perfectly smooth surface. They have a beautiful and presentable appearance, are not afraid of cleaning products and temperature changes, scratches. Marble pallets are made of natural or artificial material. Artificial marble is characterized by better performance properties and relatively affordable cost, its surface is more resistant to any dirt and much easier to care for. In addition, along with acrylic products, molded marble variants are the quietest and safest in terms of slipping.
Marble pallets are quite heavy and can crack even at the stage of measurements. They are not recommended to install without having certain skills. Due to the fragility of the material, the same advice applies to ceramic pallets. Therefore, an independent installation, as a rule, involves the installation of an acrylic or cast iron device. A detailed algorithm for the necessary actions will be considered below.
Back to contents
Preparatory stage
So, you will definitely need:
- plumb bob;
- hydraulic hose;
- siphon;
- crosshead screwdriver;
- adhesive sealant;
- wrench.
Also, you should know that the renovation of the premises must be completed before the start. This rule extends not only to cosmetic work, but also to final installation sewage system, electrical wiring and pipes that supply water. Electric networks must be resistant to moisture and have the least number of "twists", plumbing pipes should also choose only good quality.