Connecting the sockets with each other. How to connect the outlet to an electrical outlet
In living rooms, where several household appliances work simultaneously, often there is a catastrophic lack of free sockets. Part of the problem is solved by installing a socket with a double connector. What types of devices to connect to the electrical network offers a modern market and how to connect a double socket, consider in the article.
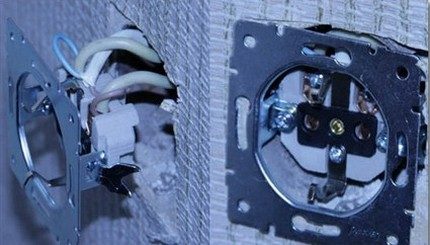
The main elements of the power outlet are an external protective housing and a working part including the base and contacts.
They are interconnected by screw terminals - clamps, necessary for connecting the cable of electrical equipment.
The only drawback of double outlets is that through them it is problematic to connect simultaneously two high-power consumers
There is an erroneous opinion that the double sockets are identical to the assembled or dual models and represent several independent devices located close to each other, united by plumes.

If you are connecting double socket to one supply circuit, the electrical installation work is carried out according to a scheme similar to the connection of a single circuit. The difference is only in consecutive connection two contact pairs within the electrical installation product
Technical progress does not stand still. Modern models represent more advanced designs. By the values of the nominal voltage and amperage, they are strikingly different from the sockets that were commonly encountered in Soviet times. For example, if in the old model the permissible current strength did not exceed 10A, then for modern electrical equipment this figure is 16A.

Each part of the double socket can be connected to a separate power circuit, if you remove the brass jumper connecting them to the terminal
In fact, the double socket has one clamp and several distribution bars. Due to this, the electric current is fed to both sockets identically, but its level will be divided depending on the power of the appliances powered from the network.
That is why, replacing the old device out of order with a new one, it is worthwhile to know it design features, which assume certain nuances during installation.

The distance between the output contacts, as well as the diameter of the fork pins in modern models is greater than that of traditional analogs, and is 4.8 mm instead of 4 mm
By modification, double sockets are classified into such basic types:
- Open and closed execution. In closed-door models, the holes are hidden behind curtains, which are shifted to the side when the device is turned on. Devices of this type are indispensable for homes where young children are. Curtains are triggered only when pressed at the same time. Thanks to this, even with the deliberate poking of a foreign object, nothing dangerous happens.
- Without grounding and with earthing contacts. In models of the second type, grounding contacts are output to the socket housing, which protect electrical appliances and the user from the punching currents that accidentally "exit" the plastic housing.
- For installation in rooms with high humidity and outdoor installation. The models of the first variant are marked IP-44. They are equipped with a housing that protects the device from moisture penetration. Devices for outdoor installation are marked IP-55. Their high-strength casings are protected from pollution by dust and moisture penetration.
Each type has the corresponding letter marking. For example: "A" indicates that this is an American double socket, "B" reports the presence of a grounding contact.

Depending on the type of execution and material of manufacture, the devices are also divided into standard and polar, invoices and custom made
Among the latest developments, programmable sockets are very popular. Timer-equipped devices are switched on and off independently from the power supply after the set time interval.
Protective housing modern outlets are made of heat-resistant unbreakable plastic. To enhance the decorative qualities it is decorated with a variety of inserts.

Due to the variety of design options, you can choose devices that are invisible in the interior or, conversely, act as a worthy decoration
When planning to install a double socket on its own, experts recommend choosing simple models without any modifications. Or, give preference to double outlets with a spring fork ejector. Such models are convenient in that they are equipped with springs that work when the plug is removed from the device.
To protect yourself, minimizing the risk of accidents, it is worth choosing the products of proven manufacturers: Schneider electric, ABB, Legrand.
Features of mounting the device
The double socket has one extension with two dilated terminals and one wiring part for the wires.

A double socket is a monoblock consisting of two plug-in sockets, and therefore the circuit of its connection into one podrozetnik will be somewhat more complicated
If desired, the arrangement of the electric point can be performed on its own, without resorting to the services of a master.
Use jumper is allowed only if the condition is that not too powerful devices are to be connected to the electrical points. When connecting powerful equipment, the master recommends parallel connection two sockets, creating a branch of wires to each point.
But in any case, to prevent accidents, the total load on this type of outlet should be no more than 16A.
If it is necessary to install a socket with two different niches for installation, it is necessary to pre-drill the electric drill with the same distance between the holes.
Image Gallery


Materials for connection
The wire for connection of the electric point should be made of the same metal as the main cable. For example, when using an aluminum cable, the jumper must also be made of aluminum.

To ensure a uniform distribution of incoming electricity, the cable used for connection must have the same cross-section as the main wiring in the room
For the installation of a double socket, it is also required:
- flat and cross-shaped screwdrivers;
- tool for stripping the braid;
- pliers;
- insulating tape.
For safety reasons in the event of a fire, any electric wires it is recommended to lay in corrugation. This solution is also convenient in that it does not require punching the wall, and also simplifies the replacement of the damaged wire during subsequent operation.
Double socket technology
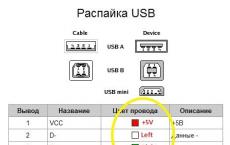
Installing a double socket in a single junket requires certain preparatory steps. The first step is to determine the affiliation of the wires, knowing where the phase and zero are. The easiest way is to study the code marking of cables:
- the phase wire is colored red or brown (less often white or black);
- the neutral has a white-blue or blue insulation;
- the grounding is always colored green-yellow.
But for greater reliability it is better to be reinsured by performing measurements.
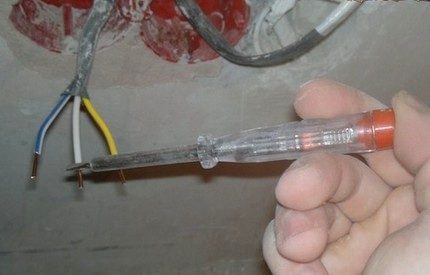
An irreplaceable assistant in this case will be a conventional or an electronic screwdriver equipped at the end with an indicator - a light bulb or an LED
To determine the accessories of the wires, remove the cover from the failed device and in turn touch with a screwdriver with a sensitive indicator to each bare wire: at neutral - the light signal will be absent, and in the phase - will light up.
If there is no ground wire in the house, the installation work is a little easier.
Before proceeding with the arrangement of the electrical point, it is necessary to de-energize the room. To do this, the levers of the automatic devices on the flap are lowered downwards, moving to the "off" position. At the installation site of the double socket, the voltage is recommended to be checked again.
If there is still a current in the phase, this indicates that not all the supply lines are de-energized. Therefore, it is so important before starting the work to turn off all the machines, and not just those that control the wires going to the outlet.
A double socket outlet with a protective contact is installed if the grounding system of the private house is arranged. In multi-storey houses there is no sense in instruments with grounding, because there is zeroing (+)
Marking on the wall
The outlet is located near a wire running in the wall or from a distribution electrical box. The location of the future device is indicated with a pencil.
Before you put a double socket with two "glasses", you need to determine the distance between the drilled holes. To do this, mark the center of the first podrozetnik. This is the intersection point of the diagonals. The center of the second device is determined by the same principle.

On a marked place in the wall, a depression is made of such dimensions that a glass-the inner case of the device
To drill a hole in the wall itself, use a crown, the diameter of which is a couple of millimeters larger than the size of the acquired podrozetnik. If there are no problems with a brick or plasterboard wall, then for perforation of concrete it will be necessary to set the impact mode on the perforator.
The depth of the hole should be such that the "glass" does not protrude beyond the wall surface. Drilling a niche, you need to clean out its middle. For this use a chisel and a hammer. Gypsum can easily be knocked down with a chisel or a screwdriver without special difficulties.
Distribution of sockets and twisting of wires
This stage is very responsible and must be approached with care and attention. The task of the master is to connect the supply wire to the contacts. For this, from junction box Pull the wire to the double socket.

The outlet itself, by unscrewing the fixing screws, is dismantled with a screwdriver into two parts, separating the front panel from the mechanism
The previously installed crown must be replaced with a drill bit. The diameter of the drill should be slightly larger than the cross-section of the wire fed to the outlet or the diameter of the corrugated tube, in the cavity of which the input wire will lie. Ideal - when the diameters of the drill and wire are the same.
Through one of the mounting holes of the podrozetnika lead main wire. A subsidiary - run through the second hole.
The twisting of wires is carried out directly in the "glass". Before performing the work, the last one and a half centimeters of ends are stripped from the braid with a special tool that does not bite the wire. In the absence of such, you can use a sharp knife, first cutting the winding round them, and then carefully removing them from the wire. For convenience of assembly, the edges of the veins are raised upwards.
To extend the life of the outlet, the bare ends of the wires need to be sealed, or use a brass contact. The second option is more successful, as it not only simplifies the subsequent use of the outlet, but also ensures high safety of the device.

When connecting the wires, their ends should not be strongly clamped in the terminals, because under the influence of great efforts they can be damaged
When connecting an outlet with grounding, always follow the wiring rule: on the right - the phase, on the left - the neutral. The grounding cable is connected to the top and center terminal of the device equipped with protruding "antennae", which often protrude beyond the body of the device. The grounding contact is fixed in the same way as the phase and zero.
You can not attach a phase and neutral to one plate, as this will cause a short circuit and damage to all wiring.

Fixing the wires in the contact holes, unclench the "antennae", unscrewing them clockwise using special bolts
Having completed the installation electrical connections, go to the installation of podrozetnikov.
Subtleties
Dashboards with power cables attached to them are fixed with the help of the holders placed on each side. They can be bundled with the device, or they have to be purchased separately. There are also models that are not equipped with fixing paws, the fastening of which is carried out by screwing on the screws.
As screws rotate clockwise, the fixing "paws" will disperse sideways, firmly digging into the jar
But since the juniper with the lever in the center experiences a double load, during operation the fastenings of the mechanism can loosen and weaken. When the podrozetnikov are dropped out, the wires are often bare, which is fraught with the emergence of emergency situations.
To improve the reliability of the masters fasteners, alabaster or cement mortar is often used. To obtain a homogeneous, thick mass, resembling sour cream, dry alabaster is mixed with water. But keep in mind that you need to dilute the material in small portions and work with it quickly and accurately.
A mixture of alabaster is laid in the place where it is planned to install the jar. To ensure that the mixture adheres well to the surface, the inner edges of the hole should be moistened with water beforehand.
Work with the installation of the internal part of the device should be carried out 20-30 minutes after laying the mixture so that it has time to "grasp" a little. Putting a "glass" on the prepared place and slamming it into the mixture, level the position using a level and a hammer.

When mounting the juniper it is important to maintain the vertical and horizontal position of its position, applying for this level in both planes
Formed cracks between the wall and podrozetnikom fill with remnants of alabaster. Without waiting until the gypsum acquires the desired strength, the influx is removed with a knife.
By placing the double outlet horizontally or vertically and giving the device a preset position, fix it with screws. If necessary, level adjustments are performed with the help of round-nose pliers.

When tightening the fixing screws, the main thing is not to overtighten them, otherwise with strong pressure the front panel can simply crack or collapse
At the final stage, the front panel is applied from above and clamped with screws. Refinement element will close the unsightly part of the outlet and protect it from accidental damage.
After completing the connection of the outlet, it remains only to turn on the automatic devices on the panel and test the work of the wiring equipment. It is better to check the work of the outlet with the inclusion of inexpensive household appliances, for example, a table lamp. After all, the slightest mistake in the installation process can provoke a short circuit and "burnout" of household appliances.
Video for self-installers
Visually, the process of connecting the built-in double socket is shown in the video:
Video guide for installing the overhead outlet unit:
Video-instruction on how to connect the outlet yourself:
If the installation quality is doubtful, please contact your electrician for assistance. He will not only inspect the work and, if necessary, fix the problem, but also dispel all your doubts about the safety of the device.
Double outlet is considered quite popular. In a single housing you can see two electrical connection points. They are intended for feeding from one working group a phase, zero and grounding. Sometimes many electricians may have significant connection issues. The connection scheme of a double socket will help to perform this process qualitatively.
We are confident that thanks to this scheme readers of the site "" will be able to perform the correct connection process. Also in this article you can see simple scheme connection of a double socket with or without ground.
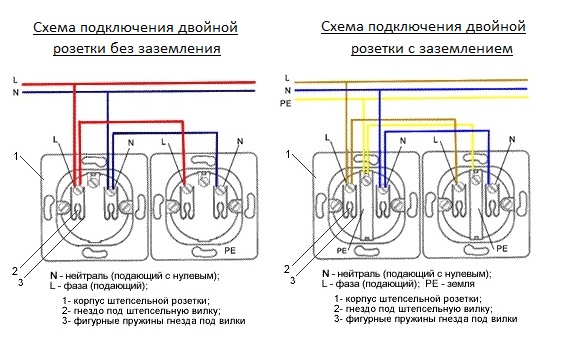
Now you need to study the connection scheme. In the photo you can see the optimal and important connection scheme for a double socket.

If you decide not to use a dual case, but a dual version, then the connection of the wires will look different. Dual sockets have two different connection points. They will be in separate junction boxes, and they can be connected using a loop.


Below, we provided a circuit for connecting the twin outlets. We hope that this scheme will be useful.

If there is no ground in your house, then the circuit will look different. Below we put a photo of the circuit of connection of the double socket without grounding.

Electric jumpers can be used only if you connect not too powerful devices. Otherwise, you will need to. A branch will need to be done for each product.
Here's a video that will help install a double socket.
This is all the information we wanted to bring to your attention on the double socket. In carrying out electrical work there is nothing difficult. You can do this yourself. We are confident that with our instructions you will be able to connect the outlet yourself. Finally, we want to tell you that you choose only a quality manufacturer.
If you choose a quality manufacturer, then you can be completely confident in the quality of your devices. They will last a long time, and you will not have any problems.
Connecting a triple socket outlet to non-professionals can cause confusion. But there is nothing difficult in this, and following our simple advice, you can connect everything in just a few minutes.
The main thing here is mindfulness and not disregard for safety rules.
Before proceeding directly to the connection, it is necessary to determine the possibility and correctness of the decision we made. For this, the rated current circuit breaker, which feeds this group, as well as the absence of prohibitions on the installation of sockets in a room of this type.

So:
- Before you install triple socket in an already working group electrical network, it is necessary to determine whether the circuit breaker will withstand an additional load. To do this, we need to calculate the possible rated current in the socket. This is done by summing the nominal currents of the most powerful consumers electric power, which can be connected in this outlet.
- If we know only the nominal power of these devices, then we consider the rated current, starting from the formula I = P / U × cosα. Where I is the rated current, P is the nominal power of the device (usually indicated in the passport or on the body of the device) and cosα is the coefficient power of the appliance (you can find the value of the device instruction manual, but if you did not find it, you can take it equal to 1).
- Now, summarizing all the rated currents for this group, we can check the conformity of the automaton to these parameters. Often the machine needs to be replaced with a more powerful one. But if the outlet is designed to connect low-power video and audio equipment, then perhaps this is not required.
Note! According to p.6.2.2, the maximum permissible rated current of the circuit breaker feeding the group network can not be more than 25A. So, if you have already installed an automatic machine in 25A, you will have to think about the division of the group or restrictions on the connection of devices to this group.
- Also, if the installation of a triple socket in an already existing group involves monitoring the cross-section of the supply wire. Often, if the machine is not suitable, then the existing wiring will not meet the new requirements. Therefore, again, you have to think about the limitations of the connected load for this group.
- Well and at last it is necessary to be defined, and it is possible here in general to establish an outlet? Mount the outlet can not be in the bathrooms and store rooms. At the same time, there is an exception for bathrooms, which allows performing the installation when installing in the power circuit of this group of RCDs.

- In addition, if it is to be installed on a flammable foundation, care must be taken to ensure its fire safety. For this purpose, the embedded under the socket must be made of non-combustible materials. Usually for this, steel products are used.
Installation of triple socket
We collect a triple socket
At the moment, the market presents a huge number of various outlets. But either the price of them "bites", or they do not meet our requirements. Therefore, often a triple socket is assembled from three ordinary outlets.
How to make a triple socket, we now tell:
- To do this, we need three conventional sockets, the required nominal parameters. This can be one socket for 6A, the second for 10A and the third for 16A. The main thing is that they meet the above requirements. Also we need a patch for a triple socket, which will create the appearance of a single whole.

- We measure the necessary height from the floor, usually 30 cm, but you can choose any other height. At the installation site of the outlet we draw a horizontal line parallel to the floor.
- Now remove the decorative caps on the front side of our single sockets and install a triple pad in their place.
- We put on the sockets overhead boxes and apply our triple outlet to the mark. We mark the place of the walling of the wall under the embedded boxes (see).
Note! If you use plastic boxes with guides (they are also called mortgages under gypsum board), then it's enough to put the mortgages and attach them to the installation site.
- We drill the wall and install the boxes. We attach them and install the sockets directly. If you did everything according to the size, then you should get a good triple socket. At the same time, its price is often much lower than for similar stationary analogues. Now it remains to connect.
Connection from junction box
The most common case is connecting the outlet directly from. It is used in 99% of cases when installing rosette groups, and also in most cases when adding outlets to already existing groups.
So:
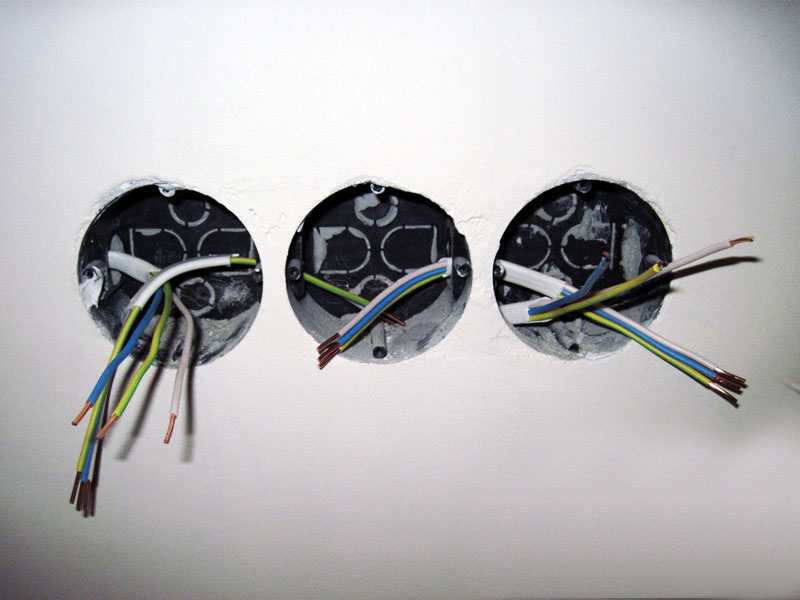
- First of all, we make a connection between the sockets. To do this, we need a wire with a cross section of not less than the wire that we plan to connect to.
- From the outlet to which you plan to connect, we make jumpers to a neighboring outlet. And from the next - to the third outlet. In this case, the grounding wire is fixed to the grounding contacts, and the ground and neutral conductors are connected to the power cables.
- Now our triple socket in one socket is ready for connection. But before performing it, you need to relieve the tension from the group you are working with. In addition, if the wires of other groups pass through the junction box, they should also be removed from the voltage.
- We open the junction box and determine the phase, zero and protective wires of our group. If your electrical network is installed in accordance with the norms of the PUE, then the blue wire - zero, yellow-green - protective and the third - phase. If this is not the case, then we are looking for these wires by means of a short-time power supply. The search methodology is described in other articles of our website.
- Now connect the phase wire in the junction box and on the socket, then do the same with zero and protective. It is important not to confuse the place of connection of the protective conductor, the phase with zero can be connected to any power contacts of the outlet.

- After connecting all the wires and closing the junction box, you can apply voltage and test the operation of our outlets.
Connecting one outlet from another
This method is often used when adding a new outlet to an existing group. It is designed to reduce the amount of work associated with the strobing of walls and reduce the final price of connection. Although it is rarely used, it also has the right to exist.
- In order to make such a connection with your own hands, you should first of all collect our triple socket, as described above.
- The next step is to remove the voltage from the outlet from which the connection is to be made.
- Then we open this outlet and then proceed according to the adjusted scheme. In fact, we install a jumper, as between the sockets in our triple socket.
- This completes the connection and you can apply voltage to our entire rosette group.
Conclusion
Now you know how to install a triple socket and collect it from several single sockets. We hope this helps you in creating a comfortable electrical network for your home.
I would just like to note that the additions to the existing network have certain limitations. Therefore, they should be used only in exceptional cases.