Manufacturing of drill bit. What kinds of Boers exist? Improved bur for excavation.
Hand drills are used to perform many types of work and relate to demanded tools.
Their self-manufacturing is considered an alternative option to make a decision on the purchase of such products.
This article will be devoted to the topic of making a garden drill with your own hands.
Hand drills are considered necessary tools to perform a wide range of works during construction, repair, landscape design, arrangement of a summer residence, a garden, a garden, soil research.
They allow drilling holes in the soil of a regular shape, the same size and consist of several metal parts. With the restriction of free cash, making the right tool with your own hands is considered the best option.
Such a solution will allow tree planting, drilling of shallow wells or wells, installation of supports for installation of arches and trellises, supports for foundation, arrangement of cesspools, compost pits, and also holes for pillars of enclosing structures without much difficulty.
The design of the tool for drilling holes in the ground
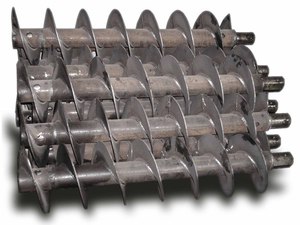
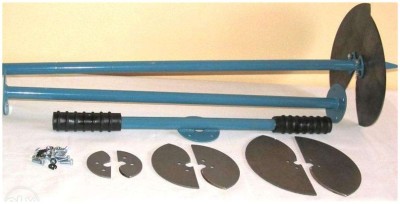
Features of the structural parts of auger drill determine its variety. These include:
- auger with a cutting element;
- rack or axle of different diameters;
- the handle is short, medium length.
The use of high-quality metal determines the reliability, durability, long service life of the garden tool. Its working element can consist of several tiers of blades. Collapsible design of the drill provides an opportunity to increase the length of its trunk, to replace the nozzles and handles.
Tools, materials for self-production
To make a homemade garden drill, you need to decide on its design and prepare the necessary tools, materials. Their list includes:
- apparatus for welding joints and turning equipment;
- sheet steel of high strength, 3-5 mm thick and short, long pieces of metal pipes;
- reinforcing bars with diameter from 16 mm to 30 mm and length, not less than 1.6 m;
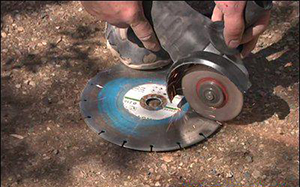
- emery or abrasive wheel, providing the ability to grind the necessary elements;
- powerful drill and metal drills.
Tip:to produce cutting elements of the drill instead of blanks from sheet steel, circular saw blades can be used.
Stages of manufacture
Making a self-made drill device takes a long time compared to its purchase. But at the same time, there will be an opportunity to gain practical skills and save money.
After preparing the necessary materials, the tools begin to produce a garden borer. The main stages are:
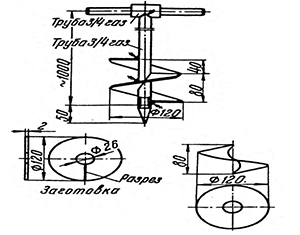
1. A number of round blanks of different diameters for cutter bits of the drill are cut out of high-strength sheet steel. This solution makes it possible to perform wells of the required width.
2. Holes in the center of the steel circles. Their diameter should be 1-1.5 mm larger than the thickness of the axis of the garden tool.
3. In the third stage, the cylindrical parts with holes for the bushings on the lathe are started to be turned by subsequent tapping. It must correspond to the size of the bolts used to securely fix the cutting elements on the drill stand.
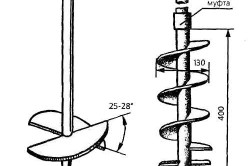
4. On the working parts of the drill, using a cutting wheel, small segments are cut out. The remaining part of the disk must be stretched with effort to twist and give a screw.
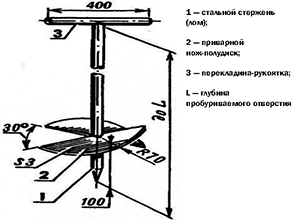
5. The lower edge of the cutting element is sharpened at an angle of 45º - 60º. At this stage, the blade is finished.
6. At this stage, the bottom of the drill stand is cut, retreating 8 cm from its end. The depth of flat sections should be 3mm. The work is done using an emery circle.
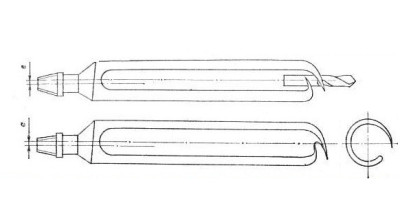
7. To form the tip of the earth drill, it is necessary to sharpen the lower end of the axis at an angle of 30º and make spiral grooves. If a metal drill is welded to the end of the rack, the tool will easily enter into dry, firm soil.
Tip: Using a scrap as an axis of the drill will eliminate the stage of sharpening the lower end of the tool.
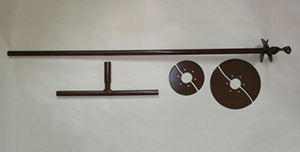
8. At the opposite end of the garden borer is fixed a handle of a removable type. The use of the bushing will ensure a rigid fixation of the part. If desired, from sections of the metal pipe, special sections can be made to increase the height of the rack. With their help you can perform wells of great depth.
9. At the final stage, the self-made tool is covered with an anti-corrosion compound and paint for reliable protection against negative environmental factors.
Below, we suggest you watch a video on how to make a garden bur for yourself:
- Device and application of drill
- Instruction for manufacturing
- Spoon type
- Care and proper operation
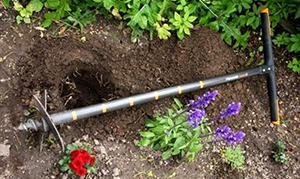
When the site has to deal with the need to drill a few holes, sometimes there is nothing left to do except to make a drill with your own hands. Hand drills are at various times in demand for repair and construction, while performing a variety of works in the suburban area, in the garden and in the garden. The drill is irreplaceable for such cases, when it is necessary to dig a narrow enough, but deep mine, for example, for planting trees or in the initial works on the installation of foundation works, when drilling various types of wells. Earth drill is a device designed to drill holes in the soil of various types. Making a drill with your own hands will take more time than buying it, but at the same time, valuable experience will be acquired, and a considerable amount of money will be saved.
Earth drill is designed for drilling holes in the soil of various types.
The following materials and tools are required for the drilling:
- lathe;
- apparatus for welding;
- metal rod or reinforcement not more than 16 mm in diameter and 2 m in length or more;
- emery or abrasive wheel for grinding some elements;
- drill with a large set of drill bits for metal;
- a section of the gas pipe;
- high-strength sheet steel.
Depending on the model being manufactured, additional miscellaneous equipment may be required.
Device and application of drill
The hand drill consists of several parts:
- screw (part of the tool, drilling well);
- stand or axle (metal pole);
- the handle for turning (it is better to make it also from metal).
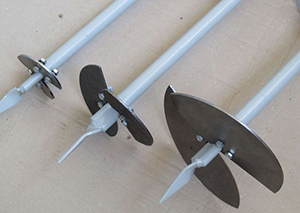
The working parts of the drill can consist of several separate layers, usually it begins with blades of smaller diameter, increasing as they approach the handle. If necessary, you can give the drill the function of increasing the length of the rod and the possibility of changing the diameter of the nozzles.
You can make several removable handles from small and short in size and ending as much as possible long and large.
The garden borer is popular in works for building pillars under a fence, a fence or a sports ground. In the ground with its help a pit is drilled, later it is installed and poured later with concrete piers or pillars. To further implement the plan between the pillars tighten the grid or else build a fence for other technologies. In the same way, using a drill, it is possible to dig a shallow well or a well under it, having previously determined the location of the underground water source. In this case, the ground is drilled to the required depth, until at the end there appears an aqua sand of silvery color or water. The pit for compost or the cesspool is very conveniently arranged with the help of a drill, large-diameter blades are used for this.
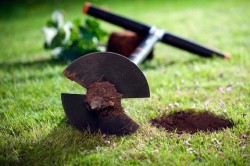
It is good to make holes for planting various plants with the help of drill.
Drill a sample of soil, making a well 3-4 m deep. It is good to make holes for planting various plants with the help of borax. When digging such pits with a shovel, they often get wider than necessary and take a lot of time and effort. Using a drill, you can make many identical and even holes in a short time, narrow and necessary depth. The drill is used for tunneling through which communications are carried out. Not far from the house for this, dig a trench and in its wall a drill of the desired diameter tunnel. The wire is then pulled out into the hole, and a plastic pipe is drawn in behind it.
Back to contents
Instruction for manufacturing
Round blanks of cutting parts of drill bits of various diameters are made of steel sheet. They need to be made different in diameter, in order to use a tool for drilling holes of different widths in the future. Billets by diameter should exceed the bore drilled by this tool by 5 mm. The hole is drilled in the center of each billet, it is made 1 mm in diameter larger than the metal rod, which will serve as a stand for the drill made by hand.
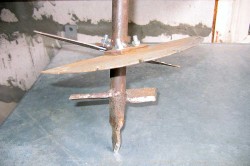
Round blanks of cutting bits of the drill are made of steel sheet.
The bushings of steel must be made on a lathe. In each of them, 2 holes with thread on their walls are made. In the future, this thread is needed to fix its cutting parts on the drill stand, using bolts for these purposes.
Using a cut-off wheel, a small area is cut out on the blades of the cutting blades of the drill, and then the part is stretched out beyond the ends, while twisting with the screw. The lower edge of the helical surface must be sharpened at an angle of 45-60º. Blades for homemade drill can be considered complete.
On a metal rod serving as a stand, make flat sections with a depth of at least 3 mm. For their manufacture, it is most convenient to use an emery wheel. Begin to make sections, retreating from the end of the rack by 8 cm. Sharpen the lower end of the rack at an angle of 30º, form a point from it and cut it into a spiral grooves, using a cutting wheel. In order to be able to use the drill on dry and cindery soils, a metal drill is welded to its end using a welding machine for greater strength of the structure.
At the top end of the rack, the handle is fixed in such a way that at any time it can be easily removed, it is fixed with a bushing. If you wish, you can immediately make spare elbows and bushings for the rack. It can be useful in case of need to do a well to a great depth. In such a situation it will be possible to remove the handle and, using additional parts, make the main rack longer. The maximum possible depth of the borehole is 20 m. The last stage of manufacturing is painting the drill, for this purpose it is better to use an anticorrosion coating.
To create the knives can be useful used circular circular saws, cut into 2 halves and welded at an angle of 120º. Toothed and uneven edges of the disc must be worn for further use. The spiral drill copes well with clayey soils and small gravel falling along the drill path.
Back to contents
Spoon type
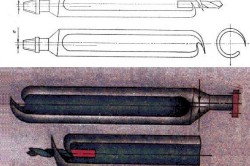
The spoon-type borer is more convenient than the spiral type when used in soil-resistant soils.
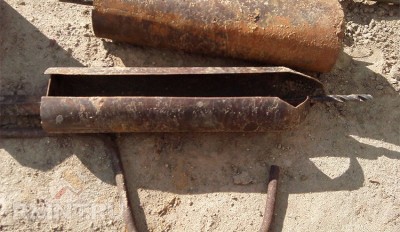
Such drills are more convenient than spiral ones when used in soil-resistant soils (wet sand and loam soils). Such a drill is made in the form of a cylinder, in which there is a longitudinal slot in the side, sometimes of the saber-like type. The length of the bour-spoon, as a rule, is not more than 70 cm. In a hollow cylinder, the extracted rock is retained until it is extracted to the outside by compression and adherence. The more loose the soil, the narrower the cut.
To make a cylinder, the sheet steel is taken and folded according to the planned diameter, and welded together. It is even easier to pick up a piece of strong pipe, the same diameter, since it initially has a cylindrical shape. Burl-spoon removes the soil not only with the help of horizontally located and sharpened lower edges, but also with a vertical cut. For use on particularly hard soils, a small metal drill is firmly welded to the bottom of this structure, positioned strictly along the axis of the rod, which facilitates entry into the ground.
Some peculiarities of the work of a borax spoon are the coincidence of the drill and stand axes. The axial line of the body at the hand drill is displaced by 1-1.5 mm relative to the central line in conjunction with the cutting longitudinal edge. In connection with the location of the axes, it is in this way that the tool is able to make a well that is larger in diameter than the drill itself. This feature is achieved by cutting the soil from the walls of the drilled shaft with a longitudinal cutting hole. To clean from the excavated soil, the borer is raised again every time.
To supply an autonomous water supply system at your dacha, you do not need to build an expensive well, it is much more economical and practical to produce a shallow sand well, which will be enough to provide the site with water for seasonal needs.
As a rule, the groundwater is not too deep, and the soil composition basically includes sand and clay. This all contributes to the fact that the well can be handled without any problems with the help of a special drill.
How to make it yourself and what kinds of such tools exist, we'll tell you in this article.
How to drill a well with your own hands: blueprints
A drill for a well with a depth of up to 20 m can be made independently without using any specialized expensive equipment. It is advisable to use drawings while working, which will help, if you want to have minimal skills, to make a simple drill for everyday country needs.
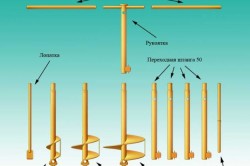
Drilling by hand involves the presence of the following structural elements:
- the borax itself;
- a drill string;
- tripod;
- goal.
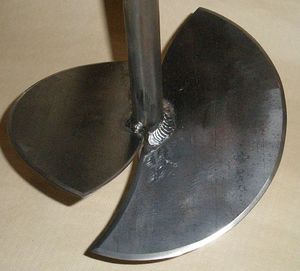
How to make a disk of your own with your own hands
 The key component of the installation is a detachable drill pipe, which along the length should increase as the borehole penetrates. The handle is responsible for its rotation, and the main element of the installation, of course, will be a drill.
If you are planning to assemble a drill with your own hands, then remember that you have to work with metal, so you need to have at least the minimum skills of working with a welding machine. Evaluate your capabilities, maybe it will be easier for you to make a simpler version in the form of a steel rod with a sharp tip.
During work, prepare two knives, which are fixed by a welding method at a distance of 200 m from the point.
The progress of the work will be as follows:
- take the metal discs with a thickness of 150 m, which will be the main for the knives. They should be cut in half;
- after the knives are installed, they must be placed on the tool at an angle of at most 20 degrees with respect to the horizontal, and the blades themselves must be located opposite each other;
- from below, the edges of the knives for the drill should be sharpened perfectly, this is very important, this determines the speed and quality of the drill insert into the ground;
- it is desirable to choose steel for the production of a strip which, when heated, can be twisted;
- the distance between turns on one spiral should correspond to their diameter.
After work, the drill must be checked: rotate it with a handle to allow the knives to drift into the soil. Then remove it from the well, and pull out a piece of cut ground to the surface.
The following tools will be required for work:
- welding tools;
- a hammer;
- bulgarian;
- drill.
It is desirable to store the remaining drilling ground away from the work site. Also, before drilling work, consider where you will take out the used soil.
As the well deepens, it is necessary to build up the rods. Compound parts of them need to be fastened together with a threaded or bush joint. To reduce the risk of their disconnection, you can additionally equip them with cotter pins.
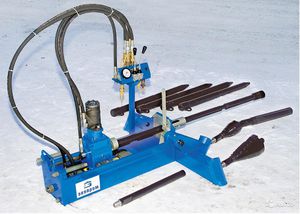
Features of rock drill
Shock-rope drilling is good because it is not necessary to make complex installations for it, and the drill itself can be assembled from improvised materials by oneself and working with one person.
Features of this type of drilling are as follows:
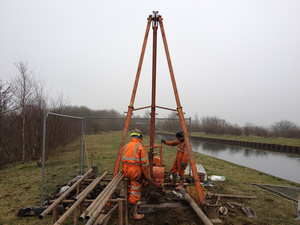
Assembling a shock drill with your own hands
The impact drill for the shock-rope drilling method is made as follows:
- put a tripod in height up to 3 m above the site where the borehole will be drilled;
- at the top, fix the rope block on it;
- attach the manual or electric winch to one or the same two block supports;
- the diameter of the drill pipe must coincide with the wellbore;
- at the top of the pipe perpendicular to its axis, weld a strip of thick metal, the opening of which along the diameter must coincide with the thickness of the hoisting rope, the hole itself must be placed along the center line;
- on the lower end make a ring or toothed sharpening, then the end can be additionally hardened in the muffle furnace;
- to make it easier to clean the top of the pipe from the ground, make a slot or several radial holes;
- if the winch has sufficient power, the work process can be accelerated by increasing the weight of the impact drill if additional metal loads are placed on top of it.
 Rotary drilling from others is distinguished by the fact that the drill cuts into the ground and removes the residual rock under the action of rotational forces. This type of work involves the use of two people who stand on either side of the bar, and rotate it with a special collar made of steel pipe or a long scrap.
Thanks to this method, it is possible to cut a shallow water well on sand quickly and without the use of complex equipment. For work only will be required:
- hand drill;
- rod for increasing the length of the tool;
- pipe for the wrench of the required length.
Spiral, as well as spoon drill, is well suited for manual drilling in light soils without stones. The spiral drill consists of a vertical bar made of a thick pipe, at its lower end there is a cutting tool based on a hard alloy. Along the structure, bands on the basis of hardened steel are welded up from the cutting edge.
Such an edge, when rotated, pruns the ground, and strips spiraling push it outward, which adds an abutment when drilling. Residual soil from the well accumulates between turns, so periodically it is necessary to pull out the drill and clean it.
For the manufacture of such a device with their own hands, the following blanks will be required:
- thick tube of the required length;
- a metal disk with a thickness of about 5 mm, and its outer diameter should correspond to the diameter of the well.
The algorithm for assembling the structure is as follows:
- sharpen the lower tip of the pipe or weld a sharpened steel tip to it;
- cut a metal disk in two and make it sharp on its edge, either smoothly or with a serrated method;
- half of the disk is welded to the vertical bar, they must be at a distance of about 125 mm from the sharp end;
- at the top of the rod, thread the coupling.
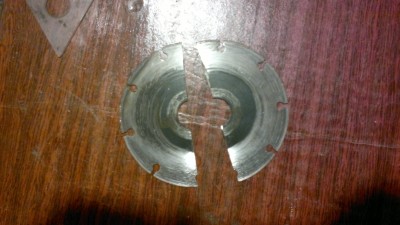
As a material for the drill, you can take a cut saw blade from a circular plate of the correct size.
How to collect a spoon
 The spout is used in soft sandy or clay soils that are resistant to shattering. It is good that the ground is opened not only by the lower edge, but also by the side, which collects the rock inside the cylinder. To clean it, also during operation, it is necessary to periodically remove it from the well.
To make such an assembly yourself, you will need:
- thick pipes with the required diameter;
- welding machine;
- a set of metalwork tools.
The course of work is as follows:
- take a piece of pipe and make in it a longitudinal slot according to the drawing;
- with a heavy hammer and a scrap with a flat tip, make the desired section;
- sharpen the bottom and side cutting edges;
- bottom along the longitudinal axis weld a thick drill with a diameter of 18 to 36 mm;
- at the top, weld a vertical rod, the longitudinal part of which should be slightly displaced to the side relative to the longitudinal axis of the working tool to about 15 mm.
It is desirable to pre-harden the cutting edges of the tool. Also, the width of the pipe is desirable to be selected depending on the composition of the soil. The drier and looser the ground, the smaller the width the pipe should have.
Features of tool care
 After you have gathered your own hands with this or that kind of drill, you need to paint it. Painting is necessary, first of all, not for aesthetics, but for protecting the structure from corrosive processes, it will thereby prolong the tool life.
Also, if you want the device to last you as long as possible, it should be cleaned immediately after use with residual debris, and also checked for damage and burrs along the edges of the blades. To eliminate such drawbacks, the drill must be treated with an anti-corrosion paint.
Before using the drill, the upper part of the ground should be removed with the help of a shovel, and then the ground should be loosened. This will allow the tool to enter the ground easier and do its job.
Thus, to assemble the drill and make a shallow country well under good conditions from a geological point of view, one or two in a record short time. Thanks to this decision, you will save a lot of money for the purchase of expensive installations for water supply of the garden garden and will be able to allocate resources competently.
If you are thinking about choosing and purchasing a manual earth drill, then you need to drill a few holes in the ground. But before you choose the model you need, you need to answer three simple questions.
Reading this text, you probably already are focused on choosing and buying an earthen boring hand (a garden borer). Please stop for a moment and answer three simple questions:
- What diameter and what depth do you need to make holes in the ground?
- How many do you need to make holes?
- What kind of soil do you have in terms of composition (chernozem with sand) or heavy (black earth with clay)?
If you have heavy soil with clay, or you need to drill a lot of holes, for example you want to install poles for fence, in this case we recommend that you refuse to purchase a manual earth drill and purchase (or rent) earth pit . Our advice is based on the fact that the garden hand drill, as not difficult to guess, is driven by hands. A person creates rotational movements around the axis of the drill, and simultaneously presses it on top. Such movements are not natural, and are also very costly in terms of forces. Above written means that in order to drill at least ten holes with a manual earth drill, a strong and healthy man will have to spend a lot of time and energy. For example, to fence a modest garden plot with a size of 6 hectare, you need to install about 33 poles, and therefore you need to make the same number of holes.
CONCLUSION
The most important thing about the earth-hole hand-held storm is that it is relatively easy to drill with light soils, with a small number of holes. If you have a heavy ground - or you need to drill more than ten holes, it is highly recommended that you buy or rent earth pit.
In this video, you can estimate the approximate speed of drilling. Note that when the clay layer is reached (if it exists), the speed will decrease, and the spent drilling force will increase:
Purpose of earth drill
As it was already written, the earth drill has only one purpose - drilling holes in the ground. Hand drill is used for construction works on the site (installation of various pillars, the construction of small columnar foundations for house structures, other auxiliary operations), as well as for planting various plants.
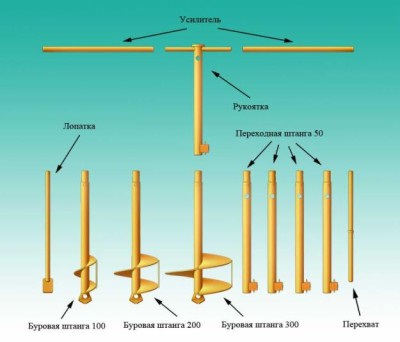
Choosing an earth-driven hand drill (garden borer)
As a matter of fact, there are only two types of widespread earth hand drills. Each of them has a central sharp base that helps the drill to be centered at a certain point during drilling, and also has a cutting edge (or several cutting edges). The only difference is whether the garden hand-held drill has a screw in its construction or it does not. The auger is designed for simplified removal of soil from the drilling zone. The most running sizes of diameters of garden borers from 100 to 300 mm.Also an earthen hand drill can be dismountable.
ADVICE
1) If you have a choice of the construction of an earthen-type hand drill, stop on the version in the design of which there is a screw. As we have already mentioned, working with a manual garden drill is very tiring, if the drill helps to remove the ground from the drilling zone - this will somewhat ease your work.
2) Choosing an earthen drill with a diameter of 300mm soberly assess your physical abilities (especially when there is clay in your soil).
Hand-made earthworks using earthen drill
Work using a manual earth drill, in fact, does not differ from the work that performs motobur . Therefore, we will give you roughly similar advice.
ADVICE
1) If you notice that in certain places a manual garden drill, drilling holes in the ground is clearly worse, compared to the already drilled holes nearby - then in this place the soil is heavily compacted. We recommend that you use a mechanical action, such as a crowbar - to soften the ground in the drilling zone. We do not recommend trying to soften the soil with water, in view of the low efficiency of this method.
2) If, for some reason, you do not make concreting or planting plants in the drilled holes on the same day, it is highly recommended that you cover these openings from precipitation or someone else.
3) Given the high physical loads that must be applied when drilling ground with a manual earth drill, we recommend that you take an assistant, or take breaks in work. Try not to conduct such work in hot weather and on intense sunlight.
On sites that are used only as a garden and a place for seasonal summer picnics, to equip an expensive deep water intake - is inappropriate. Preparation of documentation and implementation of works require significant investments. Therefore, summer residents use the traditional methods of providing the site with water for irrigation - they build wells and clog the surface wells. For the equipment of shallow water intake points, it is not necessary to obtain permits, to prepare a technical plan, and the installation and the drill for the well can be constructed and assembled by hand using ready-made drawings.
You can build a shallow technical water intake on your own
To select the right way to cut the well and prepare the tool, you need a minimum of raw data:
- The composition of the upper layers of soil - for rocky rocks it is better to use ready-made plant equipment and to entrust the work to the master.
- The presence and depth of the first aquifers - to drill the soil with self-made drill can be at a depth of 20 - 25 m.
Types of drills for independent drilling of shallow wells in the suburban area
The choice of drilling method depends on the amount of moisture in the soil, its flowability and hardness. In dense, not supersaturated vadose layers, it is easier to slaughter with a rotary auger method. As a drill bit, a spiral drill or a burlap is used - metal rods with a spiral or stepped blade cutting element. The spoon is additionally equipped with a container in order to keep the clay inside the tool and to prevent it from falling inside the trunk.
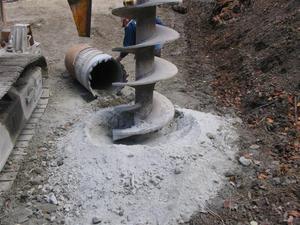
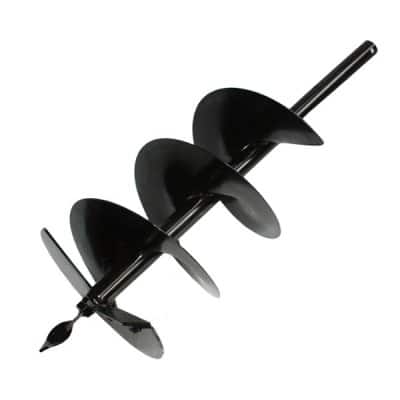
Hand-made self-made spiral drill
A classic spiral drill, made by one's own hands, is used in self-made electric or gasoline drills for wells. The tool is connected to the electric motor (screwdriver, drill, perforator) or the chain saw case. It's much easier and faster to operate such a device than manually.
When it is necessary to work in sandy or clayey-sandy layers, a viscous soil with a lot of water, loose crumbling rock, it is better to apply a shock (rope-impact) method. To pass up to 20 m use tips, which after impact under their own weight deepen into the rock. The clay remains in the container and rises to the surface. With your own hands, you can make any of the drill bits used in the percussion method:
- Glass, expansion glass.
- Needle with filter.
- Zhelyonka.
ZHylonka is easy to make independently
How to make a drill for auger drilling: materials and instructions
It is possible to fabricate with your own hands a spiral drill of 2 types for rotary drilling of wells: with a spiral-shaped cutting element, with a disk hemispherical knife. For the work you will need:
- A metal rod or a solid pipe is a base, a hollow tube of a larger diameter is for a container on a spoon pin.
- Couplings for connection of rods, metal handle - a piece of reinforcement, rod, up to 40 - 50 cm long.
- A metal sheet if a spiral knife is planned.
- Steel discs with teeth from electric saws.
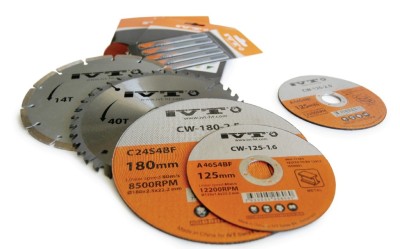
Metal circles of different diameters are suitable for forming a cutting surface
- Welding machine.
Spiral simple and two-stage drill: drawings
How to make a classic drill with a spiral ribbon knife for a sand well? With his own hands, such a tool is difficult to make without special machines for working with metal. The difficulty lies in the pre-hardening and bending of the metal strip. It is necessary to choose steel thickness from 1,5 - 2 mm. Next, the heated band is bent on the machine, giving the tape a spiral shape.
A spiral drill with a long cutting belt can not be made without equipment
Only after this, the tape is welded to the base. During the connection, follow the symmetry: the turns must be located strictly parallel to each other and at a certain angle to the horizontal line. The edge of the tape is sharpened, the surface is painted.
In the home workshop it is much easier to make an identical for functionality, but easier to assemble drill for holes of different diameters with circular knives instead of a spiral.

Drawing of a simple drill with two knives at an angle
Starting from the simplest design, it is possible to improve the tool and make a drill that is suitable for drilling shallow holes of different diameters.
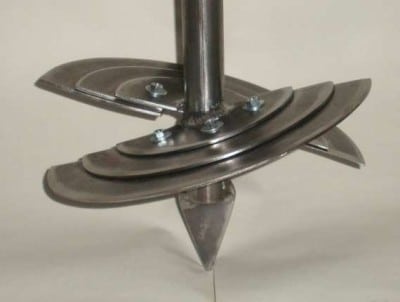
For manufacturing, 3 discs of the same thickness with different diameters are taken. Cut each into 2 halves, one edge (bottom) grind. In all parts, holes are drilled to connect the petals.
A circle of smaller diameter is welded to the base so that the edges of the two halves form an angle of 30 °. A larger diameter knives are attached to the top with nuts and bolts.
Ready-to-assemble drill with replaceable knife sets
The bar is formed with thread cutting or welded to the upper edge of the threaded clutch: in this case, do not set the anti-unwinding protection during operation.
Spoon: drill for work in loose rocks
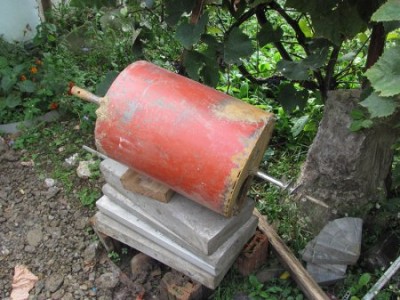
When the source is set up in a dry ground, a tool with a projectile that holds the dug soil inside is required. Such a burl-spoon, as in the drawing, for drilling sand wells can also be made by hand from a thick-walled gas or water pipe.
A regular spoon can be equipped with a tip-baking powder to facilitate work
The length of the pipe is damped by the plate along the upper edge, leaving a hole in the center for the rod. An old large diameter drill is welded to the rod. The rod is welded to the center of the pipe. On one side of the pipe form a rectangular window for excavating the soil. The lower edge is cut in the form of petals, bending the edges outwards for a larger tapping diameter and for grabbing the ground. The lower edges are sharpened.
Instead of a window, you can simply cut the side wall
To adapt as a reservoir for waste soil in a spoonful, an old metal can also be used. With such a drill, collected by hand, large diameter bore holes are drilled.
Production of drills for percussive punching
The shock method uses two basic tools: a bailer and a glass. Tools are made of durable steel or cast iron - due to the impact of the rod, the requirements for strength and resistance to deformation of the projectile are increased.
The structural difference between a standard bailer and a glass is the availability of the valve system and the length of the tool. Both types of drill bit for small water wells can be constructed and assembled by hand.
Trough and glass: simple tools with their own hands
The beaker-borer is made of 2 kinds: straight and conical with extension to the bottom. A drill with an expander is needed to increase the diameter during the drilling process. As the body use a pipe of the required diameter with a wall thickness of 2 mm. The upper edge is drowned and welded to the connecting element, which serves as a fastener to the rod. The lower edge is left unbroken, or several teeth are formed. Sharpen in the direction inside. One or more narrow oval holes for excavating clay are cut out on the wall.
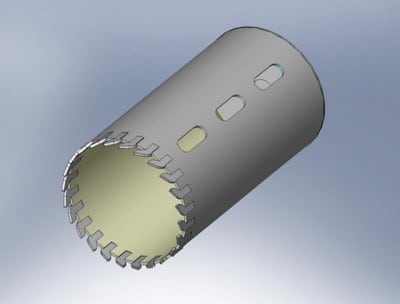
Such a drill-hole for water can be made by hand from a piece of a gas pipe
Auger is a tool consisting of a cutting glass, a hinged or ball valve, a tank body and fasteners. The length of the pipe for manufacturing is up to 2 m. It is important to take into account the weight of the structure: the mass of the projectile should be sufficient to cut into clay under its own weight, but do not make too heavy a tool, because you have to repeatedly lift it to fill the rock.
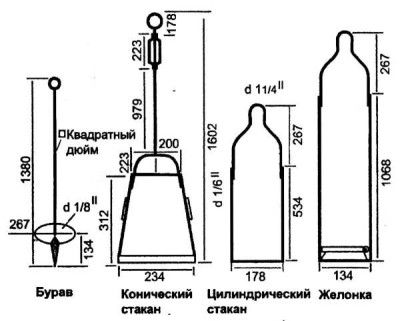
Tool drawings allow you to compare the sizes of different types of drills
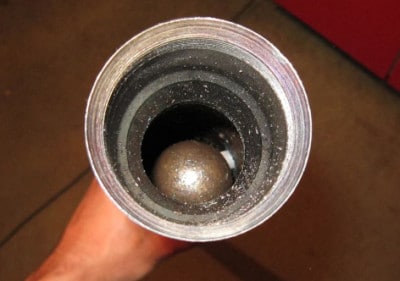
The lower edge is equipped with a removable glass, and the valve is placed on top. Choose a design for which there are the necessary tools. Ball-shaped constipation is performed from a metal heavy ball, resting against a tapering cone.
The flat valve is made of a hinge-fastener and a plate equal to the inner diameter of the pipe. Sometimes they form a double-lobed constipation.
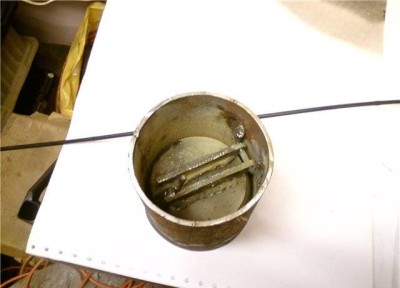
The function of the valve system is to keep the clay inside the device from the drilled shaft.
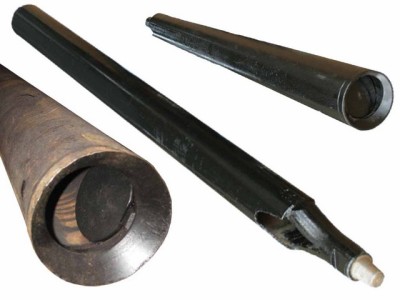
Needle: a sharp drill and a casing string of one pipe
The most economical way to arrange water supply is to make a drill bit for a sandy Abyssinian well. The tool is both a drill and a casing. After completion of work, the device remains inside the trunk as a casing string.
Needle-drill made by own hands
A thick-walled pipe is equipped with a filter and a sharp tip. On the upper edge, threads are cut to connect to the next casing element. The tip of a strong steel is welded to the base. The shape of the shock tip can be different: a smooth cone, a polyhedron tapering downward. Experts advise choosing ready-made tips of hardened steel - such a drill is sharp enough, it will not break in a solid ground.
The polyhedral borer is welded to the base
Form the filter. On the lower part of the pipe up to 1 m long, retreating 30 cm from the connection with the tip, start drilling holes with a diameter of up to 4-5 mm. The drill is held at an angle to the wall: the optimum slope is 45 °. The distance between the holes in the row is 3-5 cm, the interrow interval is up to 5 cm.
A fine-mesh steel or polyethylene mesh is wound around the part of the tube with holes. Fix the filter with steel wire, soldering the turns to the base, or fixing the clamps.
A fine mesh will not let in the pipe silt, sand and dirt
To the upper part of the pipe, when passing to a depth of up to 1.5 m, the next piece of casing is screwed and the ground is continued to penetrate to the required depth.
Video: Combined drill for wells from pipe remnants
The design of drill for shallow garden wells can be changed. On the video - how to make a combined drill for wells and garden works with your own hands in 45 minutes.
Homemade projectile can be useful not only for well construction: if you use discs and pipes of larger diameter, you will get a tool for forming depressions for planting trees, installing columns and piles. For slaughtering deep wells, the water of which can be used not only as a technical one, but also for drinking, it is better to use factory tools and not to drill without the help of specialists. A poor-quality tool can break and become stuck in the trunk, and it will not be able to remove it to the surface - all work has to be remade.