How to connect the double switch and the outlet. Circuit diagrams for circuit breakers and sockets. Outdoor socket. How to connect the light switch.
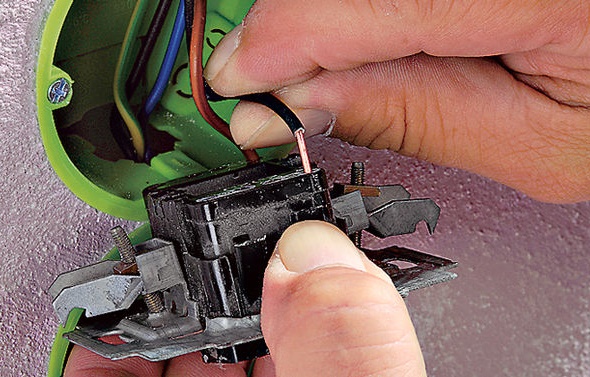
To connect the switch + outlet box, connect the five wires in the junction box.
- The green color indicated in the diagram indicates the ground cable, and the blue color indicates zero from the distribution point. They are connected to the outlet in the unit directly.
- Red indicates the phase that is connected to the outlet, and then to the combined voltage cable of the device.
- The remaining two cables are connected to two contacts, which in turn are diverted to two lamps and connected by pressing a button in the bathroom.
The device of the device assumes that there are three cables in the socket: phase, zero and ground, the switch has only the phase connected to the lower contact (zero goes to the lighting device). However, the top of the contact phase will only have after the power button.
Electric wires in the distribution box are divided into two twists of wires, as in the diagram (yellow and beige color). On the wires with the voltage from the light bulbs similar wires of the switch are twisted. Cables with zero voltage and ground for operation of lighting devices are supplied from the distribution box and the connection connections of the outlet.
Note! If you want the reverse order to trigger the keys, just swap the yellow and beige cables on the switch.
Installation of the unit with a single-key switch and the outlet is connected in the same way, only one cable, yellow or beige, drops out. For work three-key switch a six-wire cable is required, the additional wire of which will be connected next to the yellow and beige to the third contact. 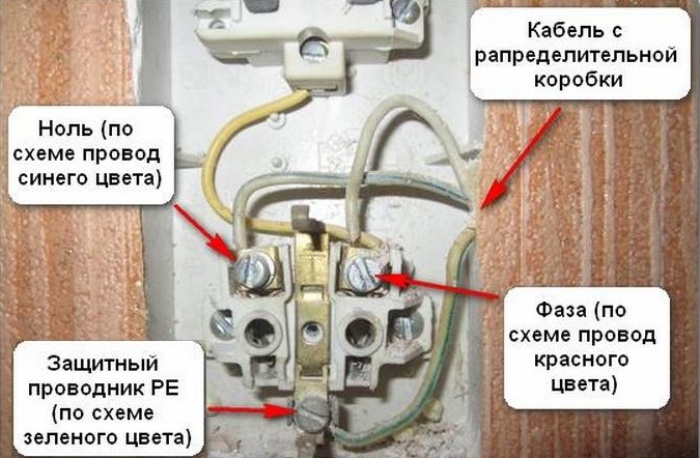
Connection of three or four outlets in the unit
To install several electrical appliances (household appliances, computer and telephone) use a block of outlets located under one distributor.
Installation of several outlets in one unit is carried out in parallel. 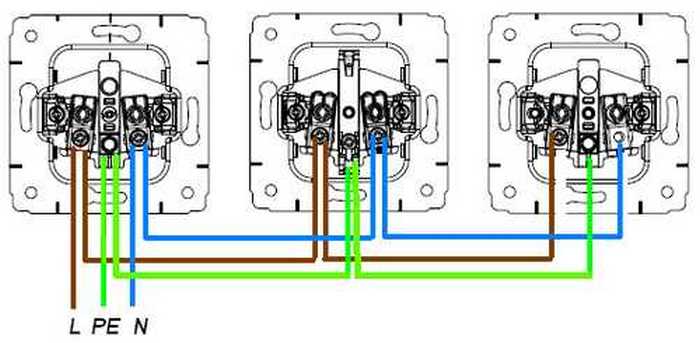
Before connecting the device, make jumpers of three wires in each location of the outlet. The size of the jumper should be such that it allows easy, but surely fit in the box.
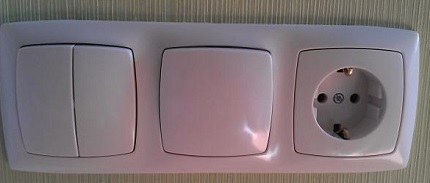
A block of three outlets is installed as follows:
- Analysis of the components of the sockets.
- Stripping of power and jumper cables. The wire from the distribution point should be a little with a margin, so that in case of reconnection it is enough for a new sweep.
- The first outlet, which is also a distribution socket, is connected to the mains.
- Installing the electrical outlet in the back box.
- Connect the second socket during the parallel conductor wires in accordance with the colors.
- Connection of the third outlet: to it connect only three cables, as to the usual single model.
- Cover the block under the cover with special cuts for each of them.

On the video you can see the process of connecting the unit from the socket and the switch.
This completes the installation, success in business!
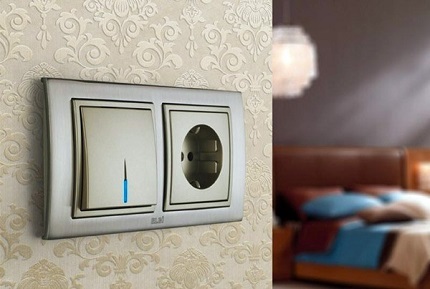
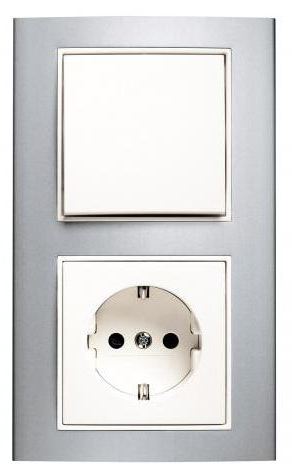
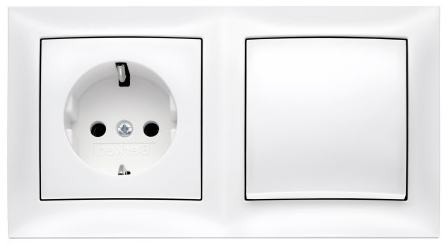
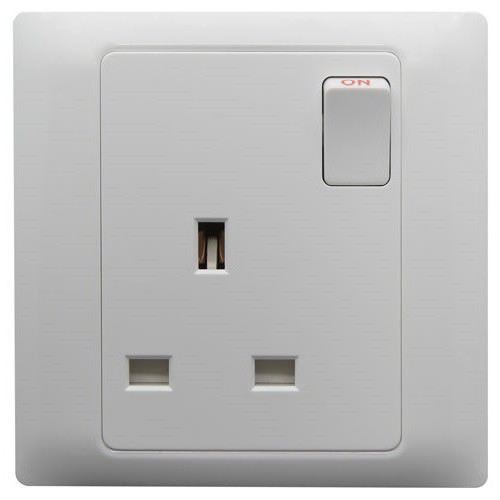
As a matter of fact, it is the usual switch, only combined in one case with the socket.
There are blocks with one, two and threekeys. In principle, they have the same circuit, the only difference is the number of pairs of contacts of the switch.
As an example, consider a block with a two-key switch and a socket.
One button switches on the lighting in the bathroom, and the other - lighting in the corridor. Basically, the socket is used for temporary connection of various electrical appliances, for example, a vacuum cleaner when cleaning an apartment or extension cord while performing any repair work.
In the bathroom I have a separate outlet, so an electric shaver, hairdryer, washer connect to it, and accordingly, do not load the outlet in the corridor.
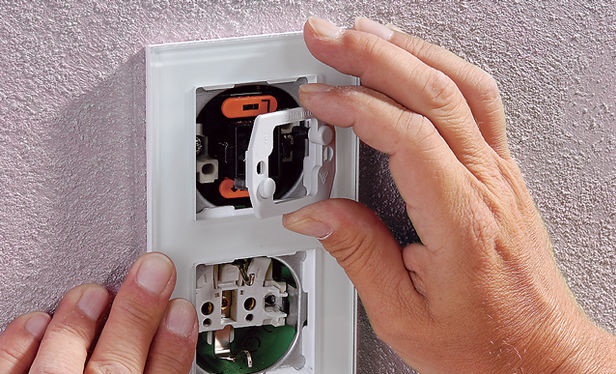
Let's look inside the block. To do this, unscrew the screw of the protective curtain from the children and remove it.
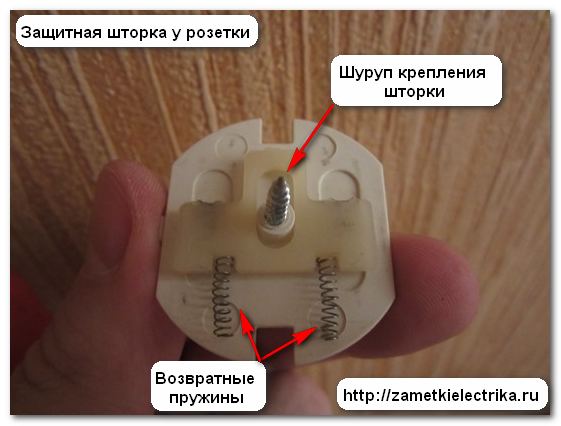
A protective curtain is removed from the socket.
Then, one by one, we take off the keys of the switch.
![]()
Now you need to unscrew the two screws securing the top cover and remove it.
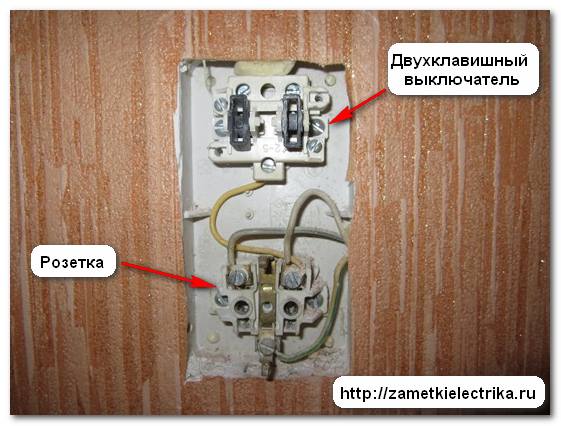
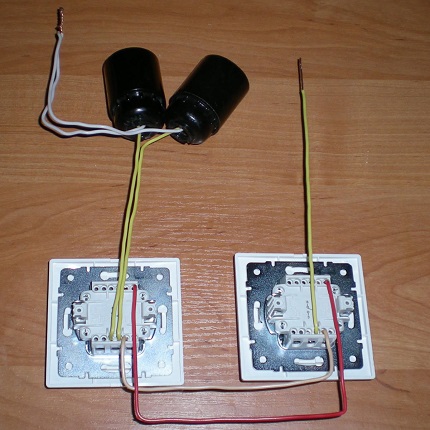
The photo shows that this unit consists of an outlet and an ordinary two-key switch, housed in one housing.
Now let's move on to the wiring diagram. There are two options. We will consider each variant separately.
Connection of the socket-switch unit. Option 1
In the first variant, let's look at the scheme that most often occurs when connecting such units.
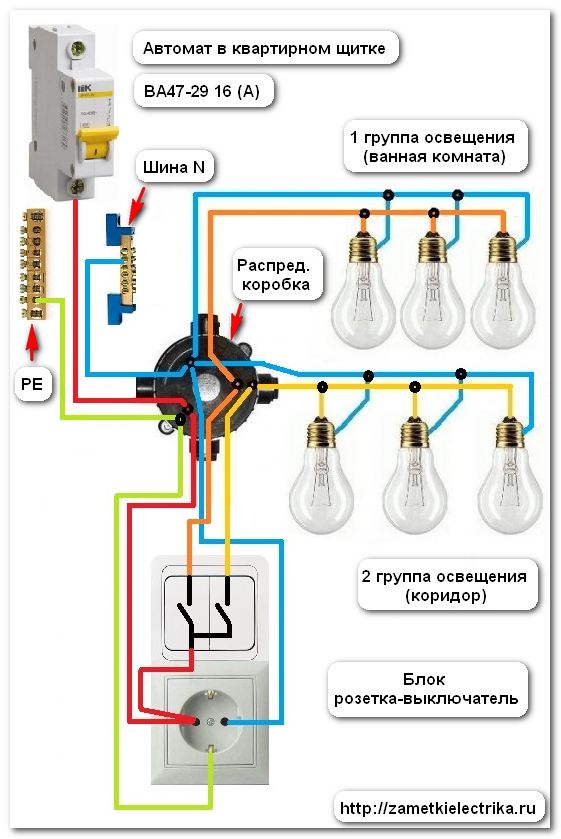
An automatic device for 16 (A) is installed in the housing shield. From it to the junction box is laid a copper 3-core supply cable, for example, VVGng (3x2.5).
Do you know why a cable with a cross section of at least 2.5 mm² is necessary?
This is due to the fact that the rated current of the outlet is 16 (A). This means that the cross-section of the conductors of the supply cable must be at least 2.5 mm2 /
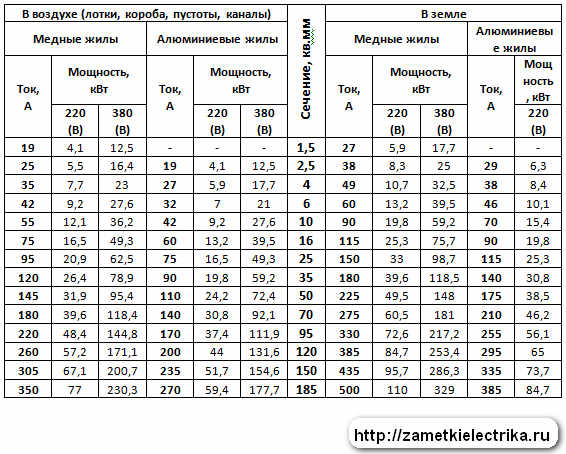
If this is disregarded, the cable will begin to warm up when the cable is overloaded in the outlet line or the lighting line, which can lead to a fire.
A copper 5-core cable is laid from the junction box to the unit, for example, VVGng (5x2.5).
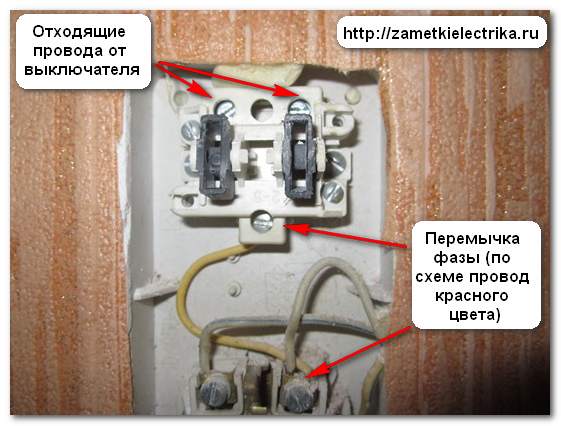
The phase (red wire in the diagram) is connected to one outlet of the outlet. From the same output, there is a jumper to the common contact (terminal) of the two-switch switch. Zero (blue wire in the diagram) is connected to the other socket outlet. Protective conductor PE (green wire in the diagram) is connected to the screw of the grounding contact of the socket.

To the other terminals of the switch wires are connected (they can not be seen in the photo), which go to 2 groups of lighting: a bathroom and a corridor.
How to connect the switch-outlet box. Option 2
As I mentioned above, the first version of the scheme is not quite correct. But this does not mean that it can not be used.
The fact is that according to modern requirements, power circuits and lighting circuits are recommended to be divided (PUE7 item 6.2.4). And in the first variant, at us they turned out united.
PUE 6.2.4
6.2.5
Work lighting, security lighting and emergency lighting are allowed to be powered from common lines with electric power plants or from power distribution points (with the exception of 6.1.28). In this case, the requirements for permissible deviations and voltage fluctuations in the lighting network must be complied with in accordance with GOST 13109-87.
6.2.6
6.2.7
When using busbar trunking as a power supply network, instead of group shields, individual protection and control devices connected to the busbar can be used to supply groups of luminaires. At the same time, convenient and safe access to these devices should be provided.
6.2.8
In places where the lines of the supply lighting network are connected to the power line of electric power plants or to power distribution points (paragraph 6.2.5.), Protection and control devices shall be installed.
When feeding the lighting network from the power distribution points to which the power receivers are directly connected, the lighting network must be connected to the input terminals of these points.
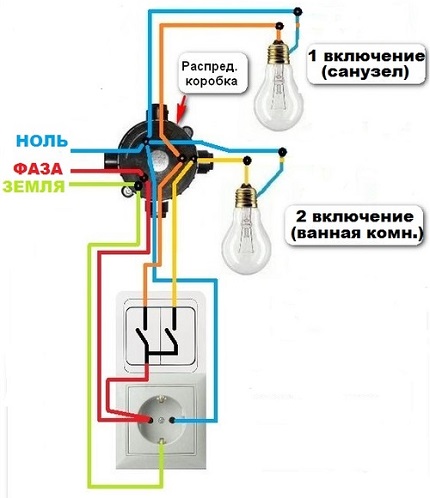
Here is the scheme of the 2 options:
The socket line will be protected by a 16 (A) automatic device with a RCD of 20 (A), 30 (mA), and a lighting circuit with a 10 (A) automatic device without an RCD.
With a three-core cable, for example, VVGng (3x2.5) we supply an outlet, and with another three-wire cable, VVGng (3x1.5) - junction box and a two-button switch.
And the last. If you have installed in the wall of the Soviet block switches + socket and the outlet does not climb the eurovisil, then you can simply drill the inlet openings of the outlet.
Each living space - home, office or parking, does not do without wiring and wiring products. Therefore, the diligent owner always remembers the key components of the wiring and how to connect the equipment connected in a single unit. Alternatively, it can be a socket with a switch in one housing, with the installation method of which should be thoroughly understood.
Since when the wires from the switch were connected to an electrical circuit, do not understand how, and in some cases even at random, it took quite a bit of time. It is noticed that in old houses and buildings a sufficient number of devices were attached with violation of many security requirements.
Yes, this approach was not affected in any way by the working capacity of components. Everything functions normally, but only the safety of operation of such devices remains in question.
Switching the outlet through a switch is a popular way to safely manage home appliances or tools that do not have their own power button
Every year the safety of money and the saving of space remain priority factors. This is why, to reduce the number of wires and used space on the wall, electrical appliance manufacturers combined several devices in a single design.
The combination of a one- and two-key switch with a socket increases the marginal efficiency and comfortable use of such electrical equipment.
Combining electrical appliances with each other, using a single enclosure, allows you to save space and reduce the number of wires involved
Ways to connect a connected switch and outlet
There are several ways to join an integrated unit. This opportunity has become available relatively recently. Previously, it was impossible to find electrical equipment in a house that was different in terms of options.
Connected in one case socket with a switch is more attractive for appearance, has no gaps and joints
The method of connecting the switch and the socket was done by connecting the wiring in the box, but without mixing the devices themselves. This method is also used today, if for certain reasons consumers can not be installed near each other.
In this case, the variant of unpaired connection of the structure also has its advantages. Let's consider them below:
- Such devices are generally available. Buying even a cheap switch with a socket will make it possible to connect them in the same circuit.
- The work on connecting these electrical appliances can be done easily even with their own hands.
- Increased safety level when using separately connected mechanisms, since the wiring to them is laid separately, which reduces the likelihood of a short circuit.
So why in recent years in homes prefer special units, where the combination of the outlet and the switch is laid by the supplier. And all because such a plan for connecting the device is more lightweight. First, there is no need to install two separate cables to the devices. Secondly, the advantages of this block are much greater than those of the separated ones.
We list some of them:
- Simplified transfer of such a block to a different location. Now there is no need to build two separate entries.
- It is no longer necessary to twice measure the height during installation of the above-described device, since this is one unit.
- High-quality instruments can be used outdoors and indoors.
- The combined unit is easier to mount on concrete, stone, wood and plasterboard surfaces.
The main disadvantage of the connected unit is that it can not be replaced with one part broken. It does not matter if it's a network socket or a switch. Almost always it will take a complete replacement. The new units are manufactured with a one-, two- or three-button switch, which is combined with a socket in a single piece.
Installation and connection of the socket-switch unit is carried out according to a scheme similar to the standard processes of installation of power supply products. First, mount the sub-socket, then the mechanism, connect the wires and install a protective-decorative cover
Connection and switching of the socket through the switch
There is a specific sequence of how to connect a socket with a switch in a single piece. The elementary way of connecting the wires from the network is to connect them to the devices according to a clear plan in the distribution box.
The algorithm below will tell you how to correctly connect a socket-outlet with a switch:
- For the indoor unit, a special hole in the wall is prepared, and for the outside - a suitable space for installation is selected. For premises in wooden buildings, overhead paired mechanisms with combined electric blocks are most often used. This method is used, for example, with open wiring.
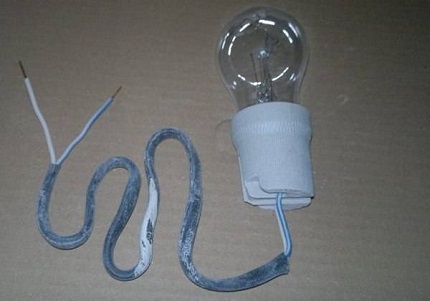
- The junction box has six (6) cores electric cables. One pair for the socket, the second for the switch, and the third for the switchboard. Each pair is a phase and zero vein. Most often in homes you can see an additional ground wire.
- First of all, we determine the phase that goes from the switchboard, and de-energize the room.
- The next step is to connect the cable with the phase from the mains to the wire going to the switch. It is necessary to clean the ends of the phase veins, then twist them together and isolate them. For this, an electrical tape is used.
- Further, the zero core of the network must be connected to the wire from the socket. We wrap them also with insulating material.
- The unused edges of the wires from the combined unit are also twisted together and necessarily rewound with electrical tape.
- This connection scheme will ensure that the phase cable of the outlet is connected through a switch. The effectiveness of this method is noticed when the network jack is very rarely used, and the connected devices must be constantly on / off.
The mechanism combined in a single body acts relatively simply. The outlet is supplied with a phase through the switch in the event that the switch is switched on. This scheme is popular, for example, if you need to heat the water in the heater, which does not have its own button off / on, and you do not want to jerk the plug all the time.
A good advantage of installing the socket-switch unit is to reduce the work on marking, forming "seats", aligning the position of the unit
Another way is to connect the lighting in the utility room through an extension cord. Then you can turn it off just by using a one-button switch.
Installation of the connected unit with a socket and a switch
Combined blocks of construction, combined in a single package, are in great demand. The main factor is that both devices will be used separately. To install a similar outlet and a switch from the lamp, a number of simple actions are carried out.
- From the main shield are laid cables with zero and phase to the distribution box.
- The box must contain five (5) wires - two (2) from the lamp and three (3) from the unit uniting the individual devices.
- The phase conductor from the shield should be connected to the wire from the socket. Using a jumper, connect the socket to the terminal on the switch.
- Zero core from electrical network must be connected to the wire with zero from the lamp and socket.
- Phase cables from the cartridge to the switch must be twisted and must be isolated.
- Grounding is also connected by means of an appropriate cable.
Such a circuit with a socket and a switch integrated in a single case will operate separately from the switch. And the main functions of the one-key switch (on / off lamps) will also be performed independently.
Observing correct scheme connecting each wire can protect yourself from further corrections, as well as from unforeseen situations
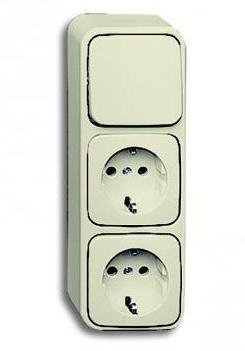
Connection of a socket with a two-button switch
Most often, the unit that connects the outlet and the two-key switch is placed between the entrance to the bathroom and the bathroom. Alternatively, it can be installed in a large room to supply voltage to one or three light sources. Conclusion: thanks to a single unit, the user can control the light in several rooms at once, and also connect any device consuming electricity to the outlet.
Consider the connection diagram of the combined device consisting of 7 steps:
- The first stage - the laying from the boxing distribution to the doubled electrical system five (5) conductors.
- From the switchboard, cores with zero and ground are connected only to the outlet.
- Due to a special jumper in the linking unit, a phase is fed to the dual tripping device.
- Both free cores are attached to the two connecting knots of the switch, through which phase is fed to the lighting devices in the bathroom and the restroom.
- It is necessary to twist the cables with a phase (from the switchboard) with loose wires (from cartridges with lamps) in the toilet and bathroom.
- In the sorting box, the cable with "0", as well as the grounding wire from the outlet, must be twisted from the exposed ends of the twists from the lighting.
- There are times when the order of the keys on the switch needs to be changed. To do this, the wires on the commutation contacts that apply voltage to the lamps in the bathroom and the toilet are simply exchanged.
It turns out that the connection scheme of a one- and two-switch switch combined with a socket differs only in the amount of time consumed and in the number of wires. For a one-button switch, four (4) cables are used, and five (5) conductors for a two-key switch. Both options include grounding.
It is not worth worrying, because the connection scheme of a combined unit with a socket and a two-button switch has very few differences
Installation of the unit with socket and three-key switch
A three-key switch with a socket is used to save energy. In recent years, has been increasingly sought after by electricians, professionals and ordinary people.
Earlier, three-key switches with a socket were installed only in panel houses. Their main purpose was to control the light in the kitchen, bathroom and toilet. But the network socket was provided for household purposes - connection of a hair dryer, electric shaver, vacuum cleaner and other devices. Many times have passed since then, most of them need replacing.
Modern layouts and design capabilities allow the use of a tri-key tripping device as the main control element of several light sources for a single room. Among them:
- main;
- additional light sources;
- decorative.
Such a method saves a person from the need to connect luminaires in the absence of lighting. On the other hand, it protects the person from the excessive volume of light in the room and will make it possible to muffle it. Adjustment of illumination remains under your complete control, thanks to one, single switch.
In addition to convenience, this three-key block decorates the room. Agree that a single unit with a rosette looks more aesthetically pleasing than three separate ones. In addition, the amount of time and effort spent on installing it is significantly less.
The three-key device, as a rule, is mounted in the premises of this type:
- in a place where multi-tier lighting is planned;
- in rooms with a large area and a complex shape;
- in not wide and long transitional premises;
This switch is also mounted to control lighting in several rooms, such as a toilet, bathroom and a hallway, from a single place. Also it can be used in working rooms to highlight a specific desktop.

As in the case of a two-button switch, the three-key unit with a socket has a simple circuit that has only one difference
The configuration of the device with the outlet is not much different from the usual three-button switch. Zero wire going straight to the outlet is the main difference.
Previously, such a design could cause inconvenience. The passage of time changed this rule. Since the mode for the arrangement of the switches has changed significantly, the installation of the outlet over the baseboard, and the switch at a distance of 800-900 mm from the floor, becomes an almost unclaimed option.
Such a layout of the outlets and switches is gradually receded into the background, because convenience and compliance with design are a priority of modern planning
There are several rules when choosing a switch. Then it will last longer and not cause discomfort. Here are the main ones:
- the keys do not sink;
- do not make extraneous sounds when pressed;
- the internal part of the switch contains the circuit of its connection;
- smooth and flat surface.
Also, attention should be paid to the degree of security of the device - this is the IP code on the package. The first figure reflects the level of protection against dust, the second - from moisture. Value and efficiency is indicated from zero (0 - no protection) to six (6 - the highest level of protection).
For example, if you install a switch in a mountain or in a shower room, you need to purchase a device with IP 44. If this street is a protection level of 65. If you install a switch in the restroom, IP 20 will suffice.
When commissioning a circuit-breaker with a power outlet, it is difficult to do without certain tools, such as:
- pliers for clamping and gripping parts;
- stripper for removing insulation from the edge of the wire;
- flat and cross screwdrivers.
The layout of the three-key switch also differs little from the connection of a two- or one-button device.

Comfortable work on assembling / repairing integrated units, sockets and switches largely depends not only on the skills of the specialist, but also on the instruments used by him
Consider them one more time:
- Before starting work, make sure that the network is completely de-energized.
- Zero and phase cables must be distributed.
- Check the phase with a special screwdriver with an indicator.
- Connect the cable to the distribution box.
- Test the connection.
An important skill in the installation is the skill of finding a cable with zero and phase. Usually, a certain wire has its own color. The zero vein is blue, and the phase is black or red.
The most successful tool for helping novice electricians is the indicator screwdriver, which has special susceptible elements and a sensor-reflector
There are several ways to determine the phase. Its presence prompts the indicator on the screwdriver or a simple incandescent bulb. The first option is more preferable, because it is simpler. For the second method, the lamp needs to be screwed into the socket, and alternately to close the output wires. When the cable is in the zero phase, the light is brighter.
One of the easiest ways to determine the phase is a bulb and a chuck, use this option only if there is no indicator screwdriver
Buy one-, two-, three-key switches with a socket - the process is not complicated. But, as practice shows, not everyone can understand the connection plan. Therefore, this article appeared. Now it's much easier to install yourself, let alone a switch with a socket.
These manipulations can also be viewed in video format. In these, experienced specialists will explain and show the correctness of the connection of all the blocks described above.
How to connect the socket and switch:
Reliable electrician in the house or apartment: we connect correctly:
Subtleties during the installation of the socket with a switch and hidden wiring:
Repair of the unit with a two-key switch and a socket:
Remember, if this article and the video did not give you a clear idea of the connection of the switches, or you have never encountered electrical equipment at all, please contact the professionals to avoid electric shock or short circuit.
The selection and installation of electrical appliances in living quarters are not the most important part of the repair work, but still have great importance in matters of visual decoration. The range of various devices today is wide enough to find the most suitable product for yourself in shape, color, size and design. You can economically place a switch with a socket in one housing. Such a combination has recently become popular with many buyers.
The advantage of combining a socket and a switch into one housing
The main advantage of installing the combining unit for the switch and socket is the ease of connection. In these cases, there is no need to make two holes in the wall and to conduct contacts in several places, as with separate connection of sockets and switches. Shtroby with this necessarily have to be masked through a small cosmetic repair. Additional convenience, of course, can be considered the location at the same height of the switch and outlet. For proper compliance with European standards, this is the principle of installation.
Due to the availability of these devices, it is always possible to buy the cheapest switch and outlet and lead installation in one circuit. The ease of installation of these electrical appliances makes it easy to do the work yourself. If necessary, the unit is easily transferred to another location. In this case, two separate podvodki to put it is not necessary. It will not be necessary to level the switch and the outlet at the same level.
Mounting Features
To plug triple switch with a socket in one housing can be practically on any surfaces, whether it's a foam block, gypsum board, stone or brick. Installation of such devices is possible both indoors and outside the building. For outdoor installation it is recommended to use models with the provided protection against moisture.
What disadvantages are there?
The negative side of such devices is the need to replace the entire unit with its partial failure. It will not be possible, for example, to remove the damaged element of the switch and insert a new one. And yet, this disadvantage is not so important, if you compare it with the advantages of using combined cases.
How to choose a suitable block?
A socket with a switch in one housing is available for sale in the modern market in various combinations, which are classified according to two basic principles. The first is the number of keys of the switch and the second is the appearance of the unit. So, for example, in one case it is possible to get a single outlet and triple switch or any other combination, which for choice is given a huge amount.
In addition, we distinguish between internal and external sockets. The first ones are used for concealed lining, and the latter for open. The external switch with a double-case socket in comparison with the internal one looks more cumbersome. However, this will be the only possible option if the living quarters are equipped open system wiring, and its replacement will be difficult.
How to install a socket with a switch in one housing?
The unit is connected in approximately this way. After the power is turned off, the markings are made for the subsequent installation of the housings. The wall is checked by a crown in the right place. Perforated holes, which are intended for cable laying, must be broken.
The installation boxes are interconnected, and special connectors are inserted into the slots. The cable is pre-cleaned and wound in the boxes. The construction is fixed to the wall with screws fixing. Wires must be prepared for connection.
The cover from the socket is removed, and the contacts are connected to its terminals. The socket is installed in the box after the screws are unscrewed. The switch wires are isolated and then connected. The cover of the unit common for the socket and switch is installed, and the lid is closed. The power is turned on and the quality of the device is checked.
Suitable places for installation
Such devices are convenient to install in corridors, bathrooms, as well as other rooms where there is a need for compact electrical devices. In such places, the sockets mainly serve as temporary power supplies for a variety of electrical appliances.
Theoretically, a switch with a socket in one housing can be installed in any corner of the house or apartment, but you should pay more attention to planning. It is best to choose appropriate place For installation in accordance with the layout of the dwelling. You can choose the number of keys, depending on the location. If it is planned to install switch blocks with outlets in humid rooms, you will need a device with special curtains for protection. Also, basic rules and installation requirements will be required.
Installation of the unit with one-key switches
A modern switch with a socket in one housing is becoming increasingly popular among buyers. To mount such a block, several simple actions are performed. It is necessary to lay a phase and a zero to the junction box from the central flap. In addition, there should be two three wires from the unit and two from the light bulbs, in which separate devices are combined.
The phase contact from the flap is fastened to the wire that is routed to the socket, which is connected to the terminal on the switch by means of a jumper. The remaining two phase contacts from the switch and the cartridge of the consuming light source are twisted and isolated. In the event that the unit provides grounding, it is necessary to connect it with additional wires.
Thanks to this scheme, the socket integrated with the switch in one housing will function independently of the switch that will perform its main functions to turn off and turn on the light bulb.

Scheme with a switch with two keys
Here is another description of how to connect a socket with a switch in one housing. You can see photos of devices of this type in the review. Basically, the units that unite and the outlet are mounted on the partitions between the doors to the toilet and the bathroom. The ability to control lighting in two rooms appears when only one block is used. In this case, it is always possible to power any consumer of electricity from the outlet.
A socket with a switch in one external enclosure requires the installation of five conductors to the electrical coupled system from the distribution block. The neutral wire from the distribution board, as well as the grounding conductor, must only be connected to the outlet. To output the phase to the double switch, special jumpers are provided in the switching blocks. Two free veins are connected to the switching contacts of the switches, through which the phase will be fed to the appliances in the bathroom and toilet.
In the distribution boxes are made the twisting of the contacts that feed through the switch phase, as well as free veins, aimed at the bulbs of bulbs in the toilet and bathroom. The grounding from the consuming device and the zero wires are taken in the junction boxes by the method of connecting bare ends with twists intended for powering the outlet. If there is a need to change the sequence of buttons that supply power to the bulbs in the bathroom and toilet, on the switching contacts, you just need to swap the veins in places.
What is the difference between one method and another?
It can be seen that the connection scheme for a single and dual switch, combined in a housing with a socket, differs only the required quantity contacts. For the first option, you need four wires, as well as grounding, and the second requires five.
Conclusion
Sockets, light fixtures and switches are the main components of any apartment, office space or garage. Therefore, every attentive and caring homeowner should understand the principle of connecting such devices after carrying out all repair work or the self-erection of new structures with their own hands. A double socket with a switch in one housing will be very useful in solving problems of placing devices in a small area or at the same distance from the floor.
Hello, dear readers and guests of the site "Notes electrician."
In this article, I will tell you in detail about the scheme for connecting a switch box with a socket.
As a matter of fact, it is the usual switch, only combined in one case with the socket.
There are blocks with one, two and three keys. In principle, they have the same circuit, the only difference is the number of pairs of contacts of the switch.
As an example, consider a block with a two-key switch and a socket that is installed in the corridor of my apartment:
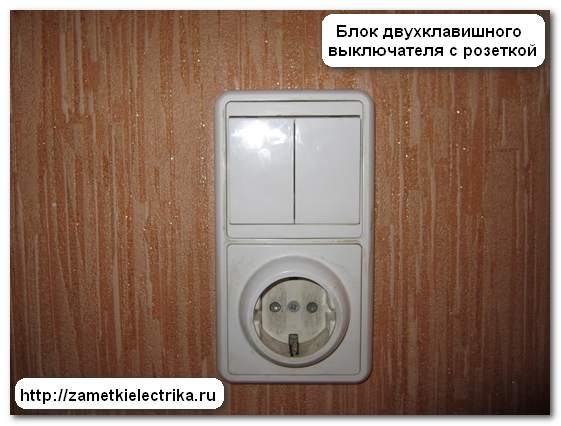
One button switches on the lighting in the bathroom, and the other - lighting in the corridor. Basically, the socket is used for temporary connection of various electrical appliances, for example, a vacuum cleaner when cleaning an apartment or extension cord while performing any repair work.
In the bathroom I have a separate outlet, so the electric shaver, hairdryer, washing machine are connected to it, and accordingly, do not load the outlet in the corridor.
If you are interested, you can see my article about.
Let's look inside the block. To do this, unscrew the screw of the protective curtain from the children and remove it.
A protective curtain is removed from the socket.
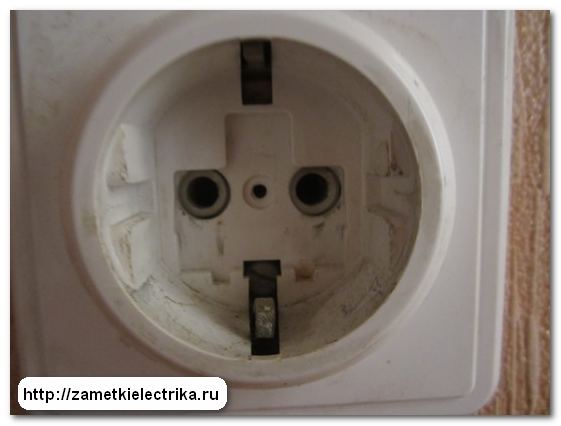
Then, one by one, we take off the keys of the switch.
![]()
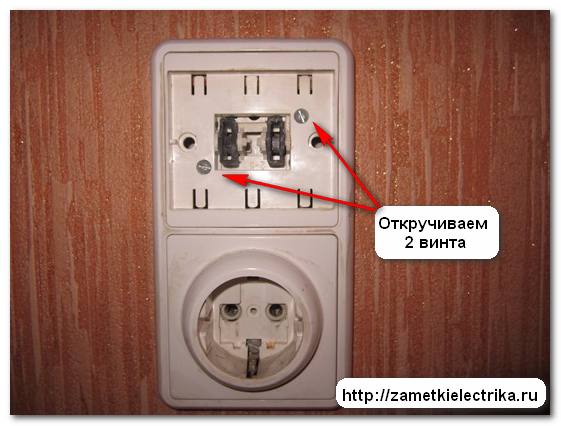
Now you need to unscrew the two screws securing the top cover and remove it.
The photo shows that this unit consists of an outlet and located in one housing.
Now let's move on to the wiring diagram. There are two options. We will consider each variant separately.
Connection of the socket-switch unit. Option 1
In the first variant, let's look at the scheme that most often occurs when connecting such units. Personally, I tend more to the second option. But more on that later.
The machine is equipped with 16 (A). From it to the junction box is laid a copper 3-core supply cable, for example, VVGng (3x2.5).
Do you know why a cable with a cross section of at least 2.5 mm² is necessary?
This is due to the fact that the rated current of the outlet is 16 (A). So, the cross section of the conductors of the supply cable must be at least 2.5 mm2. If this is disregarded, the cable will begin to warm up when the cable is overloaded in the outlet line or the lighting line, which can lead to a fire.
A copper 5-core cable is laid from the junction box to the unit, for example, VVGng (5x2.5).
The phase (red wire in the diagram) is connected to one outlet of the outlet. From the same output, there is a jumper to the common contact (terminal) of the two-switch switch. Zero (blue wire in the diagram) is connected to the other socket outlet. Protective conductor PE (green wire in the diagram) is connected to the screw of the grounding contact of the socket.
To the other terminals of the switch wires are connected (they can not be seen in the photo), which go to 2 groups of lighting: a bathroom and a corridor.
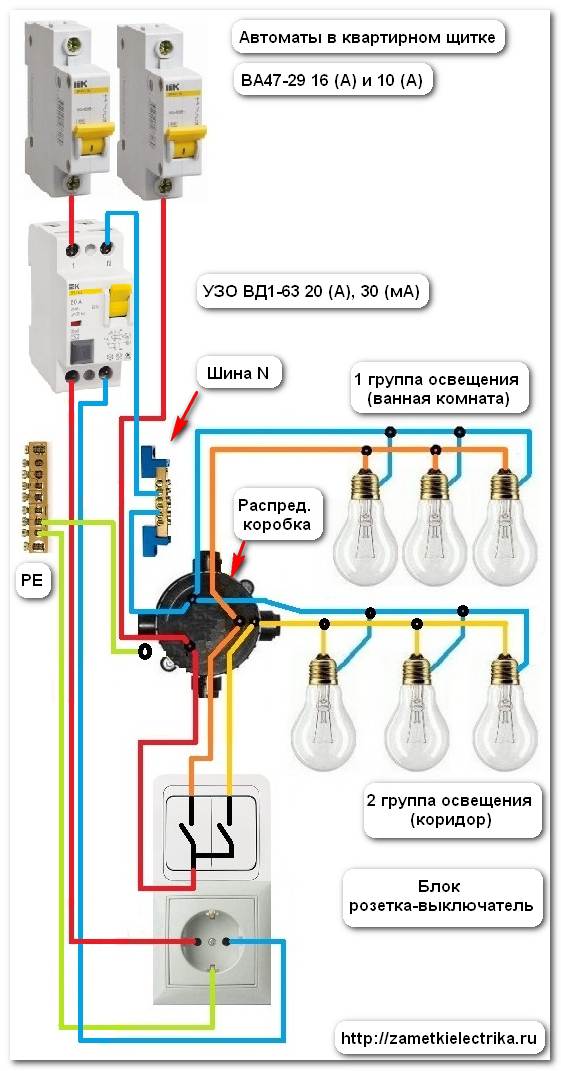
How to connect the switch-outlet box. Option 2
As I mentioned above, the first version of the scheme is not quite correct. But this does not mean that it can not be used.
The fact is that according to modern requirements power circuits and lighting circuits are recommended to be divided (, item 6.2.4). And in the first variant, at us they turned out united.
Here is the scheme of the 2 options:
The socket line will be protected by a 16 (A) automatic device with a RCD of 20 (A), 30 (mA), and a lighting circuit with a 10 (A) automatic device without an RCD.
With a three-core cable, for example, VVGng (3x2.5), we supply an outlet, and with another three-core cable, VVGng (3x1.5) - a junction box and a two-button switch.
P.S. Perhaps that's all. If you do not understand something or want to supplement, then use the comment form to this article. Thank you for attention.