Ball valve for water repair. Repair of ball valves: tips for beginners.
In this torture, life in a house or apartment turns into a crane. The monotonous sound of dripping water simply leads to the insanity of all the inhabitants. You can, of course, put a washcloth in the sink, as many housewives do, but this will solve only the problem of unpleasant sound.
The problem of over-expenditure of water, and, consequently, extra costs from family budget such a method does not solve in any way. In addition, do not forget that reckless waste drinking water causes serious damage to the environment.
With the problem, when the tap water is dripping in the bathroom or in the kitchen, everyone is confronted, but few know that it can almost always be repaired by hand.
Contents of the article
Types of water taps
Before proceeding to the reasons for the leak and the ways to eliminate them, you need to understand the typical structures of this equipment.
The simplest design - crane with rubber gasket. This kind of locking mechanism appeared before the others and is well known to everyone who has ever met a water pipe.
This mechanism is cheaper both in purchasing and in repair.
A crane with rubber gasket is one with (if it's a tap) or two (if we're talking about a mixer) rotary mechanisms. Speaking of a mixer, it has two control knobs separately for cold and hot water, which overlap the flow of water between the valves with a rubber gasket. Exactly it, most often, breaks down and is the cause of the flowing crane.
In place of mechanisms with rubber gasket came more reliable, but also more expensive analogues with a ceramic gasket.
The principle of operation of such a mixer does not differ from the previous one. Simply, the rubber membrane is replaced with a more reliable crane-axle, consisting of a ceramic gasket with, all the same, a rubber seal.
Such a mechanism is considered more reliable and durable, however, if you are dripping a faucet with a ceramic gasket, you will have to change the entire crane-axle, which can not easily hit your pocket.
The cause of damage to the ceramic gasket, most often, are raids and scale caused by impurities in the water. Therefore, it is easier to install filters at once, when installing the water supply, in order to prevent the tap from leaking.
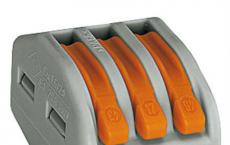
The newest, most popular and, at the same time, the most expensive or cartridge mechanism.
In this device, mixing hot and cold water occurs in one mechanism - a hollow ball enclosed in a cartridge by means of ceramic plates.
Repairs ball valve will require replacement of the entire cartridge, which will cost a lot more times than repairing previous analogues.
Such a locking mechanism has only one adjusting knob that controls the water head by moving up and down, and the temperature by turning left and right.
Causes of the tap
Although the mechanisms and appearance of the mixers are different, the main reasons for possible reasons why the tap is flowing to all for them are the same.
If in the case of rubber gaskets the handles can be tightened more tightly, then for ceramics this is very dangerous. It must be sensitive to rise and rotate to the stop and do not try to force it further.
It is the application of excessive force in the process of exploitation that often causes why the tap is flowing.
The nature of the leak
Before proceeding, to the question of how to disassemble the tap, you need to determine the nature of the leak. That is, to answer the question of where exactly and with what strength the water oozes.
In the event that the crane has obvious damage to the hull, repairs are not possible.

Here, only a complete replacement of the stop valves will help. Let's consider only those variants of a leak when the problem how to fix a crane can be solved independently:
- water oozes or drips from under the valve for hot or cold water;
- when the valve is closed, water drips or flows (not much) from the gander;
- water oozes at the junction of the gander and the mixer;
- the water leaks in the place of water connection to the shut-off valve.
The order of performance of works
Repair of the ball valve with your own hands is not a difficult task. She is will require care and accuracy.
First we remove the crane:
- First you need to cut off the water.
- If necessary, unscrew the mixer from the water supply. If the tap is attached to the sink, fill the junction with vinegar or a special liquid and leave for 10 minutes. This will help to remove the tap without too much effort.
We disassemble the crane
Having determined the problem, one can begin to ask how to disassemble the crane. We note at once that this work is roughly the same in general terms. However, there are small nuances in how to disassemble ball valve own hands. And, since, this type of mechanism is the most complex, the technology of repair will be considered on its example.
At first glance, the mixer may seem unseparable. However, if you look closely, it has stubs or stickers, under which bolts and nuts are hiding.
- remove the sticker or plug on the valve or lever;
- unscrew the bolt fixing the internal elements;
- remove the valve or lever;
- carefully remove the body of the mixer (it can be fixed with a screw located on the side);
- pull out the inner parts;
- check the gaskets and seals;
- if they are worn out - we change. If wear is visible on the entire inside of the faucet, you will have to invest in a new cartridge;
- we collect and install the stop valves in the reverse order.
Repair, as well as mixers of other types - a delicate matter. In no case can you knock on the mixer metal objects. All actions must be done carefully and without unnecessary effort. Sometimes it is necessary to decide how to dismantle the crane, if its parts are attached, it is necessary with the help of vinegar or liquid type WD 40.
How to dismantle a single-lever ball mixer with your own hands? (video)
Single-lever ball mixers appeared relatively recently and replaced the already outdated gland mixers, which often failed due to the wear of rubber gaskets. Due to their advanced design, ball valves are more reliable, although the constant effect of water of increased rigidity on their internal mechanism over time leads to breakage. For self-repair of a ball valve fault in the form of a water leak, one must know its design and how to disassemble it.
Figure 1. The device of the ball valve.
Device
To understand how to disassemble a ball valve, you should study its design. In Fig. Figures 1 and 2 show the design of a single-lever ball valve.
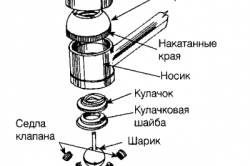
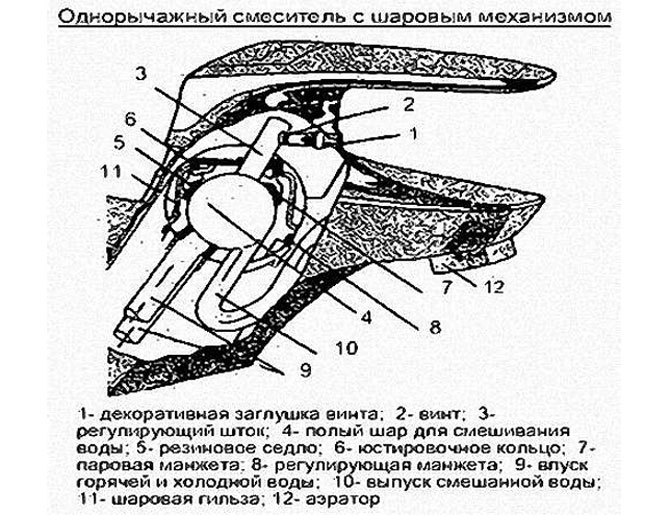
Figure 2. Scheme of assembly of a ball valve.
Ball mixers are distinguished by their reliability and durability due to the non-separable cartridge included in their design. All the parts of the mixer are fitted very precisely with respect to each other. However, such mixers still sometimes fail. Knowing the design of such cranes and understanding the principle of their operation will help to easily cope with their dismantling and repair. In Fig. 3 is a diagram of the principle of operation ball mixer.
At the heart of the construction of such mixers is a hollow ball having holes and a pin for fixing it to the handle. This ball is cold and hot water is fed through two water pipes, after which, mixing in it, falls into the spout.
When the lever is turned to the left or right, the hot or cold water supply is adjusted by overlapping the holes in the bowl. Similarly, raising and lowering the lever, you can adjust the water pressure.
Back to contents
Dismantling
Completely dismantle the mixer is necessary when it requires cleaning, repair internal parts or its full replacement with a new tap.
In order to dismantle and dismantle the ball valve, you may need a fairly large arsenal of tools, but the main ones are:
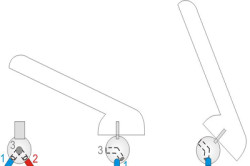
Figure 3. The principle of the ball valve: 1 - cold water, 2 - hot water, 3 - ball.
- a set of spanners or a wrench not less than 35 mm;
- set of hex keys;
- flat and cross-type screwdrivers;
- a hammer;
- pliers;
- the pipe key ("ass").
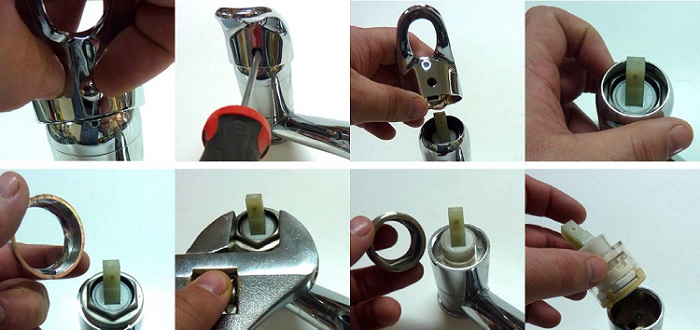
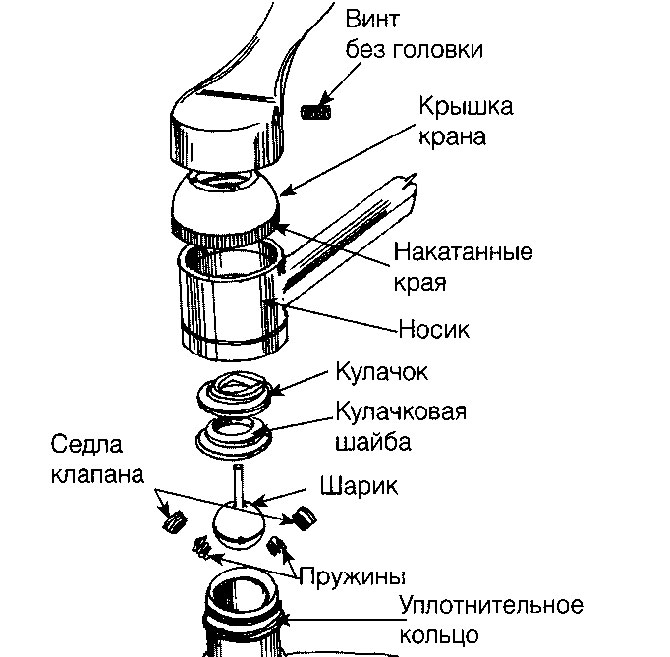
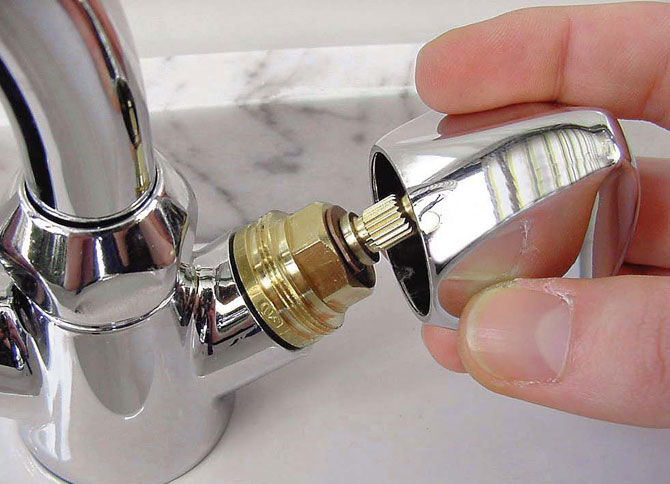
Disassembly of the ball valve starts with:
Ball device single lever mixer.
- Press the flathead screwdriver against the notches on the threaded ring and tap it lightly with a hammer. After that, rotate the ring counter-clockwise, without allowing the whole crane to turn, to avoid damage to the water hoses that connect to the mixer, if you do not dismantle them.
- Remove the mixer handle. Using a hexagonal key, unscrew the screw that secures the crane handle.
- Using pliers, remove the chrome-plated dome from the mixer. Under it is a ring with 4 teeth, which can be adjusted by moving up and down. Try not to damage it.
- Inspect the seal inside the ball. Normally, it should not have rust.
- Remove the ball from the tap and examine its stopper, made in the form of an oblong hole, preventing possible critical rotation of the crane.
- Next, check the bottom of the ball. It should be smooth and clean. If there are any damages or signs of wear, replace the ball with a new one.
- Remove rubber seals and sealing springs and replace them with new ones, because they are subject to wear during use.
- Having made necessary replacement of details and having greased all consolidations with special silicone greasing for the sanitary equipment, assemble the mixer in the reverse order.
On sale there are different modifications of ball mixers, respectively, and the ways of their disassembly can have differences. For each ball valve there is an instruction for installation and disassembly, which it is desirable to save in case of repair.
A general rule for all ball valves is the mandatory sealing of all threaded joints with a special PTFE tape. It should be located strictly on the thread. There are also seals in the form of threads in cassettes. If after the repair of the mixer the water still continues to leak, try to repeat the whole disassembly and assembly procedure again, paying special attention to the seals of the threaded connections.
Now the overwhelming majority of people from all represented varieties of "home" stop valves preferring ball valves.
These devices are a fairly common type of water valves, the main distinctive feature of which is the presence of a locking element that has the shape of a sphere.
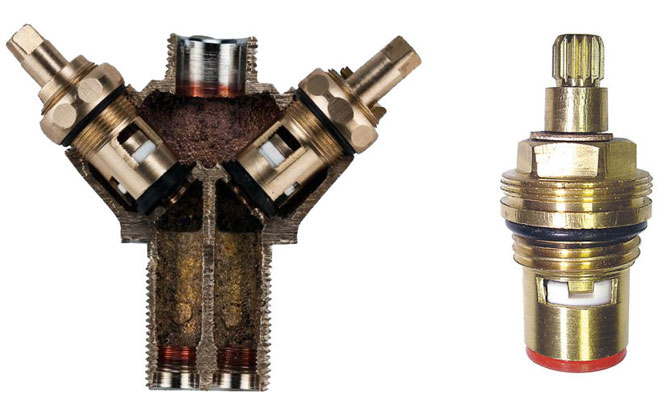
The device of the crane
Before you repair the ball valve that drips, you need to thoroughly familiarize yourself with its internal device, how to disassemble the water tap and the principle of operation. Bugatti Ball Valve in the section is presented in the form of a body equipped with a spout and, in fact, a movable element.
Shells modern ball valves now have a large number of forms, which depend on the design features, as well as the scope of the device.
The structure of the movable element in all species is often identical. Movable element is presented in the form of a hollow inside and cut off from two opposite sides of the ball, which is tightly fixed in the body due to the presence of strengthening rings.
The ball is provided with a hole through which the flow of working fluid (water) passes.
As a rule, in valves intended for domestic maintenance, the diameter of the hole in the ball correlates with the diameter of the water pipe - hence the ball valves are also called full-bore.

When the tap is fully open (the hole device coincides with the direction of the pipe) there is no liquid obstruction inside it, and water enters the drain channel.
When you rotate the handle 90 degrees, the passage through which water flows turns is turned perpendicular to the flow - the device is completely closed - therefore, the medium can not pass through it.
Ball valves have received such popularity and wide distribution, proceeding from the features of a design of the mixer.
The main advantages of these devices are:
- Long operational life;
- Aesthetics and modern mixer design;
- Ensuring a high degree of tightness of joints;
- Ease of use and extreme simplicity of installation work (disassembly, restoration).
Malfunctions and solutions
Faulty ball valves somehow sooner or later manifest themselves, because repairing the ball valve with their own hands or how to repair the tap that drips, for each one is useful and relevant information.
Let's consider the most probable or most frequent problems that comprehend this kind of shut-off valves.
Initially, before you disassemble the ball valve, in order to avoid leaks, you should prepare the unit for repair:
- Close the valves located on the pipeline in front of the tap, which drips and needs to be disassembled.
- Open the faucet tap, which needs to be disassembled, and drain the remains of water from it.
All - after that the device is ready for disassembly, without the risk of water leakage after its removal.
Armature analysis
Now it is necessary to understand in detail how to dismantle the crane in stages or what the mechanism dismantling process looks like - because all the necessary parts are hiding inside the case, and getting access to them is not so easy.
To do this, you should take the following steps:
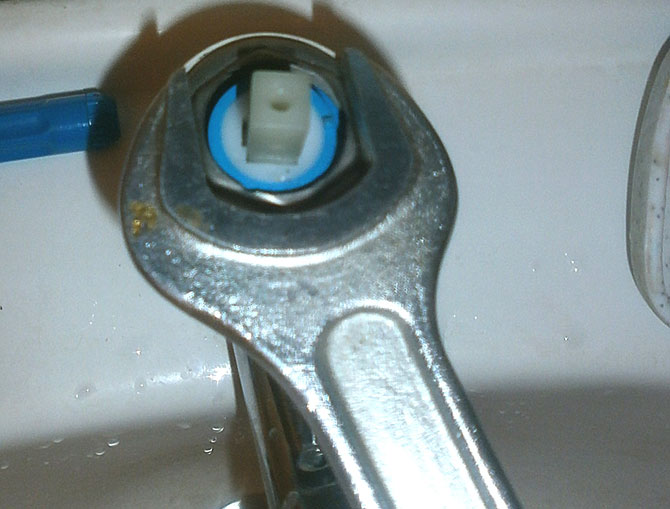
- A hexagonal key loosens the screw that holds the handle of the crane.
- Remove the handle. We see the rod - it is this device that communicates with the ball that blocks or opens the water passage.
- A threaded ring with 4 notches can be seen around the stem. They need to either tap with a screwdriver, or gently tap with a hammer on a screwdriver, rested in them - to do further work.
- The domed part, which was opened after shooting the handle, is removed. At the same time, be careful - when turning these parts of the mechanism into motion, the entire tap can come in, which is dangerous - since the device can damage pipes below the mixer.
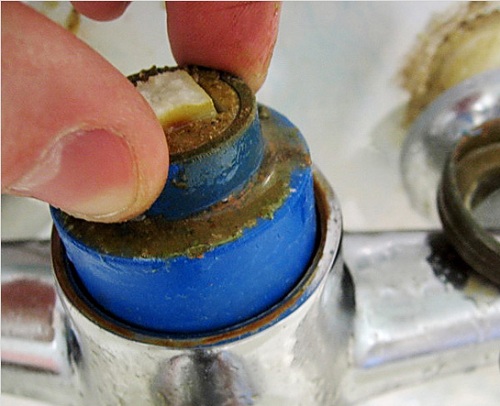
- Under the dome you can see a plastic part - we also remove it. By the way, it is in this part that the problem of leaks usually lies - if it has worn off. Immediately you can find deposits of limestone - which, of course, too, is not too useful for the reinforcement. If they are available, you should delete them. Important nuance - rip and scrape them with abrasive (nazhdachkoy, for example) means can not be - otherwise the sealant will only be damaged.
- After removing the plastic part, you can actually get hold of the ball itself and inspect it - checking for integrity and cleanliness.
- After that, you can remove the seals that fix the ball. For this, it is convenient to use a flat-thin screwdriver.
- If any signs of wear are noticed, it is recommended to replace the seals.
- It is also recommended to replace the springs, which, in fact, fasten these seals - because over time their effort is weakened, and with their task they cope worse, because of this the tap is running or dripping.

All - complete disassembly of the valve was carried out, after which it is possible to check the integrity of the elements of the mechanism, if necessary - to clean / replace parts and back to assemble the assembly.
Leakage of the crane
In the event that a ball valve flows or passes water, there is a violation of the general tightness in one of the joints of the device. Most likely, the so-called end seals are loosely attached to each other.
They can be subject to deformation due to a long operational period - this is often the case: over time, this element, regularly moving, simply abrasion, there are gaps - through which water flows.
How to fix the crane with your own hands in the event of such a breakdown, you can do more tightening of the tightening bolts, adjacent to the ball.
If the problem can not be solved in this manner (the bolts are already tightened to the maximum) - it is necessary to disassemble the structure and replace the sealing elements.
Feeding blockage
Repair of the valve, if the tap is flowing, may not be needed if the reason for the water flow is in the usual clogging.
Faults of the ball valve of this type are easily eliminated by removing the filter, represented as a small mesh - it is located at the outlet, near the ball.
Before dismantling the faucet, the filter should be thoroughly cleaned from clogging and rinsed several times.
Repair of the water ball valve will be performed many times less often if several cleaning filters are installed on it, which are placed in the body of the water pipe.

They will prevent clogging of the grid located on the tap.
Poor opening of the valve
In the event that the ball valve turns hard, the body or ball is damaged.
It also happens that in a number of such cases the tap is flowing and the question arises as to how to dismantle the faucet without valves. This is done using screwdrivers with a flat narrow sting or a wrench.
When inspecting the surface of the ball, it may become clear that it has become covered with a rust coating - treat it with fine sandpaper or anti-rust remover. It will also help to replace old holding ball ends with new ones.
Water flow through the rod
Repair of the ball valve or mixer can also be carried out in the event that the rubber seal of the stem is damaged.
Before dismantling the crane, you need to carefully untwist the nut that is responsible for tightening the gland, and replace it. As an option - the gland can be tried to tighten - tightening the bolts located near the rod.
If silicone grease is applied to new rings before assembly, this will significantly extend the service life of the valve.
Nuances of repair (video)
About the cost of repairs
The cost of repairing the ball valve depends on the complexity of the breakdown and the parts that are being replaced.
Typically, prices for cranes used in domestic water pipes are within the following limits:
- Complete replacement of the ball element with dismantling and subsequent installation - from $ 5 to $ 10.
- Cleaning or full replacement of all filters installed in the system - from $ 3 to $ 12.
- Replacement or overhaul of the mixer - from $ 4 to $ 8.
Many of the failures and malfunctions that occur in the design of the ball valve can be corrected by hand, without resorting to the help of a specialist - just a little understanding of the device of this locking unit.
In the kitchen, the mixer is much more active than in the bathroom, so it goes much more often out of order. In rare cases, the only solution to the problem that has arisen is the purchase of a new appliance and the invitation of a plumbing technician, the rest can be handled independently. Having decided to repair the mixer in the kitchen with your own hands, you will save on the services of a specialist and get important experience. It is only necessary to arm ourselves with theory and tools.
- Leak from under the nut in the place of a spout of water, from under the handle (lever) or valves of the mixer in working order.
- The correct movement of the lever or valves is broken (jam, scroll, not fixed in the desired position, etc.).
- At normal water pressure in the system, the jet is not powerful enough.
- Water drips from the closed faucet.
Please note: the detected problem must be solved as quickly as possible! This will extend the life of the mixer and protect yourself and neighbors from flooding, saving money, time and nerves.
The most problems are caused by the leakage of the crane. And here you need to know the "enemy" not only in person, but also from within. It is about the device mixers.
Features of the device of the main types of kitchen mixers
Such delights as thermostatic and non-contact faucets are good for bathrooms. In the kitchen, for a place under the sun, more practical models are fighting - traditional two-valve and single-lever models. Common elements for them are: body, spout (spout), aerator, gaskets. In the rest they are significantly different.
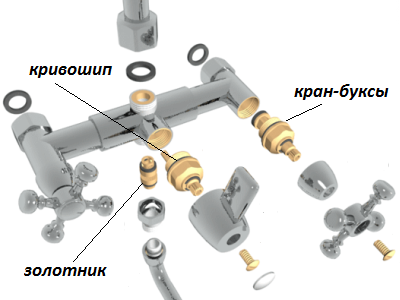
The device dvuhventilnyh cranes
The two-valve valves that are familiar to the eye are arranged quite simply. Under the flywheel, which you twist while operating the structure, the crane-box is hidden - its locking element. Below is a device of such a mixer for the kitchen in pictures.
Buses in a two-ventilated mixer (in section)
In products where a few turns of the flywheel are required to feed or shut off water, worm gearboxes are installed. Their work is based on rotational and translational motion. The more you unscrew the valve, the more the lining of the axle will depart from the so-called "saddle". The consequence of this is the flow of water into the internal cavity of the mixer, and then into its spout (spout).

Worm-crawler crane for mixer
In models where for water supply it is enough to make only half of a turn, boxes with ceramic plates are installed. When opening the tap, the holes in them coincide, and water enters the spout.

Crane-axle boxes with ceramic plates
The cost of crane-boxes is not high, they are always available in sanitary ware shops, and their replacement is extremely simple.
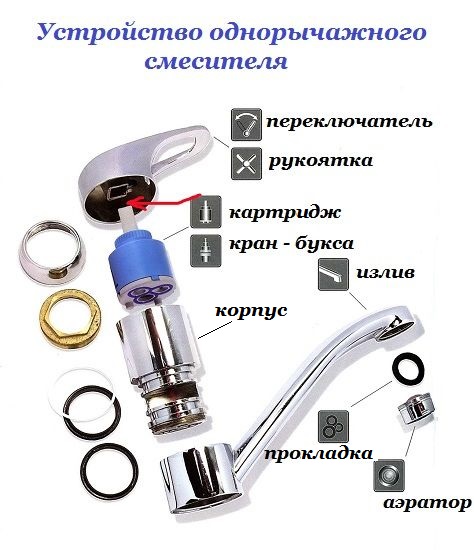
The device and types of single-lever mixers
More modern and practical are models of cranes with a single control head and temperature handle (lever). Mixing of water in them is carried out in a hollow ball with three holes or in a special cartridge.
The mixing element in the spherical models has three openings, two of which are inlet ones - intended for entering this miniature container of hot and cold water, and one output - for supplying the water with a specified temperature to the sink.
The device of a spherical mixer
The ball itself is located on two "saddles" of rubber. Its displacement relative to them, carried out with the movement of the lever, and allows you to adjust the head, the temperature of the poured water. At the top, the ball is fixed with a sealing collar and a lock nut.
Schematic arrangement of the ball model of the kitchen faucet
The principle of the mixer with the cartridge, which replaces the ball, is similar. At the same time, their internal structure is fundamentally different. In the presence of all the same three functional holes, but inside the cartridge is not a cavity, but special disks made of cermets. Due to their displacement relative to each other and the degree of overlapping of the delivery openings, when the lever is rotated, the water supply is adjusted.

Replaceable ceramic cartridges
There is a tap in the kitchen - how to fix it yourself
To repair the kitchen faucet you will need:
- knife with a sharp end;
- hex and wrench;
- screwdrivers;
- new cartridge, crane-bux, rubber gasket, etc. - depends on which part you will be changing;
- WD40 is a technical aerosol that is useful if the parts are "attached" to each other. However, you can do with traditional tapping of a hammer on a screwdriver, but the risk of damage to the mixer is great.
Regardless of which mixer you have installed, shut off the water supply to the system before starting the repair and drain the remains into a sink or separate container. To do this, just open the tap. Then you can start repairing it with constructive features.

To repair the single-lever mixer you will need an allen key
Repair of single-lever kitchen mixer
The main principles of repair are the sequence of actions and accuracy.
- Use a thin screwdriver or knife to pry and remove the decorative plug on the casing.
- In the resulting hole you will see a screw connecting the lever and the adjusting rod. Unscrew it with a hex wrench.
- Remove the lever from the body and unscrew the decorative cover. This can be done even with hands, if the details do not stick to each other.
Removing the decorative cover
- Under it will be located a locking (clamping) nut. Carefully unscrew it with a wrench or by tapping with a hammer on the screwdriver.
- If you disassemble the ball mixer, then under the nut you will see a sealing cuff. Inspect it for debris, deformations and tears. Pull the ball out. Examine its surface - it should be smooth and clean. It is necessary to remove the seals and the support springs - their poor condition can cause the tap to leak.
- If you disassemble a mixer with a cartridge, then remove it and subject it to a thorough inspection.
- Replace the failed part.
- Assemble the tap in the reverse order.
It is important! Do not tighten the nuts too tightly, as this can lead to deformation of the sealing gums and malfunction of the mixer.

Installing a new cartridge
To prolong the life of the product and ensure the smooth running of its rubbing parts, you can use a special silicone grease.
Removal of a mixer flywheel
Repair of a two-ventilated mixer
What if you have a two-valve crane in your kitchen? Almost all the same.
- On the flywheel of the valve, lift and remove the decorative plug.
- Using a screwdriver, unscrew the screw fixing the flywheel.
- Remove the flywheel. Before you will be a crane-beech.
- Counterclockwise, unscrew it and inspect it.

Extraction of the crane-axle box
- If it is a worm-type box and its gasket is damaged, replace it separately - buy it in a store (it costs a penny) or cut out a suitable thickness from rubber. Books with ceramic discs are changed entirely.
- Collect the tap in the reverse order.

General scheme of works on repair of the mixer
Everything is as simple and light as a designer. But a tap leak is not the only problem you may encounter while using it in the kitchen.
Other mixer failures and malfunction prevention
The quality of water in many cities leaves much to be desired, so over time, the aerator in the faucet may become dirty. On the inside, solid deposits build up on it. When they become too much, the pressure and quality of water deteriorate significantly. The solution to the problem is the replacement of the aerator. Ideally, it is easily unscrewed with a wrench, but for a stuck-on part you need a WD40 or a tapping with a hammer.
It is important! Do all the work carefully, otherwise the mixer will have to be changed completely.
The crane is flowing, and in the process of inspection you found a crack in it? Then it's time to go for a new product. For a short time silicone sealant can become an assistant.
To prolong the service life of the mixer it is possible, if you install a water filter and use the device carefully, without twisting the valves too tightly and without moving the lever sharply and until it stops.
Video: repair of single-lever mixer with ceramic cartridge
Now you know what to do if the tap is dripping in the kitchen. In most cases, the repair schemes considered are also suitable for eliminating the breakdown of faucets in bathrooms. This is a good saving of the family budget. But if you are not confident in your abilities or you simply do not have time, a competent plumber will perform all the work in a matter of minutes.
It so happened that with small home repairs our men, and sometimes women, are used to coping on their own. We ourselves glue the wallpaper, repair the floors, install plumbing and even put the tiles. And such a trifle as the repair of the mixer by their own hands is possible for almost everyone. If even 10 years ago in all houses and apartments of our vast homeland there were the same mixers by design, today's variety of them can confuse even the experienced home craftsman. Let's figure out which mixers are now on the shelves of our stores and what to do if suddenly flowed where it should not.
Ball valve - the most popular option
The most common construction of the mixer today is the ball valve. It is a mechanism with one swivel handle. When the handle is moved up and down, the water pressure is regulated, and the water temperature to the right and left. The popularity of such a device is explained not only by the simplicity and convenience of its operation, but also by the increased reliability.
Single lever mixer system
In order to answer the question "how to repair a ball mixer", you need to understand how the system works. That's how the ball valve looks in a section.
This is done using the following algorithm:
- We overlap and drain the water;
- Dismantle the mixer;
- We use a knife or a screwdriver with a decorative plug and remove it;
- We unscrew the screw;
- Remove the lever;
- We take out the cartridge and install a new one in its place;
- We are assembling.
That's all. Now your mixer will exactly work as a new one.
Litter in the aerator
When the water in the bathroom flows in a thin trickle, and in the kitchen it beats a powerful stream, it is not necessary to talk about the vodka's fault. So, how to fix the faucet in the bathroom if the water pressure has dropped? The most frequent and easily eliminated cause of this problem is the aerator clogging.
Check whether your case is very simple. Unscrew the aerator and open the tap. If the water pressure is normal, the culprit is found. A very rusty aerator is better to replace, and just clogged enough to rinse, direct the flow of water to its outer surface. Now install the part in place and everything is ready.
Litter in water pipe or hose
If simple manipulations with the aerator did not have an effect, the pipe or hose is likely to be clogged. Quite often in houses with old metal pipes, the rust that has fallen off from their inner surface overlaps the cross section, which leads to a drop in pressure in the mixer. Cope with the problem will help clean the pipes, but it is better to replace them with plastic ones. The inner surface of modern pipes made of polymers is very smooth and does not corrode, which means it does not "overgrow".
If there is no possibility to replace the pipeline yet, arm yourself with a thin "snake" cable, disconnect the pipe from both sides and start cleaning.
Problems with the "shower-bath" switch
Now we turn to the answer to the question, how to repair the mixer in the bathroom, if the water supply to the shower stops by itself. The lever-switch spontaneously descends, and water flows only through the tap.
The cause of such a malfunction may be the wear of the spool seals. If only the upper gasket is damaged, you do not have to remove the mixer. Since it is impossible to determine by eye, it is necessary to replace it with the beginning, and then draw conclusions:
- Unscrew the union nut of the hose and remove it;
- A thin crochet or an awl is supported by a gasket;
- We moisten the new gasket with water and install it in place;
- We collect the mixer.
If this is the way to fix the failure, you will have to change the lower gasket:
- We overlap the water;
- Remove the flexible hose by unscrewing the union nut;
- We remove the spout and the adapter;
- Remove the switch and extract the eccentric;
- We take out the spool;
With a thin screwdriver or hook, remove the lower gasket (the upper one has already been replaced);

If the upper gasket gasket has already been replaced, do it again not necessary
- We put on a new gasket, we moisten with water and install the slide valve back;
- We collect the mixer.
Note! Spacers for the spool, as a rule, do not sell separately from the mixer. If the spare rings included in the delivery of the mixer are not preserved, they can be made with your own hands of hard rubber 3-4 mm thick.