How to repair the mixer lever does not open the water. How to disassemble a single lever mixer - features and video
Single-lever cock is an innovation in the sanitary issue, which is widely used for installation in bathrooms or in the kitchen. Structurally, such a device consists of a metal casing with a special plate, in which cold and hot water is mixed. To manufacture the lever of such a product, ceramics, metal or plastic are used.
Very popular among consumers are relatively inexpensive and easy-to-use ball single-lever valves. But due to the fact that such products appeared not so long ago in the plumbing market and are unfamiliar to a wide range of consumers, many people have a question: how is this mixer dismantled and what should be done if a single-lever crane is to be repaired?
Varieties and features of the device single-lever valves
Before you start to disassemble the mixer, you need to understand the principle of its device and the types of popular single-arm cranes. By its design, such a plumbing device resembles a faucet with a single handle for adjusting hot and cold water, fixed by a screw under a decorative overlay. Thanks to this structure, the homeowner should not have problems with dismantling such a device. However, it is necessary to distinguish different types of mixers, since this will determine the sequence of their dismantling:
- ball cock;
- tap with a cartridge as a mixer.
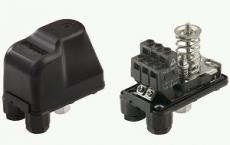
 The main element on which the principle of work is based ball mixer Is a small ball, made of metal, which is placed in the body of the crane. The ball has three holes that are designed to provide hot, cold and mixed water. Thanks to such a device, the crane was called the ball mixer.
The metal ball is in constant contact with rubber gaskets, preventing the spontaneous passage of water. This device is activated by means of an adjusting rod. In this case, to change the pressure of the water flow, the position of the holes on the ball changes. As the contact area of the holes with rubber seals increases, the flow, water supply and vice versa decrease. Such cranes very rarely break thanks to a thoughtful design and therefore are rarely subject to disassembly.
The cartridge, as its name suggests, for mixing water equipped with a special cartridge which is based on a ceramic plate. In the lower part of the disk there are 3 holes, respectively for hot, cold and mixed water. In turn, the upper plate acts as the mixer itself.
 The essence of the operation of such a system is that, when the location of the joystick is changed, the hole depends on which water is to be supplied hot or cold and is combined with the mixing chamber of the top plate. Smooth movement of the linkage mechanism is achieved thanks to special silicone-based lubricant. Manufacturers of lever valves are recommended to supply the water supply system with filters, which will avoid getting garbage into the cartridge and as a result increases the service life of the mixer.
Advantages and disadvantages of the lever mixer
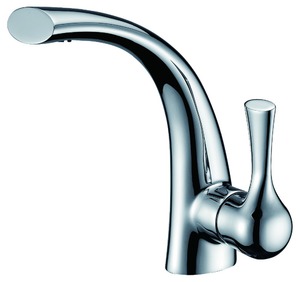
Its popularity single-lever faucets received due to its simplicity and ease of use. The design of the crane allows in a few seconds to adjust the temperature of the supplied water due to the smooth movement of the lever in the desired direction. In turn, to change the intensity of the head also do not have to turn the valves, all you need is to change the position of the pedal attached to the rod by lifting it up or down.
In addition, single-lever mixers have proved themselves on the positive side in terms of service life. Long-term service life of such a device is due to the fact that the products do not have rubbing metal or rubber elements, and ceramic cartridge wears out very slowly.
 If we consider a ball mixer, then it is inferior to the counterpart with a cartridge in that it has rubber seals in its design. Therefore, this device requires regular preventive measures for the replacement of gaskets at least once in 2 years. Most often, breakdowns are associated with the entry of debris in the form of rust or sand, which are always present in the water.
If we consider not expensive cartridge crane, then it has one problem - the difficulty of adjusting the comfort temperature of water. First of all, this is due to a slight angle of the joystick position change. But this problem does not concern expensive models, in which the angle of adjustment has a wide range, which allows setting comfort temperature parameters of water.
How is the disc crane dismantled?
In the event of failure of the plates located inside the mixer sleeve, it is necessary to perform a complete disassembly of the crane. But before that you need to prepare a screwdriver and a special hexagon. It is also desirable to watch a video on how to disassemble single-lever mixer. The very same disassembly of the crane will occur strictly in accordance with the instructions.

Before you go to the store to buy a new cartridge, you must remove the old one and take it with you. This is due to the fact that such products are manufactured with different diameters and fixing methods. Therefore, not having an old part with you can buy an inappropriate part. Also choosing a suitable cartridge you need to pay attention to on used in it seals. It is advisable to purchase a device with silicone gaskets, which are less susceptible to the influence of poor quality water in the domestic water supply.
Features of disassembly of the ball mixer
 This model of single-lever mixer is as easy to disassemble as cartridge analogue, especially if you watch video, perform repair work. It is important to understand that minor repairs are subject to minor repairs, such as reducing the pressure of water when the mixer is fully opened or a slight leakage occurs. More serious problems are solved by completely replacing the product. In this case, to clean the mesh, you need to perform only three manipulations.
- The nut installed on the mixer outlet is removed.
- The net is stretched and washed under a stream of water.
- The nut and the mesh are mounted in their place.
In the case of a leak, you will need to replace the gaskets, which is accompanied by a complete disassembly of the lever mixer.
- Remove the decorative cap, unscrew the fixing screw and remove the lever.
- The screw connection is removed, after which the screw is unscrewed by the screwdriver. Very often it forms a scum, which is easily removed by a rag soaked in vinegar.
- The ball mechanism is pulled out. Rubber gaskets are removed and replaced with new gaskets.
- A ball is placed in its place.
- Fixation of seals is carried out by means of a plastic nut. The lever mechanism is replaced and fixed with a screw.
Finally, the tap is checked for leaks.
 It is important when assembling the lever mixer not to exert unnecessary efforts, as in the manufacture of most of the cranes used silumin - a brittle material that under load can burst. When replacing the cartridge, it must be ensured that the product is fully compatible with the parameters of the broken part. Before starting to disassemble the mixer, you need to purchase gaskets, sealing tape and other related materials.
As you can see the lever mixer is quite simple. The main thing is not to hurry up and carefully memorize where and how this or that detail is located. Having studied, the principle of operation and the device of the lever-type crane, each homeowner will cope with its repair or complete replacement.
The mixer is an essential part of the sink. Often a mixer meets a shower. In the market there are different versions of cranes. So popular is the single-lever and two-valve mixer. You can fix the first type by dismantling the system, but you need to know how the mechanism works.
Single-lever mixer unit
Single-lever mixer not so long ago appeared on the market, but already managed to gain popularity. These cranes are often called "one-armed" or "one-shot". You can control the design with one hand. Having become acquainted with the device device, you can understand the principle of the mixer.
Single-lever mixer circuit:
- Handle - performs control functions;
- Jet regulator;
- Housing;
- Fixing fastening;
- Ceramic or ball cartridge;
- Gaskets made of silicone or rubber;
- Circular nut;
- Tubes for fluid supply.
Based on the design, single-lever cranes are divided into ball and cartridge. The design of the ball mixer includes a steel ball with three holes. Two of them take a hot and cold liquid, mixing the components. The third is used to supply warm water. The ball moves by manipulating the handle. Moving in the right direction you can control the head and water temperature.

To increase the service life of sanitary faucets, it is advisable to install filters.
Cartridge valves have a similar operating principle. But the role of the ball performs a ceramic cartridge. But it is impossible to repair such a mechanism, it remains to completely replace the design.
Features of disassembly of the lever ball mixer
The name of the ball mixer is due to its design. A small ball with holes provides the work of the device. In the housing, the element is placed by the cartridge sleeve. Ftoroplastovye inserts act as a sealant. With the help of water pressure, the necessary clamping of the part is ensured. Thanks to such a seal, the ball easily slides inside the sleeve.
The water head is provided by the full or partial overlapping of the holes in the ball. The temperature is determined by their juxtaposition.
Such convenient use has its drawbacks. Because of the mixing of water inside the ball, the mechanism can accumulate scum. Often this is the main cause of all failures.
Minuses ball valve:
- Poorly amenable to repair;
- Have a high cost;
- Rubber parts wear out quickly.
But the ball kitchen faucet sufficiently durable. It can withstand hydraulic shocks and pressure drops. At the same time, the water composition does not affect the mechanism of the water tap.
Nuances of how to disassemble a cartridge
Replaceable cartridges with ceramic plates are recognized as convenient by many users. Devices have a long service life. At the same time, their cost is quite affordable. The design includes several ceramic plates, which are processed by ultrasound. Due to the smooth surface of the parts are perfectly adjacent to each other.
Throughout the entire operation of the system, smooth and silent sliding of ceramic discs is guaranteed.
The disks are placed on top of each other. The upper disc is connected to the control rod, and the lower one is fixed firmly in the housing. When the lever is rotated, the discs are displaced and completely or partially overlapped. Due to this, water is mixed. The upper plate controls the head.

If the design of the 3 disc, then the driving mechanism is the element in the middle. Such mixers are used for low pressure water pipes. In this case, the liquid is mixed not between the plates, but in the body of the device. This reduces the hydraulic pressure in the crane. A rotary mixer is better to acquire a proven quality from a manufacturer that provides guarantees.
The most popular manufacturers of single-lever mixers:
- Lemark;
- Frap;
- Swes;
- Iddis;
- Crone.
Among the minuses of the system, the sensitivity of the elements to the water composition is noted. Mechanical particles of sand or scale adversely affect the operation of the device. But the cost of such mixers is much lower and they are more amenable to repair.
How to disassemble a mixer: the necessary tools
To disassemble a water-based single-hand mixer in a bathroom or kitchen is quite simple. Problems can only occur with the formation of scale on the lower part of the handle. So the lever adheres to the cartridge rod. In the rest of the problems should not arise, the main thing is to stock up with the necessary tools.
Tools for work:
- Screwdrivers of different sizes;
- Hex;
- Adjustable and wrench;
- Pliers;
If you are not sure which cartridge is installed, you will need to disassemble the crane and remove the necessary mechanism before purchasing. With a detail on the hands it will be easier to explain to the seller what item is needed. And the user himself will not need to buy unnecessary elements and several times to go to the market or to the building store.
How to disassemble a mixer with a ceramic cartridge in the kitchen
First, the water supply to the apartment or house is blocked. Next, check the density of closing the cranes on the riser. In this case, the supply valves in the kitchen or in the bathroom will need to be opened.
In advance, you should take care of a rag and a bucket for collecting liquid.
In the sink, the rubber gasket and mixer cartridges can quickly wear out and leak. They will need to be replaced. But for this, the construction is first disassembled.
Steps of disassembly of cartridge-type mixer:
- Disassemble the tap. It will be necessary to unscrew the nuts of the flexible pipes when using the adjustable wrench. Then the mixer rises above the sink, and the hoses are removed from the fixation points. Sometimes the design can be equipped with a decorative casing. From it get rid of in the first place, but very carefully, so as not to damage the protective part.
- Then remove the plug. To do this, use a knife or a screwdriver.
- Remove the fixing screw. Use a hexagon for this.
- Then remove the lever. Because of the scale, it can stick to the body. With the help of boiling water or engine oil you can make your work easier.
- Then remove the protective cover and the clamping nut. It can be under the horn key or with grooves on the faces.
- The final step is to remove the cartridge.

It should be photographed half-turn mixer or schematically depict the position of all elements, so that there are no problems with the assembly of the structure. The used cartridge is not repairable. Replace the element with silicone. It has a long service life and moisture resistance.
How to disassemble a ball mixer
Preparatory work is similar to disassembly of the cartridge. The ball mechanism is difficult to repair. Be prepared to fully replace the mixer. When the problem is manifested in a lack of pressure or a leakage of the structure, you can get rid of the replacement of the ball mechanism.
When re-assembling the mixer, all parts should be lubricated with silicone grease.
Poor pressure may indicate a clogged filter grid. For this it is enough to unscrew the spout nut and get the necessary part. It is washed with water and inserted back. When the crane runs, the rubber gasket is replaced.
Disassembly of the ball mechanism:
- First remove the red-blue plug and remove the screw securing the lever.
- Then the lever is removed. Performing the work carefully, because not always the cranes have sufficient strength.
- Then the thread is untwisted. Use a screwdriver to move in the clockwise direction.
- With the help of pliers, the crane dome is disassembled. Then the protective element is removed. On it there is also a rubber gasket, which is replaced if necessary.
- Then the ball comes from the cartridge case. If there is visible damage, the mechanism is replaced.
- The spring-loaded parts are removed with a thin screwdriver. It is necessary to put new springs, because in time they wear out.
Then a new ball is assembled and the assembly is completed. After connecting the water, the working capacity of the new mixer is checked. Perform all the work on the replacement will not be difficult for a person with a minimum of knowledge.
How to disassemble a kitchen faucet with a single lever (video)
The swivel mixer is recognized as the most convenient option for a washbasin or bath. Mark 2 varieties of this tap. It is not always possible to repair them, sometimes a complete replacement of the device is required.
Situations where it is desirable to understand the structure of the kitchen mixer, arise quite often. When choosing a plumbing fixture, installing it, repairing it in the event of a malfunction, you can not do without these elementary knowledge. Since mixers in the kitchen are different, it is important to understand their classification, structure, working principle and distinctive features.
The name "mixer" directly indicates the main function of this plumbing equipment - mixing water. The device is connected to the pipes of cold and hot water supply, and its task is to supply water in the right proportion.
The adjustment is made by the user manually. In addition to temperature correction, the mixer also adjusts the pressure of the water jet.
Mixer - a device that combines in a single casing two cranes, connected by separate pipes to the pipes of HVS and DHW
What materials are used in production
Modern kitchen faucet can be made of the following materials:
- metal alloys (bronze, brass, silumin);
- polymers;
- ceramics.
A metal mixer is the most popular option for use in the kitchen. Brass and bronze do not oxidize and do not corrode from regular contact with water. In addition, these materials are chemically neutral, which means that deposits of mineral salts do not arise on their surface. Widely distributed plumbing devices made of metal due to good performance and durability.

The glossy coating hides the yellow metal - this is brass, zinc and copper alloy with high corrosion resistance characteristics
Mixers of silumin - an alloy of aluminum and silicon - are considered less reliable. Typically, this material is made inexpensive models of Chinese or Turkish production. Due to its low cost, this alloy has become very popular in the plumbing market.
Polymer cranes are cheaper and easier to fabricate than metal models. They also do not react with water and do not suffer from its mineral composition. In addition, low thermal conductivity of plastic makes it possible to use it at relatively high temperatures of water.
The main drawback of this material is fragility, so polymers are less often used to make responsible parts of the mixer, using them mainly for the production of flywheels and a regulating lever.
Ceramics - time-tested material, which is now successfully used to make mixers. Modern cranes use metal alloys, for example, cermets. As for their chemical properties, you will not see any signs of corrosion or salt deposits, but physical characteristics have a number of disadvantages.
![]()
White ceramic mixer in the kitchen fits well in the cold Scandinavian interior, combined with the facade of the kitchen facade and the glass "apron"
Make a mixer entirely made of ceramic is very difficult, so it is used in conjunction with other materials, in particular, with brass. The ceramics are brittle, and the cermet element can crack not only from the mechanical action, but also from the elementary sharp temperature drop.
Types of coverage - protection and aesthetic side
The materials from which the basic structural elements of the mixer are made affect its operation, and the attractive appearance and protection of the housing are provided with a coating.
Modern manufacturers cover kitchen plumbing equipment in such ways:
- chromium;
- bronze;
- nickel;
- enamel;
- powder paint.
The most prestigious and expensive option - PVD - vacuum deposition. This type of coverage guarantees long term even in the most extreme operating conditions. The strength of PVD is comparable with the strength of sapphire, therefore in domestic conditions, no scratches or abrasions to the mixer are not terrible.

If the manufacturer calls the plumbing fixture matte or designates it as "stainless steel", nickel plating was most likely used, and in the photo - gold plated
Coating with powder paint is also a durable, aesthetic and expensive option. It is used in finishing premium mixers. Due to the high temperature treatment (about 180 degrees), the paint is very firmly attached to the product.
The most common type of cover for kitchen faucets is chrome plating. Chrome is an inexpensive and very effective metal for protecting the body of the crane, which looks very attractive. Chromed products can be glossy or matte. The only condition is sufficient coating thickness. A layer of chromium less than 6 microns very quickly wears off and does not look aesthetically pleasing.
Classification of mixers by type of construction
There are two main types of kitchen mixers:
- two-valve;
- single-lever.
They are fundamentally different in structure and principle of action. The difference can be understood by reading the name. The two-valve has two handwheels (valves) for adjusting the head and water proportions, and in the single-lever mode, one switch is used - the lever.
In addition to the above-mentioned traditional options for kitchen faucets, touchscreens are gaining popularity, which automatically feed water, if you put your palms to them. Choosing between these options, you must first know how they are arranged.
The structure of the two-fan model
The two-valve mixer, by and large, consists of two separate cranes, combined in one housing and equipped with one spout. Hot and cold water are regulated independently of each other. The main drawback of this design - each time you have to re-adjust the position of the flywheels to get the water the right temperature.

One of the most common models of dvuhventilnyh cranes - a mixer herringbone for the kitchen with a high spout (for the bathroom is preferable to low spout)
The design of the two-valve mixer is as follows:
- valve heads (crane-axle boxes);
- valves;
- the body;
- spilling;
- aerator.
The casing is installed in the hole made in the kitchen sink, and a rubber or plastic sealing gasket is sealed at the connection point for sealing. The design of the kitchen two-valve mixer depends on which type of locking elements (crane-box) is used.

If the valve head mechanism locking and regulating the flow of water includes ceramic discs, it should not be installed in water pipes without mesh filters. If you get into the gap between the sand grains, the device jams, it will often be disassembled and cleaned
At the moment, two versions of the device "controls" of such a mixer are used in everyday life:
- with ground ceramic discs rotating with respect to each other within a limited segment;
- with valve heads performing rotational-translational or reciprocating movements.
The simplicity and convenience of using the crane depends on the type and structure of the crane-axle box, as well as the service life of the crane.

The water leakage through the valve head of the first variant is due to the leaky sealing ring (6), in the second variant, the valve gasket (12)
It is possible to eliminate leaks of valve variants without special difficulties with your own hands. The prevalent number of such breakdowns is due to the leaky rubber sealant, which you just need to replace.

The design of the valve table mixer can be conditionally divided into two parts: the first is above the sink, the second is located under it. Most breakdowns of the upper part are due to a malfunction or illiterate installation of seals (+)
In the lower part of the valve mixing device, the pin from the rod basically drops out, which causes the water to flow from the hot pipe to the cold one and vice versa.
The structure of crane-axleboxes based on cermets
A valve head with ceramic discs serves as a locking mechanism to block / block the flow of water, depending on the position of the holes in these plates. When they are combined, water flows. The larger the area of contact, the greater the flow of water. To turn off the water, the valve must be turned so that the holes do not coincide with each other.
To imagine how a metal-ceramic type crane works, look at its design. The structure of the crane-axle box looks like this:
- the body;
- stock;
- rod retainer;
- turn signal;
- upper plate;
- bottom plate;
- elastic gasket.
The rod is inserted into the brass body by means of a lock. If everything is done correctly, at the moment of fixation you will hear a characteristic click. Put a valve on the rod. For the transmission of torque from the valve to the plate meets the turn signal. The turnstile can also be metal, but often the manufacturer saves on this part and it is made of plastic. Of course, metal models are more reliable and stronger.

Externally, the crane-axles of this type differ in color. With a blue ring put on the valve with cold water, and with red - with hot
Rubber or plastic gasket is located at the junction of the crane-axle and the body of the mixer. If it is damaged or does not fit properly, water starts to flow from under the valve. The function of the gasket is a secure fit of the valve body and the mixer body.
The structure of a threaded crane-box with elastic gaskets
The threaded crane-box works on a different principle. Its construction is as follows:
- stock;
- choke;
- valve;
- rubber gasket;
- body.
The principle of operation of such a valve head model is that, during the rotation of the valve, the gasket is pressed or squeezed, respectively, closing or opening the valve. For the progressive movement of the rod on which the gasket is located, the threaded fitting on the end responds.
The main advantage of this model is a simple replacement of the rubber gasket in case of wear. But the main drawback is the need to perform this operation much more often than we would like. In addition, to use the mixer with such crane-boxes, it is necessary to turn the valve several turns, which complicates the process of adjusting the water temperature.
Single lever mixer system
Single-lever mixer - more modern and practical option for the kitchen. The main advantages of this model:
- ease of operation - can be adjusted with one hand;
- speed of temperature and pressure adjustment - has a significant effect on the readings of water meters;
The mixer "remembers" the position of the handle for a comfortable temperature.
To understand the principle of the mixer with one handle, you need to understand its structure.
From which elements is a single-lever mixer
Single lever mixer for kitchen:
- the body;
- lever-switch;
- spilling;
- cartridge;
- aerator.
Standard mixers of this type mix water by rotating the handle in a horizontal plane, and the water pressure by moving in a vertical plane. The aerator provides a good head of water at the outlet, due to the mixing of the water jet with the air.

Scheme of the crane in disassembled form, on which you can see all the smallest details, including the ball, gaskets and springs
The main functional element is the cartridge, which is an analogue of the crane-axle box. A locking mechanism of a ball or disk type is placed in the plastic housing.
Design of Ball Locking Element
At the heart of the ball-type cartridge is a metal hollow sphere with three holes. Two of them serve to enter the water (cold and hot), and the third - to exit the water the right temperature. The ball connects directly with the handle and changes its position with it.

That's what the main character looks like-a smooth ball made of stainless steel with special holes for water and fasteners
When you rotate the hole on the ball can to some extent coincide with the holes of the cartridge. Thus, both the head and the water temperature in the kitchen are regulated. Mixers of this type are now less common. This is due to the complexity of production of such models, their high cost and frequent failure.
How the Disk Cartridge Works
The principle of a disk ceramic cartridge for a lever mixer is the same as for a ceramic tap-changer in a two-vent version. The base is two ceramic plates, one of which is movable and rotates with a change in the position of the lever.

The cartridge with ceramic discs looks like a single system, all its internal elements are hidden under a plastic casing of cylindrical shape
If the holes on the upper and lower disks coincide, the water enters the spout, if not, it overlaps.

The base of the cartridge is white ceramic discs, which are characterized by ideal grinding of the surface for maximum fit
Such cartridges with the use of cermets are used in single-lever mixers in kitchens most often.
Automatic Mixer - Non-contact use
If the basis of the single-lever or two-valve mixer is clean water mechanics, then automatic crane works thanks to electronics. The device is much more complicated:
- the body;
- sensor;
- thermostat;
- diaphragm on the spring;
- solenoid with retainer;
- shielding coil;
- core on the spring;
- sealing material.
The solenoid is an inductor. The membrane that blocks the flow of water is located at the end of the core. When the sensor is triggered, the solenoid is energized, the coil lifts the core, it retracts into the solenoid cavity, thus raising the membrane and opening the way for water. When the power supply stops, the opposite occurs: the core is lowered and the diaphragm returns to its original position.

In the diagram it is easy to consider how the main components are interconnected: coils, tip, core, solenoid, membrane, body
An automatic mixer requires the presence of a battery. You can use a connection to an eclectic network by converting current through a transformer, but this is an extra complication when installing. Batteries or batteries are often used. Automation in the kitchen is a good idea. During cooking, you often have to get your hands dirty, for example, when working with a dough. Turning on water without contact with the valve will help keep the kitchen clean.

Automatic kitchen mixer with touch control is not equipped with the usual levers and valves. The choice of jet and temperature is made by touching the right / left side of the case lightly. In addition to the sensory there are models with a mechanical miniaturized regulator
Additional Functionality and Features
In addition to the design differences, kitchen faucets can be completely different models. They must have a number of constructive features, which make this crane ideally suited for the kitchen, namely:
- high spout;
- possibility of turning;
- direction of the jet to the center of the sink;
- retractable hose.
High spout will be very handy in the kitchen, as it often becomes necessary to put water in high capacity, for example, a bucket or a jug. Another condition is that water enters the washing center. This is convenient for washing dishes. The tasks in the kitchen can be very different, so it would be nice if the mixer tap can be turned.

A good mixer can be equipped with a dispenser for liquid soap or detergent, an aerator, a flexible hose or other device that expands the functionality
The presence of a retractable hose in the design of the kitchen faucet will make the faucet more practical and mobile. With this innovation, you can easily type a bucket of water that stands on the floor or wash large-sized dishes from all sides.
![]()
Without a pull-out spout, no professional kitchen faucet can do it. In the photo - a dynamic watering can with an extended working area
Some mixers are equipped with additional functionality, for example, the ability to switch the direct jet into drip mode or by the presence of an additional outlet for the supply of filtered water.
How to make out the mixer in the kitchen
In fact, the internal structure of the mixer you hardly need until your crane is out of order. Then there is an urgent need to disassemble it and look for a breakdown. And if you prepare in advance and study the algorithm for disassembling the mixer before the malfunction occurs, you can save time and nerves by being prepared for unforeseen situations.
Disassembly of single lever mixer
In order to disassemble the single-lever mixer and get to its device, it is necessary to follow this simple instruction. First turn off the water supply - shut off the water. To unscrew the body of the mixer, you need to remove the decorative plug (often has the appearance of a round insert of red-blue color).

A decorative plastic insert hides an unaesthetic screw. Some parts of the mixer are specially made removable, to provide access to the main acting parts during the repair
Behind the plug you will see a screw connecting the lever and the rod. It must be unscrewed with a screwdriver. After that, you can remove the knob-regulator. The next step is to unscrew the lock ring. To do this, use a swivel or gas wrench.

If the nut does not unscrew, you can gently tap on the key with a hammer in the direction of movement, this should help
Now you have access to the cartridge, you can get it and replace it if necessary.
Having carried out diagnostics or repair or replacement, it is necessary to carry out all steps in the reverse order. In plumbing, it is important not to "pull" the threaded connections, but they should not "walk" either.
Repair mixer with two valves
The two-valve mixer is disassembled according to the following scheme:
- As in the first case, turn off the water.
- Remove the plug from the valve that closes the screw. Unscrew it and remove the flywheel in need of repair, or both.
- Under the valve you will see a nut that fixes the crane-axle. Using a wrench, it must be unscrewed.
- Having access to the crane-book, it can be removed and inspected visually. Particular attention is paid to sealing, if there is damage, deformation of the gasket, it must be replaced without fail.
When the inspection is completed, all the details are assembled in the same order.
Video-repair instructions for mixers
Disassembly of a crane with two valves with a detailed examination of the device:
The video shows the device and the principle of the cartridge, as well as the process of assembling the mixer:
To understand the mixer device is very important not only when choosing the right model for your kitchen. Plumbing equipment is used regularly and has the property of failing. Knowing the design of the crane from the inside, you will be able to detect a malfunction and repair the mixer yourself.
Many owners country cottages strive to fill their bathroom with maximum functionality, beauty, practicality. To do this, it is not necessary to use the services of plumbers of high qualification. Some plumbing operations are quite feasible to perform independently. Next, we will consider how to disassemble a single-lever mixer in-house, which will save on the wage labor of a hired worker.
Device
To understand how to change the mixer in the bathroom with your own hands, you need to thoroughly study the structure of this plumbing element. Single-lever mixer is a faucet, which has only one adjustment knob. The latter is fixed by means of a single screw and a lining.
But the modern market provides the buyer the opportunity to choose a specific model from a variety of different modifications of mixers of single-lever and two-valve type. And many of them have a complex device and are fundamentally different from the traditional mixers, many years present in the domestic plumbing market.

The most popular today are three types of single-lever mixers:
- with a ceramic cartridge - inside this tap there is a ceramic cartridge with three holes for. The main feature of this mechanism is that changing the position of the joystick leads to the alignment of one of the holes on the lower plate and the mixing chamber of the upper plate. Water comes through two tubes in the cartridge, it is mixed in it and passes into the drain nozzle. Adjust the set or temperature mode using a shutter made of specially shaped discs that alternately open or close the access of water of a certain temperature;
- the ball valve got its name due to the specific adjustable head of the structure. It is made of stainless steel, and the ball is hollow in the middle and is located in the body of the model. Water comes through wiring and brass tubing. The handle is located on the pin, which allows the ball to retain its mobility. And the airtightness of the cartridge holes provides special gaskets. When you press the mixer knob, the ball starts to spin. This leads to mixing of hot and cold water. Turning the lever to the left or right side allows you to completely cover either the cold or hot water. In other words, in operation such plumbing is very convenient.
 Cartridge
  Ball construction
 Required Tools
The mixer is a mechanism that provides a technical function of mixing water of different temperatures. It is installed on washbasins and bathtubs, bidets in the bathrooms, and in the kitchen on the sink. If the product is manufactured on high-quality equipment using good materials, it will last a long time without breakage. But if the mixer still requires repair or replacement of one of the parts, disassemble, replace the problem node and then assemble the product yourself.
Before you tell how to replace the faucet in the bathroom, we will dwell on those tools that will be needed for this:
- a flat-type screwdriver is an indispensable tool in the dismantling of single-lever mixers in-house;
- key hexahedron is necessary for unscrewing the screw in the mixer when dismantling it;
- a hammer;
- pliers.

Remember that the work on the disassembly of the mixer on its own you need to start only after turning off the central water supply. Otherwise, the flood is inevitable. And work for safety is only with gloves.
Disassembly instruction for single lever mixer
Doing your own disassembly of the bathroom faucet will not cause difficulties, if you know exactly the type of bathroom fittings installed. We describe the features of disassembly of each of them in more detail below, which will simplify the task of disassembling a single-lever mixer for inexperienced people in sanitary matters.
With ceramic cartridge
If you do not know how the single-lever mixer is dismantled ceramic cartridge, read this article to the end. If the cartridges inside the bathroom faucet have become unusable, you will need to completely disassemble the product and replace the defective parts with new ones.
 Cartridge Mixer Assembly
 This is a great way to save not only the payment of plumbing services, but also the purchase of a new mixer. Follow this instruction, then the work will proceed faster and not be complicated by unpleasant moments or mistakes:
- using a flat screwdriver, remove the decorative plug on the handle of the valve. It will have a blue and red color, which indicates the possibility of adjusting the temperature regime of the supplied water;
- with the hex wrench key, unscrew the screw responsible for fixing the joystick on the adjusting rod;
- remove the handle, unscrew the decorative and clamping nuts. It happens that in the design there is not a hex nut. Then you need to take extra care when unscrewing such a nut, so as not to damage the special grooves on it;
- further, it is necessary to dismantle the disc from the mixing mechanism for the bathroom. Replace the cartridge only when there is a strong wear of the latter, or it became obvious that the tap is leaking.
 Stages of parsing the cartridge mixer
 Ball
The spherical model of a single-lever mixer is also easy to disassemble. To do this, perform a number of actions:
- remove the decorative plug, unscrew the fixing screw, remove the lever;
- remove the screw connection, unscrew the screw using a flat screwdriver. If it is scraped during use, use vinegar to remove it. You can also use special chemicals, purchased in advance;
- further, it is necessary to pull out the ball mechanism, replace the rubber gaskets and put the ball back to its original position;
- with the help of a nut made of plastic, the seals are secured;
- the lever mechanism is inserted into its original position and fastened with a screw. This operation must be done slowly and carefully, so as not to squeeze the structure.

Be sure to check the valve for leaks after repairs. When dismantling a two-valve type crane, there are specific features that need to be considered for a positive result of the work.
 The device of a spherical mixer
 Leverage
Leverage mixers are very popular in the domestic market due to the high comfort of use in practice. In their design, there is a lever, which is responsible for regulating the temperature regime of the water.
The self-replacing mixer in the bathroom can save a lot. In essence, the process of performing work is conventionally divided into the same stages as the previous ones.
| Stage name | Basic Operations |
| Preparatory stage | Turn off the hot and cold water supply. |
| Dismantling work | Remove the decorative plug from the mixer, unscrew the fixing screw holding the handle, remove the handle and the protective ring, unscrew the clamping nut, and remove the cartridge. |
| Replacing the cartridge | Removal of scale and contamination from the mixer, installation of a new cartridge. |
| Assembly work assembly and installation of the mixer to its original location. | In the case of a variant with a ceramic cartridge, at the final stage it will be necessary to mount a new cartridge in the mixer body, screw the clamping nut, and install the decorative nut. |
 The handle can be removed with a fixing bolt
 Replacing the cartridge
After a long period of use, even a very high-quality lever-mixer can become unusable. Then you can fix it yourself. Before starting work, you need to understand the cause of the failure. If you want to replace the cartridge, the procedure is as follows:
- preparatory stage - it is necessary to switch off hot and cold water;
- dismantling works - removal of the decorative plug from the mixer, dismantling of the fixing screw holding the handle, dismantling the handle and protective ring, unscrewing the clamping nut, dismounting the cartridge. This can be done with a flat screwdriver;
- replacement of the cartridge - removal of scale and contaminants from the mixer, installation of a new cartridge.
 Replacing the cartridge
 Remember that it's very difficult to purchase a new cartridge without having the old part on hand. The species diversity of this plumbing element is very wide, so to achieve an ideal docking "in the blind" can be quite difficult.
Be sure to bring an old item to the store, so that the seller correctly picked up a new one. After the described operations are performed, you can proceed to the direct assembly of the crane in the home. About this in more detail.
Assembly
Now you understand how to disassemble the faucet in the bathroom. Next, we need to understand how to assemble this plumbing element. Professional plumber will always consider the important points when assembling a single lever bathroom mixer. And inexperienced in these issues a person can lose sight of them, not attaching little details of particular importance:
- the stem must not be closed during operation;
- the sides of the clamp are sent in different directions;
- a groove above the plane of the rod is located in the front;
- clamp lock should be installed directly on the side of the base;
- the slot for the hinge of the lock should be turned back;
- the mixer knob must first be tilted slightly and then inserted into the groove of the lock nut.
Dismantling, assembling and installing the mixer in its place is carried out in several steps. In the version with a ceramic cartridge at the final stage, it is necessary to install a new cartridge in the mixer body, screw the clamping nut, and install the decorative nut. Remember that the clamping nut can easily be squeezed, which will lead to malfunctions in the mechanism. Therefore, twist it smoothly without excessive effort. Finally, a plug is installed.
Video

Bookmark this site
- Kinds
- Selection
- Installation
- Finish
- Repairs
- Installation
- Device
- Cleaning
How to repair the mixer?
- Repair of ball mixer: features and recommendations
- Mixers and their repair: we fix a single-lever mixer
- We repair bathroom faucets: the solution of possible problems
Are you tired of the annoying sound of dripping water coming from the bathroom or kitchen? Remember that in addition to annoying sounds defective mixer for kitchen or bathroom leads to a significant leakage of water and increased costs for utilities, so it must be urgently repaired.
Over time, a mixer of any type needs to be repaired.
The following recommendations will help you understand how to repair the mixer yourself. you will learn about the characteristic faults of the faucets and how fast the bathroom is or how, and how to fix the breakdowns without assistance.

The device of the valve cock.
First of all, prepare a set of tools that will help you accomplish or for the kitchen yourself. You will need:
- car key;
- cartouche;
- screwdriver;
- thin hook;
- gaskets;
- cartridge.
Before dismantling and repairing the ball mixer, it is necessary to determine the cause of the leak, familiarize yourself with the device of this mechanism and assess the efficiency of its shut-off valve.

If there is a need to repair a single-lever ball valve for a kitchen or bathroom with a metal or ceramic valve, it is necessary to carefully remove the lever itself, which is a kind of handle for controlling the water supply. This lever is usually attached with a screw. When removing it, it is necessary to carefully trim the decorative cover with a knife, screwdriver or other convenient tool. After that, it will be possible to unscrew the screw itself, so that it is then possible to easily approach the inside of the crane.
With or the bathroom, you need to consider the fixing method for your bathroom fixture model.If the lever of the mixer is simply put on the rod, it is necessary to gently pull it up and take it off, without twisting any screws, because they are not provided for in this design. If the small fixing screw is in the side of the kitchen faucet or the bathroom, you need to unscrew the decorative cover. After the lever has been removed, it is necessary to unscrew the housing cover.

This lid, as a rule, is fixed by means of a thread, so disassembly and repair of the mixer provides for unscrewing this element manually, without using tools. But quite often the lid is attached using the fixing screw installed on the side. In this case, you first have to unscrew the screw yourself with a suitable screwdriver, then pull the lid of the sanitary ware with the tip or the tip of the knife and take it off with your hands.
You will see a large nut that needs to be unscrewed using a gas or adjustable wrench of the appropriate size. After that it will be necessary to remove the cartridge itself, which needs replacing. Keep in mind that the old gasket under the cartridge can be tamped and adhered, as a result of which it will not be easy to remove it. Turn on the mixer and see where the water will flow to determine the exact cause of the malfunction.
After that, you can start repairing your kitchen faucet or bathroom, replacing either the entire cartridge in the assembly or the gasket. In this case, you will need to get to the problematic place of the crane, in order to replace the worn out element.
Back to contents
Mixers and their repair: we fix a single-lever mixer

Before starting the troubleshooting work directly, it is not superfluous to hedge: close the hot and cold water supply valve. This must be done in order to prevent later if something goes wrong.
If water leaks from your bathroom or kitchen faucet, this may be a sign that some sort of garbage has fallen between the ball and the discs or saddles of the cermet. To fix the problem, you need to remove the decorative plug, which is installed in the front of the lever.
In most cases, this plug is blue-red (its blue half is located on the side of the cold water supply, red is on the hot side). Carefully remove the screw located under the plug. This screw is used to attach the regulating rod to the lever. After that, you need to remove the lever, pull out the clogged cartridge and install a new one instead. Then assemble the product.
The main and most common cause of a weak jet of water coming from the mixer is the clogging of the aerator. If a similar problem is observed in your bathroom or kitchen faucet, you need to unscrew the aerator and blow it. After this, rinse the mesh under a strong stream of water, and then screw the aerator back.
It is often difficult to establish the reasons for the malfunction of the mixer. In this case, first you need to disassemble the plumbing. Carefully remove the chrome parts, then use a screwdriver to pry the lock spring. Next, you need to unscrew the tightly seated cartouche and pull it out. Replace the old cartouche with a new one (if the old cartoon has leaked out) and assemble the product.