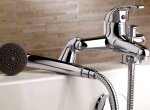
The tap on the bath with a mortise shower. Cascade models for acrylic bathtubs. We establish ourselves - we save the family budget
Acquiring any device, you need to proceed from its use in a particular room and expediency, rather than from the premises of decorating the interior. Today, there are quite a few new models in the construction market for sanitary ceramics. Exceptions are not also mixers for acrylic bathtubs. Such equipment is produced in various modifications. But on the generality of their characteristics this has little effect.
Distinctive features of mortise mixers
Mortice mixer not devoid of many advantages. The design of the room with mortise mixers looks much more impressive. This is made possible by the uniqueness of the device, which makes it possible to mask the mixer hose under the bathtub.
The shower user draws the hose through the hole and returns to its original position when it ceases to use it. In its normal position, the hose can be safely hidden. The length of the hose is 2 meters. In addition, water supply pipes suitable for the product are also not visible.
Such a device creates an even flow of water, which affects the usability. In view of the strong pressure that a mortar mixer can create, the filling takes much less time.
Known manufacturers for their products use ceramic cartridge, which increases the service life of the product. It is possible to install cascade options (nozzle, spout) in the best way, as it will be more convenient for the owner of the dwelling. There are products installed on the side wall, not on the side of the bath.
![]()
In addition to the advantages, the disadvantages of the mortar mixer have also been found in practice. A special feature of its application is intensive wear of the hose, which is caused by its regular bending. Therefore, this part is to be changed much more often than in other models. If the shower will be used often, then the replacement will have to be done every 2 or 3 months. In some products, the watering can also serves as a traditional spout and spout. With a faulty hose, the use of the mixer becomes impossible.
Since the "shower" and "spout" in the cascade mixers are spaced apart and are independent of each other, the service life of the cascade mixers is slightly higher than that of the conventional ones. This, of course, quality refers to the pluses. But in this moment there is an unpleasant moment for professionals: for installation it is necessary to do more than one hole on the side, and several.

Another important nuance that accompanies the installation of a mortise mixer is the laboriousness of the installation process itself. That is, it is much more difficult to install a mortise mixer than a wall-mounted appliance. In view of this characteristic, the mortise mixer has received many opponents of its mounting on acrylic bathtubs. Since acrylic bathtubs are polymeric products, fragility is considered an essential shortcoming of the material from which they are made. This should be taken into account when installing the device. For example, tightening the fastener, you need to try not to overdo it with pressure. Otherwise, undesirable defects will appear on the sanitary wares - cracks. Therefore, the installers equip the installation site with additional reinforcement.
And what is the price of this device?
There are quite a wide range of prices for mortise mixers, as many factors affect the cost. For cascading products, it starts at 6,500 rubles (with three mounting holes) and reaches 14,750 rubles (with 4 holes). You can find samples and more expensive.
If you resort to the help of a specialist, then, in addition to the price for the product, you will need to include in the costs and installation fees. For one hole, you will have to spend about 400-500 rubles. And consider how much it will cost three holes.
The cost of conventional (non-cascading) models fluctuates around 3900-7150 rubles.
![]()
Buying the model you like, do not forget to specify what is included in its kit. Some types of devices do not provide for the supply of a hose and shower head. An important fact when buying is to pay attention to the company-manufacturer. In order to save money and finances, and moral forces, try to choose products of trustworthy brands.
Recommendations for self-installing the mortise mixer on the edge of the acrylic bath
To install a mixer of this kind on your own, you need to prepare a set of tools:
- wrench, adjustable;
- electric drill with a nozzle cutter;
- screwdriver.
Insertion of the mixer into the bath is carried out, guided by the following points:
- Produce a layout of the place where the mixer is planned to be installed. Such a place must meet the requirement of accessibility, so that it can be connected to water and accessed in case of repair or replacement.
- With the help of an electric drill, at the end of which a crown mill of the required diameter is inserted, drill the side of the bath in a pre-marked area.
- In the future, the installed gasket for the mixer (included in the kit), produce its installation.
- The mixer is attached to the wall of the bathtub by twisting one or more nuts from the inside.
- When it is required to install a single lever device, perform the following steps: screw the bottom of the stud and put a metal half-washer on it. The nut is screwed, and the mixer is attracted to the bath surface through the floor.
Immediately, the hot and cold water, using special flexible hoses. Flexible piping can be bought at the same point of sales where a mixer is purchased. It is important not to forget about the installation of rubber gaskets, which go under the ring washer.
Now you can buy an acrylic bathtub with already prepared holes for the mixer. This will greatly facilitate the installation process.
Cutting the mixer into the wall surface
You can install the device in the wall, using only a false panel. Another way to fix it on the wall with the provision of convenient access to the structural system under the finish will not work.
Technology of the procedure:
- Arrange the false panel and above perform the finish. The mixer will be fixed to the stationary surface of the finish.
- Bring pipelines to the place where the mixer will crash.
- They maintain the required distance between pipe fittings, fixing them in an unchanged state.
- Screw the eccentric nipples to the fittings, having wound the FUM-tape or natural coil up to them in advance.
The mixer nuts are twisted from inside the finishes to the eccentric nipples, using the winding.
After completing the installation, open the valve and observe the operation of the device. If the onboard devices leak, then they are slightly tightened with a key. For more on the types of bathroom faucets, see.
Despite the success of modern housing construction, a small bathroom and a combined bathroom remain a sad reality for many apartment owners. Where almost every square centimeter on the account, some of the problems can be solved by installing a mixer on the side of the bath. This fashionable novelty has many advantages. However, she also has a number of shortcomings.
The opportunity to save space is not the only advantage of devices of this type. The faucet, installed directly above the bowl of the bath, fills it practically without splashes, which are capable of staining on walls and other elements of the interior. As a result, cleaning will require less effort.
Models of faucets that mount directly to the side are usually characterized by increased productivity. Therefore, the bath fills faster, and the comfort level increases markedly. Mediated by such a solution allows you to save a little: if the bath fills quickly, the water in it does not have time to cool down, i.e. heating costs hot water will be somewhat reduced.
Image Gallery


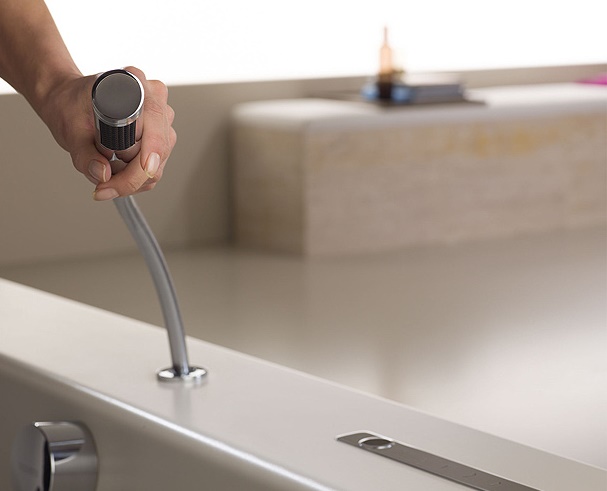
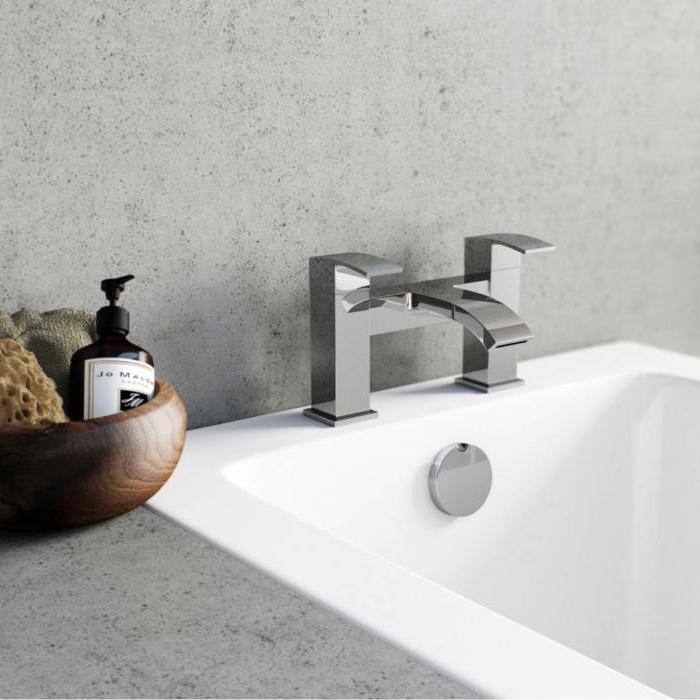
Such mixers are distinguished by stylish design and a wide variety of designs. For example, you can select a model whose elements are mounted separately. The control panel is placed at the head to be at hand, pouring - along the center of the long side, the shower head - in the corner, etc.

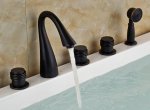
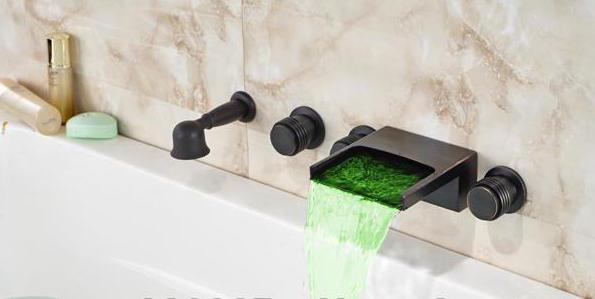
Faucets waterfall type for the side of the bathtub look very impressive and often equipped with a convenient control panel. But the cost of such products is usually quite high
Finally, mixers of this type look usually very stylish, they leave a lot of opportunities for decorating the interior. The shower head is standing directly on the side, and its hose is usually hidden between the wall and the side of the bath or behind the false panel. The interior design of the bathroom from this solution only wins. Another advantage is the low noise level when the mixer is operating.

The mixer on the side of the bath looks stylish, increases the comfort level in the bathroom and is relatively easy to install
It should be remembered about the shortcomings
Despite all the advantages that are described in detail in the brochures, you should think about a number of problems before you buy a mixer for the edge, especially if the owner plans to install it by himself. First of all, do not buy an inexpensive model, because due to operational features, these plumbing products are subject to high loads. A poor-quality mixer will have to be replaced very soon.
The most vulnerable element of this mixer is the shower hose. Most of the time it is in a folded state, so it gradually deforms. Soon, the cracks appear on the hose, it begins to leak and needs replacement. Unfortunately, even expensive and high-quality mixers from problems with a hose are not insured.
The hose of the shower head of the mortise mixer is in the folded state behind the bathroom cabinet or behind the false panel. Constant deformation of this element leads to its frequent breakdowns
We will have to accept the fact that the hose needs to be changed periodically. Prudent buyers immediately take a spare hose to perform this simple repair, as soon as it becomes necessary. Especially vulnerable in this regard are faucets, in which the spout acts simultaneously as a shower head.
For amateur craftsmen who do not have much experience in plumbing work, it should be remembered that at home it is easiest to install an onboard mixer on an acrylic bath. When working with a product made of cast iron or steel, the enamel will almost certainly be damaged, which can lead to corrosion. As a result, the bath must be repaired or completely replaced.
It is better for an inexperienced master to entrust this work to a reliable specialist. Another way to solve the problem is to purchase a bath with a ready-made hole for mounting the mixer. However, usually with this option they supply acrylic bathtubs. Of course, when choosing a mixer, it is necessary to take into account the dimensions of such a hole.
Design features of the mortise mixer
To install on the side of the bathtub, most manufacturers offer so-called modular models, although there is a variant in the form of a monoblock. Before starting the installation, you should carefully study the design of your mixer, as well as the manufacturer's recommendations for its installation and further operation.

Elements of the mortise mixer of the modular type can be installed separately, but they are controlled from the common center, which increases the comfort level
Monoblock models are usually delivered in assembled form, but modular devices consist of several elements. First of all, this tap is the central part of the mixer, on the case of which there are three outputs:
- for hot water;
- for cold water;
- for spout.
Separately, there is space for connecting the shower head. These inputs have standard sizes, so the buyer can decide for himself where the spout and shower head will be located. The connection to the pipes of hot and cold water is carried out with the help of special half-inch eccentrics.

This scheme allows you to get an idea of the features of mounting the mortise mixer on the side acrylic bath, as well as the necessary supplies
Quality mortise mixers of famous brands have the ability to withstand severe water hammers. In many models, a separate shower head is controlled by a lever mounted on the spout housing. This design automatically switches the flow of water from the shower again to the spout, when the watering can is returned to its place.
Installation procedure for a mortise mixer
To install a mortise mixer, a number of operations must be performed. Here is their order:
- Mark the installation location of the mixer.
- Drill a hole of appropriate dimensions.
- Install the mixer.
- Lock its position with the help of fasteners.
- If necessary, install other elements of the modular system.
- Connect hot and cold water hoses.
In words, the information on how to install the mixer on the side of the acrylic bathtub looks very simple, but in practice everything may be completely different. There are a number of nuances and important points that you should pay attention to before the installation, and maybe even before the mixer is purchased.

In this figure, a diagram of the installation of the mixer on the edge of the acrylic bath is presented. It is recommended to use a special bar for reinforcing the structure after drilling
First you need to prepare
When preparing for the installation of a mortise mixer, three steps must be taken:
- purchase a suitable mixer;
- prepare the necessary tools and materials;
- choose appropriate place for installation.
Of course, the models of mixers of this type are very diverse. And yet there are a number of general requirements that should be taken into account. Do not buy a suspiciously cheap mixer.
Replace a low-quality model will have very soon. It is better to pay a little more expensive, not to remember then the proverb about miser, which had to be paid twice. Preference is given to the mixer, produced by a well-known manufacturer.
Mortice mixers, which are installed on the side of the bath, are supplied as separate elements. Recommendations for assembly are found in the product data sheet or in the special manual provided by the manufacturer
Not at all superfluous will be the product's passport, manufacturer's recommendations for installation and, of course, warranty obligations, certified by signature and stamp. If there is a need or desire to save money, it is better to choose a mixer with a simple design and high-quality execution. The same principle should be followed when selecting consumables: even more expensive, but more reliable.

Depending on the model of the mortise mixer, it may be necessary to purchase additional consumables before installation: flexible hoses, eccentrics, gaskets, fasteners, etc.
The following materials and tools will be needed:
- electric drill, professional or household;
- a special nozzle for a drill, it is called a crown mill;
- screwdriver;
- fasteners;
- flexible hoses for cold and hot water supply;
- adjustable wrench.
Fasteners are usually sold with a mixer, but this is not always the case. The diameter of the core bit must match the dimensions of the device. You can manage without a drill and without a milling cutter, if you buy a bath in which the hole for the mixer has already been made in the factory. Instead of flexible hoses, water pipes made of PVC can be used. Mounting them is more difficult, but such designs last longer than flexible piping.
Usually the mixer is installed in the middle of the bead, at the end or at the corner. When choosing a place, remember that part of the communications, including the shower hose, should be hidden. For this, a special space should be provided. Sometimes it is necessary to arrange a special false panel to hide behind it these communications. It all depends on the specific situation.
Image Gallery


Another important point is the provision of access to communications. Periodically, the hidden communications of the mortise mixer must be serviced, repaired, replaced. Therefore, it is important not only to find a fairly spacious place, but also to make it possible to reach the communications without special difficulties.
For example, if a false panel is used, it should be made removable. Access can be provided with a removable decorative screen that covers the entire bathtub.
Mixer installation procedure
First mark the bathtub on the side of the bath. To do this, you can use a special marker or any writing tools that will leave a fairly visible track and which then is not difficult to erase. After this, you can start drilling. Crown milling cutter is put on the drill and drilling is performed on the marking.

For drilling holes in an acrylic bath for an electric drill, use a special nozzle, which is called a crown mill. The recommended number of revolutions is 500-600
When the hole is ready, its edge needs to be processed by sandpaper, file or other similar device. This not only makes the edge of the hole smooth, but also allows you to adjust its diameter.
The mixer is placed in the hole with a special gasket, which is placed between the side of the bath and the device. The gasket acts as a shock absorber and sealant. If this element is not supplied with the mixer, it must be purchased separately.
After that the mixer is fixed with the help of special fasteners. These can be clamping nuts or a special stud in combination with a clamping hem and a nut. It all depends on the device of a particular model.
Then separate elements of the mixer are installed: spout spout, shower head, controls, etc. Details for specific models are described in the manufacturer's manual. Now the mixer is installed, it only remains to bring hot and cold water to it.
Most often, special flexible hoses with threaded connections are used for this. When installing on the thread, a special seal should be wound, for example, a flax thread or a FSM tape. Do not use too much gasket, this can damage the thread.
But too little sealant will not provide sufficient sealing of the connection. Determine the optimum sealant layer as follows: if the relief of the thread is hardly probed through the sealant layer, the winding should be stopped.
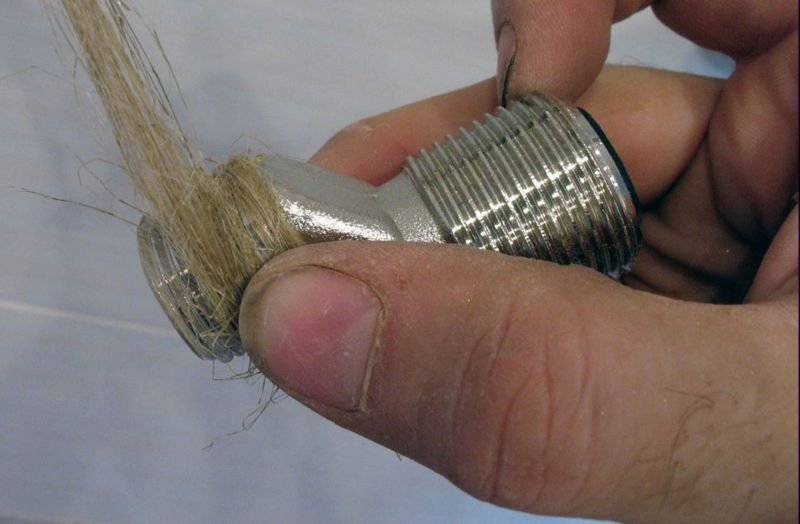
When installing threaded joints, a suitable sealant should be used: cottonwood, linen thread, FUM tape, etc. Wind the seal on the standard thread counterclockwise
Normal situation is when, after screwing, the seal slightly protrudes from under the nut. To seal the seal properly and not unwind during the installation, it must be wound on the thread counterclockwise. Sometimes special gaskets are used instead of FUM tape. These elements will have to be replaced periodically, so that the connection does not leak.
Example of installing a mortise mixer
Let's analyze the process of installing the mortise mixer in steps. The insert will be made in the side of the acrylic bowl. The gander and shower faucet of the mixer are located separately from the stop valves. Below is the diagram:

The shut-off valve of the mixer shown in the example is separated into a separate block. The spout and shower are located in convenient points (+)
To drill holes for the installation of the elements of the mortise mixer, we store a marker, roulette, drill and a set of cutters, in particular, a Forstner drill.
Image Gallery


![]()
Further actions for installing the mortise mixing device on the edge of the acrylic bowl are performed in accordance with the manufacturer's recommendations:
Image Gallery

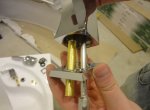
Step 1: We try the mixer's gander to the installation site, determine its direction, since fastening will be done rigidly

Step 2: To the leg of the gusak spout, attach the decorative mounting stand, passing through it the connection pipes to the communications

Step 3: Install the spout again into place, but with the stand attached to it completely covering the drilled hole

Step 4: Connect the flexible hoses by screwing them with a short fitting. We do not have to use the rewinding, we tighten the key by 10

Step 5: On the underside of the bowl, mount the lunar mounting brackets used to fix the spout position

Step 6: The single-lever cock, designed to adjust the head and temperature of the supplied water, is installed in a similar way

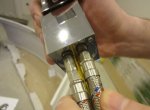


In the end, we perform the connection to the hot and cold water supply systems. cold water. From the back of the bathtub, it should look like this:

During the marking and selection of the location for the installation of the components of the mixer, it is worth considering the length of the hoses included in the kit. If they are short, you will have to buy it yourself
The best time to install the mixer on an acrylic bath is the period of repair and installation of a new bath. Installation of the device is carried out before connecting the bath to the sewer and installing a decorative screen. If the decision is made to replace the usual wall-mounted mixer on the mortise model, it is necessary after the installation and dismantling of the old mixer to perform some finishing work.

To provide access to the mixer mixer installed on the side of the bathtub, you can use a convenient flip-up screen, a false panel or inspection hatch
Perhaps, the entire bath will have to be dismantled and installed again. With these costs of time, effort and resources must be considered. If you need to install a non-removable version of the decorative bath screen, you can make a manhole in it to provide access to communications.
When installing the mortise mixer on the edge of the acrylic bath, manufacturers recommend using a special bar. Indeed, acrylic is not as durable material as cast iron or steel. According to manufacturers, the presence of a hole in the rim weakens the structure. Planks and panels serve to strengthen the rim and prevent its possible deformation.
In practice, the craftsmen do not attach any importance to this moment and do without any straps. This element often has to be trimmed and adjusted to the size and shape of the rim. The border usually has a rounded shape, which significantly complicates such a fit. In order not to bother with this problem and do not waste time, home craftsmen simply disregard the manufacturer's recommendations.
Fortunately, information about the collapsed mixer, installed without a bar, has not yet been received. And yet you should remember about this danger and reasonably assess the risk-cost ratio for mounting the reinforcing bar. If its shape coincides with the shape of the rim, it makes sense to strengthen the structure.
Features of drilling on enamel
Specialists do not recommend newcomers to independently make holes in the edge of a cast iron or steel bath. The problem is the presence of enamel, which performs not only decorative, but also protective functions. If the drilling is incorrect, the risk of irreversible damage to this layer is high. Still, there is a technique for home drilling of such surfaces, and an experienced craftsman can easily cope with it.
In addition to conventional tools, such as a marker, roulette, screwdriver and drill, you need a special perovy drill, designed for drilling glass and ceramics, as well as a transparent tape and a piece of clay. After marking the place of drilling should be carefully sealed with adhesive tape.
Then from the piece of plasticine you need to make a round edge and stick it around the circumference so that the place for drilling is in the center. The area bounded by the plasticine edge must be three times the size of the mixer hole. It turns out an even round area with a side. In it you need to pour water.
After that, you can start drilling in the center of the markup. It is recommended to use a drill with a diameter of 6 mm at a speed of about 500-600 revolutions. The pressure should be moderate. In the course of such a careful drilling, a narrow through hole will appear in the side of the bathtub, through which the water present at the drilling site will flow out.
Now, from plasticine, you need to make a small cap and stick it to the bottom of the rim so that the resulting hole is centered. Again, pour water and perform a second drilling with a 12 mm drill. The pressure should be weak. When the drill passes through the rim, it is possible to remove all plasticine and evaluate the quality of the work, the chips on the enamel should be minimal.
After that, you need to expand the hole to the required size to install the mixer. For this, a new markup is performed, indicating the boundaries of the hole. The surface must be sealed again with a transparent tape. Expand the hole with a grinder using a rubber nozzle with an abrasive cloth. Turn the turns to the maximum, but the applied force should remain minimal.
When the hole is sufficiently expanded, a nozzle with a diameter of 20 mm can be used. It should be understood that with minimal effort, which will protect the enamel from damage, the work will not progress very quickly. It will take more than an hour to work with the grinder. When the hole is ready, a sealing ring is inserted into it and the mixer is installed in the usual manner.
There are other ways to accurately drill the enameled surfaces. Some masters simply glue a metal plate to the enamel and drill such a "sandwich" through and through. The metal will protect the enamel from damage. Others before drilling accurately remove part of the enamel with a grinder, and then perform drilling with a crown cutter.
Finally, there is a method for drilling cast iron with a diamond core cutter using a conductor made of wood. But in this case the cutter must be cooled quite often, watering it with water.
Useful video on installing mixers
Here is the detailed procedure for installing the mixer on the edge of the acrylic bath:
The process of drilling the rim of the enameled bath is graphically presented in the following video:
In general, the installation of the mortise mixer is relatively simple. When performing work it is important to act carefully and accurately. With the installation of such plumbing on the side of the acrylic bath can even handle a beginner master.
Soviet times are long gone and then the queen of the bathroom - a cast-iron bath descended from the throne. A few options could not get accustomed to, but relatively recently humanity has made a step towards a comfortable and functional plumbing. Today, more and more buyers prefer acrylic bath. Undeniable advantages of such products are supplemented by new methods and elements of mounting additional equipment, for example, mixers.
Many people are interested in the question, which mortise mixers for acrylic baths are best suited? What are the differences between them? How to weigh the merits and demerits of plumbing and perform the installation of the most mortise mixer without damaging the bath?
All these answers you will find in the article.
Technical features of mortise mixers for acrylic bathtubs
The construction industry is rapidly developing with this, new elements of sanitary ware, materials and technologies are emerging. More recently, the installation of a cast-iron or enameled bathroom seemed familiar, but today such an option fades into the background. Replacing the old models of baths are modern, compared with the first having a lot of advantages of interior items for the bathroom - acrylic bathtubs. They are safer and easier for their relatives.
To all modern models of acrylic baths are selected special models of mixers. Combined faucets, used for bath and washbasin, have long lost their popularity. They were replaced by modern - separate, built-in or mortise mixers. Thanks to this, the process of connecting the communications was simplified: the need to mount the pipes in the wall next to the bathroom has disappeared.

Mortice mixer - a miracle of sanitary engineering of the XIX century
As the name suggests, mixers are cut on the side of the bathtub. Mortar mixer for the acrylic bathroom looks more compact and aesthetic, does not cause inconvenience during operation. The supply of water under this also changes: all fasteners and communication elements are hidden from the human eye. Due to its features, the mortise mixers for acrylic baths are popular among customers.
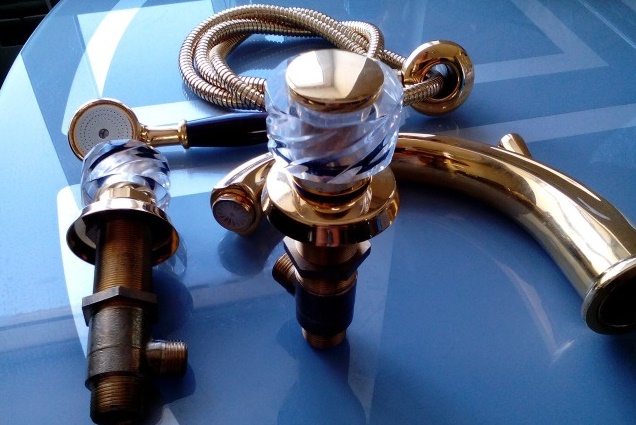
Important! Most recently, cascade mixers began to appear on the market, representing improved models of plumbing for the bathroom. Cascade mortise mixers are characterized by ergonomics and higher quality finishes. The main feature is a smooth and quick filling of the bathtub.
The water supply from such a mixer resembles a mini-waterfall, which is directly in your bathroom. If you want, you can choose a mixer for acrylic bathtubs with backlighting one or more colors, which will emphasize the style of your bathroom.
Advantages of mixers
With some positive features of the mortise mixers we learned earlier, but there is one more indisputable advantage: the hose from the shower head hides under the surface of the bath.

This is incredibly convenient: the hose is easily stretched by raising the watering can and just hides back at the end of the procedure.
This design looks more aesthetic, and free place on the wall can be used as a space for fastening shelves or simply zadekorirovat it, creating an exclusive design of the bathroom.

Disadvantages of Mortise Mixers
From the shortcomings of the mortise mixers, a rapid wear of the hose for the shower hiding under the surface of the bath is isolated. On the one hand it is convenient, but from the point of view of practicality - no. Excessive bending of the fittings for the mixer leads to a rapid breakdown of the product. Comparing the usual and the mixer for an acrylic bath with a shower (mortise), it is worth noting that the life of the hose when using the first option is up to 5 years, in the second case - only up to two. In addition, it is impossible to determine the leakage of the hose in advance because it is hidden from view. It is possible to detect the problem only when a pool of water appears under the bath, and this situation can lead to other more serious breakdowns.

Mounting the mortise mixer step by step
If you are going to mount the mixer for a corner acrylic bath mortise yourself, then you will need a set of inventory:
- screwdriver;
- adjustable or set of keys;
- drill with nozzles of milling cutters of different sizes.
Installation of a mortar mixer in an acrylic bath is carried out in this order:
- Prepare the surface: in the intended place of installation of the mixer on the bath, mark the holes.
Important! Before you start the layout, determine the location of communications and build on this. This stroke will minimize the length of the hose.
- Having equipped an electric drill with a crown cutter, perform the marking according to the preliminary prepared scheme.
Important! If you do not have time to mount the mixer in an acrylic bath - get it with the hardware already mounted.
- Mount the mixer in an acrylic bath. Do not forget about the need for a special substrate for the tap in the form of a rubberized or silicone gasket.
- The mixer is screwed with special nuts. If you mount single-lever mixer, then for fastening, use a half-washer (washer-crescent). Tighten the nuts using a torque wrench.
- Mounting the mortise mixer for the acrylic bath (inexpensive), screw the hose to the valve. It is better to use rubber hoses, protected by a special sleeve, complete with silicone gaskets. Then connect the water and check that the mixer and hoses are properly installed: do not they let flow.
The installation of the corner mixer is carried out in a similar way.
Features of tapping the mixer into the wall
There is another installation technique, with which the mixer is mounted in a wall. Unimpeded access to all components of the crane is guaranteed through a special false panel.

To mount such a construction, you must perform the actions in this order:
- The assembly of a false panel in the wall is preceded. The installation scheme of the mixer on the panel is similar to mounting a shear mixer in the side of the bathroom. The free space below the panel allows also to conveniently and reliably hide all pipes, hoses and fasteners.
- To the concealed mixer select eccentric adapters or special hoses with overhead nuts, water pipes are supplied.
- With a rigid connection, the pipes are fixed using special brackets, and with a flexible joint, using a dowel plank.
- Completing the work, all connections are tightened, turn on the water supply and check the system for any stains. If a leak is detected, it is removed by tightening, repacking or replacing the gaskets.
Mortice mixer is the best choice
Mortice mixers for acrylic bathtubs, the price of which is slightly higher than usual, but still enjoy great popularity. The cost of the mortise mixer in the side of the bath varies depending on the manufacturer and the functional features and starts from 2,500 thousand rubles. Adhering to the installation technology and using high-quality materials, you can get a reliable and durable water supply system for filling the bathroom. In addition to acrylic bathtubs, mortise mixers are installed on the sinks.
Customer's opinion about mortise mixers
Mortice mixer is functional and indispensable. This plumbing is popular. High level of sales and active use of the Internet make it possible to form an accurate picture of the reviews about the plumbing. In general, they are positive, most products have earned neutral feedback, and negatively respond mainly to Chinese cheap models, but as practice shows, it is not worth saving on plumbing.
If you do not have experience with such products, it is better not to mount the mixer yourself. And entrust this work to professionals in their field.
Many users note that the bathroom with the mortise mixer looks stylish. Such plumbing models are used for modern or high-tech baths, but over time, modern plumbing elements are increasingly used even for classic bathrooms with inconspicuous design, which makes the modest interior more expressive.
Mortise mixer - it's stylish, fashionable, functional and exclusive.
How complex self-installation mixer on an acrylic bath? Technologically it is not more difficult than to mount it in a box or wall, but there are rules, the violation of which can lead to undesirable consequences.
The peculiarities of the installation of a mixer on an acrylic bath are related to the fact that these bathtubs were originally designed to create the greatest possible comfort, and special requirements were imposed on the design of the mixers themselves. To ensure a powerful head of water with ease, the elegance of the mixer design, they are not made in a single package, but from three to five separate parts that are installed on the side of the bathroom. Such a mixer is called cascade.
Quality criteria for the mixer for acrylic baths:
- Technological perfection;
- Aesthetics;
- Durability.
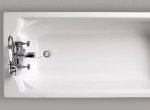
These mixers are mounted in the side of the bathtub, and the peculiarity of their design is that only switches, a spout and a shower head are above the board, and all the rest is hidden under the bathtub - supply hoses, water mixing cartridge, shower hose.
Types of cascade mixers
Cascade mixers are produced, as they say, on 3, 4, or 5 holes.
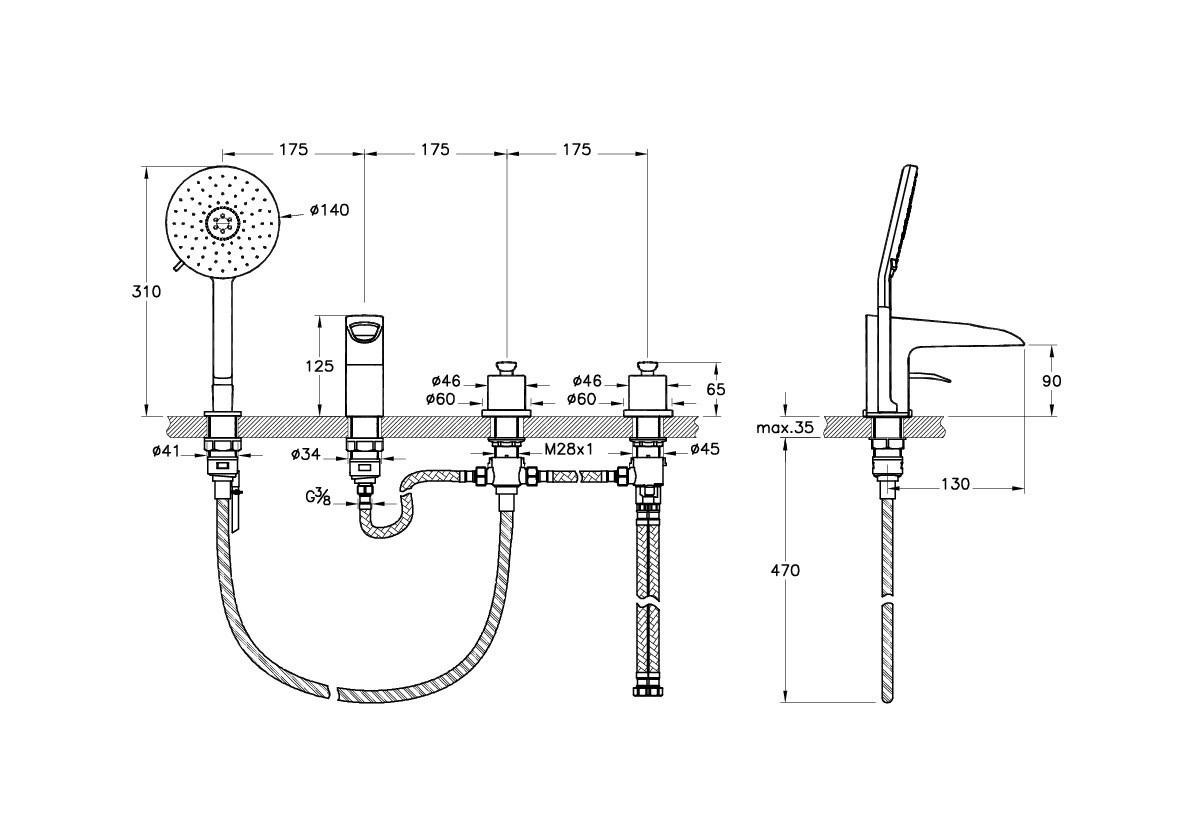
Scheme of installing a mixer in four holes
3-hole faucets:
- Spout with a switch "spout / shower";
4-hole faucets:
- Water temperature and pressure control;
- Switch "spout / shower";
- Spill;
At the mixer on 5 apertures above a board settle down:
- Water temperature regulator;
- Pressure regulator;
- Switch "spout / shower";
- Spill;
Selecting an installation location
Theoretically, any arrangement of the parts of the mixer is permissible. However, when repairing access to the faucets near the wall will be difficult. For repair, you need to dismantle the bath, turn it over, replace the knots, then re-install the bath, seal the joints.

The installation site is chosen so as not to obstruct access to the mixer during repair.
Install the mixer either on the open side, behind the removable screen, or near the side wall, but closer to the edge to allow access to the mixer units. Most often the shower hose breaks (it is believed that it serves no more than a year) - place it in such a place that the replacement can be made without difficulty.
Some acrylic bathtubs are sold with ready-made holes - before purchasing, evaluate how convenient their location is.
Setting the mixer
The principal difference between installing the mixer on the side of the acrylic bathtub and the usual vertical mixer on the sink is the presence of several holes and the need to strengthen the side of the bath.
Tool
- adjustable wrench;
- screwdriver;
- electric drill;
- nozzle to the electric drill - crown bit with tungsten coating.
Operating procedure
- On the new bath, first install the mixer, and then install the bath.
- Mark the center of the holes so that they are at a sufficient distance from the edge of the bead.
- Cut out the holes with a drill with a crown cutter (tungsten coating).
- Use a protective gasket, which is usually included - to strengthen the side of the bath.
- Secure each part of the mixer in the hole using one or two nuts. Use rubber gaskets on both sides. While tightening the nuts, do not apply excessive force, otherwise the cracks may appear in the bath.
- Connect the parts of the mixer with flexible hoses according to the scheme.
- The shower hose with one end connect to the spill / shower switch, the other, through the opening - to the watering can.
After installing the mixer, you can proceed to the installation of the bath.
Make the bathroom not only convenient and functional, but also a beautiful room, provided that all elements are located minimally occupying free space. One of the most successful solutions for saving space is the installation of a mortise mixer on the side of the bathroom.
Design Features
One of the main differences between this model and the traditional mixer is the separation of nodes. The design consists of several parts, each of which carries a certain functional load. The faucet, watering can and spout are not only independent of the design, they are also mounted separately on the side of the bath.
What are the advantages of such a division? Firstly, it is very convenient, since each element can be installed in the place where it will be most convenient to use. Also worth noting is the variety of types of water flow control devices (sensory, semi-turn), spout models (classic spout or cascade), as well as the overall layout of all elements. 
Advantages of the mortise mixer:
- strength, duration of operation are ensured by the high quality of materials used in the manufacture;
- allows you to save maximum free space in the bathroom;
- simple and clear installation process;
- functionality of use;
- stylish design;
- separate device mixer allows you to fill the bath with water faster.
Of the disadvantages worth noting is a rather high cost. However, the quality of materials used in the assembly and the duration of operation fully pay off a high price.
When buying, pay attention to the following:
- The mixer should not be light. A small mass is a signal that low-quality materials or questionable metal alloys have been used in production.
- A successful addition will be the built-in temperature limiter. This device will avoid burns. Especially relevant this model will be for those who have small children in the house.
- A quality mixer produces a low water flow noise.
- To select his design is not necessarily for the interior of the bathroom. The modern, stylish appearance of the design itself can become an ornament of the interior.
- Special attention should be paid to faucets, equipped with a special device that reduces the amount of water used. This helps significantly reduce the bills for consumed water, which in the light of constantly rising tariffs is very important.
Choosing a mounting location
Traditionally, the place for installing the mixer is chosen or in the middle of the side of the bath, or at the end, or at the corner. Selecting the location of the structure, it must be remembered that a certain part of the communications, as well as the shower hose must be hidden. For this purpose, it is necessary to provide for a special free space. In some cases it is necessary to mount a false panel, behind which all communications are hidden. 
Also, an especially important point in choosing a mounting location is the possibility of free access to communications. Periodically there are situations of routine repair of the elements of the mixer design, therefore it is necessary to worry in advance that access to them is unobstructed.
Necessary tools and materials
To install the mixer passed quickly, and the result of the work was pleased with its quality, it is necessary to prepare the necessary tool in advance:
- drill;
- the nozzle is milling (the diameter of the cutter must correspond to the dimensions of the device);
- adjustable wrench;
- flexible hoses (can be replaced water pipes from PVC);
- screwdriver;
- fasteners (sometimes sold with a mixer).
Step-by-step installation instructions
Follow this algorithm:
- Preparatory stage. After the installation site has been selected, a bump of the future holes is marked on the side of the bathtub. If the bath is made of acrylic, the hole is very convenient to do with a drill and a feather drill. In the case where the bath is covered with enamel, an additional metal plate will be carefully drilled to cover the drilling site. The distance between the holes should vary between 11-22 cm. Finished holes must be treated with sandpaper. This will make their edges smoother and more neat.
- Installation of the shower hose is carried out through the hole of the largest diameter. Before installing the shower module, a pipe connecting the shower with the tap is inserted into the adjacent hole. The hose is inserted into the mounting hole and is tightly fixed from the inside by a lock nut. In order to prevent leakage between the outer washer and the lock nut, seal rings are laid.
- The final part. According to the manufacturer's scheme, all other parts of the structure are assembled. To the central part, which is responsible for the mixing of cold and hot water, the corresponding pipes are connected. Also to the central part is connected a branch pipe, which is responsible for supplying water to the spout. In the same way, a watering can is fixed.
Alternative installation method
If for some reason it is not possible to make holes in the side of the bathroom, you can use a good alternative - installing the mixer in the wall.
Algorithm of actions:
- We equip the panel falsh. They can look like shelves or ledges from a wall. Important: in the place where the mixer will be installed, it is necessary to conduct waterproofing and finishing works in advance. Also do not forget about the free space for installing hoses.
- To the location of the mixer we bring hoses. Rigid fastening of pipes involves the use of special staples. When flexible fastening, the dowel planks are used.
- Directly in the panel falsework make holes for the mixer.
- We mount the crane.
- At the final stage, all connections are properly tightened, water is turned on, all elements are checked for leaks.
Regardless of the method of fixing the mortise mixer, it is important to take care of free access to all elements of the structure. Specialists do not recommend tightening the bathtub. The most practical solution is to install a removable screen. ![]()