Connecting the electrical outlet. How to carry out the socket from the socket: the instruction. Wiring in the apartment
Often happens so that in the right place there is not enough outlet and begin to breed not quite aesthetic extensions. In my opinion, if there is a clear certainty that a socket is simply necessary in this place, it is better to install an additional outlet.
To connect an additional outlet is best to the junction box, if there are no junction boxes nearby, then it is quite possible to connect to another outlet.
We will need to consider the route of laying wires or cable to a new outlet. In this case, it is desirable to lay the cable strictly vertically and horizontally, bypassing the others engineering Communication, and on the shortest path. As if on the path of least resistance, for example, do not hollow reinforced concrete overlap if you can do half a meter loop.
Before starting any electrical work you need to remove the voltage from the wires and installation products with which work is to be done. Then you need to make sure whether the voltage is really off, you can use the indicator screwdriver or the probe to do this)).
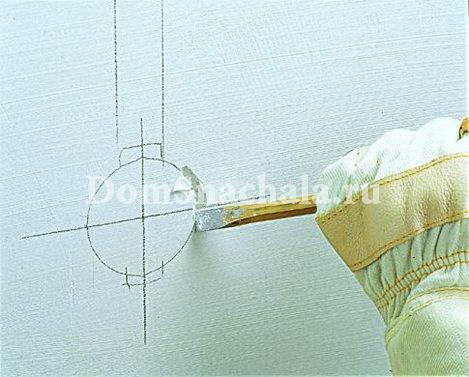
When the route of the cable laying is marked out, and the electricity is off, you can proceed to the penalty. What kind of tool will be required for fencing depends on the material of the wall: it is possible to work with a conventional old chisel with a gypsum wall, a scarp will be used for cement plaster, it will be easier to operate a puncher with a brick, and for the laying of fines in reinforced concrete, it is necessary to use diamond discs (they are often called Turbo and Super Turbo) it forms the boundaries of the penalty, and the center is then selected by the puncher. There is a big minus in the work of the USM: since the bulgarian basically cuts concrete without wetting with water (dry cutting), then a large amount of fine dust is obtained. If dust is unacceptable, then you can do with a perforator: using a drill with a diameter of 16-20 mm along the cable route, drill the holes so that they are as close as possible to each other, and then, in the impact mode, cut the bridges between the holes.
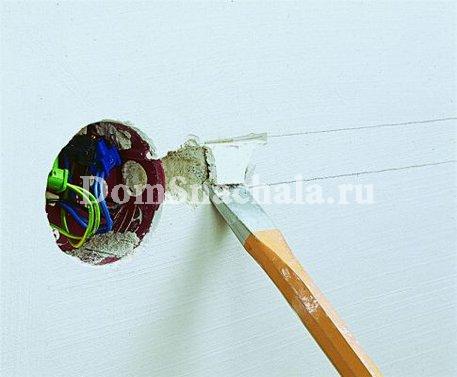
The next stage is the cutting of the niche under the sub-socket of the future outlet. The tool is chosen in the same way as for laying fines. In addition, if the material is soft, then to drill out the contour you can use a crown drill, with a diameter slightly larger than the diameter of the juniper.
As a result of all operations, a wire should be attached to the penalty, and the sub-socket should be inserted into the notch for the sub-panel.
Next, you need to fix the jar, for this you can use alabaster, gypsum plaster, or another fixing compound.
After the fixing compound is applied it is necessary to set exactly the junior pad. The front part of the podrozetnik should be level with the wall, and the podzheetnik itself will be located vertically.
If you install not one junk box but a group, then it is convenient to use a pre-made template))

After the podrozetnik froze in the socket, you can lay the cable, fix it and plaster it.
After the plaster has hardened, it is possible to connect the wires of the cable to the appropriate terminals in the junction box.
When after major repairs or construction of housing is put into operation, it provides a certain number of outlets. Their number is determined by the rules and regulations of special documents.
But sometimes you need to add additional connection points for electrical appliances. If they are not very powerful, you can stretch the wire from an existing to a new outlet.
Even a novice electrician can cope with this task. How to conduct the outlet from the outlet, will prompt the advice of experienced masters. Additional points of connection to the network will give comfort to life.
Types of sockets
Studying the technology of how to conduct a socket outlet, you need to consider all of them existing species. In our country there are three main types.
The first of them is labeled as C1A. This outlet is without a ground loop. It operates at a voltage of 10 A (direct current) or 16 A ( alternating current). To it it is possible to connect low-power consumers (fixtures, small appliances etc.).
The next variety is labeled as C2A. It is a socket of euroformat. It provides grounding (on the sides). To such a network point, you can connect heaters, stoves, powerful household appliances.
The S3A socket also provides a PE loop connection, but it differs from the previous version in configuration. In the center of the socket there is a steel rod, and in the fork - a recess for it. This device is also suitable for high-power devices.
Wire Selection
Electrical wiring in the apartment is very scrupulous. If you do not comply with the standards, contacts may overheat. In this case, there are breakdowns of electrical appliances. Maybe even a fire.
To prevent this, it is necessary to pay special attention to the set of wires. If the socket is not grounded, it will consist of 2 cores (phase and zero). This is the easiest way to connect. 
But to improve the safety of the operation of the wire is arranged. This will avoid electric shock. The wire in this case consists of 3 cores.
In addition to this criterion it is necessary to pay attention to the cable cross-section diameter. The more the load is applied to the wire, the thicker the conductor will be required. There are copper and aluminum veins. Fire safety requirements indicate the advisability of using the first type of material for internal wiring in a residential building. Copper withstands a greater load than aluminum, and does not overheat.
Serial and parallel connection
This allows you to add an additional point of connection to the network in the most secure way. For example, an electrical outlet with earthing should be installed with an unbreakable PE cable. It can be cut only in some cases, when the property has already been put into operation by the owners. 
In addition to parallel connection, it is sometimes possible to carry out sockets from another outlet. In this case, it is necessary to carefully monitor the performance of all electrical safety requirements. This method is applied when it will be impractical.
Serial connection rules
Serial connection of sockets must be performed only in the most extreme cases. But the classical situation of the type presented is not uncommon. The question of how to make an outlet on the balcony from the outlet for lighting arrangement, is solved by a sequential connection. 
If the loggia is not included in the network of powerful appliances (heaters, household appliances, etc.), it is easier to conduct the cable from the nearest outlet. All work will require a minimum of effort, time and materials.
Sequential connection of the outlet from the outlet will be completely safe if both powerful points are not included in both these points of the network. As a rule, such elements of the electric circuit are designed for 10A or 16A. This factor must be taken into account, including various devices in them. In fact, this is one node of their supply, which is designed for the specified capacity.
Preparing for connection
Studying the process, as from the outlet to another outlet, you need to start with preparatory phase. First, the initial connection point is de-energized. Then it must be disassembled. Tools for this work should have some protection, at least rubberized handles.
The front panel of the outlet is removed. Most often the terminal block must be removed from the terminal box. For this, screws are loosened at the appropriate places. remains at its former place in the wall. 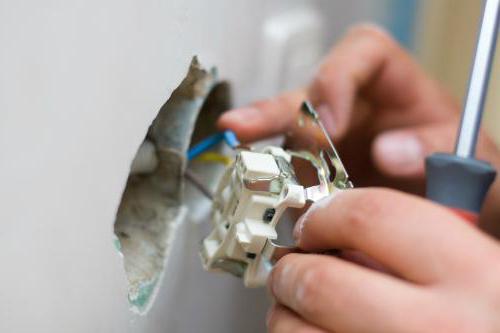
If the plate-podrozetnik is structurally combined with the mechanism, only the body is dismounted from it. Also, the appropriate wires and a new outlet are prepared in advance.
Cable connection
Considering how to connect the sockets, you should pay attention to connecting the wires. When buying a cable, you can see that its veins are sealed in a single shell. It is necessary to get rid of it.
Cut the plastic with a knife and remove it from the conductor. You can not slice a vein, so perform carefully. From the insulation, the wire is released approximately 1 cm. It is these bare areas that will be connected to the terminals. In the podrozetnik these pure veins are in no case in contact. 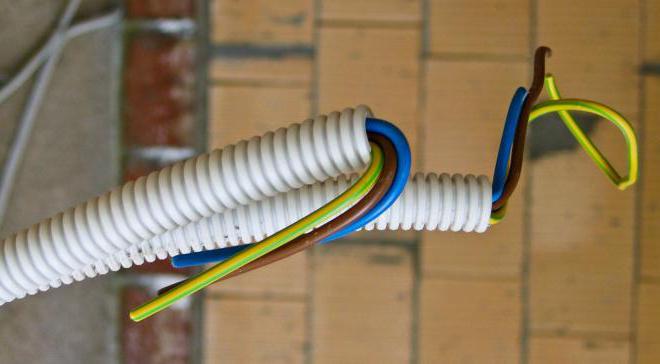
The bare ends are folded into rings. They put them on the appropriate terminals. It is necessary to withstand separation by zero, grounding and phase. Then it is necessary to tighten the terminals. This is done tight, but not very much.
The connection is checked for a fortress. Harnesses need a little twitching. This outlet can be assembled. Next, you need to start creating a new power point.
Arrangement of a new outlet
The wire is fed to the place where the additional power point will be mounted. Electrical wiring in the apartment can be done in a hidden and superficial way. For the new outlet, the second option is quite suitable.
In the appropriate place, first install the sub-socket. In this case, it is better to choose the overhead equipment. Then you do not have to drill a hole in the wall. If the base is wooden, the mantle is mounted immediately using self-tapping screws. 
For a concrete wall, you will first have to locate the fasteners and then drill holes for them. Then the receptacle is placed in its place. The wire is also released from the insulation and connected to the corresponding terminals. The front panel of the socket is installed.
Inspection and operation
Having studied how to conduct a socket from the outlet, it is necessary to say a few words about its operation. After all the above work is done, you need to enable electrical network. Next, the old and new sockets are checked for function.
If there is no smell of burning, sparks, then everything is done right. The energy consumer connected through them should operate in its normal mode.
Sockets of this group should be perceived as a single point of feeding with a total load not exceeding 10-16A (depending on the characteristics of the device). With their help, for example, you can charge your phone, camera, light a small lamp room.
Do not in any way include heaters, an iron, a boiler or other similar equipment. Fulfilling these requirements, you can expect a long and productive life of the system.
Knowing how to conduct a socket from the outlet, a novice electrician can perform this work quickly and correctly. Observing the safety rules and the requirements for the arrangement of the power grid, it will be possible to create a reliable system. It will function for a long time. Also, following the recommendations of professional electricians, it will be possible to create a reliable and safe energy supply system.
It is very difficult to meet electrical wiring, which is in an apartment without outlets. It is impossible to connect electrical appliances without having a high-quality outlet in the apartment.
In the modern world, the current load is greatly increased. It is important to implement correctly parallel connection outlets. This is one way to connect the outlets.
The parallel connection of the outlets is the safest. The type of outlet is of great importance. To date, more often there are rosettes with engraver. It is able to automatically restore contact. Parallel connection of outlets can be made independently. 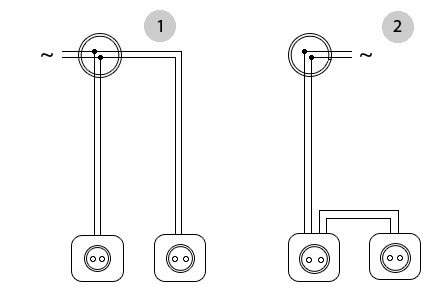
First of all, you need to remember that when connecting the necessary wires directly to the contacts, be sure to fold the end of the wire. This must be done in the form of a ring, in order to create a sufficient area for contact.
This will serve as a kind of guarantee for connection electric consumers of a powerful type. a parallel connection of outlets is very often used in everyday life.
It happens that there is not enough one functional outlet in the room, and then a decision is made to install another one, which will help discharge the load on the first one. For this case, a parallel connection is ideal. Do not pull the new wires from the existing electric unit. Everything can be done much easier.
Parallel connection of outlets should be carried out very carefully. In this case there are some features. First of all, the ends of the new wire are connected in parallel, hence the name. The connection occurs to the wires that approach the first outlet. 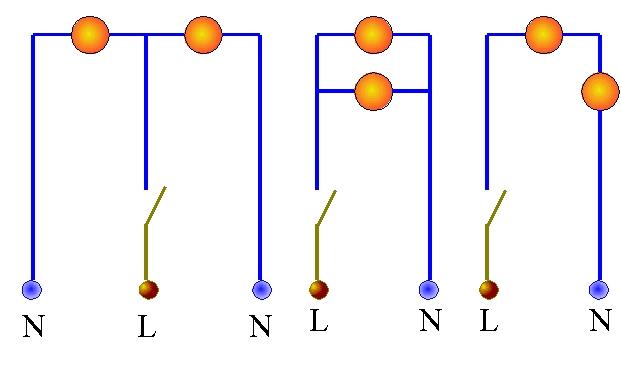
This is very important nuance. To make it easier for you to understand, we will explain the entire connection mechanism in more detail. You need to connect "Phase" to "phase", and in turn, "Zero" - to "zero". We recommend that you connect the phase wire to the socket of the socket, which is located on the right.
In the case of parallel connection of outlets it is very important to observe safety precautions. Do not lose sight of the small nuances. Please note that during connection parallel socket, it is important to pay attention to the material of the wires.
It is necessary that the material of all used dips be identical. This is a very important point. It is not possible to connect wires made of copper with aluminum wires. In the event that the connection of wires from different materials can not be avoided, it is advisable to carry out their luring.
Parallel connection of two outlets
Parallel connection Two sockets are used in the event that there are electrical outlets of the same group. Parallel connection of two outlets can be carried out in several ways. You can connect the wires in parallel. 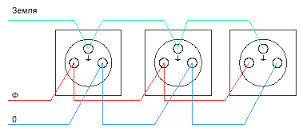
Connect the wires in the junction boxes. You can also go the other way and connect the sockets using the shelf.
The second option is to choose if you want to connect the sockets that are very close to each other. Before installing the sockets, perform several necessary operations. First, install sub-grid type boxes and route the wire to the distribution panel.
Parallel and series connection of outlets
Connect the sockets in parallel or in series. Parallel and serial connection Outlets should be carried out in different cases. Electricians do not recommend a series connection of outlets.
But this is a controversial issue. To begin with, we must understand what the difference between the two methods is. It should start with the fact that all the outlets that are in the same group have the same connection scheme. It is called parallel. 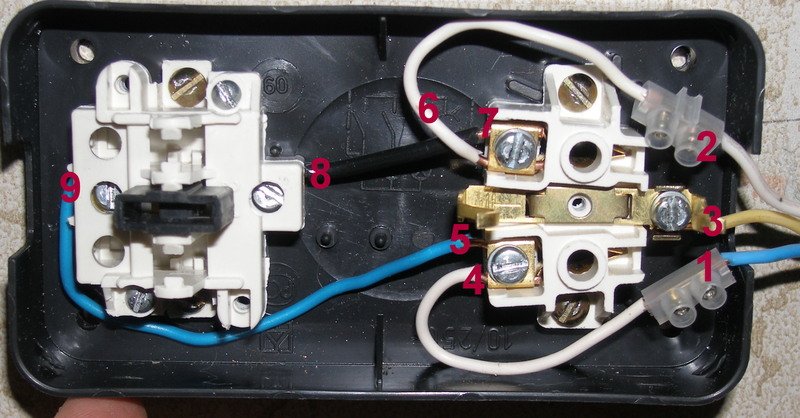
The question is that a parallel connection can be performed by several different ways. You can connect the sockets by tapping them in boxes, including twisting, soldering and clamping, or you can connect them to the terminals, but not by acting on the boxes.
The latter method is called a loopback connection
That it was easier for you to decide which connection of outlets to choose - parallel, or still consistent, we propose to make a detailed comparison of these two methods. As for the connection by the loop, this method can help to save on the material. Thus, you will have to do less work and spend less resources.
But in this case there is a risk, because today it is not allowed to break the PE conductor. This is spelled out in generally accepted norms. 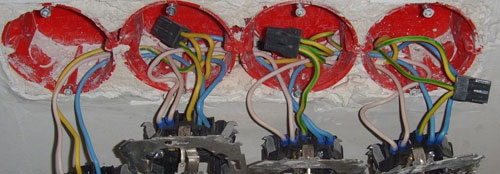
These rules can be circumvented, only if you are engaged in replacing the wiring in your own apartment or house. You do not need to hand over the listed objects in operation, and, consequently, and no one will check them. Which way to choose depends only on you, but we do not recommend that you once again risk your safety and the safety of your loved ones.
You can make a connection with a loop and at the same time avoid violation of safety rules. To do this, you only need to leave unbroken wires of current-carrying type, namely phase and neutral wires. This will allow you to reduce the load on the main terminals of the first outlet.
If you implement the stated order correctly, this will save the PE guide whole, and you thus do not violate the generally accepted security rules.
And also you can see the video connection socket and switch
- place of installation;
- number of connections and power consumption;
- cable supply;
- connection method.
Connection and installation of sockets in the apartment
It is also necessary to determine the places of installation of stationary household electric appliances: refrigerator, TV, washing machine, a computer.
rules
It is supposed to install the power outlets from 2 to 5 pcs, connected with each other by a cable. Correctly selected their distance from the floor, which should be at least 25 cm, which will prevent moisture from getting wet when washing the floor. If possible, you do not need to connect the loop, in spite of the fact that more wires are needed from the box. In the children's room, electrical outlets are located at an altitude of 150-170 cm.
In order to reduce the overload of individual sections of the home network, it is advisable to install additional outlets. They will be very useful in the future when new electrical appliances appear. If there is a correct wiring in the room, there should not be any tees or extension cords.
It should include the connection of temporary instruments: an iron, a laptop, a vacuum cleaner, chargers for phones or tablets. In rooms with high humidity, the outlet can only be installed with a moisture protection of at least IP 44. If there is a washing machine and a boiler in the bathroom, they are connected to their outlets with an RCD to protect them from electric shock.
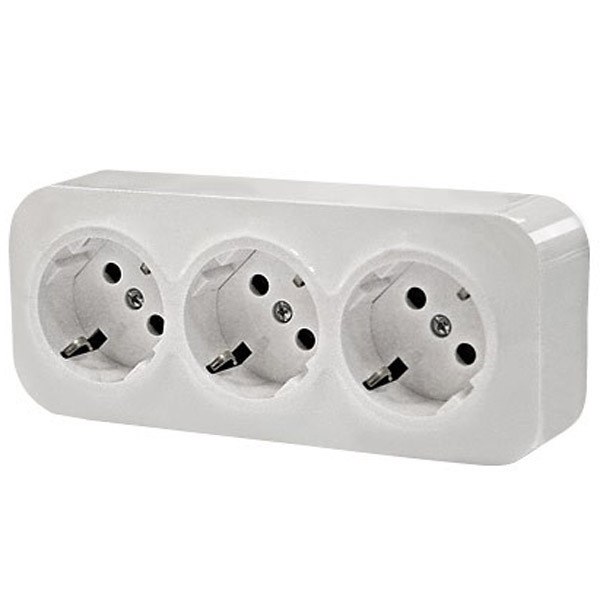
Socket Outlet
With regard to sockets, it will be correct to withstand one standard to avoid connection problems. In Russia, devices of the C5 type have been previously used, and now the C6 euro socket is prevailing. It is designed for current up to 16 A. The mechanism consists of two brass contacts fixed to a plastic or ceramic base with iron plates, which are terminals for connecting wires. Yet better device from the contact and the terminal, representing one common element. Then only wires will be attached to them by screws.
Socket Outlet
The socket can have flat contacts for connecting the ground wire.
You can connect the plug firmly to the outlet if you provide reliable contact with its pins entering the receiving sockets. Then there will not be heat in the place of the connector. The best designs allow 5 thousand cycles, which is equivalent to 6 years of operation of the outlet.
Securely connect the wires and sockets to the terminals using screws with protective washers.
The grounding electrodes are made in the form of two plates connected to the third terminal connected to the outgoing wire. They come into contact with the electrodes of the plug before its pins, which is shown in Fig. b above.
Ways of fastening
The type of sockets give much attention. It can be internal or external.
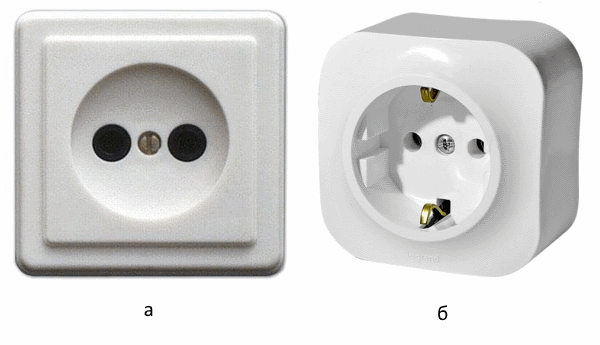
Internal and external outlet (b)
The internal model is installed in the wall socket built into the wall, and is fed to it concealed wiring. Outer socket Mounted on the surface when the wiring is open. The latter option is often used when laying the cable in a box. On a concrete or brick wall, the sockets are fixed through the base with dowel-nails or screws. Under them lay a plate of non-combustible material (paronite, plaster). This is especially important for wooden walls. A wall socket is not required for installation.
A separate group are external sockets with an open installation. They are used in the garden, on the street, in the garage and all places where there may be atmospheric effects. The high resistance of the outlets allows them to be used in rooms with high humidity and country houses. Fastening is made on a wall with the use of a substrate.
The outer socket on top is closed by a lid and has a high level of protection - IP 55. Models of this type are resistant to rain, snow, wind and sun rays. They are often connected to power tools and equipment during work near the house.
The internal installation is made in the jar. Under its size in the wall of the crown is a notch, to which the groove is grooved to hide the wires. If hollow partitions are used, there are special installation boxes for gypsum board.
The old metal padding has a large diameter. Therefore, it will have to be changed to a new one, otherwise a smaller socket will not hold properly. The box is carefully removed from the recess and its size is adjusted to a new one, which is installed on the plaster solution along the wall plane. It is better to make the juniper slightly recessed inside.
Before installing the outlet, first of all, the automatic power supply to the room where the work is done is switched off. Then check with the indicator screw that the circuit is actually de-energized. Pre-installed podrozetnik, and for installation provides free access. The wires are cut to 10 cm. This size is enough for convenient connection.
The socket is disassembled by disconnecting the outer and inner parts. The ends of the cable or wire veins are loosened from the insulation by 10-12 mm length and are cleaned. They differ in color as follows:
- blue is zero;
- white - phase;
- yellow-green - earth.
These colors are common, but there may be others.
Zero or phase must be properly connected to avoid contact with the grounding prong. It is located in the middle and has no electrical connections with the plug pins.
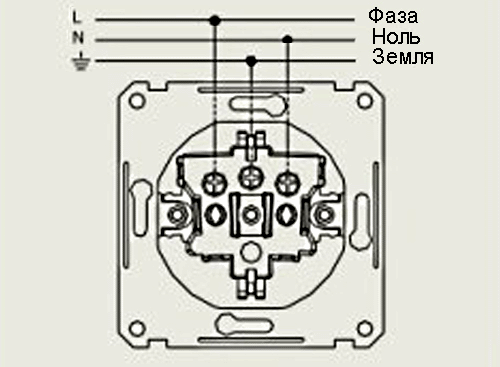
Connecting the outlet with ground
Some sockets do not contain a grounding contact.
Phase contacts are correctly connected everywhere on one side. Usually this is done on the user's left hand when he is standing in front of the outlet. Through the sub-wire, the phase conductor is separated from the ground and ground, and connected to the terminal on the other side.
After determining the correctness of the connections, the wires are inserted into the nests and tightened with screws. Some contacts are self-clamping and additional fastening not required. For this, springs are built in, which press the wires to the current-carrying terminals. Their bare parts should not protrude more than 2-3 mm.
Inaccurate installation often leads to loosening of contacts and in the future in these places can be disrupted electrical circuits, or conductors will overheat.
On the terminal, you can connect 2 wires, but only in the modular connection scheme. In parallel to the outlet, another device, for example, a luminaire, can not be plugged in. With a large number of outlets and switches in the room from junction box extend the wiring to the modules inside which the terminal blocks are integrated. Between the wires can be connected twisted only temporarily.
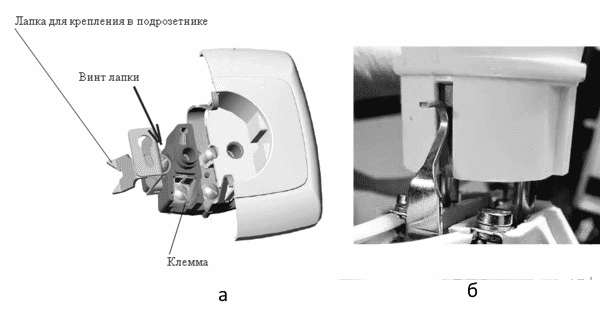
The socket is installed in the box with the help of clips. Wires with a small margin are carefully placed in the jar. They must be positioned so that the socket can freely enter the installation site. There are different ways of fixing it. The easiest installation is done by screwing the screws into the sub-socket. Spacing legs hold worse. They must be pressed with a screwdriver when tightening the screws. On some designs, there are holes for additional fixation, located along the perimeter of the metal frame.
The socket is exposed horizontally, after which the spacer screws are tightened permanently. The cover is applied to the inner part and is tightened with a screw. It is firmly attached to the wall.
Mounting the socket block
Sockets can be assembled together for the simultaneous connection of several devices to them or use a construction that is one common unit.
Before installing a group of sockets, you must select the correct location. In the kitchen, it is placed over the countertop so that electrical appliances can be connected. In the living room, the device is mounted behind the TV, hiding all the cords behind the screen. In the bathroom can be connected even triple socket, but at the same time it is located at a distance of at least 0.6 m from the water, and the body is selected with protection from moisture.
The sliding blocks that are built into the table top are becoming popular. They look aesthetically and save space.
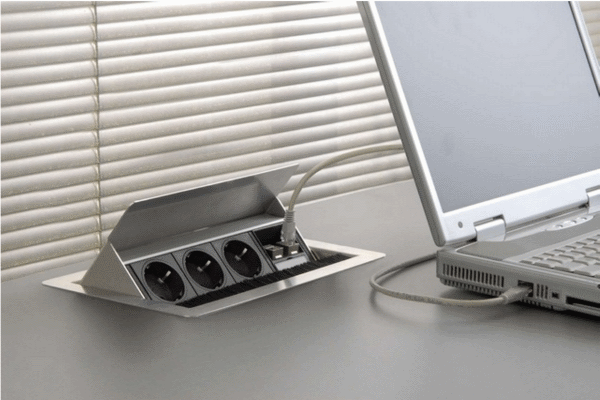
Retractable socket for computer table
Between each other, the sockets are connected in parallel with the cable and with one power line. The disadvantage is a high probability of breaking the contact in the circuit, after which further connected sockets will be without voltage. A loop connection can be made through one continuous wire, if carefully cleaned at the contact points. The grounding can not be connected with a loop, otherwise currents from all subsequent outlets will be assembled on the first socket.
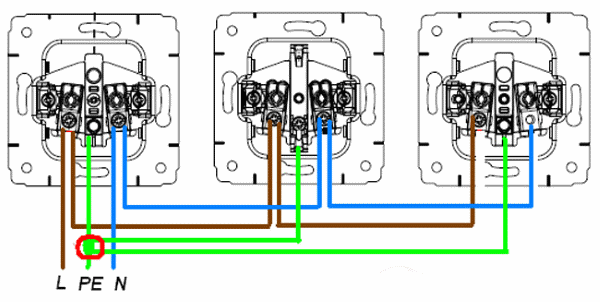
Connecting the neutral and phase with a loop and a ground wire through the junction box
In the figure, blue and brown colors show the wires for connecting zero and phase, respectively, and green is the conductor of the earth.
Zero and phase are connected by a loop, and ground is supplied to each outlet separately from the junction box (red circle).
Before applying power to the home network, you should check that all connections are correct.
Sockets with доп. functions
Devices with a timer are more comfortable to use and increase safety. They enable you to make the switch in time. You can turn off the pump after a certain time, turn on the TV before starting your favorite program, disconnect the electric stove. The connection to the network is made in the same way as with ordinary outlets.
The presence of a built-in RCD makes the operation safe in rooms with high humidity, where there is a danger of getting an electric shock. The presence of the sensor inside ensures timely disconnection of the device with leakage current, and also protects against short circuit.
Universal models allow you to connect electrical appliances with any type of plugs. To do this, they have made several connectors.
Connection. Video
How to connect double socket, you can learn from this video.
All operations of connection of outlets should be carried out with a phased implementation. Everything must be done accurately and without haste, in the presence of all necessary tools and materials. If there is a lot of work, it is advisable to apply voltage after each connection and check how the socket works.
Instructions
First, evaluate whether you really need to install another sockets. In many cases, it is easier and safer to put an extension cord with an outlet block and an overload protection. You can disconnect from the network several electrical appliances - for example, a TV, DVD, receiver, etc., at the touch of a button on the extension cable. The inclusion of electrical appliances through the extension cord can be considered as the simplest and effective method increase in the number of outlets.
If you firmly decide to put an additional outlet, select the place to install it. Sockets are mounted at a height of 50-100 cm from the floor. Supernumerary sockets - within 30 cm from the floor. They have protective curtains, closing the terminals when pulling the plug. Sockets should not be located closer than 50 cm from pipes, radiators and other grounded elements of the apartment.
The main difficulty may arise when installing sockets on concrete and brick walls - in order not to chisel them, select the overhead outlet. To fix it in the wall, it is necessary to drill two holes and insert wooden plugs into them. Posting from one sockets to the other it will be necessary to lay it in the cable channel.
The new socket is installed, now it is necessary to connect it to the old one. Before work, be sure to turn off the electricity in the apartment. Remove from sockets housing, unscrewing the fixing screw. Using a screwdriver, unscrew the screws securing the wires to the terminals sockets.
Strip the ends of the two-wire wire that you will connect sockets, about 1.5 cm. Fold the eyelets under the fastening screws to the terminal, then flatten them flat with pliers. Flat wires will provide more reliable contact. Similarly, flatten and loop on the wires that came up to the outlet.
Enter a pair of loops - one from the old wire, the other from the new one, to the mounting hole in the shoe sockets, insert the screw and grasp it with a nut. Once the screw is in the thread of the nut, tighten it with a screwdriver. In the same way, connect the second pair of terminals. If the outlet is grounded, use a three-wire cable, connect the third core to ground. After the end of work from the old sockets the wire connected to it in parallel will depart.
In the place where the wire will pass through the wall, screw the cable channel. Place the wire in it, then cut it in place and connect its veins to the new sockets. Install the case with a new sockets, close the cable duct. The work is completed.
We decided to make repairs, level the walls plasterboard? Correct solution. After all, it will quickly and economically hide from prying eyes all the defects and unevenness of the walls. One is embarrassed - there are no switches or electric sockets on the new walls. It's fixable: install them yourself.
Instructions
Before fixing the sheets of gypsum board on a wooden grate, make the installation of the electrical circuit. To do this, determine the location of the switches and electrical outlets. Place the electric cables in the corrugated hose and secure it to the frame. Pull the cable from the junction box to the installation site of the electrical outlet. It should be located at a height of 250-300 mm from the floor and at a minimum distance from the connected appliance. Why is this distance from the floor? Because the location of the power outlet below it will be difficult to work vacuum cleaner. And with a higher location on it will be an additional load in the form of the weight of the electrical wire of the connected appliance. The higher
When the installation site is selected, mark the center of the future outlet on the wall of the plasterboard. From the center draw a circle with a diameter of 68mm. This will be the installation place for the box under the electro outlet.
In advance, take care of the purchase of installation boxes for mounting on gypsum cardboard, tk. they differ from others in the way they are mounted on the wall.
On the drawn circle cut out a special nozzle to the drill hole in the sheet drywall. In this hole, install the junction box, before passing the electrical wire inside it.
It should be noted that the height of the installation box is standard and is equal to 45 mm. If the distance from the main wall to the outer surface of the drywall sheet is less, then the hole under the mounting box will have to be deepened into the main wall.
Fasten the box in the hole, for which use screws tighten the tabs to the inside of the sheet drywall. Then tighten so that the mounting box does not move.
Connect the wire to the outlet by pulling it out of the box a distance of 10-12 cm. Then fix the screws outlet to the installation box, align it and close the decorative strip.
Related Videos
note
All work on the installation of electrical wiring and installation of the power socket do with the voltage off.
Sources:
- We do the electrical work ourselves in 2017
- sockets for drywall in 2017
Whatever capacious modern hard drives, sooner or later they are filled, and then there is a need to connect second screw - more correctly, a hard drive.

Instructions
Unplug the system unit from the power supply and remove the side panel from the case by unfastening the fastening screws. If your hard drive is connected to the motherboard via the IDE interface, you will use a wide 80-pin gray cable with two or three connectors. Through one connector the cable is connected to the motherboard, the other two are connected to hard drives or optical drives.
On the hard drive on the side where the connectors of the interface cable and power are connected, there is a special field with several contacts, two of which are connected by a jumper (jumper). By closing different contacts, you instruct the computer's BIOS (Basic In-Out System) what role is assigned to this hard drive. If you are going to install an operating system on it and make it bootable, set the jumpers to the "Master" position. If this second hard disk, and the fate of it - to become a repository of information, jumpers label the position Slave ("slave"). A variant of Cable Select connection is possible, at which the mode of operation is determined by the cable: the device connected to the end cable connector is assigned to the Master, and to the middle one - to Slave. For this connection, a special cable with cable sampling is required. The combinations of the contacts are drawn on the label on the upper side of the hard drive.
Carefully inspect the connectors of the interface cable and the hard drive - they have "keys" to avoid the wrong connection: on the connector of the hard drive - the recess, the plume - the ledge. Sometimes the cables are marked additionally: along one of the sides a red strip is applied. The loop must be connected so that the strip is closer to the power connector of the hard drive. To the motherboard, the cable is connected as well, taking into account the "keys".
Connect the power adapter to the hard drive. The top parts of the power connectors of the cable and the hard drive are rounded, so it can not be connected correctly. Put the side cover on the place, connect the computer to the power supply. Press the Power button, after the initial iron scan, go into the BIOS and make sure the system "saw" the new hard drive.
After loading the operating system, if necessary, break the new hard drive into logical disks and format them.
Related Videos
note
If the hard drive supports SATA interface, jumper settings are not required.
A socket with a grounding in your house not only protects against possible electric shock. The presence of grounding makes more stable the operation of complex household devices: a washing machine, a computer, video and audio equipment.
Outwardly, the socket with grounding is different from the usual one by the presence of built-in earthing clamps made of metal. In the world practice, many variants of the designs of sockets with grounding are used, but in Russia this option was chosen with staples. The choice is due to the design in which, when the plug is plugged in, the terminals (staples) intended for grounding first come into contact, only then phase ones. This type of device is called Shuko, or type F (CEE 7/4).
Why Grounding?
This term in electrical engineering means the connection of current-carrying elements of electrical installations, electrical appliances to the ground. The main task of grounding is protection against electric shock. With its presence, the electrical potential goes into the ground, protecting the person. To ensure the process, simple devices are used. Most often it is a rod made of metal, dug to a depth of at least 2 meters. Sometimes a few rods are inserted, connected between themselves, - the quality of grounding is higher, the larger the total area of contact with the soil.
There is also one more concept - connection with "zero". Here we mean the contact of the electrical equipment body (for example, the switchboard, stationary type electric power tool) with the "zero" wiring. Such an operation is necessary to protect against the closure of electrical equipment. AT ideal "Zero", "earth" are connected.
Installation features of the outlet with earthing
This socket is installed in analogy with the traditional connection device, but with three, not two, contacts. One of the important moments in the installation is the coloring of the wires. A wire originally designed to connect the ground is always yellow-green in color. Wire for zero contact - blue and blue. The phase wire can have a different color, but in any case it will be different from zero and ground. Nevertheless, it is recommended to check the correctness of the connection by the tester.
With the arrangement of grounding in private (suburban) housing, the difficulties usually do not arise, but in a multi-storey house problems can arise. There are 2 options for connecting the ground. In the first case, you can conduct a wire to the body of the shield on the landing (it must be grounded). The second option - the connection of the ground wire and the "zero". This option makes it possible to connect RCDs, differential automata.
A wireless socket with a remote control is an innovation in the modern electric appliance market, however, the technology itself, allowing to use such a wonderful thing in everyday life, is old enough and transparent for understanding.
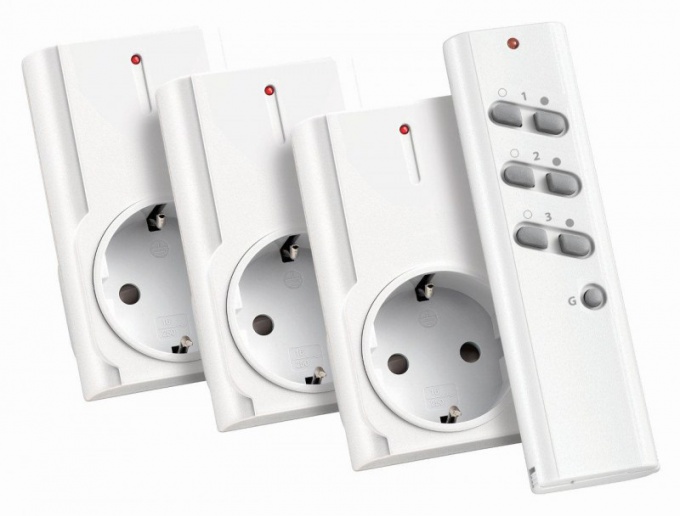
General scheme of interaction
Wireless socket with remote control remote control has almost the same scheme of work, as any modern device, controlled remotely, whether it is a TV or air conditioning. The socket has two elements: the remote control and the device of the outlet itself.
Each of the components has its own power: the socket is powered by a household power source, and the console contains a battery. General scheme The work of such devices is to transmit the signal from the console to the outlet itself. In this case, the signal can contain some multicomponent information, which is determined by the specific features of the device model.
It should be noted that this socket is not built into the wall of the house, but is connected as an external socket, allowing you to close and open the contacts between the old socket, which is built-in, and the new one.
Signal transmission
The signal sent from the console to the outlet is an RF signal of the infrared range. This type of signal is most often used for remote control purposes. The signal is generated in the control panel. Pressing this or that button on the console, you start the whole chain of creating the IR signal, each of which has some carrier of a certain frequency, on which the information signal is separately superimposed.
The information signal is an RF wave, one of the parameters of which varies according to the information being sent. This parameter can be the amplitude, phase or frequency of the wave. A similar transformation of a radio wave is called modulation. Depending on the method of information transfer, the amplitude, phase and frequency modulation are distinguished.
For example, if this outlet has only the ability to be turned on or off remotely, the console must be able to generate only two possible information signals: the socket is turned on and the outlet is off. This can be done by giving one of the options one particular amplitude of the information wave radio oscillations, and the other variant - the other. The information signal is mixed with the carrier, which serves only for propagation of the wave, and reaches the receiver located inside the outlet itself.
The signal receiver is arranged in such a way that it is able to distinguish the types of signal and to make an appropriate decision. In this example, the receiver decodes or demodulates the signal, extracting information about the state of the socket from it. Such a state is transmitted to the control device, which closes or opens the socket contact with the main power supply of the network.