How to fix the lid for the toilet. Repair of damaged attachments. Additional functions
Installation of the toilet in the corresponding room of the house or apartment is completed with a "control" stroke - the installation of the seat and the lid. Usually this device comes with the basic kit, but if you just need to replace the old product or its absence in the kit, the seat can be bought separately. The most important thing that is important to do before installing the lid on the toilet - to choose the right parameters: shape, size, color and the corresponding holes for fasteners.
The easiest and most reliable method is to sketch a full-size rim in full size, measuring its maximum width, length and distance between the mounting holes on a large piece of paper or newspaper. According to such an original drawing, specialists of plumbing shops should not choose the right model for the buyer.
Mounting the lid of the toilet bowl with your own hands
Another option that simplifies the first is to photograph the rim on a mobile phone camera or digital camera. True, measurements still desirable to do, as the picture will not determine the size of the fastening for the toilet seat.
When buying a particular product, you should pay attention to the rim of the toilet bowl, more precisely - its width. It is necessary to choose a stable, fully covering the frame, otherwise the construction will not only be uncomfortable and flaky, but it will also become a container of constantly accumulating dirt.
Dismantling of the old product
In the process of removing the lid, there is nothing particularly complicated, but in some cases real problems arise. It all depends on what kind of fastening for the lid of the toilet seat was established earlier:
- Plastic is very easy to remove, usually the bolts do not "resist" and can easily be twisted. But if the product has been in operation for a long time and has become contaminated, it may require effort. In the case where the plastic bolts do not want to be removed, they can simply be cut with a red-hot knife blade. It is not necessary to be afraid, that the melted material will soak up a toilet bowl: plastic after hardening is easily liquidated from ceramics / faience.
- Brass is also not a problem when replacing the lid, but if any bolt thinks "pokapriznichat", calm it will be easy with the help of conventional kerosene.
- Steel often becomes a source of problems. Fixing parts from this material are generally not recommended to be installed in places with high humidity, as excessive moisture provokes the formation of rust. But, if there is an incident like this, there are several ways to correct the situation.
Methods for dealing with rusted steel fasteners
When the bolts are so welded to the body that it is unclear how to remove the seat from the toilet without the brutal physical force and damage to the entire structure, you have to go for a trick. Firstly, you will have to go to the store to purchase a special lubricant that has the property of penetrating into the cracks between the materials and freezing rust. This effect works very simply - the old pieces of sediment begin to crack and release the bolts. To achieve an even better result, after a thorough patching, it is recommended to wrap the problem area with a cloth for 15 minutes, then try to remove the bolts.
Plastic fastening of the lid of the toilet bowl
If the steel bolts are so "grown" into the product that they are not taken by the penetrating compound, you can resort to using an ordinary electric drill with several drills. To begin with, a 1/4 inch drill must be drilled around the joint with the bolt. The main thing in this manipulation is slowness and accuracy, as it is easy to touch and damage the remaining parts of the structure in a hurry.
Then you need to change the bit to 1/16-inch and continue "drill". And then with the help of the socket wrench it is necessary not only to unscrew the bolt, how much to loosen it in the grooves. This procedure may take some time, but, in the end, the design will yield.
If there is a choice of fastening, then it is best to buy plastic products. They are not only easy to install and turn out without the involvement of any special tools, but they are also simply removed even when contaminated. Steel structures complicate the process of dismantling the toilet cover many times, so it is better not to buy them for the needs of the bathroom.
Seat / cover mounting options
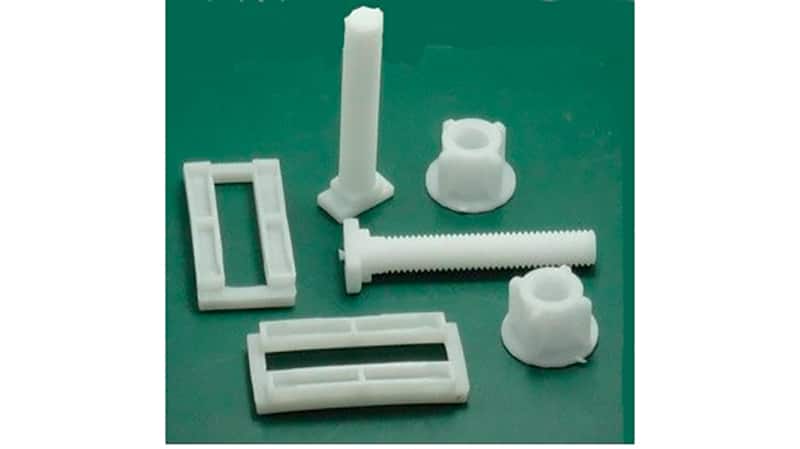
The basic role in the installation process is played by the kind of the toilet seat, since the consignment copy, called "eared" by the people, will require more employment and attention than the one-piece model. This is due to the need to fix the lid in the same holes where the water tank is attached. Before you attach the lid to the toilet with "ears", you need to purchase ancillary equipment - clamps from polyethylene. They will be needed to fix the bolts holding the whole structure.
Mounts for mounting the lid of the toilet bowl
A few tips to "facilitate" the process:
- optimum fastening of the lid of the toilet bowl is plastic or brass;
- when screwing parts from brass, it is advisable to use intermediate washers made of plastic (otherwise you can easily break the whole toilet bowl);
- do not choose steel elements for new designs and, if possible, replace them with old toilet seats;
- if after installation of a new seat the toilet seat is shifted and the water starts to leak, it is necessary to check the rubber cuff (this requires a flashlight and looking under the rim: if the construction simply skewed, it is enough to fix it with a wire, and if there is a rupture or decay of the element, a complete replacement will be required).
Installing the lid of the toilet bowl
Manipulation for replacing the cuff is simple, but time still takes. First, shut off the water supply, then disconnect the drain tank, and then remove the cuff itself. Before installing a new part, it is advisable to thoroughly clean the place of attachment from lime and plaque. And only then start to install:
- a narrow part of the product is put on the toilet shelf;
- the water tank returns to its rightful place;
- the cuff is straightened and is thrown over the wide part of the horn of the body;
- by draining the water, the reliability and absence of leaks are checked.
Mounting the lid of the toilet bowl onto metal fasteners
On the one-piece shelf, the fastener for the toilet seat is easy to install: in such cases, separate mounting holes and special clamps for "clamping" are already prepared.
First aid for breakdowns
Situations where the lid or toilet seat fix is damaged is by no means a rarity. The reasons for this can be a lot: long life and regular wear, inaccurate treatment of owners, a blow something heavy, too much stress on the surface of the product (for example, if you stand with your feet), and many other options. If there is no opportunity or desire to purchase a new model, you can try to "resuscitate" the old one.
Tighten the cover firmly
Eliminate the crack on the surface of the plastic seat will help acetone or dichloroethane: it is enough to drop some liquid to the place of the accident and firmly adhere the edges, then give a good dry.
Damaged polypropylene or polyethylene elements are subject to fire: the fracture points must be carefully melted to a soft state, combined and allowed to cool. And then lightly polish. With a careful attitude joints will become almost invisible.
The "eared" toilet bowls have a characteristic unpleasant feature: with an erroneous initial installation, the weight is distributed unevenly during use and most of the emphasis is on the plastic construction. Sometimes it is enough just to lean more securely on the tank or slop the product with the foot in order that the surface of the lid or seat burst, and the "ears" fall off. The easiest way to fix it is to buy a new lid and carefully install it. However, you can correct it yourself.
This will require:
- properly clean the damaged area from dirt and plaque;
- carefully dry (you can resort to a hair dryer);
- completely degrease (for example, acetone, gasoline);
- mix in any not very valuable capacity epoxy and hardener;
- the obtained composition accurately smudges the cleavage sites, while the excess of the mixture is very desirable to be removed immediately, since the composition quickly hardens and is difficult to remove;
- smoothly connect the edges of the chips and firmly press against each other.
After the final hardening, you can put everything in place, while it is advisable not to forget about the cause of the damage and put the supports or adjust the entire structure. Otherwise, after a while, the same problems will appear, but on a larger scale, which will require a complete replacement of the structure.
Usually, the repair of plumbing does not cause any difficulties. Most often the tank starts to leak or the lid of the toilet seat is broken. In the first case, you can fix everything, in the second - you have to go to the store for a new lid. Doing repairs is a waste of time.
Choose a lid and a toilet seat
On the second place after problems with a tank there are breakages of a cover and fastenings for sitting of a toilet bowl. In this case it's easier to go to the store than to repair them. The plumbing department will surprise you with a huge choice.
This last century was only plastic and plywood seats. Today they can also be supplied with an analyzer of the composition of intestinal gases, and with heating, microlift, and the soul you like.
Materials from which the seats and lids for toilet are manufactured:
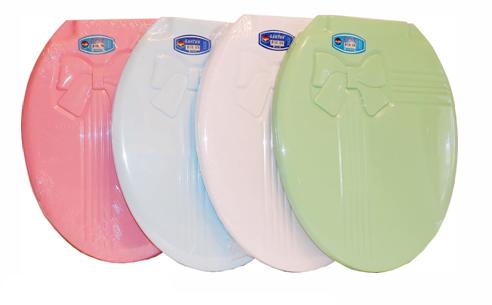
- Plastic (polyethylene, polypropylene, polyvinyl chloride). The seat itself is not solid: under the rounded surface there are ribs of stiffness, which rest on the toilet with rubber inserts or plastic protrusions. The advantage of this option is low price, lack - fragility;
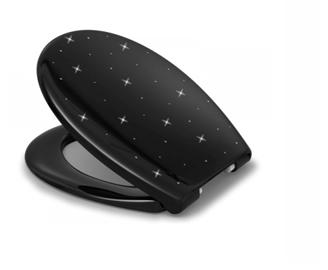
- Duroplast. As a matter of fact, the same plastic, but it differs a firm surface, outwardly reminds ceramics. The material is resistant to weak acids and ultraviolet. Antibacterial additives do not allow microbes to intensively spread over the surface. Advantages - strength and attractive appearance, lack - a higher price than, for example, in conventional plastic;
- Plywood. Yes, there are also such specimens. At the bottom are glued, or even completely screwed with rubber pads, the lid is not provided in the kit. Advantages - very cheap and very durable, disadvantages - disgusting appearance. A few decades ago, perhaps, this seat was almost in every house, now it is suitable, perhaps, for a summer residence;
- Soft seat with foam rubber. The base is made of plastic, covered with a polymer cloth. The design is different, you can find it and quite laconic, although seals and flowers are much more common. Advantages: soft and comfortable, shortcomings - very quickly breaks, especially if pets are accustomed to walking not in the tray, but on the toilet;
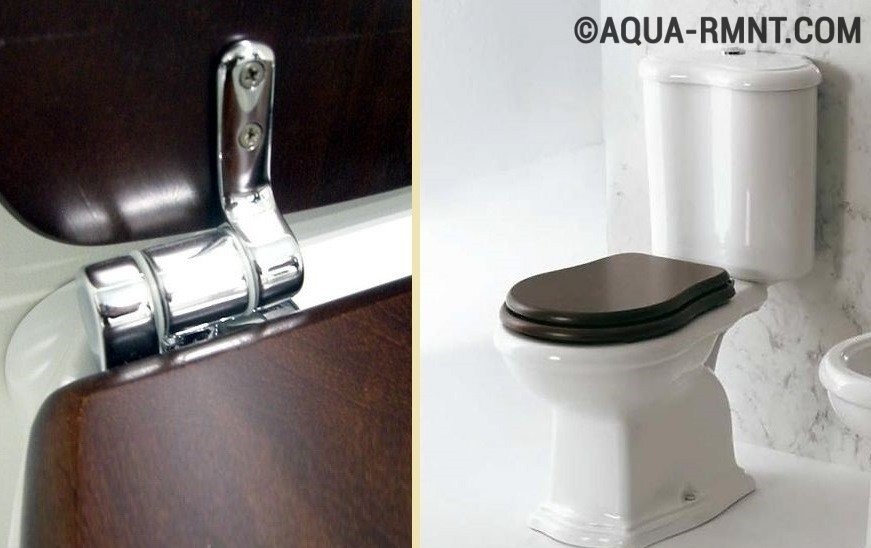
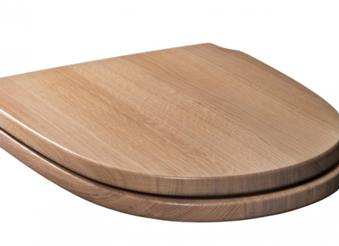
- Wood, chipboard or MDF. The quality of performance depends on the individual manufacturer, there are also rough products, there are also very attractive. The disadvantage is the weight of the seat. When it falls, it can simply split the toilet bowl.
Caps break for various reasons: from time, because of factory marriage, and maybe someone accidentally dropped it on the toilet. Most often, cracks appear on the surface and plastic fasteners fall apart. - employment is useless. Much faster, easier and cheaper to buy a new one.
Before you go to the store, decide on the form: inconvenient, inappropriate and ugly will look like a square seat with a lid on the oval toilet, and vice versa. It is enough to take a picture of your toilet on the mobile phone, and also record its overall dimensions
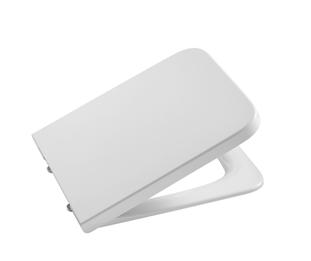
In general, semi-oval caps and seats are sold in stores. The proportion of products chopped or rectangular shape is somewhat smaller. The edges of these caps are rounded, so as not to get hurt and do not tear your clothes.
If the craving for everything original extends even to the restroom, you can find exclusive seats with covers: frogs, flowers, ducks, music for music lovers is sold in the form of a guitar or folk instruments.
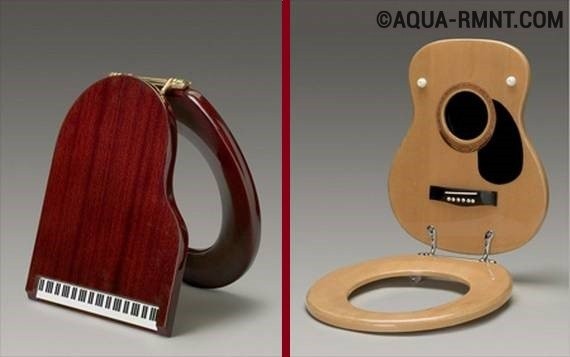
Want to pass for the original - install on your toilet seat a seat with a lid in the form of a guitar
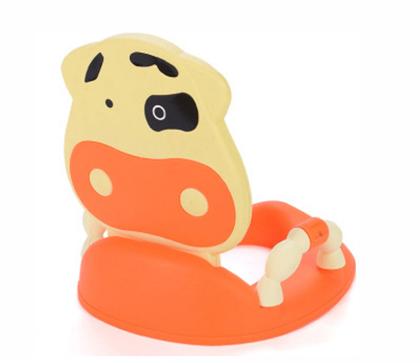
If the family has a small child, then the standard seat will be too large for him. In this case, take a closer look at products that have a liner with a smaller hole in the lid or between it and the seat. It's just for kids.
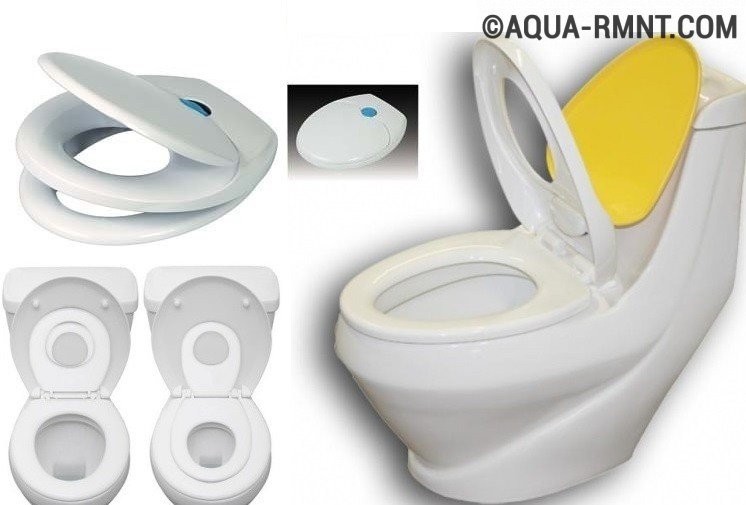
If the family has a small child, it will be easier to wean from the pot if there is a small seat on the toilet. Children love when there are things meant only for them
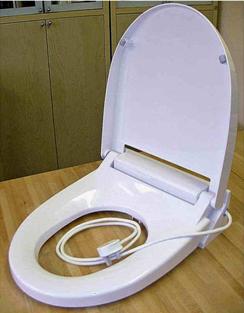
As for the functions that manufacturers of sanitary ware supply their products, there is no limit to imagination. In stores you can find seats not only with microlift or heating, but also with a built-in bidet and an analyzer of intestinal gases.
Repair of the microlift of the lid of the toilet bowl should not be carried out by yourself: be entrusted to specialists. Otherwise repair "at random" can turn into a shop after a new lid
The developers even thought about the psychological mood during their stay in the latrine and equipped the toilet covers with radio receivers and audio systems. The latter, by the way, imitate the sound of pouring water: apparently someone is so much easier to do their thing.
How to remove an old one and install a new cover with a seat
Before removing the lid from the toilet, you need to prepare a tool. In old designs, the nuts are hard to reach, so you need a socket wrench, as well as silicone, pliers and a hacksaw.
To remove the old toilet seat, you will need a socket wrench, silicone and pliers
Usually, the seat with the lid on the toilet is secured with two bolts. Sometimes a hairpin is used instead. If the plumbing is already many years, then, most likely, the nut will have to be clamped with pliers.
Before removing the seat from the toilet, it can be lubricated with silicone or oil, then it will be easier to unscrew it. In extreme cases, the bolt is sawed with a hacksaw. At the same time, in order not to damage the toilet itself, plywood or cardboard is piled.
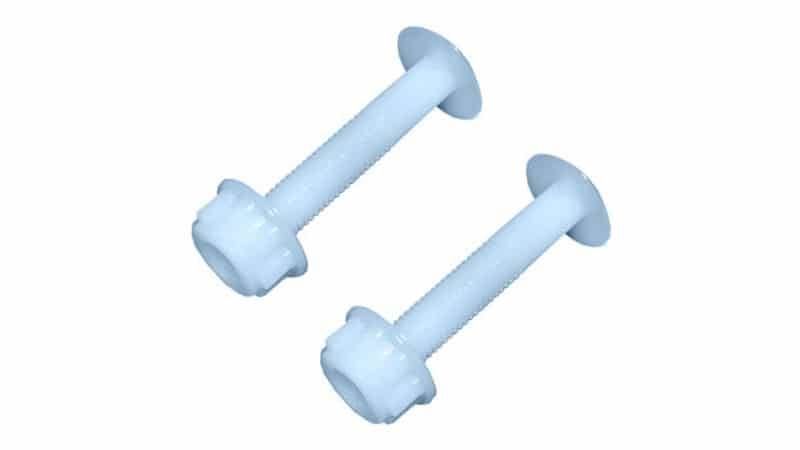
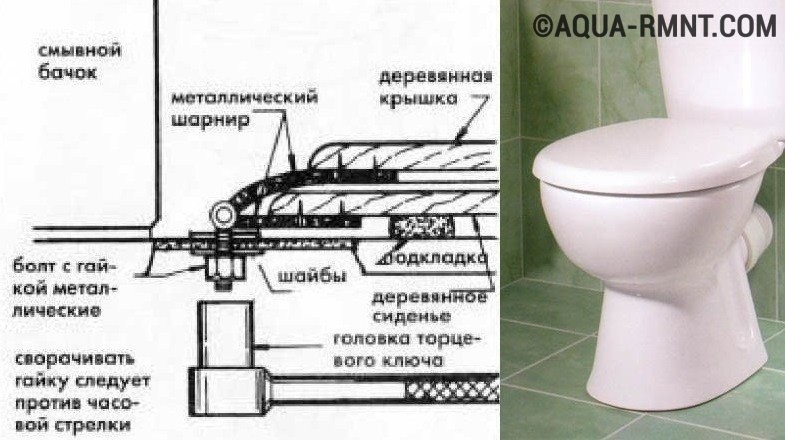
The hinge in the new plastic seats is easily accessible from the top. The kit now sells everything you need for installation, including plastic bolts and nuts. They do not rust, and if necessary, they are easily untwisted.
To install the cover, first you need to get the fasteners into the grooves and tighten the bolts. Then you need to slightly push the structure forward and tighten the nuts. Then the seat will not move during operation, and the lid will not constantly fall.
Bidet - a convenient thing, but in most apartments it is impossible to fit it in bathrooms among other plumbing. Manufacturers are aware of this and offer an alternative: a cover-bidet.
![]()
Specialists have proved that the absence of a lid on the toilet leads to a violation of the rules of elementary hygiene, since when splashing water splashes with faeces can spread to a distance of 3 - 5 m. At present, the lid for the toilet can be a complement to the interior of the toilet room, additional functions of the sanitary product.
Lid selection
To pick up the lid for the toilet, you need to rely on the following parameters:
- material of manufacture;
- shape and size;
- additional options;
- company-manufacturer.
What are the lids made from
The lid-toilet seat can be made:
- plastic. Polyethylene, polyvinyl chloride or polypropylene are most often used. Plastic covers are characterized by low cost and variety of shapes and colors. Negative qualities are poor thermal conductivity and susceptibility to mechanical influences;
- duroplast. More expensive, but also more perfect material for the production of covers. Most often, children's seats are made from duroplast, since the material contains an antibacterial component that prevents bacteria from multiplying on the surface of the device. Covers are also available in different colors and in different colors;
- wood (MDF, chipboard). Covers of these materials are distinguished by their high cost and high weight. When the surface is accidentally dropped sharply, chipped surfaces may appear. A positive aspect is the environmental friendliness of the material used.
The optimal material for household use, according to experts, is dyuroplast.
Variety of shapes and sizes
The lid of the toilet bowl must completely repeat the shape of the bowl. Only in this case it is able to last a long time.
If small children live in the house, you can install a multi-colored cover in the shape of an animal.
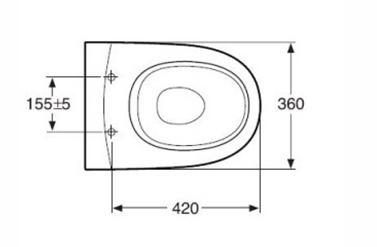
To determine the size of the cover, you need to find out:
- the distance between the holes intended for attaching the device to the toilet bowl;
- the width of the toilet bowl (measured in the largest part of the sanitary equipment);
- length of the toilet bowl (measured from the center line of the location of the fasteners to the edge of the bowl.
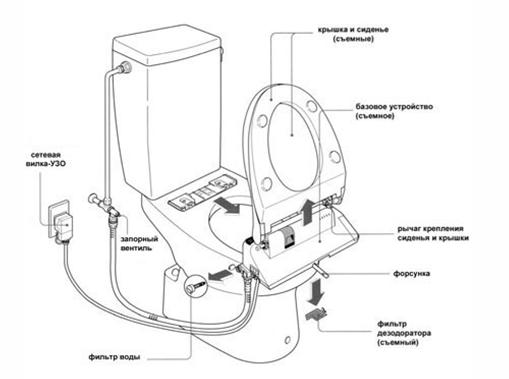
Additional functions
Recently, lids with additional functions have been widely used:
- cover-bidet. Allows you to install one plumbing device instead of two, which helps to save the space of the toilet room. Depending on the model and the cost on the cover, a function of autonomous water heating can be provided. The lid is controlled from the side of the panel or from the remote control;

- cover with microlift. After using the toilet, the lid slowly sinks to the seat, and the possibility of a sharp fall, which can cause damage to sanitary ware and noise, is excluded;
- the heated seat cover ensures maximum comfort even in the cold season. With the help of the temperature sensor on the surface of the seat, the temperature is constantly maintained at 35ºС - 36ºС;
- cover for an adult and a child, supplemented by two seats of different sizes. For the comfort of small users of the toilet, special covers have been developed, which do not require the installation of additional equipment in the form of a lining.
All additional functions can be set separately or together with each other. For example, a lid with a child seat, supplemented by a heating function and a microlift.
Separately, you can select a "smart" cover, which is equipped with a sensor that responds to the approach of a person. When the user enters the toilet the lid opens, and when it comes out, it closes. "Smart" covers can be supplemented by any functions.
Lid manufacturers
When choosing a cover, it is also worth paying attention to the manufacturer, on which the quality and longevity of the products depend. The most popular are the covers, issued:
- the Spanish company Roca. Covers for toilet bowls are suitable for both sanitary ware of this brand, and for other modifications. Lids of different sizes, colors and with various additional functions are issued. Warranty for products is 3 - 5 years;
- polish company Cersanit. The company's products are recommended by specialists, as the most durable and reliable. A wide range of models allows you to choose devices of different shapes and sizes;
- the company Jika (Czech Republic). In the Russian market, the company is represented relatively recently, but, according to users, the covers are reliable products;
- the firm Gustavsberg (Sweden). The company specializes in the production of covers with additional options.
Among Russian companies it is possible to allocate firm Сантек which lets out qualitative covers of different complete sets, colors and the sizes
Cover installation
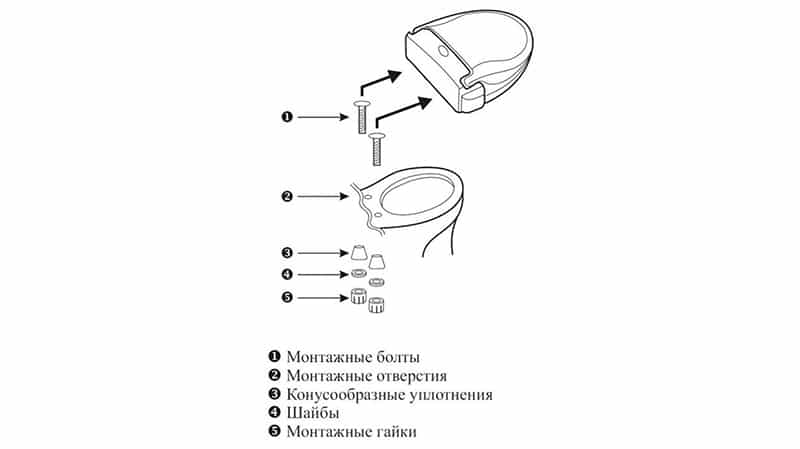
Replace the lid on the toilet or install a new device without the help of specialists. The installation scheme consists in the following actions:
- dismantling of the installed cover. A standard white cover without any functions is attached to the bowl of the toilet bowl with special bolts located near. Therefore, in order to remove the cover, it is enough to unscrew the fastening elements;
- to install a cover with additional options, you need to connect to electricity, and in the case of a bidet and a water supply. To connect the power supply, it is necessary to install the outlet. For the water supply of the cover, the pipes are routed;
- mounting plate is installed;
- the new device is fastened to the bowl of the toilet bowl;
- the cover is connected to the power supply and the water pipe;
- the working capacity of the device is checked. If necessary, adjust or adjust individual options.
The installation instructions for the cover are shown in the video.
When installing covers from different manufacturers, certain nuances may occur. The process of mounting the cover must be described in detail in the instructions that accompany the device.
How to remove and change the lid (seat) and fixing the toilet with your own hands.
It turns out that changing the lid of a toilet bowl is easy. I tell you this as a woman saying 🙂 The most interesting is that if you never look beyond the seat, it seems that it's just unreal. But one day I had to do this with my own hands, and even on 2 WCs, and everything turned out to be quick and easy. I was not too lazy to take pictures of everything, so that the girls and women were even clearer. The article will answer such questions as replace, unscrew, remove, put, assemble, attach, fasten, and secure the seat.
So, what do we need?
1. Choose the right lid for the toilet.
Yes, yes, you have to start the seat change by choosing the right lid shape. Now in the building stores, which is just not for sale. It is very important that your cover is not super expensive, soft, in the form of an aquarium and so on. etc. namely of the same size and shape as the previous one. In order not to bother with forms, you can just take a picture of the old cover on the phone and show the consultant in the store, which I did. What else to pay attention to? The fact that the rim of the toilet bowl can be wide, and you buy a narrow lid, in this case, the dirt will accumulate, plus - the seat will not be stable.
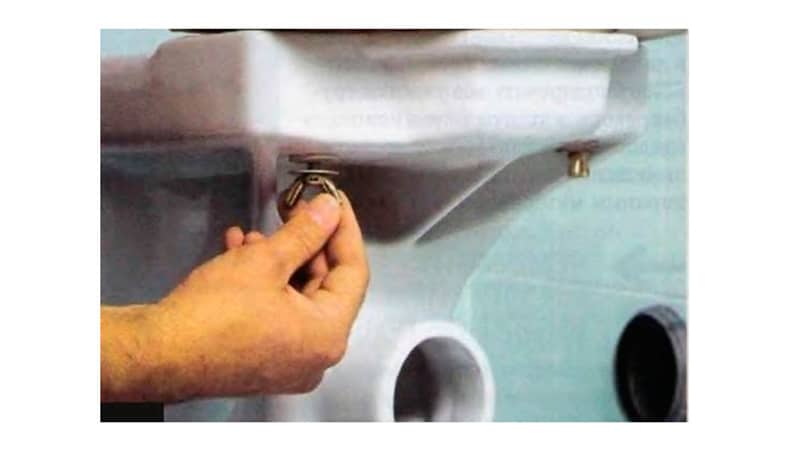
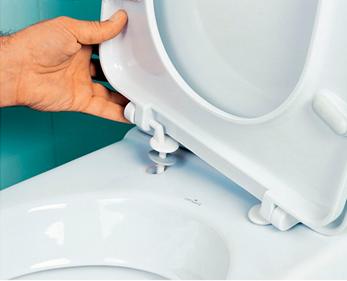
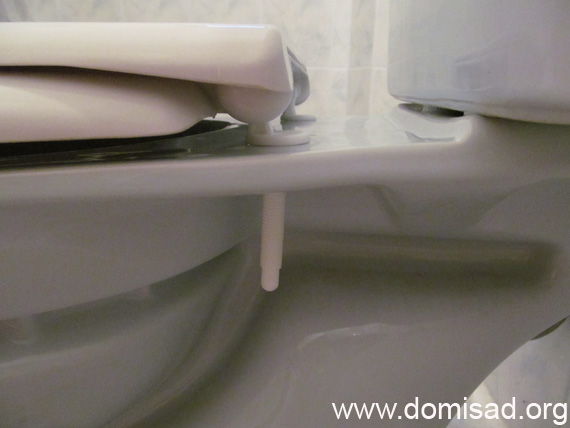
2. How to remove the lid of the toilet bowl?
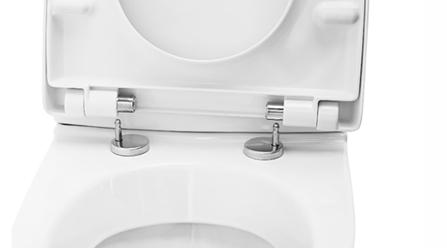
As you understand, the next step is to remove the seat. For this you need to look under the toilet. There you will find only 2 "nails". We unscrew them, it is easily done by hand, without any tools. Just need to turn the pipelines in the right direction until they turn out. Yes, yes, the toilet seat rests on 2 simple plastic or metal pins. So, your toilet is ready for renovation:

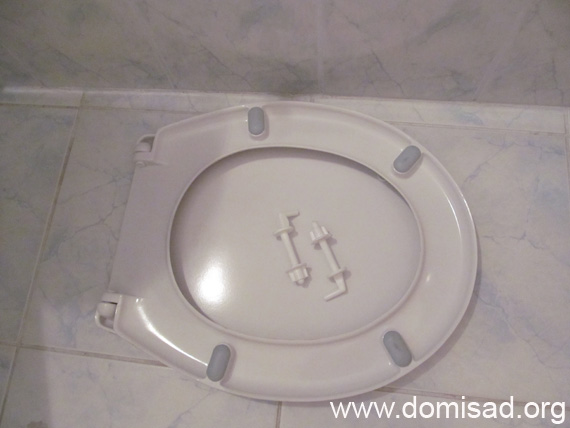
3. Installing the new cover
We take out of the box a new toilet seat and make sure that it fits us and will be stable. We check the spare parts and prepare them, the most interesting is that the spare parts are at a minimum, and I will remind you that for installation you will not need any tools. Here is our "gentleman's" set:
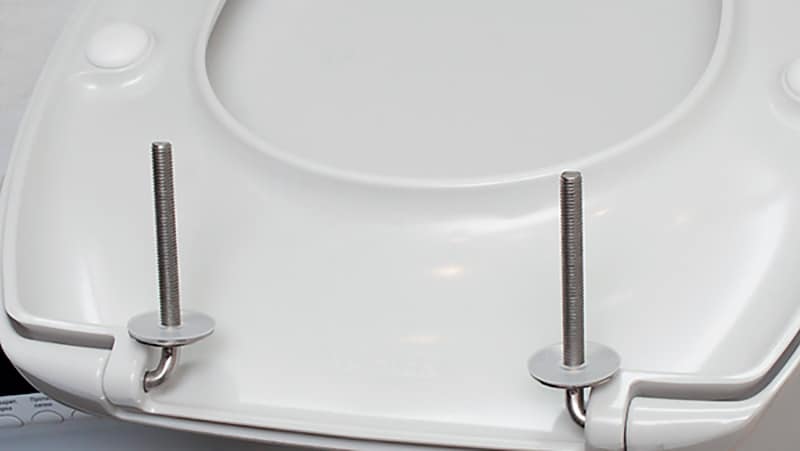
4. Screw the screws
When you removed the old cover, you already realized that you need to combine these screws with holes in the toilet itself. And the bent ends are inserted into the holes that unite the seat and the lid.
Paste from the inside. If you look at the picture, you will see them. The last thing is to tighten the caps:
Well, that's all, the toilet is ready for operation!
A few things to consider:
- Cheap seats for toilet bowls have plastic screws, as seen in the picture. When you twist them, just do not crack. Do not overdo it. Moreover, if twisted very tightly, the stability of the seat can deteriorate, if so, loosen one or both screws.
- Some lids do not understand, from the outside or from the inside, insert the ends that connect the lid and seat. We have 2 toilets at home. When replacing the first one, I fell into a sink. Twisted everything, then I look - the lid is crooked. I had to unscrew everything. And I still tightened properly, then regretted it 🙂
- Not the fact that you will have exactly the same installation system. But the principle is almost the same for everyone, so be sure that you will succeed in the fastest time and for this you do not need a plumber. But how do they break the covers? At us one cover has taken down the husband a leg when very much hurried up to a toilet. And the lid in the second toilet I took down when I threw some huge stuff into the shower. It happens 🙂
-

Paint for wallpaper for painting - types, features, benefits.
-

Is it possible to make an apartment electric switch with my own hands?
-

Advantages of a two-chamber profile of a plastic window (double-glazed windows).
-

Calculation of the water heating system of a private house.
-
How to properly glue vinyl wallpaper, preparation, gluing, work with corners.
-

Hydrophobizers for use during construction and repair.
Usually the repair of sanitary ware is required because of the leakage of the tank or the deformation of the fastening that holds the lid of the toilet bowl.
The solution to the second problem involves the purchase of a new seat. Its installation is not a very difficult task, which can be easily accomplished with our own hands.
Removing the old cover
Removing the toilet seat is a fairly simple operation, but it has its own characteristics, depending on the mounting option. It can be executed from:
- plastic,
- brass,
- become.
Plastic fasteners
Differ the most simple dismantling. The bolts are spinning quickly and easily. If necessary, they are cut with a blade of a knife heated to 130-175 ° C.
Dropped plumbing melted plastic drops are easily removed after hardening.
Fixation made of brass
Fasteners are spinning quite simply. When problems occur, a method is used that reduces the coupling of surfaces. A small amount of kerosene or special lubricant (WD-40) is taken, the thread and the toilet area are covered at the fixing point. Now the unwinding of the lid will go much faster. 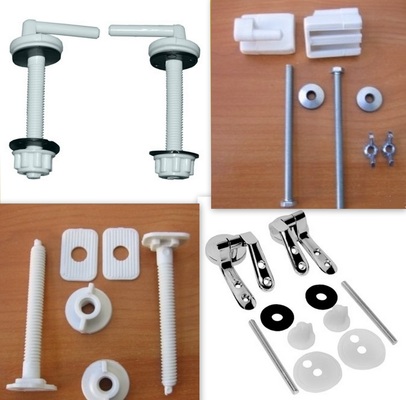
Steel fasteners
The most difficult mount for dismantling. Steel can become rusted, so to facilitate unwinding the bolts it is recommended to use:
- Penetrating grease with a "freezing" effect. It must be applied to the fasteners, wrapped with fabric and left for a quarter of an hour. After this time, you can unscrew the bolts with a socket wrench. If this method does not help, then the second option is recommended.
- Electric drill. To work you will need several drills of different sizes. First use a 0.25 inch drill, then 1.16. Processing is very accurate. Then take the socket wrench, blur and dismantle the fastening connection.
Fixing a new cover
The leading role in the installation of a new seat is played by the type of the toilet seat. She may be waybill and one-piece. Installing the first option will require more time and attention.
Mounting the cover shelf
This design is called "long-eared". The complexity of its installation is due to the fact that it must be fixed in the same holes as the water tank. For work, you will need polyethylene clamps, which will hold the bolts.
The work is carried out taking into account several recommendations:
- use only plastic or brass fasteners;
- when screwing brass parts, use intermediate plastic washers;
- do not use steel elements;
- do not allow the shelf to move relative to the toilet bowl, as this can lead to leaks;
- to perform the installation of the seat with the tank lifted, following the integrity of the cuff.
Full process of replacing the seat you can look at the following video:
Mounting the whole shelf
Here, work is much faster. The design contains special holes, into which are placed the clamps, clamping the seat. Can be installed on the tank of any shape. 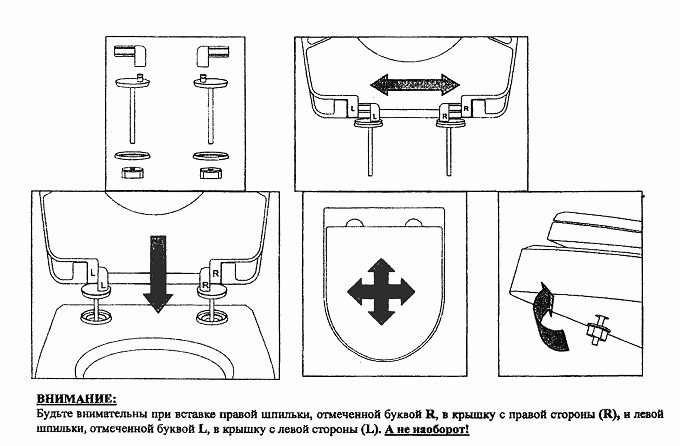
Installing the lid of the toilet bowl with microlift
The toilet seat with microlift is considered more convenient. The lid is raised and lowered very smoothly, without loud sounds or damage.
The process of installing it is quite simple and includes several steps:
- Using a plastic sleeve, connect the lid and toilet bowl between each other.
- Insert the mounting bolt.
- Lay a pair of rubber liners necessary for the tightness of the structure and the softness of the fit.
- Insert the seals into the seat, which are connected to the latches on the toilet.
- Install the tank on the bolts to adjust the fit and height of the placement.
- Secure the structure with nuts.
- Check the alignment and tightness of the connection: if the lid has moved away from the bowl, you will have to replace the nuts and fixing bolts.
First aid for broken toilet
Some toilet flaws can be eliminated without a complete replacement:
- To eliminate cracks, use acetone or another solvent of plastics, applying it to the surface. After waiting for softening of the material, the edges of the fracture are shifted and allowed to dry.
- Damaged polyethylene and polypropylene sites revive fire. The fracture sites are gently fused to a soft state, combined and allowed to cool. Then the plastic is gently ground, making joints almost imperceptible.
Repair of "eared" toilet bowls is carried out in the following order:
- Stripping, dehumidification and degreasing of the deformed surface.
- The chip is treated with a solution of epoxy resin and hardener.
- Compression of parts with simultaneous removal of excess mixture.
- Waiting for time to freeze.
Conclusion
Damage to the lid of the toilet can occur for various reasons: from factory marriage to inaccurate treatment. The most optimal and financially profitable solution to the problem will be the acquisition and self-installation of a new product.