Assembling the shower enclosure yourself. How to install a shower cabin with your own hands. Video instruction. Correct sequence of actions
The content of the article:
The shower cubicle is no longer a novelty. This is the ideal choice of those whose bathroom does not give a particularly "walk around", as it is necessary to contain a laundry basket, a sink and a washing machine. Also installed a shower in private homes, as an additional bathroom for guests. But do not underestimate the shower cabin, because it, besides saving space, has such advantages as: convenience, comfort, utility and practicality.
Having decided to change the bathroom to this convenient unit, you must be ready for certain subtleties and nuances that are important when installing it. In order to know how to properly install the shower, you need to thoroughly understand these nuances.
Shower in the bathroom. a photo
Shower cabin: check of a complete set
 In order that there are no problems when installing the shower, it is necessary to find out in advance whether all the details of the device in place, and whether they are intact.
Buying a shower in a store or taking it from a warehouse, make sure of the availability of such mandatory elements of the device as:
- walls;
- pallet;
- panel with watering can + nozzles, with additional functions;
- top cover (for closed models);
- doors (closed models).
Carefully check their integrity.
In order to make sure that the glass of the device is not broken, you can simply shake the package in which these details are located. If there is no sound of broken glass, you can be calm, as the glasses used in the production of shower cabins are hardened. They are broken into many small glass on impact, and the noise from the broken glass you will surely hear.
Selecting and preparing a place for installing a shower enclosure
On the Internet, you can find a large number of videos: "How to install a shower cabin." However, not every one of them has advice on how to prepare a place to install it. Considering the choice of this site, make sure that next to this place is present:
- circuit;
- water supply;
- drainage.
Too remote location of these important structures can bring additional troubles and costs.
Also, the proximity of the ventilation opening will be a plus, as it will save the walls from accumulation of condensate. Therefore, we recommend that you install the shower in the bathroom as close to the ventilation as possible.
It is important to make sure that the floor surface is as level as possible. Otherwise, it will be necessary to puzzle over how to install a shower tray so that it stands perfectly even. When the horizontal is displaced, it is necessary to align the floor to avoid further height adjustment of the legs of the cabin located under the pallet, which is an extremely laborious process.
Another important point, which should pay close attention is the wall, near which will be placed a shower. If it is located at an angle of less than or more than 90 degrees, there will be a gap between the cabin and this wall. A defect in the form of a small gap can be filled with a special sealant. If the gap is too large, then the wall will have to be leveled.
Assembling the shower enclosure with your own hands
 To know how to install a shower cabin by your own hands, you first need to figure out how to properly install the shower tray, which is the basis of this device. Therefore, the installation of the pallet should be taken very seriously, carefully preparing the surface on which it will be installed.
The next step is to adjust the legs of the pallet, after which a hose is installed to drain the water, one end of which is attached to the pallet itself, the other to the drain hole located necessarily lower than the pan. The joint gasket should fit as tightly as possible, otherwise, it is worth using a sealant. When connecting the drainage, pay great attention to the hoses. If their connections do not have threads, this indicates their poor quality. Such connections should be replaced to prevent leakage.
Before proceeding with the installation of the walls of the booth, read the instructions that come with the kit. Most often, the assembly is carried out with the help of connecting bolts, which also need to be changed if they do not inspire confidence. First install the walls, then the ceiling, and the cab doors are installed last.
One of the most critical stages is the connection of water supply. If you are not sure of your professionalism, but the budget is tight and there is not enough money for the master, you should first see the video: "How to install the shower cabin with your own hands" and carefully consider all the details concerning fastening the water hoses, then not flood the neighbors and do not repair them and yourself.
Installing the shower cabin yourself, as a rule, people do not pay attention to the sealing of the tee for water. Better to be reinsured and using FUM tape or ordinary packs tighten connections.
To connect the cab to the mains, it is safer and safer to use a special outlet that does not allow moisture to enter and place it behind the cab to avoid water and tension.
Video instruction for installation and inspection of the shower cubicle
Final work on the assembly of the shower cubicle
After the shower cabin is installed it is necessary to check on the following items:
- Stability of the cabin. The instability of the cabin indicates a violation of the installation of the pallet.
- Sealing of joints. The leakage indicates a poor tightness, which can lead to the flooding of the bathroom.
- Checking the functioning of electrical components. The lack of functioning indicates the wrong connection of the cabin or the defect of the element itself.
- Correct and smooth movement of the doors. Difficulties in closing and opening the doors indicate a defect in the movement mechanisms or an error made during their installation.
What does the cost of installation depend on?
Additional costs when installing a new shower can occur when:
- the need to dismantle the old plumbing;
- large size shower cubicle;
- setting of additional functions of the cabin.
The average price for installing a shower cubicle is 6,000 rubles and varies from 3,000 to 10,000 rubles, depending on the above factors. But practice shows that the installation of a shower cabin by professionals in the aftermath is paid for by the lack of costs for repairing those errors that are when you install it yourself.
If you still decided to try installing the shower yourself, then carefully read the video instruction for installing this unit.
- Instruments
- Installing the pallet
- Fencing assembly
- Doors
- Mounting the dome
- Installing the screen
It's not difficult with your own hands, if it contains a clear and understandable instruction with a detailed description of each action. Such guides of their clients are provided by well-known world brands, whose products belong to the middle or expensive price segment. The task is simplified by all sorts of notes and stickers pointing to the top or bottom of the part, its front or back side. Those who, due to shortage of financial resources, had to prefer a Chinese-made shower, such care is not spoiled. All that they have is a page with mysterious letters in Chinese dialect of English, hot enthusiasm and a desire to save by assembling yourself. Next, we'll look at how to assemble a shower cabin, made by Chinese craftsmen, and remain unharmed.
First of all, the buyer should make sure that his cabin reached him safely. The weakest link is the glass. The verification is simplified by the fact that the glass for the shower enclosure is tempered, so with strong impacts, they simply crumble into small fragments. If you do not hear rattling when shaking the package, then it's okay with the glasses.
Fittings and fasteners are in a separate box. The absence of several washers of screws or some other trifle has become a good tradition, so it's not worth to be surprised and indignant. Also be prepared for the fact that some accessories will have to be replaced.
Instruments
Before you collect the shower, you need to prepare a small list of materials and tools:

- Washers for thread M16.
- A quality siphon (the one that comes in the kit, as a rule, you can immediately throw out).
- Sanitary silicone sealant.
- Crosshead screwdriver.
- Set of wrenches.
- Long construction level.
- Gloves.
- Paint.
- Brush.
- Some old, but clean clothes that can be disintegrated into rags.
- Soap.
Back to contents
Installing the pallet
Before the operation, wear gloves, otherwise a splinter can be picked up from the fiberglass from which the pallet is made.

- Now it is necessary to twist the long studs into the intended seats for them at the bottom of the pallet. In most models of this class, it is impossible to turn the legs in a strictly vertical position, but there is no special need for this.
- For each pin, screw the nut.
- We put one washer on the nuts.
- Now it is necessary to establish the cross parts of the support frame. In the event that there are noticeable irregularities on the pallet, it is possible to lay gaskets from Penoplex for their compensation under the frame. Please note: the welded lining must be facing away from the pallet. If it is deployed to the pallet, it will be in a partially suspended state due to a skew.
- The central leg should be screwed into the nut, which is welded to the shortest part of the support frame. Then the washer is put on the leg and another nut is screwed, which should be pressed up to the stop. Finally, re-tighten the nut - this will be a foot rest nut for the foot, the height of which can be adjusted with the help of a thread.
- To fix the fixing beams in the pallet are mounted wooden bars, to which the beams are screwed with screws. Bolts of fastening and support can be tightened only after all screws are fully screwed. Otherwise, they can be pulled out of the tree due to skew.
- Now all the metal parts can be painted, without it they will eventually rust.
- The height of the legs should be adjusted using a level and tighten the locknuts, but only slightly, since after installing the tray in place, their height will have to be adjusted a little. It is also necessary to install brackets on the legs, on which the pallet screen will be fastened. With the installation of the screen should not be rushed (contrary to the instructions attached to the cabin instructions), do this only after connecting the cabin to the utility networks and final adjustment of the legs in height.
- We proceed to install the siphon. As already mentioned, the best option is to purchase a full siphon instead of the one that comes with the kit. If you still decided to mount a "native" drain device, then its corrugated hose must be bent in the shape of the letter "U". Such a bend will ensure the formation of a water seal, which will not allow odors from the sewer pipe to penetrate the bathroom through the drain hole of the cabin. Installed on the drain spring-loaded cork with the image of the foot is better immediately dismantled. After a short period of operation, it starts to flounder: pushing it to close the hole, it turns out easily, but to "squeeze" back, you will have to suffer.
Back to contents
Fencing assembly

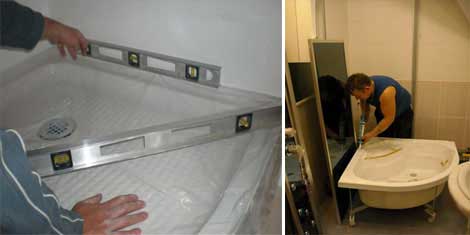
Figure 1. Diagram of shower tray installation.
If there is no marking, the upper part of the glass can be determined by a large number of holes. In addition, this part is wider than the lower one and, unlike it, does not have figured cutouts. The glasses have a frame in which the grooves for fixing to the elements of the guard are made.
Pushing the glass, it must be raised and smudged the place, in which it rests, with a silicone sealant. Now the glass can be lowered and secured by tightening the screw on the clamping bracket.
Surplus sealant is best removed with a finger soaked in soapy water. After this place, from where the sealant was wiped out, it is enough to wipe with a clean cloth or napkin. The lower and upper parts of the rack must be screwed to the arch with screws.
Then on the glass it is necessary to put on the sealant of silicone. It is important not to confuse the direction: the seal of the seal should look inwards. Seal the joint sealant should not be. Do not try to get the seal under the clamping bracket, it's unlikely to fit there.

Now the fence can be installed on the pallet (Figure 1), previously smearing the last sealant. When applying the sealant, make sure that it does not fill the groove in the sump, designed for water drainage. Do not screw the fence to the pallets with screws.
Attach the side panels to the pallet by screwing them with self-tapping screws and washers. Places of adhesion of panels to the pallet and the fence should also be sealed with a sealant. Tighten "tightly" screws do not immediately follow, since the fastening holes in the panels and the pallet may not coincide. Tighten the fasteners evenly, then the panel will gradually fall into place without stress.
The scheme for installing the rear panel is completely identical to the layout of the side panels.
Not so long ago, shower cabins were considered almost exotic, but very quickly moved into the category of everyday things. They are increasingly installed in bathrooms instead of traditional baths, or, if the area allows, paired with them. To choose such equipment of special work does not make, in fact its assortment is wide enough.
While the installation of the shower is often difficult, especially for those who have never done this before. Let's try to understand all the subtleties of the procedure.
The installation features of the cab depend on the type of device, distinguish:
- Rectangular devices. Installed along the wall, the tray is quadrangular.
- Corner equipment. Has a tray of triangular shape, mounted in the corner of the room.
If the size of the bathroom allows, you can place in it a bath and shower. It is very convenient and practical
In addition to the type of installation, shower cabins have one more significant difference. They are of two types:
- Closed or hydroboxes. A full cabin equipped with four walls, a ceiling and a pallet. Such models are usually equipped with many additional functions: hydromassage, rain shower, the ability to listen to radio, etc.
- Open constructions. In the design there is a pallet and side walls, the remaining elements are absent. The cabin is attached to the walls of the room, its installation is complicated by the need for waterproofing works. The functionality of these cabins, as a rule, is very limited.
Regardless of the type of shower enclosure, it includes several elements:
- Side panels. In open models are attached to the wall, in the closed - to the back wall.
- Back wall. It is supplied with a fastener for the mixer and additional accessories.
- Pallet. Equipped with a special frame for installation and height-adjustable feet.
- Ceiling panel, only present in closed hydroboxes.
- The doors. Can be of various types, for example, swinging. Most often used sliding doors with roller mechanism.

Depending on the model of the cabin, its configuration can be different. Before starting the installation, be sure to check the availability of fasteners, flexible hoses and the necessary adapters. If something is missing, please pre-order
These are the main elements of the equipment. In addition to them, additional elements can be included in the car kit: flexible liner, fasteners, gaskets and the like. If all this is missing, before starting the installation you will have to go to the store.

Corner shower cabins are very convenient for small bathrooms. They occupy quite a bit of space, but they are spacious enough and roomy
How to prepare the cabin for the assembly?
First of all, you need to prepare a place to work. We release the bathroom as much as possible, remembering that the cabin is rather bulky equipment, all work on its assembly will be carried out directly on the site, where there should be a maximum of free space. We proceed to unpack the device.
Depending on the type of cabin and its model, the number of packages can be different. Their number is checked by the assembly instruction, which must necessarily be included with the equipment. It is important that it be translated into Russian, otherwise there will be no sense from such a text.

Carefully unpack all the details and once again check the equipment of our cabin. We remove the parts removed from the package so that they do not interfere.
Turn the tray and install it on a pre-prepared substrate. It can be a dense fabric or a sheet of cardboard. So the part will be easier to protect from damage during installation.
In no case do we put fragile glass panels on the floor. To avoid damage, we install them vertically, leaning against the wall.
Assembling the shower cubicle
Start the assembly of the cabin with a careful study of the manufacturer's instructions. In it the most complete taking into account the features of the model describes all the moments of installation. Rarely, but it happens that the instruction is missing or given in a foreign language, then you can try to find the video instruction on the Internet or take advantage of our advice.
We will consider the basic rules for assembling closed hydroboxes, which will be relevant for cabins of any models.
Stage # 1 - collect and install a pallet
The pallet is a metal-plastic or metal tray in which water is collected. To increase its strength, the element is mounted on the power frame. With the installation of the frame we will begin. Depending on the model, it can be prefabricated or integral.
In the first case, the frame will need to be pre-assembled from the elements proposed by the manufacturer. The assembled frame can be installed, but first it is necessary to sample it and determine the optimal height of the pallet. That's why at the initial stage all the fasteners are not installed, but only "we are making".
Let's get to work:
- Take the pallet, turn it over and lay it on the substrate upside down. We find grooves designed for studs, and carefully screw the fasteners.
- We find nuts, which are intended to limit the strength elements, and wind them
- We install the power elements on the studs.
- We put in place and fix the siphon.
- Adjust the height of the frame. It should be 2 or 3 cm higher than the lowest point of the siphon.
- The adjusted frame is fixed with nuts.
- Adjust the height of the legs. To do this, turn the frame and twist or unscrew the adjusting screws. As a result, the bottom drain point of the pallet should be 5 ° below the level of the sewer tee.
This completes the preparation for fitting. Now you need to put the pallet on the place prepared for it and check if the slope is correctly set. It's very easy to do this. We put a drain hose to the sewerage pipe, fix it to the equipment drainage and fill it with a bucket of clean water.
We carefully watch how she leaves. If this happens very slowly, then the slope is insufficient and you need to increase the height of the pallet. If the water leaves too quickly, the height of the legs should be reduced.

The shower tray is installed on a frame, which can be solid or prefabricated. In the latter case, it must be assembled before installation
We carefully adjust the height of the pallet and only after that we proceed to its final assembly. We disconnect the device from the sewage system and perform the following operations:
- We turn the pallet and lay it on the substrate.
- Nuts, "baited" on the studs, carefully tighten.
- At the points marked on the power elements, screw the screws into the body of the pallet.
- We take additional legs, which are designed to distribute the load uniformly throughout the structure, and install them at specially designed places. Securely fasten the legs.
- The newly installed elements are adjustable in height. The accuracy of the adjustments is controlled by means of a level.
- We carefully check the reliability and durability of fixing all installed elements.
- The pallet is ready for installation. We put it in place.
- We connect the sewage system. We connect a drain hose to the sewer pipe. All connections are made with the obligatory use of a suitable sealant, otherwise they will pass water.
- Using the level control the horizontal of the installed pallet. If deficiencies are identified, they are immediately eliminated.

The height of the shower tray can be changed. For this purpose it is equipped with special adjusting legs
Step # 2 - mount the side walls
Before installing the panels, it is necessary to install all the equipment on them, which is provided by the model of the shower cubicle. Checking the instructions, determine the attachment points. Most often, the panels already have technological holes. We find out which accessories in which place will be fixed.
Most often, a mirror is installed on the back panel. We attach it especially neatly, we do not use the key. Carefully tighten the nuts by hand. We fix other accessories.
If the walls of the shower cubicle are made of tempered glass, we must use special silicone gaskets. They protect fragile enough details from possible damage by fasteners. After all accessories are installed, proceed to install the panels on the pallet. We will start from the back wall.
Carefully pick it up, put it in its place and secure it. Now we mount one of the side panels. First we perform only vertical connections with the previously installed back wall. Similarly we arrive with the second panel.
We proceed to docking panels with a pallet. It must be done very carefully. The boundaries of the elements must exactly coincide, otherwise unwanted gaps will appear that will not only damage the appearance of the shower cabin, but also disrupt the sealing of the equipment.

Sealing of all connections and joints of the shower enclosure is the most important stage of installation, on which the quality of equipment assembly depends. For work we choose quality sealant
All compounds must be treated with a suitable sealant, which will ensure the waterproofness of the hydraulic box. Particularly neatly working with the front of the cabin. We make sure that the docking line is very flat and all the elements take their place.

The glass elements installed in the frame are fixed with screws. Now you can assemble and replace the frame in which the doors will be installed.
After the panels are in place, proceed to install the mixer. Then we connect the cabin to the water pipes. The connection is easiest to do with flexible hoses. When choosing their length, it should be taken into account that it should allow, if necessary, to move the equipment about a meter from the installation site.
Otherwise, the repair and maintenance of the cabin will be seriously hampered. Flexible hoses should not be too taut or bent, we attach them with special clamps.
Step # 3 - install the ceiling panel and doors
On the ceiling panel of the hydraulic box can also be installed various additional elements. Before assembling the parts, mount them in place. To install the ceiling panel alone is almost impossible, you need to invite an assistant. Its task is to maintain the element.
We lay the panel on the assembled structure and, taking a level, we check its vertical with respect to the pallet. If deviations are found - correct the position, if not - fix the part with screws.
There was one more important point: you need to check the position of the entire structure with respect to the pallet. We perform the operation using the building level. If necessary, correct the shortcomings by gently turning the system right on the pallet until it reaches the desired position.
We proceed to prepare the doors for installation. First put on the rollers rollers, and put on the edges of seals of silicone.

Particularly carefully we work with glass doors, because they are fragile enough. Be sure to use special silicone gaskets for fasteners
Do not forget that the outer element is put on the outside by the "petal". The doors are ready for installation. We put them in place. At the same time, the upper adjustable rollers are turned upwards to the maximum, while the lower parts are tightened.
To adjust the position of the doors tighten the upper rollers, so you can ensure a tight closing of the door leafs. We put the screw caps on the rollers. Now you need to install the handles on the doors, if they are provided for this model.
Stage # 4 - connect the device to the network
Our shower cabin is practically installed. By engineering communications it is already connected, it remains only to connect it to the electrical network. This should be done with the help of a three-core copper cable separately separated from the electrical panel with a cross section of at least 2 square meters. mm.
If the shower cubicle consumes more than 5 kW / h, then the connection must be made via an individual 25 A automatic device.
After the connection, we make a trial run of the cabin, during which we thoroughly inspect the equipment for leaks. If some joints let the water in, wipe them dry and once again thoroughly soak the sealant. Take the decorative apron and install it on the pallet. The cab is ready for operation.

If the test run of the shower cabin showed that it is not sealed, you will have to re-cover all joints and joints with sealant
Errors in installation that must be avoided
Specialists identify several typical mistakes that are most often made by inexperienced collectors. So, you should avoid:
- Insufficient sealing of the structure, which leads to the appearance of moisture under the shower and leaks. The problem is solved by spreading joints and joints with silicone sealant.
- Errors in calculating the ratio of the bottom of the cabin and the level of the sewer pipe. The drawback leads to a too slow drain of water from the pan or even its stagnation. It is corrected by adjusting the height of the legs of the pallet.
- The entanglement of the guides along which the doors move. If the element intended for installation from above is at the bottom and vice versa, the door comes out of the grooves. It can fall and break. To fix the defect, you must reinstall the profiles.
- Poorly aligned pallet. If the structure is not aligned well enough, it will swing and crunch when a person stands inside. To solve the problem, you need to adjust the height of the legs of the pallet.
Many apartment owners say goodbye to the traditional bulky bathroom and choose a more compact multi-functional shower. It is very important not only to choose the right equipment, but also to install it correctly.
The easiest way is to invite specialists, if you want to carry out the installation yourself, you should carefully read the instructions and strictly follow all of its points. This guarantees a quality installation, after which the cabin will serve its owner for many years!