Overhaul in the bathroom with your own hands. Bathroom repair in a new building. Features of work in new homes and the choice of brigade
The process, which really requires special attention, is the renovation of the bathroom in a new building. This is not surprising, because as soon as the owner moves to a new apartment, most often, he sees the bare walls and the lack of any design.
Unfortunately, to do expensive repairs in the first year of residence is strictly not recommended, because otherwise, after some time, the repair work will have to start from the very beginning. This is due to a variety of factors, such as the shrinkage of the foundation, and as a result, a small shrinkage of the entire structure. On how to proceed in this situation, and will go further.
Where to begin?
We begin repairing the bathroom in a new building. First of all, you should determine for yourself the fact who will perform the repair work: the specialists involved, or you yourself in-house. It is also recommended to determine the approximate amount of work. In this situation, the advantage lies in the fact that there is no need to clean the old tile, but it will be necessary to pay special attention to the leveling of the walls: the conveyor work of the plasterers is rarely at least satisfactory.
Among other things, you should imagine exactly how the room should look after the completion of the repair. This applies not only to the decoration of walls and ceiling, but also the arrangement of furniture and sanitary ware.
What should I consider while preparing for repair work?
Given the fact that the house was built recently, one should not immediately make expensive bathroom renovation in a new building. Much more relevant, to buy inexpensive tiles and paste it on the walls and floor. As for the ceiling, it is ideal for him decorative panels. This approach is due to the small shrinkage of the structure. Depending on the time that has passed since the foundation is filled, shrinkage can take from 1 to 3 years.
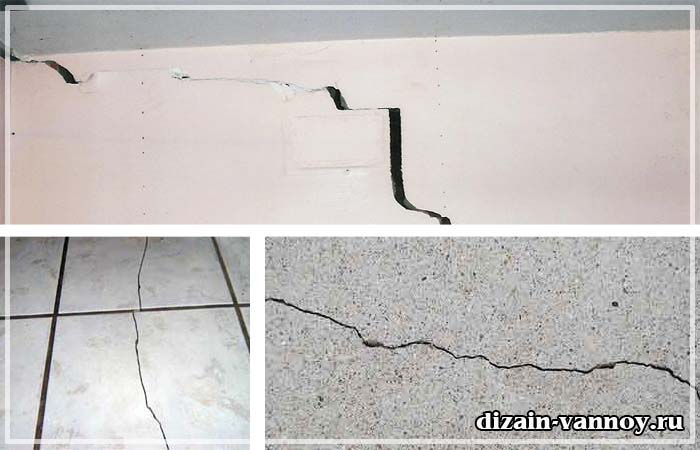
If you neglect this advice, you can get extremely negative consequences. So, expensive tiles will start to crack and very soon lose their attractiveness.
Among other things, new settlers can expect such surprises as "flooding" by neighbors from the top, as well as leaks in their own apartment. In the first case, it will be necessary to repair the ceiling urgently. As for the second option, he will force to an urgent opening floor covering and repair of communications, if the inspection hatches were not provided.
Advantages and disadvantages of repair work in new buildings
During the renovation in an apartment located in a new building, specialists, as well as the owners themselves, face a number of characteristics that are completely uncharacteristic of secondary housing. Let's consider them in more detail:
disadvantages
- Often, a thorough leveling of the walls is necessary. In this case, it is recommended to determine in advance whether there are voids. For this you can use a conventional hammer. In case there are really empty spaces, they will need to be filled with a plaster mixture;
- As for the alignment itself, it is in most cases that it takes a long time. As a rule, a bathroom in a new building, like most surfaces in the entire apartment, has wall and ceiling swings that need to be removed;
- Before you start the finishing work, you need to do all the work related to laying engineering communications. This applies to the heating system, water supply and electricity. Practice shows that it is better to replace these systems at once.
Benefits
- There is no need to get rid of the old wall and floor coverings;
- Ability to choose any design. If your imagination and wishes are not enough, you can see examples of photos and videos.
Sequence of works when repairing a bathroom in a new building

First of all, it is necessary to perform all the "dirty" work. They include the following steps:
- floor screed;
- leveling of walls and ceiling.
The next stage is the laying of communications, as well as the grounding device. After this, it is possible to begin the installation of sockets and ventilation grilles. When the preparation is complete, it can be started in a new building.
The final stage is the placement of furniture and sanitary ware.
What should be considered when choosing a construction team?

It's not a secret for anyone that the services of qualified specialists are quite expensive. That is why in most cases those who decided to buy a new building prefer to turn to masters who came from other countries (not European, but very much the opposite) and working illegally. As a rule, the cost of their work is much lower, which in most situations is crucial, but one should not forget the folk wisdom about stingy and double payment.
In this case, it should be remembered that an illegal worker can be "found" at any time by representatives of law enforcement agencies and sent to a sunny homeland. Among other things, it is not uncommon for construction brigades to get an advance and, after a few days, simply disappear without even starting work. To avoid this, payment should be made after the fact, that is, as the bathroom in the new house will acquire a complete look.
Another feature relates to the quality of work. The fact is that illegal builders are well aware that if a low quality is revealed, the customer will not be able to contact the company and present a claim, which means that one can not especially strain.
When choosing a construction team, we should also take into account the financial side of the issue. There are often cases when the choice and purchase of building materials is entrusted directly to employees. Thus, the owner does not spend his own time on trips, but, at the same time, can become a victim of dishonesty of specialists. This applies to both the cost of materials and their quantity. To avoid this, experts recommend not to neglect shopping trips.
An alternative is a preliminary visit to construction markets and supermarkets, a study of their range and the prices of materials that will be needed to carry out repairs. It is also recommended to calculate the amount of material in advance and make an estimate.
Proceeding from the above, it is necessary to choose specialists with great care. It is best if it is a construction team, which officially works in any company, where it will be possible to send a claim if there are discrepancies or poor quality.
Despite the small area of the bathroom, the repair of the bathroom is a very laborious work requiring the skills of producing a complete complex of plastering, painting, finishing, plumbing works. For repair, you may need a large number of tools that can not be found in every home.
Before starting to repair - soberly assess their capabilities. Review the available tool. Many power tools: a perforator, a corner grinder - a "Bulgarian", a tile cutter or a device for channeling canals in the walls can be rented at specialized rental shops or electric tool shops.
With the rest of the tool - spatulas, rule, chisels, saws, a set of plumbing keys, etc. - is much more difficult. They are usually not rented out. Have to buy before the repair.
Preparatory stage
Repair in the bathroom begins with the dismantling of existing equipment.
First of all, the room is freed from the suspended ceiling. First, remove the decorative skirting, then - the stretch ceiling or racks of the rack ceiling. Gypsum plasterboard ceiling is destroyed by a perforator or hand-held pickax. After that, the wiring of the spotlights and the lath are dismantled.
The places of trimming of wires are reliably isolated. A single hanging cartridge is left, which can withstand an electric lamp of at least 200 watts.
Dismantle the sink, if the bathroom is combined - a bidet and a bath. Dismantling the bath, especially cast iron, is the most laborious stage. With your own hands you can not do without outside help. Old mixer and toilet can be removed in the last place.

With the help of a chisel and a hammer, an old wall tile is removed by hand or by a perforator. At the same time try not to damage outdoor system pipelines, especially if it is made of metal-plastic pipes. The meters of water are covered by several layers of soft tissue for the time of repair.

Just like the wall-mounted floor ceramic tiles are removed and the condition of the screed is evaluated. If it is not damaged - it is left. If there are cracks and chips - it is better to remove it as well.
Installation of a new pipeline system
Modern finishing technologies provide for the hidden location of communications. Therefore, if you decide to remove non-decorating pipes - two options are possible: shredding channels for their installation in walls or the installation of false sheets from plasterboard or plastic panels.
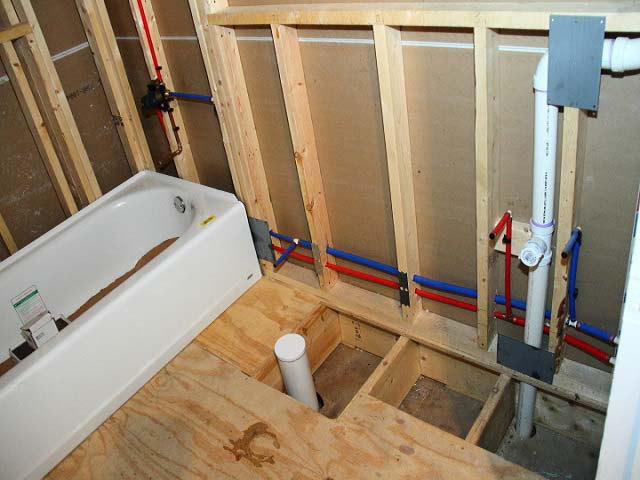
The first option is more suitable for brick and cinderblock (gas-foam) houses, the second - for houses made of reinforced concrete slabs. The channeling of channels in such slabs is a very laborious process, which can disrupt the integrity of the iron framework of the wall.
For strobleniya on the wall make a marking the passage of water pipes, then using a device for cutting channels in the walls or "grinder" with a diamond-coated disc in the wall, cut two parallel furrows with a width and depth of 5 mm. exceeding the diameter of water supply pipes.
Then, with the help of a hand chisel and a hammer or perforator with a cup chisel, the concrete between the cuts is selected. In places of installation of tees, concealed mixers, thermostats arrange niches.
Mounted metal plastic pipes laid in channels and fixed with metal or plastic clips. Install end caps on the end of the pipes. The assembled system is connected to the water supply and tested for leaks, leaving for 24 hours under operating pressure. If there are no leaks - the canal is shpaklyuyut quick-setting gypsum plaster.
Installation of new electrical wiring
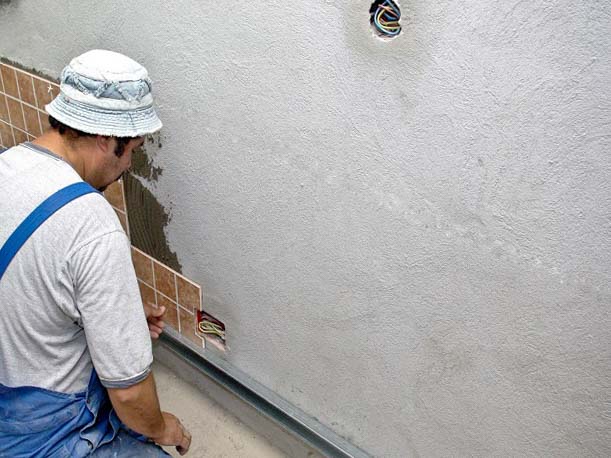
If the bathroom provides for the installation of additional electrical appliances: a water heater, a hair dryer, additional sconces, switches or sockets, before the plastering of the walls, the channels are laid, similar to the channels for water supply pipes.
Niches for installation hidden outlets and switches are drilled with a 60-80 mm d cup drill. on a brick or concrete puncher.

All electrical wiring in the bathroom is recommended to be placed in corrugated PVC round channels of the appropriate diameter.
The assembled wiring is checked for operability by means of an electric voltage indicator, after which the bare ends of the wires are securely insulated, and the wiring is disconnected from the mains.
Aligning the ceiling and walls before finishing
Regardless of what kind of finish will be used in the future, the ceiling and walls in the bathroom after the removal of the old ceramic tiles or plastic panels are re-plastered with moisture-resistant gypsum plaster or cement-sand with the addition of liquid glass to impart water resistance.

If the ceiling in the bathroom is not planned to be suspended or tensioned, after plastering it twice shpaklyut finish gypsum plaster ("Vetonit VH" or similar to another manufacturer). Time to dry before processing with an abrasive mesh - not less than 24 hours.
After the final grinding, the ceiling surface is swept with a broom or a hair mop and treated twice with an acrylic primer of deep penetration. After drying primers are painted with high-quality water-dispersion paint in 2 layers.
Laying tiles on walls
Laying tiles requires professional skills. The first time to lay the tile is exactly difficult. The thinner the wall, the simpler the laying process. Therefore, plastering the wall is not enough with one spatula. It is necessary to use an aluminum rule with a length of at least 1000 mm. to eliminate the plaster rims along the wall plane.
Particular attention is paid to the corners of the room. It is necessary to strive to give them correct angles of 90 ° in all three planes.
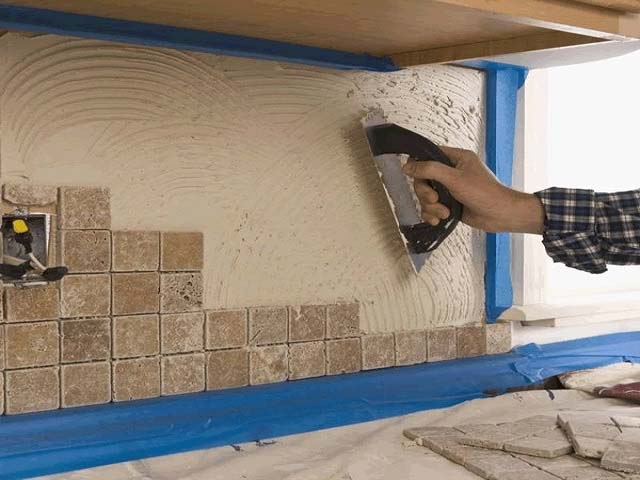
Tiles are laid on a special tile adhesive or synthetic mastic.
The first method allows you to level (smoothen) the unevenness of the wall by varying the thickness of the applied adhesive layer. A sticker for polymer mastic does not give such an opportunity.
Apply the tile adhesive to the tile with a comb spatula. Then tile is applied to the wall and tapping the handle (wooden) spatula or rubber kiyanki tightly pressed against the wall checking its position using the building level.

For inexperienced craftsmen, large cross-pieces, placed at the corners of the tile, are of great help in maintaining the bracing between tiles of the same width.
The greatest difficulty for beginners is its cutting.
Required is a tile cutter. Never buy tile cutters of small size - according to the size of the tile. They often break it and have a very weak lever, which quickly bends. The tile cutter should be as large as possible.
If possible, use an electric tile cutter or a "Bulgarian" with a thin "diamond" circle.

Selecting corners in the tile to bypass technological holes, pipes, niches, channels - is possible only with the use of "grinder".
Round holes for sockets or outlets of water supply pipes are drilled with a special nozzle on the drill - a "ballerinka".

For holes up to 10 mm in diameter, spear-shaped carbide drills or diamond drills are used.
Seams between tiles are rubbed with special grout for seams of the appropriate color, using rubber spatulas. Excess grout immediately removed from the tiles with a damp sponge, not letting them wither.

Floor covering in the bathroom
Laying of floor tiles is made by screed. Before filling the leveling mortar, a layer of waterproofing made of PVC film is laid on the floor. On the perimeter of the room is attached a damper tape.
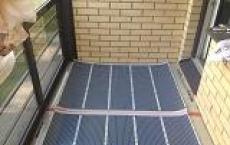
If it is planned to arrange a "warm floor" - water or electric - a layer of foamed insulating material "Penofol" with a thickness of 3-10 mm is laid out. On top of it - plastic pipes for arrangement of a warm floor or an electric heating cable. With the help of component fasteners they are attached to the floor. After this, a self-leveling solution is poured.
When using a finishing polymer floor based on epoxy resins with a decorative effect, you can do without further laying of ceramic tiles.
If the tiles are laid - the technology corresponds to that when laying tiles on the walls.

Use the room for further work only after the full strength of the final polymer floor or adhesive composition for floor tiles.
If the walls are not finished ceramic tiles, on the perimeter of the bathroom is mounted a plastic skirting board.
Installation of sanitary equipment
Begin with the installation of a bath - as the most cumbersome and heavy equipment.
With the help of screw feet, the bath is leveled on the floor surface. Connect drain and overflow siphons and connect them with common system sewage system. Pour a small amount of water and check the connections for leaks, leaving the water in the bathroom for 12-24 hours.
If planned - around the bath arrange the crate of the podium. It is closed by a removable screen. Arrange a blind wall, tiled with tiles can not, this will make it difficult to access the sewage system in the event of an accident.
Then install and fix other equipment - a sink, toilet bowl, bidet. Check for tightness of the connection with the sewage system in the same way as in the bath - filling with water siphons or water valves.
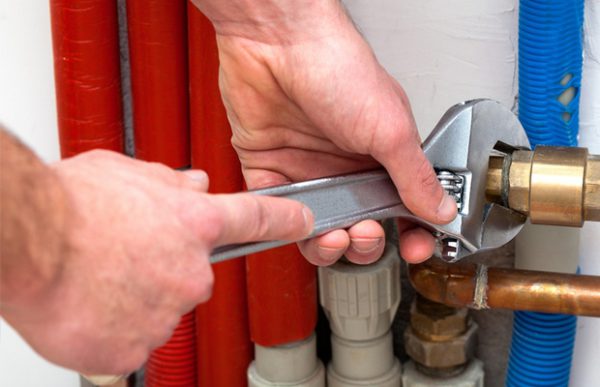
The connection to the water supply system is in most cases carried out using flexible hoses in a metal sheath. More reliable is the connection with metal plastic pipes.
The mixer and faucets are connected to the outlets of the water pipes using eccentrics, which allow to adjust the width of the pipe outlet from the wall in accordance with the distance between the mixer inputs.

Optimal insulating material is a tape or FUM thread. Use for sealing the threaded connections of sanitary equipment, silicone sanitary sealants can not be used! They do not withstand pressure in the water supply system and quickly give leaks.

Installation of doors and additional equipment
After the completion of the installation of sanitary ware, the doors to the bathroom are installed.
The door box is collected in a separate room on a strictly horizontal surface. First lay the door leaf. Around it - the elements of the door frame. To maintain the gap between the box and the door leaf, insert the gaskets that come in the kit or strips of fiberboard 2-3 mm thick. Designate the location of the door hinges. On the door leaf and the door frame, use a chisel groove and fasten the hinges.
Opposite elements of the box are fastened with two cross bars on the screws.
The door leaf with the box is installed in the doorway. It is checked in 2 planes according to the level of horizontal and vertical installation. Fix with wooden wedges and foam around the perimeter of the mounting foam. To prevent the foam from getting on the door leaf, it is recommended to cover it with a plastic wrap.
After polymerization of the foam, the excess is cut with a knife and the casing is mounted. Slice the door handle with the lock.
Additional equipment: hangers for towels, shelves, cabinets, soap dishes and clothes dryers are fixed to the tile with a double-sided foamed tape. If they are heavy - holes are drilled in the tile. Use only PVC anchors.
![]()
On the ceiling mount the main lighting. Connect additional lights and install sockets and switches.

From everyday surprises, no one is immune, especially when it comes to such unpredictable elements as water. She can turn a bathroom ...
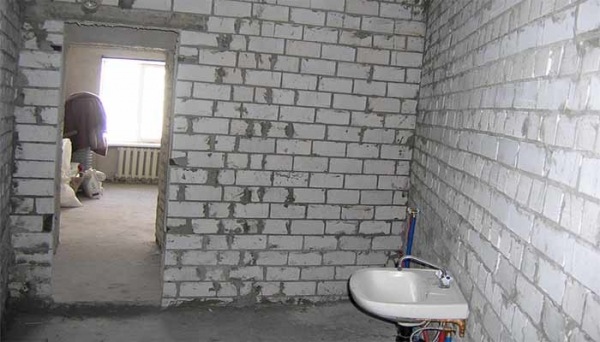
Eternal question - where to start repairing a new building? It's simple, start with a general assessment of the condition of your room. And if in the bedroom, the living room or the children's room, as a rule, it is difficult enough to refresh the finish of the ceiling, floors and walls, then the bathroom and kitchen require a thorough and thorough approach. Where do you start the repair in a new apartment? What are the distinguishing features of repair in a new building from repairs in a premise that has long been lived? Such questions are often of interest to many consumers.
After buying an apartment in a new building it is worth being prepared for the fact that there will be absolutely no finishing there inside. The approach from this point of view will significantly reduce the cost of the premises and will make it possible to trim the area according to own possibilities and taste.
When renovating a bathroom in a new building it is very important to know the following:
- the lower the cost of the tile, the less you will regret it. For some time, the walls of the bathroom have the property of "adjusting" to the overall design. As a consequence - the emergence of microcracks, there are always microcracks, it is possible deformation of the tiles. That's why you need to look cute tile, but such that after a short time (a year or two) you could take it to the trash without the vexation of wasted money;
- absolutely any house eventually shrinks. As a rule, this happens for the first time for 2-3 years - this means that a selection of necessary materials should be thorough;
- when installing pipes immediately take the plastic pipes. This material Great for all temperatures. Also, it is resistant to changes in jet head and corrosion.
- if there is a window in the bathroom at once, without unnecessary emotions, install a high-quality PVC profile. Similar designs are resistant to dampness and stress. Also they are not afraid of deformation.
It is desirable to immediately ceiling a plasterboard, of course, if it suits you. All ceiling ceilings are least deformed. An important plus is that gypsum board is a very light material, it does not, in any way, heavier the design. Allows the ceiling to "adjust" to the construction of the entire house.
Also, you should seriously consider the following aspects:
- where it is better to arrange the pipeline and the electrician, to penetrate the walls, to continue grooves;
- if necessary, where to make the bathroom partitions;
- deal with the issue of lighting;
- to estimate where will stand washer, estimate the location of the outlet for the electrical appliances you need;
- how the piping will be made in the bathroom. Do not forget that she will, too, pass into the kitchen;
- to establish a washbasin, a shower (a bathroom);
- check the sewage connection;
- be sure to install everything you need to ventilate your bathroom;
- add hot and cold running water.
- Facing
- Installation of equipment
- The final stage
The room is noticeably different from the restoration of other living quarters. Substantial moisture, frequent vaporization and exposure to elevated temperatures cause additional requirements for materials and repair technology. A step-by-step room is a prerequisite for quality work.
Due to high humidity and temperature, repairs in the bathroom should be carried out with increased requirements for the quality of materials and work.
In modern times, a huge range of construction and finishing materials is produced. The use of different materials and equipment requires the use of certain technologies for their installation. Step-by-step repair of the bathroom includes everything necessary steps (steps) and allows to solve the arising problems. In general, this approach to repair involves the following steps:
- Planning.
- Preparation
- Direct repair work (installation).

To calculate the amount of materials, the bathroom needs to be measured, the condition of plumbing and pipes should be assessed.
Planning is the first step.
Any step-by-step repair should begin with an assessment of the scope and timing of the work, for which you need to outline an action plan and a cost estimate. At first, the condition of the bathroom itself (ceiling, floor, walls, doors) is determined and the need for repair. Then, the need to replace plumbing, plumbing and sewage systems, electrical wiring, ventilation.
With the help of a tape measure measurements are made of the overall dimensions of the bathroom, piers, as well as ledges or niches, if any. After selecting the desired design, a list of required materials for repair is made (the recommended materials are discussed below) with the calculation of their number. The tape measure of the length of water and sewage pipes is made, as well as the length of the electric wires. Determined required amount and the nomenclature of equipment and materials.
Back to contents
The next step in the repair is to prepare the bathroom. To begin with, it is necessary to vacate the premises from all furniture and old sanitary ware, including dismantle the bath. Then the bathroom is released from the pipes and ventilation system. If necessary, the wiring is dismantled.
Before the beginning of the finishing works from the bath you need to take out all the furniture and sanitary equipment and remove the old finish.
After the release of the bathroom from all the disturbing, the tile is removed from the walls and floor tiles. The ceiling is peeled off, and if there were old suspension systems, they are dismantled. In cases where paint or paint has been applied on walls or ceiling, it is removed completely.
The main tool required for preparatory work:
- bulgarian;
- plumbing keys;
- hammer (sledge hammer);
- abrasive sandpaper;
- chisel or chisel;
- pliers;
- nippers.
Back to contents
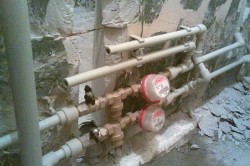
The next step in repairing the bathroom is the installation of communications, namely pipes, concealed wiring, ventilation system. In this order, the installation is carried out. First, water and sewer pipes. They come to the points where it is planned to install a bath and a sink. Metal or plastic (polypropylene) pipes can be used for water supply and sewage drainage.

After the dismantling of the old covering and sanitary ware, new pipes and wiring are installed.
Installation of concealed wiring is carried out from junction box to the points where it is planned to install sockets, a switch and lighting. When laying, it should be borne in mind that in subsequent stages the wiring should be inside the outer layer of the wall and ceiling, it must be laid in a previously made deepened channel. It is recommended to use a wire type PV, VVGili or PPV with a copper core.
Ventilation is recommended to use an exhaust type. When using forced ventilation, an electric wire is supplied to the installation site of the fan. If a standard air discharge into the shaft is provided, the vent window is closed with a decorative plastic grille.
The main tools for installing communications:
- sanitary engineering key;
- bulgarian;
- screwdriver;
- pliers.
Back to contents
An important step is to level the surface of the ceiling, walls, floor.
Initially, the ceiling is equalized.

Before finishing the walls, the floor and ceiling are leveled.
When repairing a bathroom, usually choose a ceiling of two types: lined with slabs of moisture-resistant materials (for example, plasterboard with a waterproof layer) or painting over plaster. In the first case, there are no special requirements for leveling the surface of the ceiling.
The second design requires an even ceiling and more thorough plastering. If the "rough" ceiling is flat, just apply a small layer of putty, but so that the wiring closes. In case the primary principle has numerous and profound flaws, a thick layer (or two layers) of plaster on a cement base is applied. The plastered (shpatlevannaya) surface is carefully rubbed with a sandpaper.
The walls of the bathroom are leveled to obtain a surface without pits and other large flaws, taking into account the fact that it will be tiled. The leveling of the walls is done by plastering with the control of flatness along the vertical and horizontal lines. Grouting of the surface is not carried out.
The room is made using a bulk floor. Such a formulation is obtained by diluting a standard dry floor mix. Filling is carried out from the far wall to the door by applying a spatula with an even layer of mortar. In the process of pouring, it is necessary to continuously monitor the horizontal surface of the resulting surface.
All leveling operations are carried out with a spatula, and grouting - with a sandpaper. Consumable material: dry plaster, dry filler, dry mortar for the floor, cement, PVC adhesive.
Back to contents
Facing
A very important and responsible step in repairing the bathroom with your own hands is the final lining (finishing) of walls, ceiling, and floor. The most

The walls in the bathroom should be tiled, as this material is durable, well washed and does not rot.
the decorative way of finishing the walls is recognized as facing them with tiles. The fixing of the tiles is carried out with a standard glue intended for these purposes. Masterkom glue is applied to the surface of the wall on an area of 2-3 tiles. Tile is installed on the glue, and a beacon is fixed at its corners to maintain the same size of the seam between the tiles. When laying the tiles should be particularly controlled, so that under it there are no voids. For dense overlapping, it is taped with a rubber mallet. After the glue dries, grouting is performed. A standard mixture for grouting can be used, in which the color of the desired color is added. The trowelling mixture is rubbed into the seam with a rubber spatula so that it occupies the entire depth.
The ceiling is finished according to the chosen design. Often the ceiling is covered with plastic panels. Apply tension ceilings. The most common and cheapest way is to paint the ceiling with water-based paint or enamel. By adding color, you can provide any shade. It is produced by painting with a roller.
It is usually faced with ceramic tiles. The best material is ceramic granite, which has increased strength, its surface is non-slip. The technology of laying such a tile is similar to laying tiles on a wall. The leveling of the floor is checked by level. The tool for facing:
- master OK;
- a spatula for rubber;
- rubber kyanki; beacon;
- glass cutter;
- paint brush;
- paint roller.