Connecting the telephone socket. Concealed installation of telephone socket. Schemes for connecting telephone sockets and plugs.
Although infrequently, there is a need to change the telephone socket or install an additional one in another room or, for example, in the kitchen. Such a situation can arise when repairing an apartment or buying an additional device with the need to post a new line. Making the connection of the telephone socket easy and practically safe. How to do it, we will tell below.
Depending on the type of telephone line installation, all devices can be divided into two main types:
- external, when the installation is carried out directly on the wall surface. The line in such cases is also usually conducted in an open (external) way;
- internal, when mounted in a specially designed for these purposes, a deepening. It makes sense to install if there is a hidden cable installation.
Another way to classify is the type of connectors (connectors) used to connect to the telephone. You can distinguish such types:
- soviet model of the RTSHK-4;
- modern RJ-11, used usually at home;
- modern RJ-14, used in offices for faxing, laying a modem line and for other equipment;
- modern RJ-25, which are connectors of special purpose;
- universal or combined, combining two or more kinds of connectors, for example, RTSC-4 and RJ-11.
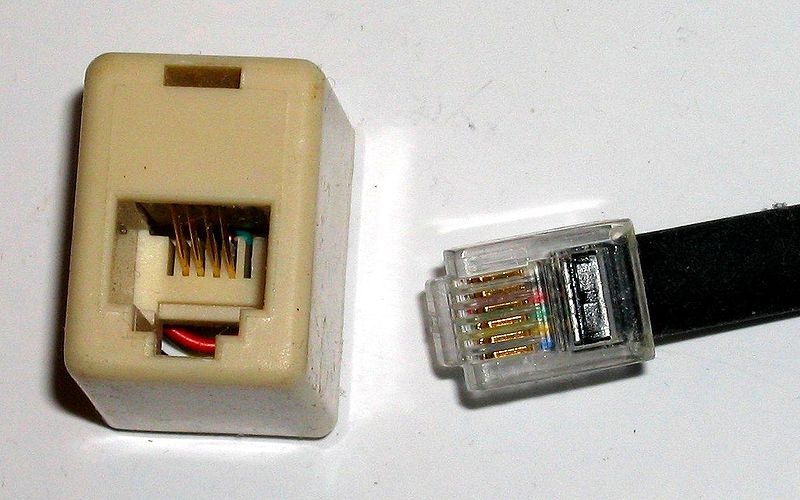
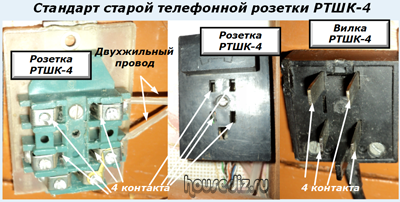
The old Soviet RTShK-4 is practically never used anywhere, since all modern telephones have connectors (connectors) for the European socket RJ-11. The plug for these old outlets had four flat metal connectors and a plastic flat tab. For sure, many are visually familiar with this design. The connection was made by means of a two-wire cable.
The device is also connected to a RJ-11 connector using a two-wire cable. The same type of sockets in modern devices is used to connect the handset directly to the device.
Connectors type RJ-14 use four-wire, and RJ-25 - already six-wire. The connection of the last type of outlet must only be ordered by qualified personnel.
Video "Installing the euro outlet"
Connection diagram
The connection scheme of home appliances, regardless of the type of connectors, is the same everywhere. It is necessary to connect the two ends of the telephone wire to the corresponding contacts in the socket. Consider how this works in older and newer devices. Detailed description of the process of laying the cable and installing the device on the wall, depending on the type of installation, we will not, but only describe the connection scheme. Note only that the tools may need the following:
- screwdriver;
- nippers;
- drill or perforator;
- a sharp knife or blade for stripping the veins from insulation;
- crown on a brick or concrete when performing a concealed installation.
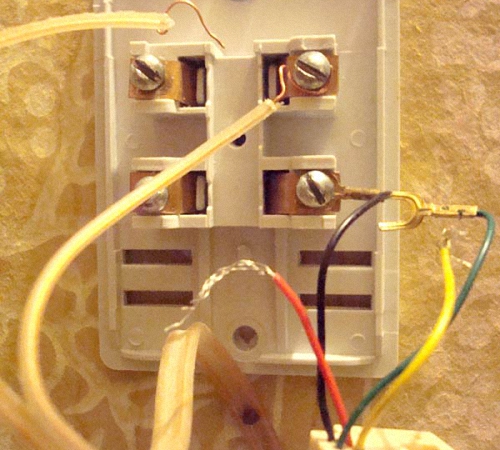
In connectors of the old type RTTK-4, when you open the cover, you will see two contacts on one side and two on the other. At the bottom of the device box there will be a hole under the flat fork of the plug. It should be connected to the contacts on the right. The polarity of the wires does not matter.
To do this, cut the telephone line cable with a small margin, which then disappears under the cover of the socket, and clean the contacts with a sharp knife or blade. Perform this operation better in rubber gloves, as the voltage in the line in the standby mode is 60V, and in the call mode - 120V. This tension is not fatal, but it can "bite".
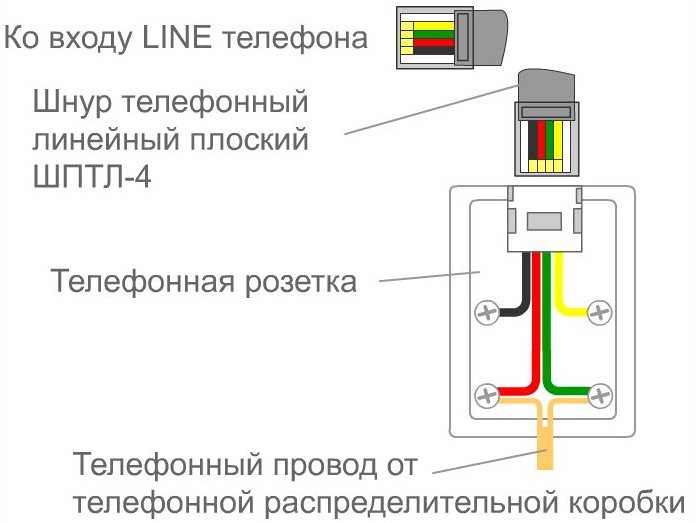
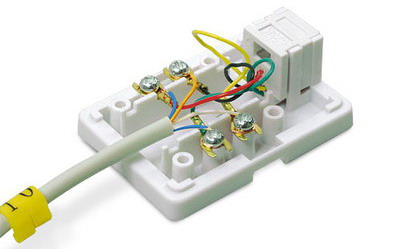
The connection scheme for RJ-11 connectors is similar to the above described method. When you open the cover, you will find the contacts to which the wires of red and green color (usually) are suitable. Red indicates minus polarity, and green indicates positive polarity. If the cable of your line has the same coloring of wires, make the appropriate connection: red with red, green with green. Although usually the polarity does not matter, some modern devices can negatively react to non-observance of this condition.
Connection features of the Legrand outlet
The products of the French company Legrand enjoys a steady demand due to the high quality of the products. The connection scheme of the telephone cable is the same as in the above-described cases, except for a small nuance.
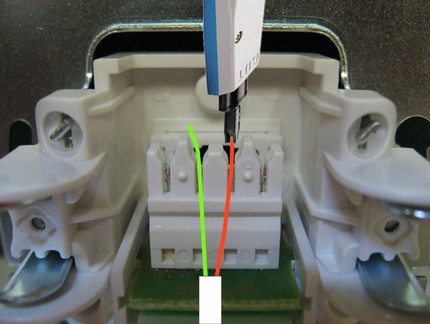
Legrand's products have a built-in contact stripping system that eliminates the need for this procedure to be performed manually. When installing this product at home, you will need to connect, as usual, only two wires. If the socket is designed for four contacts, then use two medium, while trying to comply with the color of the cores when connecting.
The wires must be inserted into the hole of the corresponding contacts (without stripping the insulation on the cores) and turn a quarter turn of the clamping device. It's all. It remains to close the lid and the job is done.
The installation of information communications is not life-threatening, as opposed to setting up electrical lines. But there is one difficulty in connecting such an outlet. Before connecting the telephone socket to the telephone cable, it is necessary to know exactly the type of connector. It is he who determines the way of connection. The most common are the standards RJ-11 and RJ-12. About their connection and will be discussed.
Device and types of telephone sockets
The market of sockets for connection of telephone communications is presented by two kinds of sockets. One-part models provide the connection of one device to the network. Multi-connector power points provide the ability to connect multiple devices.
All telephone sockets traditionally consist of the following elements:

- Housing. A box that protects the connection from external stimuli. It is necessarily made of dielectric material. The old devices are made of ceramic, modern - made of plastic;
- Contacts. Plates that are made of brass. Ensure uninterrupted current flow;
- Terminals. Elements that are used as adapters. Thanks to them, the wires are connected to the contacts of the device.
If everything is simple with the boxes, then the standards of connectors there is much more. Connector types:
- RJ-9. Connect the handset to the unit.
- RJ-11 - two wires. Connecting the phone to the line networks;
- RJ-12 - four wires. Connect 2 phones to the network;
- RJ-14 - four wires. Connecting the phone to several lines;
- RJ-25 - three pairs of contacts. Connecting phones to lines with additional features. It is extremely difficult to connect independently.
For self-connection, you need to follow the scheme how to connect the telephone socket to the telephone cable by colors.
The process of connecting a telephone cable to an outlet
The connection scheme is presented for a communication box type RJ-11. The process consists of the following steps:
- The voltage of the telephone line is only 60 V, while the signal passes - 120 V. However, precautions are needed. It is advisable to use rubber gloves. If the onions are wet - you can get unpleasant strikes of current.
- It is necessary to remove the outer insulation of the cable. After that, you need to clean the edges of the veins from the insulation. It is important not to damage the wires, do not leave a mark on them. So the chance of their breakage increases. Remove insulation with a cigarette lighter, matches are not recommended. So you can damage the veins.
- According to the scheme it is necessary to connect the veins to the contacts. To connect a conventional fixed telephone to the line, the scheme is quite simple. Two wires must be connected to the contacts, which are located in the middle of the socket. If the box is standard, such as Vico or Legrand, then veins should be taken green and red.
- Tester check the polarity. In connected networks, the minus should be a red wire, plus a green wire.
- Place the veins in the grooves in the communication box. They must be hidden and not intertwined with bare contacts.
- The socket is attached to the wall, or to the shelf. After attaching the box, it must be closed with a lid.
- Connect the connector into the socket. After that, you can check the connection.
Habits do not need to be fixed too tight to not squeeze them. After connection, it is advisable not to jerk the main line cable. The veins are thin and easily broken.
Installation and connection of a hidden socket
Before you connect the power point in a hidden way, you need to buy it. The hole in the wall is made to fit the size of the socket. When the device is purchased, you can proceed with the installation process:
- To the place that will be equipped with a telephone socket, you need to connect the communication cable. It is best to hold it on the baseboard, and in the height you can hide it in a special plastic box.
- In the wall, drill a hole with a crown that has the same diameter as a telephone box. In order for everything to be smooth, before drawing it is necessary to draw a contour of the outlet with a pencil.
- The box should be placed in the hole and fixed with its hardware.
- The standard scheme for colors is to connect the telephone cable to the contacts.
- The body of the device must be fixed with spacers. Screw the screws, but not much.
- You can connect the phone to a power outlet and check the serviceability.
- If the phone works, you can insert an external frame.
These products are low-current contacts located in plastic cases of various shapes, designs and sizes. The connection can be made by the way of fastening the contacts with screws or using a specially designed connector. In older products, special plugs are used.
Connecting yourself
Before talking about the connection, you need to bring to the place intended for installation of the telephone cable outlet.
In new residential premises, it is laid during construction work on concealed wiring. Outwardly only a pair of contacts are output, but the socket can be installed.
In the used rooms, the cable is often laid along the baseboard, but this is impractical, since it can be damaged during cleaning. It is common to lay the telephone cable under the plinth, for this there is no need to dismantle them, just move it slightly and lay the cable in the formed slot. After that, put the plinth in place.
To the place of installation, the cable can be brought directly along the wall, and it is possible to patch the channel and lay it as a hidden wiring.
Materials and Tools
The main devices that may be needed for the installation of telephone wiring:
- side cutters for cable cutting;
- knife - for cleaning the ends of wires;
- screwdriver - fixing the ends in the socket;
- screws - fixing the base of the device to the wall;
- drill - drilling holes to fix the outdoor unit;
- a drill with carbide tacks - as a rule, is used with a diameter of 4.2 mm;
- plastic inserts in the holes;
- "Bulgarian" with a disc for concrete - to perform concealed wiring;
- perforator with a core drill, the size of the drill in accordance with the size of the box;
- - to specify the polarity of the contacts in the connector when connected;
- protective latex gloves - if during the work accidentally there is a call to the phone, the potential difference can reach 120V, which is already unsafe with direct contact.

The order of performance of works
- If it is decided to install hidden wiring, first you need to make a channel for laying the telephone cable. With the help of the "Bulgarian" grasp the channel along the entire length and lay the wire in it, fix the channel with cement mortar.
- In the manufacture of open wiring, special plastic brackets will be needed to fix the cable to the wall and an electric drill with a drill. In the holes of a depth of about 20 mm, insert the plastic liners, and fix the wire under the bracket with a nail or screw. All hardware is sold as a bundle, compatibility problems do not arise.
- Installation under the plinth will require the use of a chisel, by which the plinth is removed from the wall for laying the wire. After that, the plinth is pushed into place by regular nails.
- When installing the outer box, it must first be connected to the cable. After that, fasten it to the wall. Here options are possible, determined by the design of the boxes themselves. If its base has holes for fastening, you need to attach it to the installation site and mark the holes on the wall. Using a drill, drill the holes, install the inserts and fix the base of the box with the screws from the kit. Then install the cover, which has for this purpose a special latch. The base without holes for fixing can be installed on the wall using a double-sided adhesive tape. Fastening is quite reliable, but when the connector is disconnected, it is advisable to hold the housing.
- When installing the inner box, you need to use a perforator and a core drill in the diameter of the box. After completing a blind hole in the wall, install a box in it, connect it to the cable and fasten it in the hole. Replace the cover.
- When connecting the contacts, it is necessary to check the conformity of the poles (location "+" and "-") by the tester.
All works are simple and accessible to the non-professional performer.
Types of connectors. Features of application RJ11, RJ12 and other types
Telephone connectors serve not only for connecting devices in the communication line. They are used to connect to other devices and communication devices.
Sockets are made with one, two or more connectors and can provide simultaneous connection of several subscribers.
In a wide variety of connectors, it is necessary to consider some of their types:
- RJ11 - two-wire version, it is used for connection to networks of linear type.
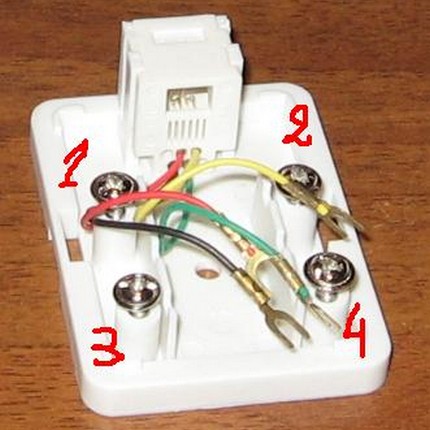
- RJ14 - equipped with four conductors and four contacts, compatible with most models of modern phones. To connect one subscriber, you need to use the 2nd and 3rd contacts. If you need to connect several additional lines, you need to use the 1st and 4th contacts. If you use a telephone socket, the connection is made using red and green wires.
- RJ25 - has three pairs of contacts, for its connection requires the participation of a qualified telephone specialist.
- RTSHK-4 is a legacy of the Soviet period, but they are produced and are being used up to the present. Has a special key included. The connection is made in a non-detachable manner with a tap-off box. If there are several points of this type in the room, they are closed using a capacitor.
About devices for connecting RJ11 and RJ12 we'll talk in more detail:
- The first of these types of products is used for individual connections in ordinary telephone networks.
- The second one is used for networks with high loads - in office or public places.
These kinds of connecting devices have two or four contacts, made as a metal plug, connected to the contacts that are located in the center. For installation, a special tool is required - a cross-over knife that allows you to remove the braid without damaging the wire and to compress the plug when mounted on the wire.
To connect, you must:
- remove the braid from the wire for a length of 4 to 5 centimeters;
- spread out each vein of the cable, the number of which is from 4 to 6;
- lay all the wiring in the sockets of the sockets;
- check for a contact between the connector and the phone cable.
Beginning the connection you need to take care of the measures without danger in the performance of work. Be sure to wear rubber gloves that can protect you from electric shock.
The common standards of the outlet device indicate that the red color of the braid usually means a positive conductor, while the green indicates a negative value. The tester will be able to verify this.
Ways to connect all outlets are identical, but they differ in the ways in which they are installed, depending on the version.
Almost as it is, installation of popular rosettes of the French type Legrnd is made. The range of products of this type is very diverse, the outlets are available with any kind of installation: external, internal and any other. Color marking follows European standards and is identical in similar products of other manufacturers.
Examples of prices for telephone connectors
Table 1
| Picture | Model, description | Price, rub) | Manufacturer |
| Reksant. With the function of an adapter for the use of euro outlets in conjunction with old domestic | 60 | Russia | |
| Telephone socket internal Reksant 2 - 6p-4s (2 ports), color milky white | 380 | Russia | |
| Telephone socket internal Reksant 1 - 6p-4s (1 port), color milky white | 290 | Russia | |
| Telephone socket Proconnect 2-6p-4s | 55 | Brand | |
| Telephone socket RJ12 1 module 6 contacts ABB Zenit N2117.6AN | 500 | Brand | |
| Telephone socket 2 RJ11Legrand Suno 774839 | 490 | Legrand France |
- When building a telephone cable, remember the safety rules:
- When grooving the groove for the cable on a brick or concrete, be sure to use protective goggles or a protective mask to protect the eyes and face.
- When drilling holes for fixing the cable or the base of the outlet, take the same safety measures.
- When cutting the material from the shredded channels, from the blind hole for the socket box, install a protective disc on the chisel, which prevents damage to the hands.
- Wiring work must be carried out in protective gloves.
- If there is no device for checking the polarity of the wires, use a cut of potatoes. Insert the ends of the wires into the pulp, the surface of the pulp around the plus wire will soon begin to darken.
- Modern rosettes are executed in a safe way. However, they should be installed in a place inaccessible to children.
- When stripping the ends of the cable for connection, it is necessary to avoid damaging the insulation of internal wires and, especially, of the conductors themselves. This leads to a deterioration in the quality of communication and the possibility of a line break.
- If you use an old Soviet two-wire wire in the form of a plastic ribbon with wiring at the edges, it is unacceptable to attach it, driving nails between the wires. This often leads to a line break during installation. When the nail is in contact with the wiring, a grounding pair may be formed, which degrades the quality of the connection.
Leading all the works thoughtfully and carefully, you can successfully cope with the simple task of doing wiring and installing outlets. Take without doubt and you will succeed!
For more than a century people communicate at a distance with the help of telephones, the designs of which are constantly being improved and modified.
Modern models differ from their predecessors with ease of use, aesthetic appearance, reliability.
However, the principles of work, laid in the first designs, remained the same:
- mandatory presence of an operating communication line from the automatic telephone station;
- electrical connection to her stationary telephone.
Phone outlet functions
A socket complete with a plug is a modern way of connecting a telephone set to a communication network. Their task is reduced to the reliable and rapid creation of a stationary connection.
The electrical contact sockets of any outlet are always under voltage lines. To protect against accidental short circuits, they are recessed into the housing. The fork terminals are bare and isolated from the environment only after installation.
Design features
Common elements of any telephone socket are 3 parts:
- a body made of a dielectric material based on plastics;
- terminals for connection of communication wires;
- spring-loaded brass contacts creating an electrical circuit.
Telephone sockets and plugs operate in low-current circuits, are manufactured taking into account the voltage in them up to 120 volts. They can be used:
- hidden inside the wall with the closed way of laying the telephone line;
- open-way way.
The type of installation affects the design of the room and the maintenance conditions. It is taken into account when connecting a phone to a specific model.
Telephone Outlet Standards
As the phones are improved, the ways to connect them to the communication network have undergone several technical developments.
Old Standards
In the first telephone sets to connect them to the line sockets were not used at all, and the wires were simply twisted among themselves or connected by other available methods. For the work of the phone it is sufficient to create a closed loop of current, which is formed by only two conductors - current-conducting veins.
This method works reliably for any model. A plug and a socket can be simply cut off, and wires twist and insulate. Communication will be ensured.
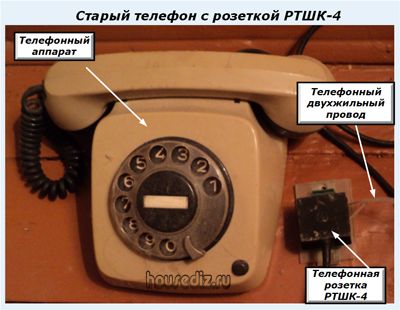
In the eighties of the last century in the USSR, the standard of rosettes and plugs for phones RTShK-4 began to be introduced. To connect to the PBX line, a two-wire copper wire was used, called in the jargon of "noodle" signalers for its appearance.
This method reliably provides a fast disconnect connection of the phone.
The abbreviation RTSHK-4 stands for a socket for phones with four plug-type contacts and an additional capacitor. To prevent misplacing the plug into the socket, an additional plastic connection is created on their housings - a protective key.
Wiring plan
The RTTK-4 has two pairs of contacts, and not one, which is quite enough for the operation of a conventional phone.
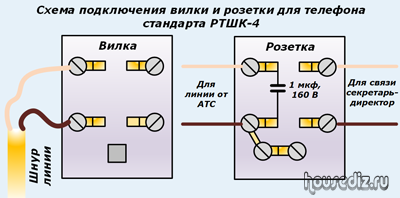
The second pair allows you to connect an additional line of communication with one more subscriber by the principle of communication between the director and the secretary, when two phones use one telephone number.
In order for the phone to work, it is necessary so to connect the wires to the outlet, when through its contacts with the plug the current of the automatic telephone exchange passes to the telephone set. Older models did not need to observe polarity.
A capacitance of 1 μF was used to conduct network tests by signalers and to generate a busy signal. It was installed only on the terminal when they were connected in series.
Now the use of a capacitor in the outlet refused. This does not affect the quality of the connection.
Telephone sockets of the RTShK-4 series take up a lot of space. They are morally obsolete, although they successfully exploit and refine their resources.
Modern standards
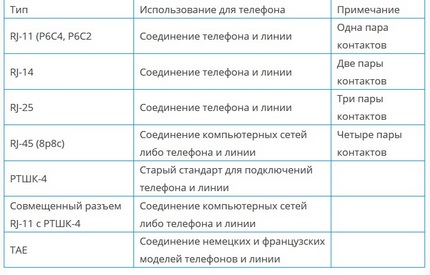
As a result of the rapid development of microprocessor technologies and the creation of standardized equipment for them, the case of plugs and sockets for low-current circuits, marked with RJ symbols, has been put into operation. They allow you to connect up to four pairs of working contacts to the circuit and are issued with the standards described in Table 1.
Table №1. Standards for low-current circuits
Brief descriptions of connectors
RJ-11 connector
Housings of modern fixed telephones are connected by sockets and plugs with one pair of contacts. They are mounted inside a plastic module of a single design of the RJ series and are designated RJ-11.

Brass contacts, as seen in the photo, are located in the center of the plastic module, called the manipulator. Other places on it are free. Through these contacts on the plug and socket, an electrical circuit is formed between the ATS station and the telephone.
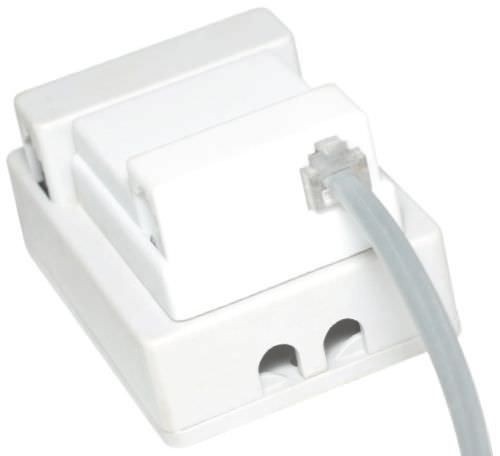
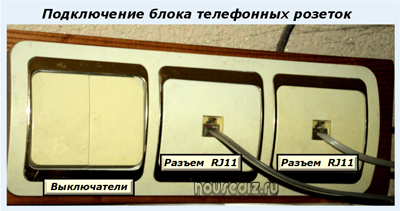
Using the RJ-11 interface, you can connect more than one device to the network, but several. To do this, it is enough to assemble the sockets in series into blocks, as shown in the photo below.
Combined RJ-11 connector and RTShK-4
The method of connecting the phone is based on the use of an adapter, combining the possibility of connecting the plugs of old and new standards with lines equipped with modern technologies. Such a module is convenient to use when an exclusive old phone is required to be connected with a new telephone wiring and enter it into the interior design.

Connectors with two and three pairs of contacts RJ-14, RJ-25
This standard of manipulators for communication means quite allows to apply them for the work of the phone. It is just necessary to use two middle contacts, which are already used in the telephone socket of the device.
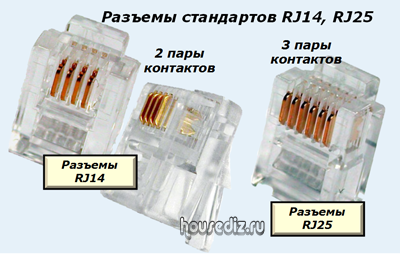
At manipulators of different manufacturers there are different plastic locks. In this case, you can not plug the plug into the socket: you can destroy the fragile case.
RJ-45 connector
It has four pairs of contacts, designed for computer systems and devices, sophisticated communication devices.
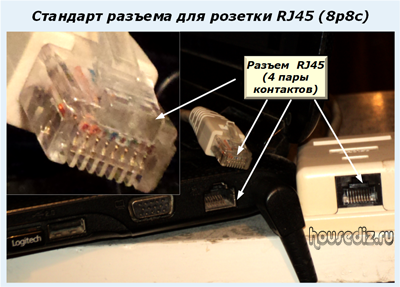
The interface of the RJ-45 connector allows it to be used for a telephone set. Again, the electrical circuit needs to be created through medium contacts. But it is necessary to pay attention to the conformity of plastic keys.

Methods for marking low-voltage sockets
The position of each contact in the connector must be considered and labeled for easy installation and repair. For this purpose, marking is created by:
- figures near the contact or the designation of its position on the installation diagram or factory drawing;
- coloring of the insulation of wires with strictly appointed colors.
Manufacturers of telephones and manipulators produce products marked in several ways. They are summarized in Tables 2, 3 and 4.
Table number 2. Color marking of twisted pair wires in low-voltage sockets
Table number 3. Old color coding for low-current sockets
Table number 4. German color coding for low-current sockets
Ways to connect modern telephones
All the above tables show that the connection of the phone to the network is performed according to the old principle: through two contacts. It's just that modern manipulators use medium contacts, and the rest are not involved.
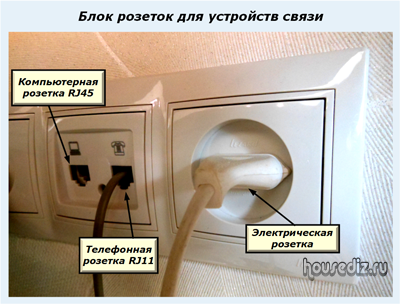
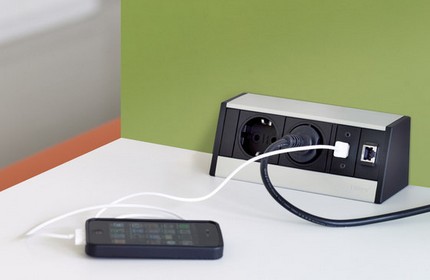
For the purposes of design and ease of use, telephone sockets are not to be placed separately on the wall, but combined with other electrical units, low-current circuits.

They can be built into the elements of wall furniture or covered with paintings or technical devices: monitors, televisions.

Hidden Telephone Network Dangers
For low-voltage communication devices, the voltage applied in comparison with domestic wiring is reduced. But its usual value of 60 volts can still create a current through human hands and deliver a lot of trouble. When a call is made over a telephone line, it is generated by an AC signal with an amplitude of about 120 volts.
This is enough to get pain through the dry skin of your fingers, and if the body is a little sweaty, then the reaction of the muscles will be unpredictable.
Work in the operating telephone circuit must be carried out in protective gloves and follow the developed technical measures of the safety rules.
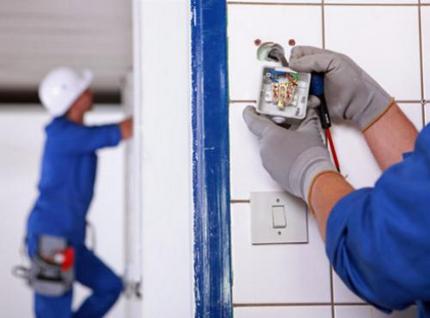
Installation of telephone sockets
A mandatory condition for the phone to work is the reliable transmission of the line through the ATX line through it. When installing the circuits, it is necessary to exclude wire breaks and their incorrect connection. For this purpose, the assembled circuit must be connected before connection.
The general principles of placing telephone and electrical outlets on the building structures of rooms practically do not differ in any way. They are described as separate. First, you will need to select a method for placing telephone wiring: hidden or open, and then execute it.
The protection of open wires can be done by placing them in plastic decorative cable channels, which are equipped with a variety of accessories, including telephone.
The material of the article successfully complements the video of the author Revastroy, which shows the techniques of installing the computer outlet of the company Viko. See and comment on it and the article.
Connecting the telephone to the communication network can not be done without installing the outlet. What design features the device has and how to connect the telephone socket, without resorting to the services of specialists, we consider in the article.
The designs of fixed telephones are modified and improved every year. And modern devices significantly exceed their predecessors, favorably standing out against the backdrop of their high reliability and ease of use.
To ensure the uninterrupted operation of the device, two conditions are necessary:
- Presence of an operating communication line from automatic telephone exchange.
- The possibility of an electrical connection of a stationary device to this line.
The only thing that does not change in the field of telephony is the principle of fixed telephones.
A telephone socket of a traditional design includes three main elements:
- body - made of a dielectric material (ceramic or plastic);
- contacts - spring-loaded brass elements, providing reliable passage of the current through the electrical circuit.
- terminals are the adapters necessary to connect the wires.
The electrical contact sockets of the stationary socket are recessed into the housing. This solution protects the device from accidental short circuits.
On sale there are single- and multi-part models. The first are designed to connect one device, the second - allows you to switch multiple devices at once.
Old and modern device standards
As the equipment has improved, the ways of connecting telephones to the communication network have experienced a number of changes. In the first models of telephones, connection to the communication line was carried out even without the use of outlets. To create a closed loop, the wires were simply twisted together, or they were connected by any other available means.
In the 80s of the last century, ATC line connections were made using two-wire copper wires. And to ensure a fast disconnect connection of the phone, rosettes and plugs of the standard RTShK-4 were used. This abbreviation stands for "socket for phone plug type for four contacts."

The cases of such devices are equipped with a protective key - a plastic connection, which allows to prevent the incorrect installation of the plug into the socket
The design of the RTSHK-4 includes a key and two pairs of contacts. The first pair provides the phone with normal operation, the second allows you to connect an additional line, provided that both phones are on the same phone number.
In place of the obsolete models of the standard RTSHK-4, as a result of the ubiquitous spread of microprocessor technologies, Registered Registered equipment marked "RJ" began to be used. It complies with the international standard IEC 60884-1 and 60669-1.
Modern standardized equipment for low-current circuits allows you to connect up to four pairs of working contacts
Connection of modern stationary models of phones for use at household level is carried out through sockets equipped with one pair of contacts. The cases of such devices are mounted in the cavity of the plastic module and are designated by the symbols RJ-11. Between the two contacts, which are compact metal forks, the conductor wires are buried.

In the central part of the plastic module, called the manipulator, there are brass contacts through which an electrical network is created between the telephone and the automatic telephone exchange
To connect two devices to separate lines and create office mini-PBXs use devices standard RJ-12 and RJ-14. Universal four-wire connectors are suitable for most telephone equipment models.
To connect several devices at once, you only need to collect the sockets in series into blocks, observing the scheme: the first line is connected to contacts No. 2 and No. 3, and the second line to # 1 and # 4. Devices of this series are more used to create a mini-PBX when arranging office space.
No less in demand and models that have a combined connector RTSHK-4 and RJ-11. The installation of adapters allows you to connect the plugs of both old and new standards with lines equipped with the use of modern technologies.

Such modules are mainly used when it is necessary to connect a vintage exclusive old phone with a new telephone wiring
The main difference between RJ-25 devices is three pairs of working contacts. For this reason, the connection of such equipment can be performed only by a qualified specialist who is well versed in telephony and electrical engineering matters.
When connecting faxes, modems, computer systems and other complex devices of communication devices, the RJ-45 standard is also used. When connecting devices standard RJ-45 focus on matching plastic keys.

The RJ-45 connector has four pairs of contacts, but only two contacts are located to create the electrical circuit, located closer to the center
Despite the structural differences between old and new standards, the device plugs have similar connectors and dimensions. The device is connected to the network only after two contacts. Only modern models use only medium contacts.
Installation diagrams and connection methods
To connect the telephone socket is much simpler than its electrical analog. But a process that involves working with low, but still stress, requires carefulness and caution.

The connection scheme of the telephone socket is quite simple and involves connecting the two ends of the telephone wire with the corresponding contacts in the socket
When installing a telephone wall socket, you can apply one of two methods of installation:
- open - assumes installation by an invoice method;
- closed - in which the telephone line is hidden inside the wall.
When choosing the method of laying are guided by the design of walls, the conditions of service of the communication line and pretentiousness of the design of the room itself. The overhead rosettes look not very aesthetically pleasing, but they are ideal in the speed of service: in a few minutes they can be removed from the support and evaluate the integrity of the contacts.
The open method can be carried out at all without mounting on the wall, placing the device on the floor, and the cable leading to it can be hidden under the plinth
To protect the open wires from mechanical damage, use decorative plastic cable ducts. On sale they are found in the form of wall structures and floor skirting. The control of the state of the wire in them is conveniently carried out through one or two third-party snap-in panels.
Closed installation is most often using cable KSPV. The only core of this cable is made of copper wire, and the outer shell - from polyethylene, painted in white.
The telephone line is also laid using the distribution cable of the TRP. It has a separating base. The vein of this single-pair wire is also made of copper and insulated with polyethylene.

For convenience of operation and harmonious combination with design, telephone sockets are not installed separately in the wall, but are included in the outlet block
To decorate the connection points and make them less visible to outsiders, the devices are placed behind TV screens and monitors, and also built behind the facade of wall furniture.
A separate line should be highlighted sockets, built-in skirting. The main thing is to choose models, the front panel of which fits snugly against the skirting surface. Otherwise, over time, it will depart from the base, revealing unsightly stitches.
How to connect a telephone wall outlet
When installing a telephone socket, it should be noted that the voltage for low-current communication devices does not exceed 60 volts. But even a lower voltage can still create a current, causing discomfort to a person. At the time when a call is being made via the telephone line, the voltage rises altogether to 110-120 volts. And it is able to give serious pain when contacting. Up to a value of 12 volts it drops only after the tube is removed.
All work on the connection of the current telephone circuit for the purpose of observing safety precautions is recommended to be carried out in protective rubberized gloves
The principle of placement and the method of installing telephone sockets is practically the same as the technology of installing electrical outlets. Since today the most common devices that have the standard J-11 and J-12, the specifics of connecting the telephone socket, let's look at their example.
Preparatory work
The first thing that needs to be done is to study the schemes of internal communication. They are attached to the product manual.
When connecting the J-11 and J-12 standards, there should not be any problems: just connect the cores of the corresponding polarity. The main thing is that in a suitable plug to the device the wires are removed in the mirror reflection of the contacts of the socket.
In case you are unknowingly purchased and plan to install the standard J-25, the design of which involves 6 contacts, use only the 3rd and 4th contacts for connection.

By the standard to each contact a wire of a certain color is brought, this solution increases the convenience of maintenance and facilitates the repair
Planning to use the apparatus of the old standard, it is worthwhile beforehand to worry about purchasing a universal outlet. It is equipped with a four-pin connector and a connector. In addition to the outlet itself, it is also necessary to prepare a two-wire wire with a cross-section of 0.3-0.5 mm.
From the tools for the work, it is necessary to prepare:
- building level;
- cross knife;
- voltmeter;
- screwdriver;
- nippers;
- graphite pencil;
- protective gloves;
- double-sided tape;
- punch (if mounting a new point).
When choosing a screwdriver, they are guided by the type of surface and the dimensions of the screws used for fastening. To minimize the likelihood of electric shock, it is better to perform all manipulations with a screwdriver, the handle of which has insulation.

Having planned the place of installation of the connection point, with the help of the building level, the horizontality and verticality of its position are corrected
To connect a socket type of a hidden type, it is necessary to make a hole in the wall in advance for its installation - a jar. This can be done with a perforator equipped with a special crown with a diameter of 60-70 mm. For lack of such work can be done and conventional hammer with a chisel. But manual labor takes much more time and effort. Then, to the hole made, it is necessary to cut the channel for laying the telephone cable.
Stripping ends
Before starting to melt the cores, it is necessary to clean the ends of the wires, removing the outer layer. Bare away the last 4 cm of the wire.
When cleaning the telephone cable, remember that it is very vulnerable to damage. A broken core will only lead to a malfunction of the equipment. Since it is not always possible to accurately perform cutting from the first time, experienced masters recommend that when laying a cable, make some margin along its length. The excess wire can then be hidden under the cover of the device.
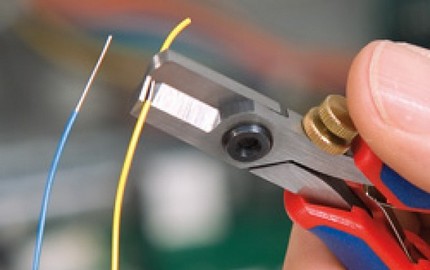
The removal of the protective insulation from the ends of the cable should be done very carefully, using a cross-cutting knife, sharply sharpened blade or side cutters
The task of the master is to clean the ends of the wires from the braid so that in bare form they are whole and devoid of any defects.
Socket Wiring
Stripped wires with the veins removed are connected to the connectors of the box itself, being guided by the symbols indicated on the front panel of the indoor unit. When the installation method is closed, for ease of connection, the wires are made protruding beyond the wall plane by 50-80 mm.
To observe the polarity when connecting the wires follow the rule: the red insulation on the line with the sign "-", and the green braid on the "+"
If the rule is not observed, taking into account the polarity, there is a great risk that during the operation of the telephone the device will occasionally fail.
At this stage of work, a voltmeter is required. With its help you need to check the availability of the communication line. The voltage in the line should be within 40-60 volts.
The supplied cable cores are applied to the clamp and tightened tightly with special screws, ensuring reliable fixation. The shape of the grooves to which the wires are attached facilitates the installation process. Places of joints with electrical tape do not need to be wrapped.
When connecting devices, the design of which is equipped with four contacts of the fork shape, only two central contacts
Performing an open installation, at the final stage, it remains only to close the housing cover with a latch and fasten it with screws. A ready-made socket is attached to a wall or floor, "planting" it on a double-sided tape.
When the installation method is closed, making sure that the wires are not intertwined in the jar, according to the marked markings, the indoor unit is mounted in the wall. Having given the block the desired position, the design is fixed with the help of spacer screws and screws.
At the final stage, it remains only to remove the gaps between the junket and the wall, covering it with gypsum mortar, and also to seal the channels with the padded telephone cable.
After the gypsum acquires the desired strength, replace the protective fringe and attach the front panel. In modern-design devices, the protective frame is snapped onto the indoor unit, and the front panel is secured by screwing in the screws.
If you need to connect a multi-socket outlet that allows you to install several telephones, you must follow the same technology as when installing a classic version of the device. The only difference in the process is the increase in the number of conductors requiring connection.
Connecting the device:
Replacing an old outlet with a new one:
Nothing is difficult to connect the phone outlet there. The only thing - do not economize, buying equipment of low price range. It does not always meet the standards and is able to fail even at the stage of connection.


