Infrared warm floor under the tile. Preparatory and energy-saving works. Wet and dry installation
It was customary to use only cable or water system. But already today, infrared heating systems are becoming more common.
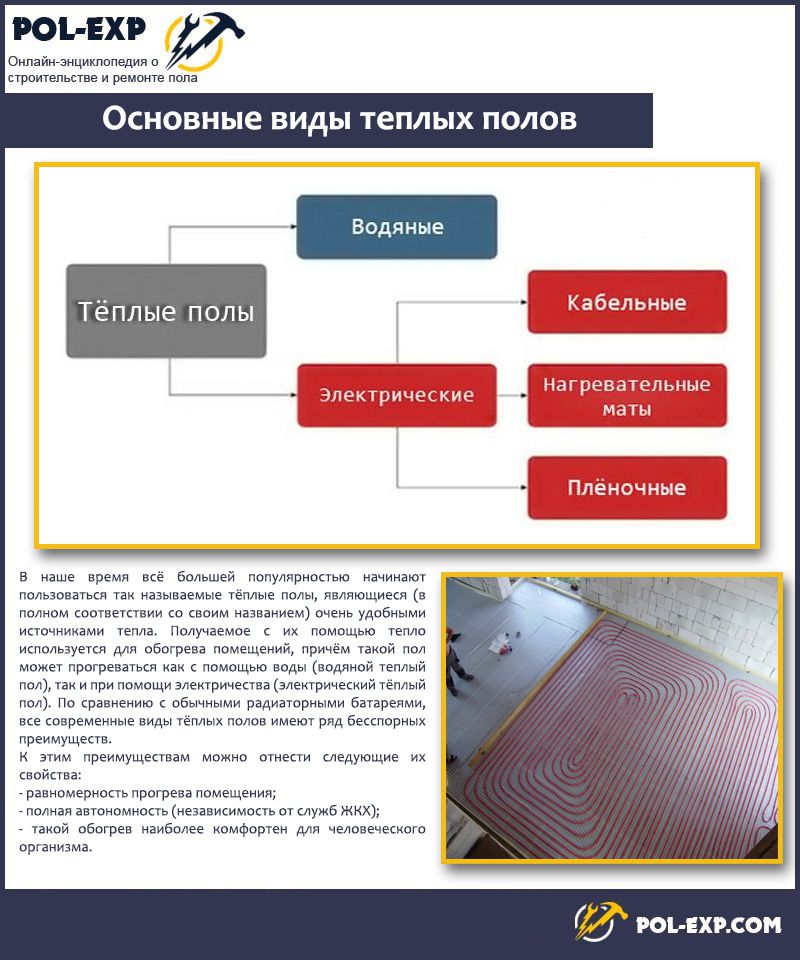
Main advantages
Infrared warm floor, the pros and cons of which is recommended to consider even at the stage of acquisition of building materials, has many undeniable advantages. Among the main advantages can be identified the possibility of rapid installation due to the lack of the need for additional work, which is true if the floor is perfectly flat.
Warm floor infrared, the minuses of which must also be taken into account, can be installed on any floor covering, without the need to equip the screed or prepare the base for another technology, if any already exists.
Another additional advantage is that the system operates using a thermostat, it allows you to correctly adjust the temperature inside the room, and the film changes in the regime evenly warm or cool, changing the microclimate inside the room. If you decided to choose an infrared warm floor for heating your own accommodation, you should definitely consider the advantages and disadvantages of such a system.
Moisture retention

Experts emphasize that when the room is heated by infrared radiation, the humidity level does not change, and the temperature at the floor is higher than that which is kept at the ceiling level. Those users who are worried about the health of their loved ones, most often choose exactly such heating systems, as they produce a curative effect, and also contribute to the prevention of a number of diseases.
The main disadvantages of infrared sex
Have you decided to purchase an infrared heated floor? Pros and cons of this system, we will consider in this article, to help you decide on a choice. Such equipment has some drawbacks, among them there is the risk of easy damage to the film during the mechanical process. The best infrared warm floor, however, is not so difficult to pick up by considering the proposals of popular manufacturers. Many consumers abandon such systems, preferring other heating options because infrared equipment is quite expensive.
Fire safety

Among other things, during operation, strict rules of use must be observed, as improper application can cause damage to the film, which in some cases leads to a fire.
The order of mounting works

Choosing an infrared warm floor, the pros and cons of this system, you must be considered before the moment you visit the store of the corresponding goods. Experts advise you to use professional help for installation work. However, if you decide to carry out these manipulations yourself, you will have to conduct several manipulations, among them - the preparation of the base.
The surface may not change beforehand, however in this case it is necessary to check the readiness of the floor for further manipulation. Thus, the draft base must be flat and clean. Suppose that the height difference is not more than three millimeters.
Laying of the infrared warm floor must be carried out only after checking the condition of the substrate. The level of the surface can be checked using the building level. If necessary, the plane needs to be leveled, and after it should be well dried, cleaned of dust and debris. To do this, professionals use, however, if you decided to produce the work yourself, then it is quite possible to manage the household appliance. Only after that you can proceed with installation.
Technology of work
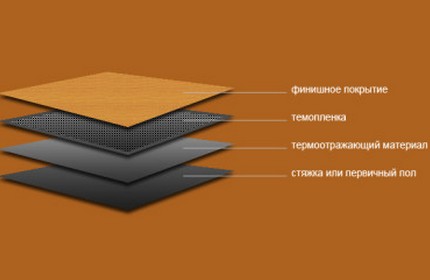
If you decide to use the infrared warm floor for heating your home, you will first need to lay a layer of waterproofing, which is necessary to protect the entire system from the harmful effects of moisture. The next step is laying the insulation. Do not listen to experts who do not recommend the use of thermal insulation. Infrared warm floor under the tile should be laid using a heater, this layer will help avoid heat loss, which can be directed down. Such training will increase the efficiency of the system used many times, reducing power consumption.
For insulation, you can choose different materials, but professionals recommend using a technical plug for this. This is especially true in cases where tiles are used as the finishing coat. The material must be laid in such a way that the metallized side is facing upward, it is important to spread the layers and glue them with adhesive tape.
Drawing up the scheme of installation
Before you begin laying the infrared warm floor, you need to determine the location of the thermostat. The optimum figure is fifteen centimeters, which should be retreated from the floor surface. At the next stage, the master composes the scheme for installing the film, and one should always take into account the fact that the system should not fit under large pieces of furniture and household appliances.

Mounting the first row, retreat the distance from the wall, which should be from ten to forty centimeters. If the infrared warm floor is the main source of heat, the system should occupy approximately 70% of the area of the room. If it is planned to lay this system as additional heating, the percentage is recommended to be reduced to 40.
Peculiarities of stacking and connection
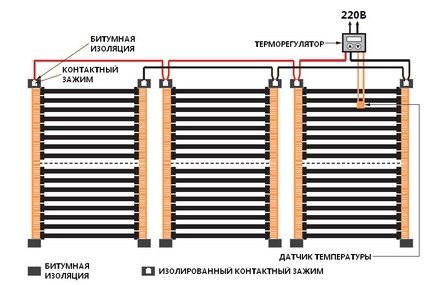
Infrared polyester film should be laid on the heater in accordance with the scheme drawn up in the previous stage. If there is a need, the film can be cut according to the lines specified by the manufacturer. Elements need to be covered by turning the copper side of the contacts down towards the wall. In the latter case, it is a question of the wall on which the thermostat is supposed to be located.
Contact clamps should be connected to the edge of the copper strip, and then connect the wires. The junction points of the clamps, as well as sections of the film cuts, must necessarily be isolated with the use of special bituminous mastics.
Installation of an infrared warm floor can be done after cutting the canvas. The length of the heating elements provides fewer contacts. The master should remember that the maximum possible length of the strip should not exceed the figure equal to eight meters. Some of the contact clips should be located on a thin supporting surface, while the rest will be inside the film.
Initially, a temperature sensor should be connected to the underside of the film, which is carefully insulated beforehand. After completing the installation of the material, as well as connecting the wires and contacts, you need to install the thermostat.
You can install the system using an outlet (as an ordinary electrical appliance). As the long practice shows, most of the wires that connect the thermostat with the film, it is better to pass under the surface of the plinth. At the next stage, the master must connect the infrared floor to the mains.
Stage of testing
After you managed to lay the infrared warm floor, you need to test it, only then you can lay the finishing floor. You will be able to make sure that the system works fine, if you do not notice the sparking, as well as overheating in all areas where the connection was made.
It is important to follow also that the film is heated as much as possible evenly. If this test is successful, then the heated floor should be covered with an additional layer of polyethylene film, only then you can start the installation work, where the final floor covering will be used.
Infrared Floor Selection by Manufacturer
If you decide to purchase an infrared warm floor, you should understand the manufacturers whose products are on the market today. In the store you can find a film of Heat Plus brand. This flooring is the development of the Korean company, which acts as an exclusive importer in the Russian Federation. If you want to choose a modern system that is manufactured using the latest technologies, then it is worth choosing this company, since in 2012 it has updated the equipment and production is currently being carried out on unique machines.
Infrared warm floor, the installation of which can be produced independently, can be produced by Caleo, which is now very common in the Russian market. As a manufacturer, DYS Technology and GT3 Corporation are engaged in the production of infrared systems for heating. In 2004, they patented manufacturing technology, which has certificates of the Korean Association of infrared radiation. The production procedure is unique, and you can independently verify the high quality of this product.

Have you decided to purchase an infrared heated floor? We discussed the installation of this system above, now we will deal with the choice of brand.
Another no less famous manufacturer of this product is Techno Profi. On the market, similar infrared warm floors are known under the brand name RexVa. This product is on sale in twenty countries of the world, the company is engaged in the implementation of individual orders due to scientific and technical potential, as well as the flexibility of production. This allowed buyers to purchase products that are of high quality and affordable value.
Why it is necessary to stop on this variant
If you lay the infra-red warm floor under the tile, it will allow you to equip the system, which will last for a long time. If it is a house with a normal thermal insulation, then the electricity consumption every day is about 30 watts per square meter per hour. If you control the electric floor with a thermostat, this will minimize the cost of energy. Together with this, it will be possible to provide maximum comfort to all people who are in the room.
Connecting an infra-red heated floor eliminates the presence of electromagnetic fields in rooms, which is present in each cable-type system. The film emits infrared long beams, as well as anions, which are negatively charged ions.
Heat generated infrared heater, will have a favorable effect on health, but on sensations it can be compared with sunlight.
Conclusion
If you decide to choose an infrared warm floor, which one is better, you can determine by reading the description of the manufacturers presented above. It is worth noting that each company uses the best technologies, and you will have to decide only with the cost that will be most acceptable.
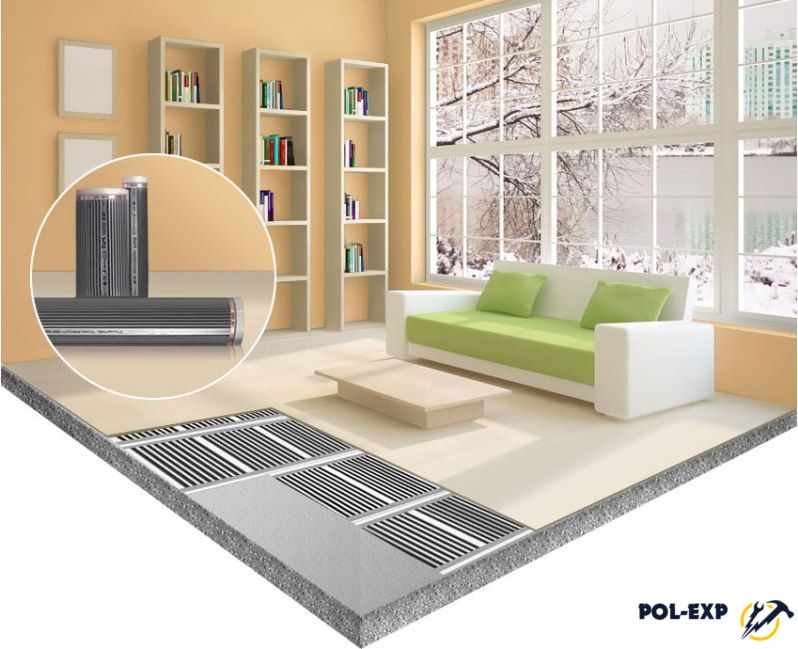
In most cases, the floor heating system is installed under the ceramic granite and ceramic tile. They warm well to the desired temperature and give off heat. Installation of an IR warm floor is carried out under the tile on a ready-made concrete base or screed. In addition, the infrared film can be mounted on the old tile, in the case when the room is being repaired.
Installation of infrared warm floor film
Infrared film warm floor under the tile for its installation requires additional materials, such as glass magnesite or gypsum board.
Step 1
First of all, the heat-reflecting material is laid on a prepared, level surface. Between each other, the sheets of material must be fastened with adhesive tape. The thermofilm is placed on top of the contacts in the direction where the thermostat will be located. Then all connections are made with the help of contact clips and mounting wires according to the instructions. Do not forget to insulate all connections properly.
Step 2
After this, the resulting structure must be covered with a polyethylene film, which will be used as a waterproofing. Then put glass magnesite or gypsum cardboard, which is attached using a dowel of nails (or other similar method) to the base of the floor. It is very important to be careful during this process so as not to disrupt the integrity of the thermal film and its heating elements.
Step 3
The top layer of glass magnesite or gypsum board must be treated with "concrete contact", after which the surface will become a good basis for laying ceramic granite or ceramic tiles. Connection of the film-warm floor to the thermostat and the electrical network is described in the technical documents.
What else do you need to know
There are some rules that need to be followed when installing an IR film underfloor under the tile:
- Be as neat as possible during installation, so as not to cause mechanical damage to the thermal film. To do this, you can wear soft shoes, try not to scratch the film with a trowel and do not drive dowels and nails into the carbon and copper strips.
- Do not use as a thermal insulation material based on aluminum foil.
- Preferably use special temperature sensors and temperature controllers for the tile.
Installation of infrared warm floor Caleo in the video below.
The comfort of living in an apartment or a private house depends largely on the microclimate in the premises, so you need to take care of a good heating system. The best modern option is a film warm floor, which is great for laying tiles. It is a roll material consisting of a dense base and heating elements. Depending on the type, the film floor can become an additional or main source of heat in the room.
Features & Benefits
The popularity of the film floor is explained by the availability of a wide range of benefits, including:
1. High efficiency. Thanks high power, the system can quickly heat up, and the maximum temperature can reach 50 o C.
2. Minimum electricity consumption. The film floor consumes a small amount of electricity, which allows you to save in the cold season, central heating. In addition, the automatic control system switches itself off automatically when the optimum temperature is reached, but the heated surface of the plates continues to exude heat.
3. Uniform heating of the room. The film is covered with 70% of the floor area, so the heating of the air is much faster, while the highest temperature is stored in the lower part of the room.
4. Availability. Prices for film floors have a wide range, so among the rich range is not difficult to find inexpensive materials. In addition, you can save on the services of a master if you install the system yourself.

5. Universality. Electric floor heating is suitable for any floor covering, whether it is tile, parquet, laminate or linoleum.
6. Resistance to moisture. Heating can be safely installed in rooms with high humidity - in the toilet, bathroom or in the kitchen.
7. Security. Warm floors do not carry danger to others. They do not emit toxic substances, and do not ignite.
8. Simple installation. Install and connect the system is not difficult, you only need to follow instructions exactly and follow the recommendations.
A warm floor of a film type is often mounted under a ceramic tile, because it has a high degree of thermal conductivity.
Kinds
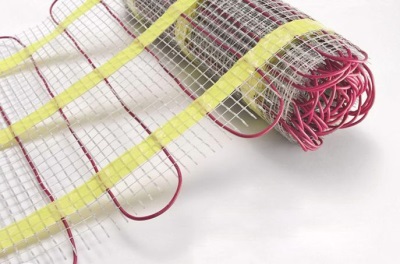
Roller heating systems, which are installed under the tile, can be in the form of a thin mat with heating elements, or two soldered films with a carbon fiber between them. Both materials are quite effective, but in order to understand which one is better, you should familiarize yourself with their characteristics.

Carbon fiber model They are made of lavsan film, which has high strength, elasticity and durability. In addition, it is a dielectric, which indicates its safety. For the production of a heating element, i.e. carbon fiber is used carbonaceous paste and special additives. To increase the strength and durability of heating systems, some manufacturers cover the films with graphite spraying.
Carbon filler is laid in parallel strips, and sealed between two films. Then equip products with conductors made of copper or copper-silver alloy, through which the current will flow to the heating elements, and they in turn are equipped with a parallel circuit. A film floor of this type is also called infrared. It can be installed in just 2-3 hours, and just as quickly dismantled, to move to another room. The only drawback of the system is its high cost.

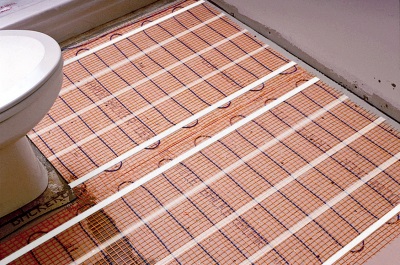
Thin heating mats consist of a heat-resistant mesh and a cable attached to it. The products are equipped with a conductor with a small cross-section, which can be unshielded or unshielded, or two-core with protection. This type of film floor can be installed in different rooms, regardless of their conditions. In addition, mats will be a good choice for rooms with non-standard configuration, tk. their mesh base can be cut between the heating cable and give the products the desired position.
Installation of a warm floor is carried out quickly enough and simply, after all only it is necessary to untwist a thin mat, to connect it to a network, and after that it is possible to stack a tile. When flooring is used a small amount of cement mortar, it will be enough not only to glue the tiles, but also securely fixing the mats, tk. The mixture will penetrate through and their cells, and heating wires to the bottom.
How to choose?
Film warm floors designed for laying tiles have many similar characteristics, which complicates the choice of consumers. Therefore, in order to determine which system is best suited, one should pay attention to their differences.
For example, a film with carbon fibers has the following features:
- the material can be dismantled and installed in another room;
- directly above the installed system can be placed furniture and other items, and they will not interfere with the radiation of thermal rays;
- the electromagnetic field is practically zero;
- in the event of damage to the heating elements, the entire system continues to operate, except for the failed section;
- can be the main source of heating.

As for thin mats, their only positive difference is simple installation and affordable cost. Thus, a film with infrared radiation is the best choice. But it should be noted that floor heating mats will be good if there is a main source of heat in the room. In addition, they are much cheaper than a film with a carbon heating element, which is an important factor for most consumers.
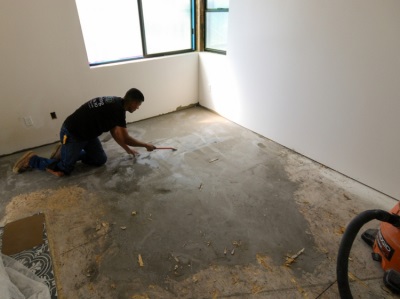
Preparatory work
Before starting the installation of a warm floor, it is necessary to prepare the base.First thing out of the room you need to take out all the items and perform cleaning. Then, using the level, check the presence of irregularities on the surface. If there is considerable curvature of the floor, then it is better to make a screed using a self-leveling mortar, and in another case, local application of the putty will be sufficient.
If the room has a wooden floor without visible damage and rotting, then it can be left, but before installing the film floor it is still recommended to perform a cycle. In another case, you should remove the old coating and make a concrete screed, or replace it with GVL or plywood.
Another an important stage is the drawing up of a scheme for laying the heating material. As a rule, it is placed almost on the entire floor area, retreating from the walls by about 20-30 cm. It is important to remember that when laying thin mats, furniture placement should be taken into account. under it there should be no heating elements.

Stacking
To lay a warm film floor, you need to prepare additional tools and materials:
- scissors;
- roulette;
- perforator;
- plastic corrugated tube;
- a hammer;
- dowels;
- bituminous scotch tape;
- polyethylene film;
- reflective film;
- electric wire;
- connecting clips;
- temperature sensor;
- thermoregulator.

The first step is to determine the location of the thermostat, after which a small trench is prepared with the help of a perforator, into which a corrugated pipe with electric wires will be placed. Further, in accordance with the scheme, a light-reflecting film is placed on the floor, sheets of heating material are placed on it, they are connected with each other and a thermal sensor is installed, and then connected to a thermoregulator. In the end, the system is covered with a polyethylene film, and fastens it to the floor using dowels. After that you can start laying floor tiles. It should be noted that when installing thin mats do not need to use polyethylene film, you can immediately begin to finish the surface finish.
The system of the warm floor is widely used today for the arrangement of living quarters due to its ability to change its operating mode depending on the variation in the microclimate. Among the main types of electric floor heating, which are compatible with tiles, the most common are two: cable and film. Which is better to install an electric warm floor under the tile and what points to consider when connecting it?
With all the "pluses" of the floors, finished with tiles and its competitor - porcelain stoneware, they are difficult to classify as warm coats.
Eliminate this disadvantage most easily by installing a floor system that can function all year round, which is especially important for apartments that depend on centralized heating.
In multi-apartment buildings, electric floors are considered almost the only available way to organize additional heating of housing
When choosing the type of electric floor system are oriented not only to the area of the heated room. Three main parameters are taken into account:
- compatibility with the selected floor covering;
- possibility to build a concrete screed;
- price range.
Power consumption of the energy of the selected system and the length of cables, indicated by the manufacturer based on the given area, averages 140-160 W / sq. M. But, planning as a finishing lining to use a similar in structure to stone gres, it is better to choose a system with a nominal capacity of 220 W / sq. Meter.
Cable type system
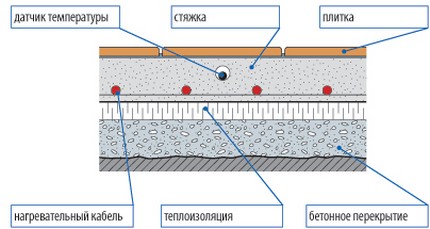
The basis of this heating system make single and double-core electrical heating cables embedded in a monolithic cement screed.

Regardless of the type of wires used. they are able to normalize to produce heat at the moment of passing through them an electric current, providing simultaneous and at the same time heating over the entire length (+)
The difference between them is significant:
- Single-core - the basis of heating of their conductor is the resistive principle, which is valid for the operation of a heating element or an iron helix. Single-stranded though they are famous for their democratic price, they are very inconvenient to install, since they require that the ends converge at one point, and the wires themselves do not intersect when distributed along the floor.
- Two-core - the function of the heating "spiral" in them is able to perform as one cable, and both at once. They are equipped with an end clutch, which ensures the continuity of the circuit.
If we compare single- and double-core cables, the first ones lose in that electromagnetic interference from them occurs much more than from two-wire analogs.

The height of the cable system, including the centimeters involved in the preparation of the base plus the thickness of the flooring itself, reaches 10 cm
But in view of the laboriousness and length of the installation, which requires the master to have the appropriate qualifications, and long expectations before putting the system into operation, such cable options are gradually losing their positions in the market, giving way to more modern thermo-mats.
A key feature of ready-made heating mats is that one- and two-wire conductors are already fixed to the fiberglass mesh frame.

Due to the fact that the heating mats are allowed to be laid on the base base, bypassing the stage of the substrate construction, and the tiles "plant" directly on them, the height of the system reaches only 5-6 cm
Unlike cable analogues, heating mats do not emit a harmful electromagnetic field, and their elements are resistant to rust.
Infrared film floor
The film floor is considered one of the most effective among modern systems heating. In contrast to the above described analogs of the system, it does not create electromagnetic fields, but radiates waves close in spectral parameters to solar radiation. Thanks to this, the room is warmed up completely homogeneously, and the ionized air positively influences the health of the household.

In an effort to improve the durability and reliability of the plates, some manufacturers cover the heating elements with graphite spraying
There are two types of film systems:
- With plates of the carbon type fixed on the lavsan film, which emit far-wave infrared radiation. When connecting carbon bands, a parallel circuit is used. They can be safely laid as under the porcelain tile, and under the tile.
- Carbon double-layer films with bimetallic strips made of copper or aluminum alloy. Heating bands in such films are located between layers of elastic, but dense polyurethane. For this reason, they are poorly compatible with the ceramic coating.
Film systems of carbon execution are allowed to be placed both on horizontal surfaces and on vertical bases. They can be laid without screed. Therefore, the thickness along with the finish facing does not exceed two centimeters.
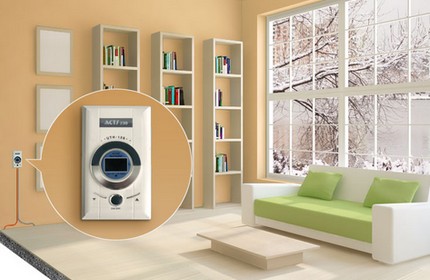
Regardless of the type of system chosen for connection, you will also need to purchase a thermostat, the design of which is equipped with a temperature sensor
Presented in the domestic market, the choice of temperature sensors is wide and varied: with push-button and mechanical control, with LCD and LED indication, in various colors and original design solutions. Any of the presented models is designed for installation in a socket socket of standard dimensions.
Methods for installing a film floor
When installing a film warm floor under the tile, the installation of the floor system is carried out using one of two technologies: "dry", involving the use of gypsum boards, "wet" - by pouring concrete.
Dry packing
Since the tile adhesive is too poorly adhered to a smooth film, when laying such a floor system, an intermediate layer is built between it and the tile. For this purpose pave:
- gipsokartonnye sheets, which are gypsum panels, glued on both sides of thick cardboard;
- glass-magnesite sheets made of composite materials supplemented with wood shavings.
Both materials are weakly resistant to infrared radiation, so the loss of IR radiation properties becomes minimal. As a result, this multi-layer system evenly distributes heat throughout the floor, eliminating the possibility of overheating.
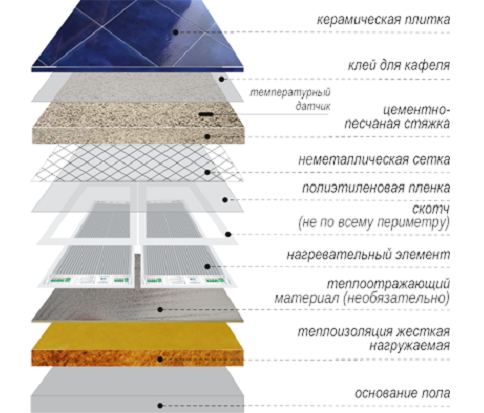
The system of electric underfloor heating is assembled according to the principle of "multilayer pie": a thermal insulator is laid on the base, the thermal film is lined on top and then covered with GKL and tiles
Laying the infrared warm floor under the tile is performed in six stages:
- On repaired from cracks and cracks, and then the aligned base is lined with a heat-reflecting layer.
- The second layer is laid strips of carbon film in such a way that the edges of the seams are not found on each other. It is desirable to cover the laid strips with a film of dense polyethylene.
- Installing terminal clamps on the edges of copper plates, connect them to the electrical wires. The assembled system is connected through a room thermostat, after which the uniformity of the heating of all the plates is checked.
- Cut the sheets of gypsum board into blanks of the appropriate size in order to completely cover them with heating bands.
- The gypsum plaster sheets fastened to the base are covered with a layer of priming composition.
- Using a glue designed for a system of warm floors, glue the tile.
The main thing when laying a carbon film - to ensure the most dense contact with the thermal insulation material. This is necessary in order to exclude the appearance of an aerated emptiness.
When laying a carbon film, it should be placed with copper elements downwards so that the connection contacts are directed to the side where the thermostat is supposed to be suspended. The places of the cuts of the film from the wrong side, as well as the points of connection of electric wires, must be covered with a layer of bituminous insulation.
On the underside of the lined film, a temperature sensor is mounted, and after connecting all the contacts, a heat regulator, which is connected directly to the network
Gypsum boards are fixed to the primary base by screwing, trying not to break the integrity of the plates.
Pouring a "wet" screed
The implementation of this method of installation will take a lot of time and effort. To save bills for consumed kilowatts, which go to warm the slab of flooring, under the floor system lay the substrate in the form of insulation. In the role of a substrate apply:
- isolon-polyethylene foam having a disjoint molecular structure;
- foil is made of polyethylene foam and coated with a metallized polypropylene film;
- a technical plug having a honeycomb structure.
The insulating material is cut into strips, the size of which corresponds to the width of the thermal film. Blanks lay under each mat so that all the cutouts in the film fall on the substrate.

Thermal insulation is designed to prevent the loss of heat produced, making it possible to use it as fully as possible
At the top of the insulation, a heat-reflecting layer is laid. All joints are treated with special glue.
Since there is no grounding for the installation of a film warm floor, it is not allowed to use aluminum foil as a heat reflector, which is a conductive material. For the same reason, reinforcing mesh with cells of 20-40 mm, designed for concrete screed, should be made not of metal, but of polymer.
The role of the earthing switch can be made with an electrically conductive tape, which is glued along the perimeter of the room. To increase the security of the system, it is necessary to "power" it from a separate machine, and set the RCD at the input.

To the heat-reflecting interlayer with the help of pieces of construction tape, glue the heating plates, the current-carrying tires of which "look" downwards
The laid floor system is covered with a polyethylene film and begins to lay a concrete screed. For this purpose, a cellular plastic mesh with a section size of 5x5 cm or 10x10 cm is placed on top of the film. It will act as a reinforcing skeleton. The mesh is attached to previously laid layers, trying not to damage the thermal film.
The top of the laid and fixed mesh is applied a concrete-cement mortar, forming a layer 5 mm thick, so that it completely covers the technological holes. Leave the screed for a week and a half to complete drying.
When the screed gets the necessary strength, proceed to the stage of gluing tiles or porcelain stoneware. The technology of cladding is usual. The only thing is to "plant" the coating on the glue, which is not afraid of temperature changes.
The technology of installing a cable floor for tiles
Installation of a cable underfloor under a tile requires a certain qualification. In addition, it is possible to include such a system only a month after the installation.
Drawing up a layout plan
Before proceeding with the installation of the system, it will be correct to first draw up on the scale a plan for its layout. When developing a plan from the general working area, exclude the areas where furniture is located and it is planned to install heavy household appliances. It should be understood that further rearrangement may adversely affect the performance of the floor system.

Between heat sources in the form of radiators and a floor system, it is necessary to provide a buffer zone of 100 mm
Taking into account all the nuances in the finished form, the layout plan will have the outlines of the irregular shape of the figure, which is inscribed with a rectangular and square coverage area. Based on the total area of the working surface, the cable length is calculated taking into account the factor that the cable should cover 70-75% of the total quadrature. On how competently designed the floor system will depend on its effectiveness.
At the design stage, you need to think over a convenient place for the placement of the thermostat. In some cases, when installing a floor system, it is necessary to lay a separate electric wiring line of the required capacity.
Preparatory and energy-saving works
The key condition correct stacking, both the heating system and the finishing tiles are carefully leveled surfaces. The master's task is to get the ground to zero, because the worse the ground is prepared, the worse the final result will be.

In the case of strong damage to the base, it is better to perform a complete dismantling of the old covering, and the finishing floor should be leveled with a concrete screed 3-5 cm thick
A set of tools that will be needed to perform the work:
- building level;
- roulette and ruler for marking and control;
- a tool for stripping insulation and cutting wires;
- soldering iron with solder for wiring before switching;
- building hair dryer for heating shrink tubes;
- a puncher and a grinder with a dial over the stone;
- multimeter for control measurements of the conductivity of a circuit and its resistance;
- megohmmeter for checking insulation resistance;
- building mixer and tank for mixing cement mix;
- roller and brush for applying a liquid primer;
- toothed and ordinary spatula for distribution of pasty cement mixture.
To prevent a situation when the laid system will heat the ceiling to neighbors, it is necessary to perform energy-saving works.
The thickness of the layer of thermal insulation depends on the category of located below the premises: if this is a heated house, then you can limit two to three centimeters, if the basement or basement - at least 5 cm
When planning to arrange a warm floor on a loggia or veranda, a layer of insulation should be laid before the waterproofing layer. For this purpose it is better to use sheets of expanded polystyrene 10 cm thick or mineral wool.
On the prepared base lay a waterproofing layer, the basis for which is:
- foamed penofol, which is a roll material made of foamed components, equipped with internal reinforcement;
- extruded expanded polystyrene having a foamed polymeric structure;
- foamed polyethylene, equipped with a foil coating.
The material should be laid out with an overlap on the wall. To compensate for the thermal expansion between the floor and the wall, a damper strip is laid along the perimeter of the base. To reduce the heat loss will help and partial insulation of the walls at a level of 20 cm from the floor.
Cabling
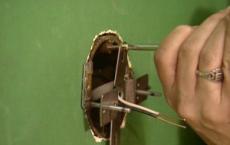
The first step is to mount the thermostat, making a socket for the sub-socket using a special crown for its installation in the wall. The height of the socket is not less than 300 mm from the floor level. The location of the podrozetnik in the aftermath should not be covered with large-size household appliances or heavy-weight stationary furniture.
The temperature sensor is placed in a corrugated tube with a diameter of 9-16 cm. To ensure that the pipe runs level with the floor, a drill is made for it using a perforator or a grinder equipped with a disc for working on a stone. Between the podzheetnikom in the wall and corrugated tube in the floor lay a groove 20x20 mm for the placement of mounting electrical wires.

The length of the horizontal part of the sleeve for installing the temperature sensor should be of the order of 0.6-0.8 meters, and its lower end is insulated with a plug or wrapped with an insulating tape
The heating cable must be checked by the tester for an electrical resistance before laying.
Laying the cable floor heating under the tile is performed in several stages:
- On the cleaned and leveled base, a primer is applied which will ensure good adhesion to the concrete.
- Over the entire floor area to be heated floor foil roll insulation, placing a reflective layer out. Strips are laid close to each other, and the seams between them are glued with paint tape.
- Guided by a pre-drawn scheme, roll out on the surface and fix with self-tapping screws or dowels mounting tapes.
- To the mounting slats with plastic clips or "antennae" fix the cable so that its loops bend without interference, and he himself does not intersect with other heating elements. The laying is completed in the area of the end clutch.
- The thermo sensor, connected to the signal wire, is buried in the corrugated tube, the outlet opening of which is covered with a cap. One end of the corrugated tube with the sensor is placed strictly between the turns of the heating elements, and the second is placed in the strob.
To facilitate installation, use a fiberglass reinforcing mesh. It will act as a frame when laying the cable and will serve as an additional hardening of the screed.
When installing a two-wire cable, under no circumstances can they be cut, the heating elements can only be stacked in their entirety
If necessary, turn the strip mesh base can be cut into fragments, while avoiding overlapping and crossing the cable. The cable itself can not be cut.
Connecting the system and filling the screed
The wires with the contacts of the stacked system are taken out into a box, inside which bare "tails" are tinned and commuted.
With the help of the multimeter, the conductivity of the circuit and the resistance are measured, comparing it with the previous readings. If possible - additionally check the insulation resistance. Then power is turned on briefly and the system is operational.

In the foil insulation with a step of 1000 mm, make "windows" in size 50x200 mm, which will ensure the contact of the future screed with the base of the floor
Having installed a system of lighthouses at a height of 3-5 cm, evenly distribute the concrete solution over the surface, trying to prevent the formation of air cavities.
On the dried screed, apply a primer and spread the floor covering. At the time of hardening of the screed it is important to completely eliminate drafts and ensure uniformity of congealing of the composition without drying and freezing.
On hardening and purchase of strength screed will take from 7-10 to 28 days, depending on the composition of the solution and the recommendations of the manufacturer of the finished mixture. Starting from the third day after the initial setting, it is recommended that it be regularly moistened with a spray gun and covered with a polyethylene film.
After curing the concrete, it remains only to lay the tile and wait until the glue has completely dried. You can start the system no earlier than one month after the screed is poured. And run should be gradual, starting with a mark at 15. ° C, and every day increasing it by 4-6 degrees.
Video guide for installing electrical floors
How to lay the infrared rod system:
Connection of heating mats:
The sequence of laying the film system:
The scheme with the location of the cable is better attached to the passport of the product, adding it with such data as the pitch of the winding, the distance from the walls, the location of the connecting and end clutches. These values may be required when repair work is required.
The tile is one of the better options flooring in the bathroom, bathroom or kitchen. It does not spoil from the effects of moisture and is very durable. However, when you move around it, your legs may be uncomfortable because of a cold sensation, because this material cools down quite quickly and does not keep heat. That is why the infrared warm floor under the tile is an excellent option to make a bathroom and the kitchen as comfortable as possible.
In the construction market, there are several options for organizing a warm floor in the premises - a system of water and electrical type, the latter are of two types - cable and film. Each of them has its advantages and disadvantages, which can significantly affect the final choice of the owner of the house. And all the nuances should be taken into account at the design and repair stage.
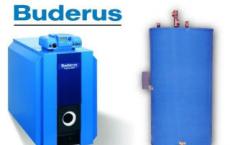
Water floors are a system of pipes through which hot water, supplied from a district heating system or from stand-alone boilers. Such floors are usually equipped with screed, but there are options that can be equipped without filling cement mixes.


On a note! Because of the need to fill the screed, the height of the ceilings in the room is reduced by at least 7-10 cm. Also, water floors can not always be arranged in apartments located in the houses of the old foundation, because it is impossible to connect to the central heating system (the load on it will be too high ).
The electrical cable floor is a system created from a heating cable laid on a draft base and also flooded with a screed. Sometimes the cable can be laid and without pouring the cement mixture. There is such a floor, as you might guess, from the power grid.

- it is too electrical systems, only the substrate is heated by infrared radiation. The system is a thin film mats, laid on the floor and generating heat. Usually such floors are laid on top of a filled screed. One of the main advantages of using IR floors is the lack of a significant increase in the floor level due to the lack of need to fill the screed.

Is it possible to lay the film floor under the tile?
It is easy to give an answer to this question, but before that it is important to analyze the conditions of exploitation of the floor, to see recommendations for laying the system. In the instructions to the heating cloths it is indicated that they can be laid under the laminate, and under the tree, including the tiles under the tile. Thus, installation of this system under tile can be done safely.

On a note! IR floor systems can be installed even outdoors under porcelain stoneware, since such heating is not afraid of the impact of water. Thus, near the house there will never be ice-covered paths.

In general, IR floors are usually laid under the laminate, carpet, etc. using the so-called "dry-editing" technology. But, nevertheless, they are laid and under the tile, but already with the use of tile glue, and sometimes screeds or mixtures for liquid floors. However, in the last two cases it is important to remember some features of the work.


In general, under the tile you can use the cable floor - it is likely to last longer than the film floor, and is specifically designed for this kind of work type of floor heating. At least, for a "wet" installation, it is ideal. However, if you install IR floors correctly and in compliance with all safety requirements (grounding, work in a dry room, etc.), there should not be any problems with them.

Principle of film coatings operation
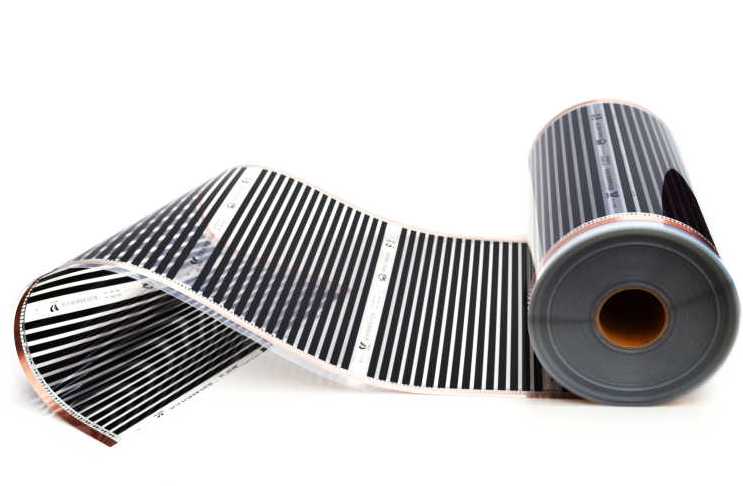
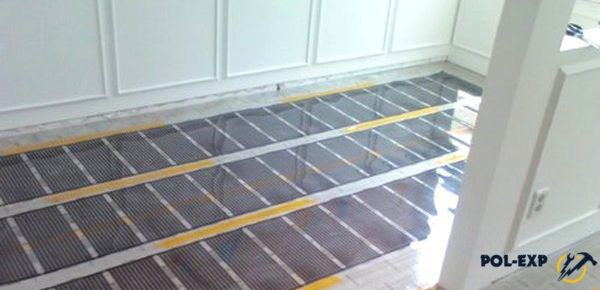
IR floors - this is a fairly thin film, between the layers of which there are strips made of graphite (carbon). It is these black strips that are the most heating elements, because of which the system begins to produce heat. Also there are film floors completely covered with carbon. The film is laid out on a prepared floor base, connected by wires to the mains and begins to heat up. All surfaces around the film are heated by infrared radiation.

Infrared film - photo
The floor heats up very quickly due to the film's work, and thanks to the "smart" thermostat it switches off after heating. Thus, the IR floor works only about 20 minutes per hour. If necessary, the system starts up again and heats the base.
Infrared floor has the highest coefficient of efficiency in comparison with other types of heating systems for the floor. It heats up rather quickly, while consuming a very small amount of electricity. Thus, it is very economical.
The film is great for styling in any type of room, whether it's a bedroom, a nursery, a living room or a bathroom with a kitchen. In this case, the laying of canvases is carried out in accordance with the layout of furniture in the room - where there will be large objects (sofa, cabinets, etc.), the film does not fit. It is easiest to mount it only where the legs touch the floor - for example, at the exit from the bathroom.

Attention! There are two types of IR floors - bimetallic and carbon. The first lay under the tile is categorically impossible.
It is interesting that, unlike other heating systems, the IC floor heats the objects surrounding it, rather than the air. Thanks to this, such a system positively influences the formation of the microclimate in the room, it does not dry the air, but, on the contrary, enriches it with negatively charged ions.
Characteristics of infrared heaters
IR floors are easy to adjust by temperature - for example, by setting the thermostat to 21 degrees, you can achieve the most comfortable floor temperature. Although in general, the heating system can be up to 50 degrees, but there is no need for this. Since now there are quite a lot of manufacturers of IR systems on the market, it is easy to find equipment at a suitable price. Installation can be done independently and quickly enough, and this will also have a positive effect on the purse of the owner of the premises. And in some cases, IR floors can even be replaced centralized system heating.

Advantages of infrared flooring
IC sex has a lot of advantages.
- The IR system does an excellent job of heating the surrounding interior items. The wavelength is 5-20 microns, which allows it to pass through the tile.
- Adjust the temperature with the installed IR floor system is quite simple, which will create an optimal microclimate in any room.
- Such floors are economical, they spend little energy.
- Human health will not suffer from significant electromagnetic radiation, as when laying the cable floor.
- IR floors can become a kind of ionizer of air.
IR warm floor under the tile - which is better
Disadvantages of infrared systems when laying them under tile
But IR floors have their drawbacks. Especially it concerns the option, in which the system fits under the tile.

Infrared warm floor under the tile: styling features
Installation of IR floors under the tile is not as complicated as it might seem at first glance. But there are a few nuances that are important to consider. First, you need to worry about the materials and tools that you might need to work. It can be a heat-reflecting substrate, directly the IR film itself necessary quantity, tape for insulation of wires, tile and glue for it, adhesive tape, corrugated tube, gypsum board, contact clips, polyethylene, connecting wires, scissors, etc.

Infrared flooring - installation
For laying and tiles, and IR heating system, you need a flat base. Therefore, it must be cleaned of debris and inspected for damage, protrusions. No relief on it should not be - all cracks are sealed, and bulges are recommended to be ground.
Also, preliminary work on the installation of the IR floor system includes the creation of a scheme for laying the IR film and the placement of various elements of the thermoregulator type. This should take into account the location of large-sized furniture, and places where the film will not be mounted. It is important to remember that all wires going from the heating system to the thermostat should be laid in the corrugation and groove, which is punched in the wall. However, it is not always necessary to wall the walls. Sometimes the wires are laid in a plastic narrow channel, which is attached to the wall surface.
Attention! It is important to work with IR heating film carefully, as it is quite easy to damage. And cut it only on clearly marked lines of cut. Cutting the film in another place, it can be rendered unusable.

All installation work must be carried out at an air temperature above 0 degrees, and also at a humidity of not more than 60%. It is also important to ground the entire system. Particular attention is paid to insulation of contacts, as well as possible places of film damage.
Table. Types of mounting IR films.
| View | Description |
|---|---|
| It is used for mounting on the surface of IR films of laminate, carpet. For the installation of tiles is used, but rarely. It implies a careful leveling of the surface, the laying of the thermal insulation material and the film itself, then the installation of a protective film layer (polyethylene), sheets of gypsum board and directly the tile itself, which is fixed with glue. In this case, the film is not exposed to contacts with caustic substances and will last for a long time. But here the height of the base in this case is quite significant, which is not always true. In addition, this way of carrying out the work will cost more. |
| Used for laying tiles tile, stone, etc. The so-called classical method. Works will cost less than with a dry type of installation, but they are much more difficult. In this case, the surface is also prepared, then the heat reflector is laid on which the IR film is mounted. Then it is closed with a polyethylene film, reinforced and filled with a mixture for bulk floors. Ceramic tiles are mounted using the classic method (on glue) on top of this layer after it has dried. The system of the warm floor can be put into operation about a week after laying the tiles. |

Installation of an infrared warm floor under the tile
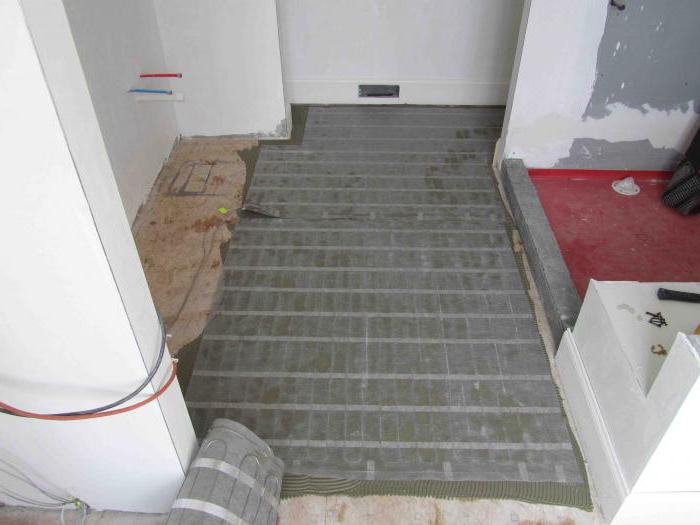
Let's consider, how the process of installation of an IR floor of firm LamaHeat by a wet method occurs. This is a special kind of IR floor, looking like a fine mesh net, and it is great for a wet laying method.
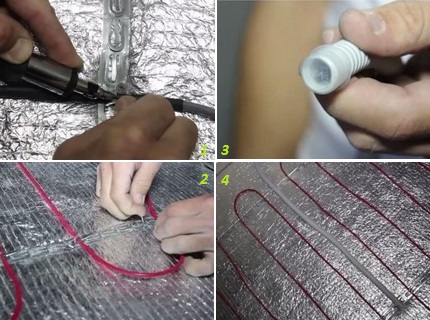
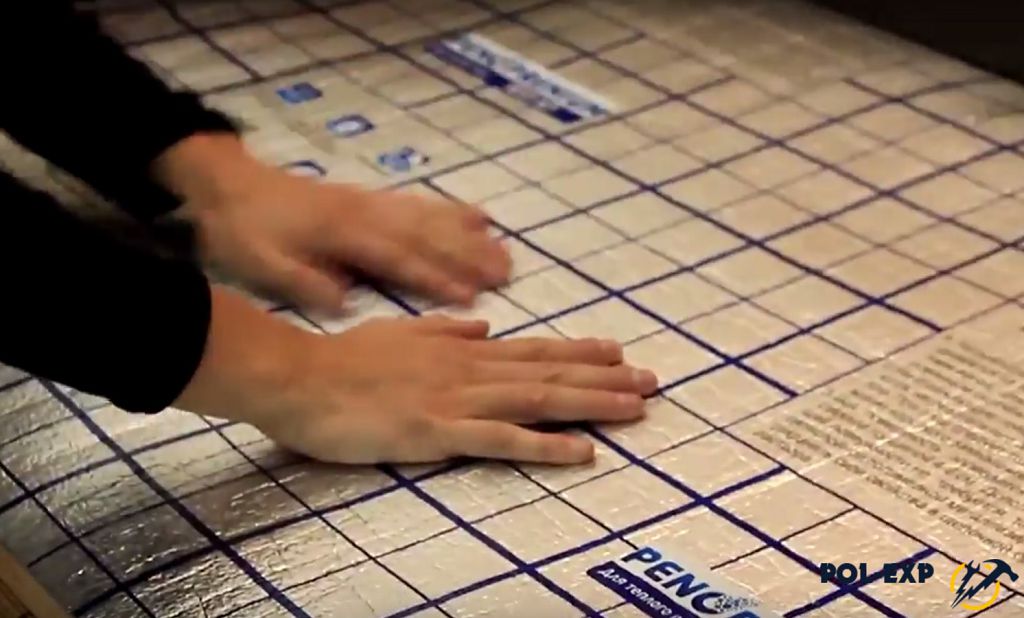
Step 1. The surface of the rough floor is thoroughly cleaned of debris. Then the lavsan heat-reflecting substrate is laid on it. Its individual bands are joined together by means of an adhesive tape.

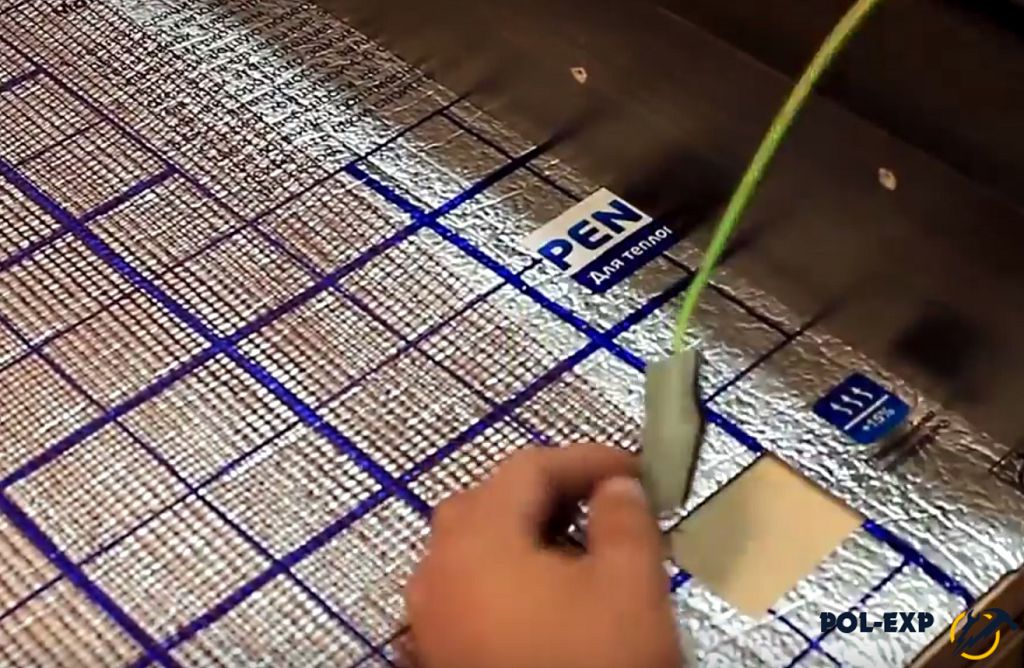
Step 3. This cloth is connected to the mains by means of special terminals and wires. The terminals with the wires inserted in them are clamped with pliers.

Step 4. The places of connecting the wires are insulated with bits of bitumen insulation on both sides.

Step 5. With the help of a clerical knife, the notches for laying wires in them are cut on the surface of the thermal insulation.
Step 6. The ends of the IR sheet where the wires are not connected are necessarily isolated.

Step 7. On top of the IR grid is poured a layer of self-leveling floors. The layer is carefully leveled and dried.

Step 8. The tile is laid on the floor of the floor. The tile is fixed to the surface with a tile adhesive applied by a notched trowel.
![]()
Video - Installation of IR film under the tile
Video - Installation of the classic type of IR film under the tile
IR floor under the tile can be stacked, but it is important to carry out all work carefully and carefully, without fail following all the rules of the work. Otherwise, warm floors of this type simply will not please the owner of the apartment with their work - they will quickly fail. In general, such a system is quite reliable and is distinguished by excellent quality of work.