Installation of a warm floor on the loggia. The device of a warm floor with application of the centralized heating. Heating mats and their types
As a heat source for the loggia, various heating systems are used, which are installed mainly in the floor. They allow to maintain the preferred temperature regime, to form the most favorable conditions. Correctly arranged warm floor on the balcony is able to generate the required amount of heat.
There are several types of heating systems installed in the floor, and used to insulate the balcony and loggia.
- heating mats;
- heating two-wire cable;
- infrared screened film.
Consider systems in more detail.
Heating mats and their types
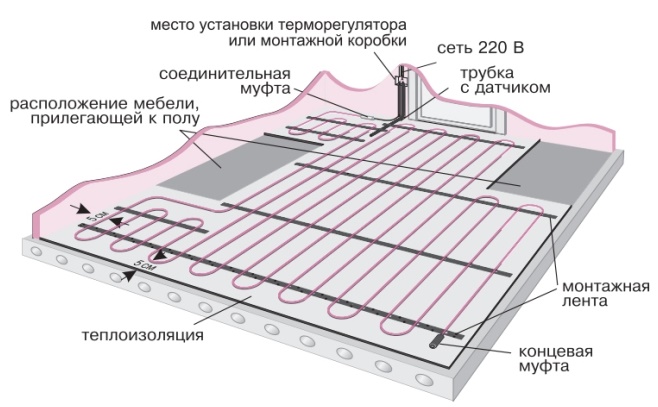
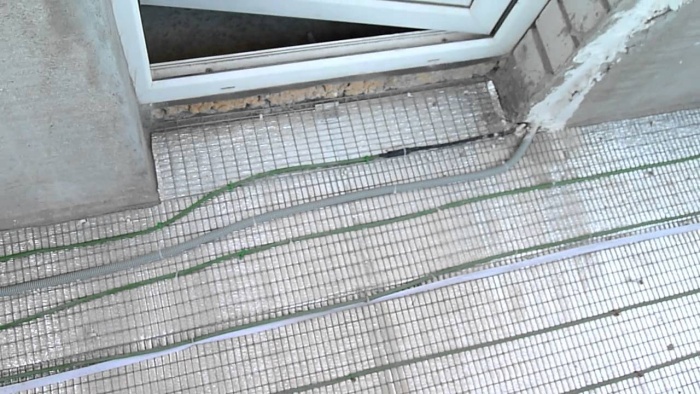
One of the most popular and budgetary systems are heating mats. They represent a single heating cable, wavyly attached to a special grid of durable fiberglass. Devices belong to the class of systems with cable heating, their installation is carried out exclusively in the floor.
Heating mats can have a length of 50 cm to 3 meters, the width of the reinforcing mesh retaining wire is usually 50 cm
As a source of heat, one-or two-wire cable is used. Its diameter varies in the range 2.5-4.5 mm. For the operation of mats, a 220-230 W power supply is required.
The cable is protected by a special plastic screen. The length of the cold wire is usually more than 2 m.
The manufactured heating mats are divided into two groups. They are divided according to the type of cable into:
- single-core;
- two-wire;
The feature of mats with single-core cable is that they must be stacked so that the two ends are connected to the thermostat. This greatly complicates the installation, as it requires cutting mats. Also, a mat with a single-core cable emits an electromagnetic field, so it is not injected into rooms where people are constantly located.
The main advantage of single-core heating equipment is its low price, the possibility of introduction in the bathroom, toilet, kitchen
Double-stranded mat is an improved version of single-core. Here, besides the heating core, there is electrical cable. Its introduction into the design allows one end to be connected to the thermoregulator, and the other - to be hidden in the coupling, which makes it possible to finish the installation in any place.
A mat of a two-wire type practically does not emit an electromagnetic field, therefore it is completely safe for a person. It can be implemented not only on the floor of the balcony, but in any other room as a source of additional heat.
Heating mats also differ in power, can generate from 60 to 2300 watts of energy. You can read how to calculate the required power of the mat, below.
Both single-core and double-stranded mats are reliable, able to serve faultlessly for many years. Usually single-core modifications are thinner than twin-core ones, they have more power, therefore they can warm the floor surface faster.
Pros and cons of heating mats
Let's consider features, advantages and disadvantages of heating mats.
- When using mats, the height of the room decreases by only a couple of centimeters, taking into account the height of the tile and the layer of glue.
- The system is economical, rationally consumes electricity. If the balcony is furniture, then under it mats do not fit.
- Heating mats are easy to install. The only thing that can cause complexity is connecting the system to the thermostat.
- Mats are used for heating for a short time. For a permanent 24-hour work they are not calculated.
Over the mats, it is possible to apply a tile adhesive composition and lay the tile itself. The choice of the device takes into account the area of the heating surface, heat loss loggia. For mounting on the balcony, it is undesirable to take a long mat, since the device can not be shortened. Reduce only possible cold ends, so for the balcony to choose a device that is most appropriate to the floor area.
Mounting of heating mats
Install heating mats with caution. It is important to protect the cable from mechanical damage. It is inadmissible to use cutting and sharp objects during installation, leaving them unattended.
It is also important to try not to step on the cable. To exclude the possibility of this incident, it is desirable to install in shoes with a soft sole or without shoes, and before installation, the floor surface should be completely cleaned of contaminants.
Caution should be exercised during fixing the tiles, applying glue and stripping the joints. You may accidentally damage the cable during these operations.
Consider options for laying mats on different types of surfaces.
On the concrete floor of the loggia, first install a heat-insulating material, then level the floor, install a shock absorber, which will prevent deformation on heating. Then put the mat on the shock absorber, then cover with glued tile, which is applied to the tile. At the last stage, a protective tube is installed for the temperature sensor, the temperature controller, the connection of cold wires.
Before laying the mat, to ensure its maximum efficiency, you can put on the floor layer of insulation
If the floor is laid out of wood on the balcony, then the surface is first leveled with a concrete layer of 7-9 mm, then the heating mats are laid, solid foam is put, then the floor is covered with wood.
If the installation is made on an old tile covering, then do concrete screed, install the heating element, cover it with tile glue, and then create a new tile coating.

Heating mats can be easily installed on the old tiled roofing of the loggia without dismantling it
Consider the details of the installation in more detail.
Before introducing floor mats into the floor surface, it is necessary to make a schematic installation plan. It should be applied:
- the contour of the heated surface;
- laying scheme;
- provide the location of the temperature sensor, the thermostat taking into account the location of the power supply wiring.
It is important to prepare the surface for laying mats before starting work. To do this, remove cracks on the floor with putty. After it dries, the floor is cleaned of dust and dirt. If the surface is wooden, make sure that it is securely fixed.
Before laying, you need to install a tube groove that comes with a temperature sensor. It is important that it is located at the level of the top edge of the product at an equal distance from the heating cables. During the work, it is necessary to seal the tube on one side with electrical tape, so that it does not get tile glue. The other end is connected to the thermoregulator, which is located in the junction box.
The laying can be done in two ways - by cable up or cable down. The first method is most simple, it is used in practice most often.
The way in which the laying is done with a cable upwards is that the mats are laid down by the net. Further, with the use of glue, the device is point-mounted to the floor surface. After the surface of the mat is applied tile adhesive of the required thickness (usually 3-5 mm), after which the tiles are settled.
![]()
It is important to spread the glue over the mat surface evenly to avoid the formation of air voids, since during operation they can lead to overheating of the cable and its breakage
The cable must be completely immersed in a heat-conducting medium (tile adhesive, etc.).
The method by which the cable is laid down with the cable (ie, the grid upwards) is more complicated in execution. Before laying tiles make a pattern mat. To do this, it is spread out so that it completely covers the heated surface. Next, cut the mesh net, then fold into a roll. On the floor, apply a layer of glue 2-3 mm, after it is unfolded mat with a cable down and slightly pressed.
During laying, it is important to ensure that the distance between the cables is not less than 5 cm. The second 5-6 mm layer of glue is applied with a spatula spatula directly on the heating mat, after which the tiling is laid.
Heating electrical cable
At the heart of any system of floor heating is a heating electrical cable. It acts as the main heating element. Control is by means of electronic thermostats of various modifications. To operate the device, a voltage of 220 V is required.
The cable is laid in a concrete screed or tile adhesive. The product can provide a floor temperature of +25 to +32 degrees
The cable system includes a cable heating section, its main element is a two-core shielded cable that is connected on one side by a lead conductor, a protected clutch, and on the other - by a heating core.
Specific heat release of the cable is approximately 18 W / m.
Advantages of the cable are as follows:
- the electromagnetic field created by the device, the cavity is safe for humans;
- due to the use of a small power in the construction of the heating core, the cable's wear resistance increases, the service life of the cable;
- simplicity of installation;
- the screening film provides electrical and fire safety of the product, protects it from mechanical damage.
Let's consider the cable installation in the next section.
Specification of heating cable assembly
Installation on the concrete floor has a number of features. It is desirable to insulate it with a 20-50 mm layer of expanded polystyrene or any other heat insulating material. Further it is required to cover a thermal insulation with a concrete screed 10-15 mm. This will eliminate the contact of the insulation with the heating element of the floor, otherwise the device may overheat.
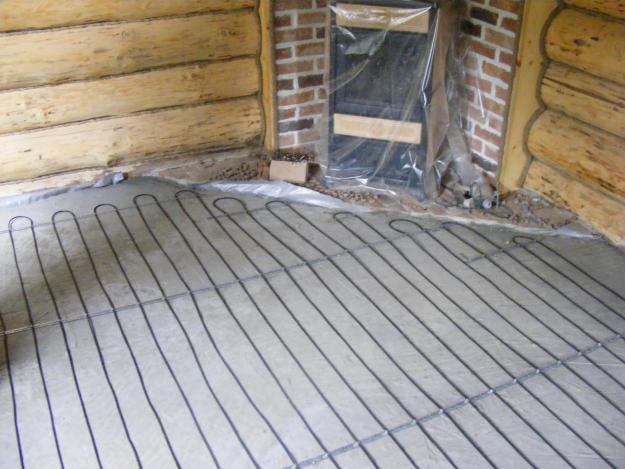
After the procedure, the mounting tape is laid on the floor and fixed. The cable is laid evenly undulating over the entire area. It is important that its nodes do not intersect. The radius of bending must be equal to or more than 10 times the diameter of the cable. Fix the device using a mounting tape, attaching it to the protruding parts.
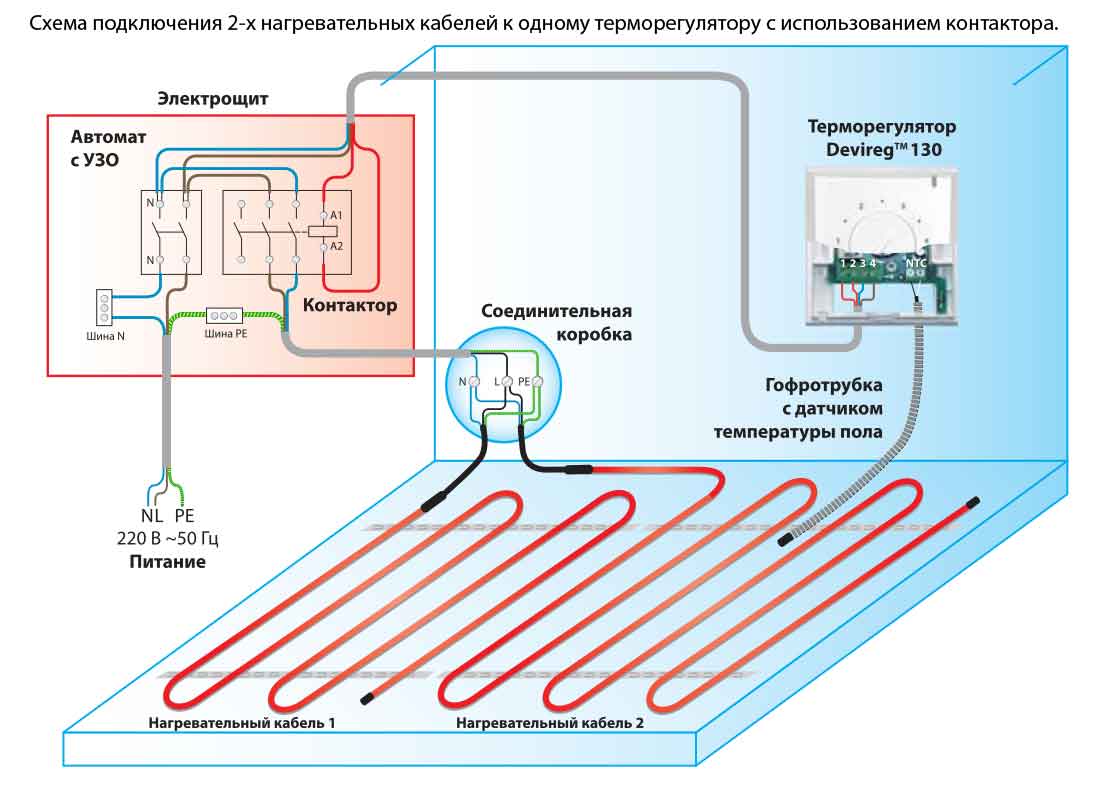
In one thermoregulator it is possible to connect from two or more heating cables. The cold end is installed in a box in a stroba located in the wall. The sensors are attached between the cable strips, they are removed to the installation box. It is powered by 220 V from the nearest outlet
After laying, check the compliance of the real resistance of the heating core with the information in the passport. You can connect the cable before installing it to check its operability, then to lay and screed. Couplings must be located in the screed of concrete. Before the device of a coupler make the scheme of a cable laying where define places for an arrangement of couplings.
It is important to remember that the cement screed finally hardens after 28-30 days. Until then, the system can not be turned on. It is also forbidden to run heating cable sections in a collapsed position. The stacking step should be calculated according to the passport.
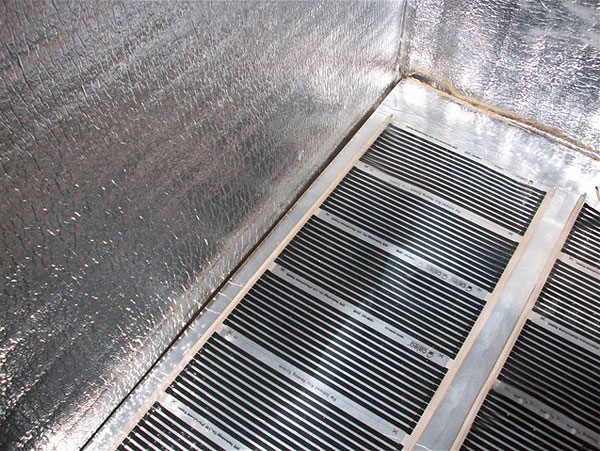
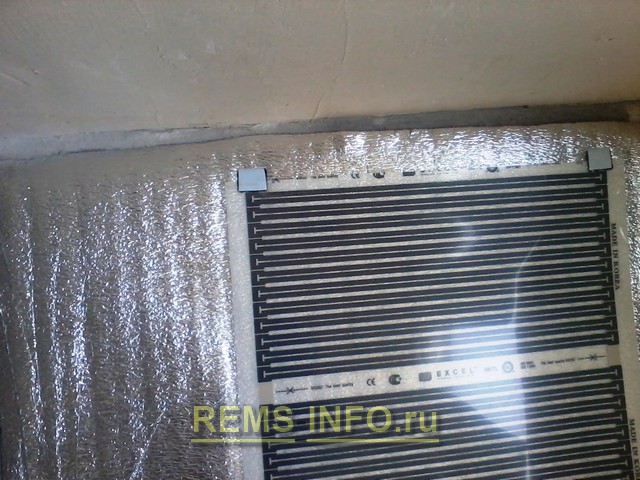
Infrared film for heating
The principle of the IR film is based on the generation of long-wave infrared rays. The device itself looks like a cloth covered on both sides with a polyester film. It is flexible, so it is easy to install on any part of the floor. For the introduction it is not necessary to fill the cement screed or the glue base device, the film can be easily installed and dismantled.
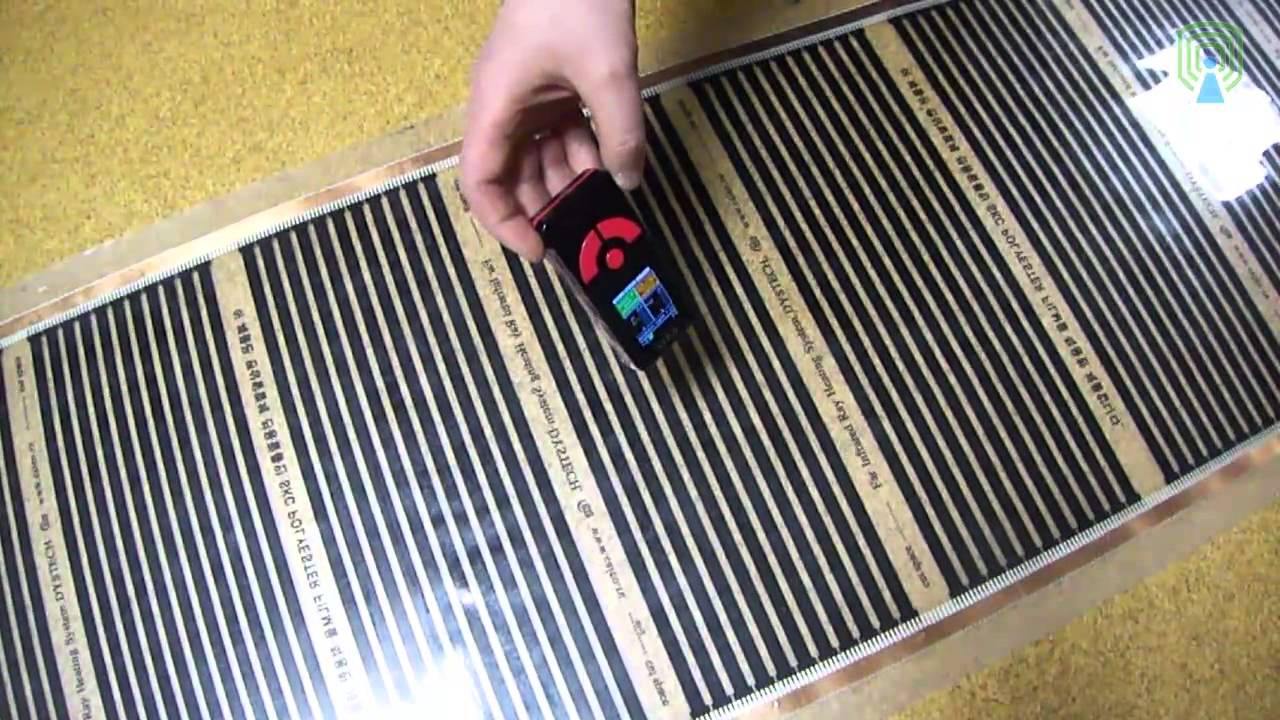
The layers of the film consist of carbon and copper tires, thanks to which the heat transfer is 100%. IR-film effectively functions at low temperatures, it is widely used for installation in the loggia
The film is a kind of emitter of infrared rays, which a person interprets as heat. Its maximum heating temperature is +50 degrees.
Any IR film consists of:
- heating element of the carbon element, which is a converter of electricity to heat;
- bimetallic tires, by means of which the energy is supplied to the heating elements;
- two-layer polymer film, performing the function of protection against mechanical damage.
The device is running from electrical network 220-230 V.

To fix the film to the floor, you can use a stapler, glue base or any other method, depending on the type of coating that will be installed
The current, passing through the components of the system, is converted into thermal energy, it is transmitted to the surrounding environment, which then heats the air mass around itself.
Types of infrared films
There is a large variety of IR films, which differ in their specific technical parameters and appearance. Two main types can be distinguished: low- and high-temperature models. Also, films differ in power, maximum heating temperature, thickness, width, and fields of application.
When choosing a film, the key parameter is the temperature of its heating. So, if it exceeds +27 degrees, then the laminated coating should be discarded, since it undergoes deformation irreversibly under the influence of high temperature. Therefore, high-temperature modifications should be laid only for ceramic tiles.
If the flooring will be a parquet board, laminated cover, carpet, etc., then you need to install a low-temperature system that heats up to +27 degrees. For coating in the form of tiles, expanded clay, high-temperature modifications can be installed, generating + 45- + 50 degrees
In the loggia you can install a warm IR film both on the floor, and on the walls and ceiling. Additionally, the panels are mounted on both walls under the windows, opposite the windows.
When choosing a film, it is important to focus on the area of its application.
Strong advantages of IR film
Experts identify a number of advantages of IR film. Among them:
- environmental safety - radiation is considered beneficial to health;
- when the device is heated not air, and interior items, so there is no evaporation of oxygen, does not change the composition of air;
- there is no electromagnetic radiation;
- simplicity in installation, wide possibilities in adjustment.
IR-film is longevous, practically does not fail and does not require repair.
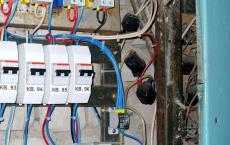
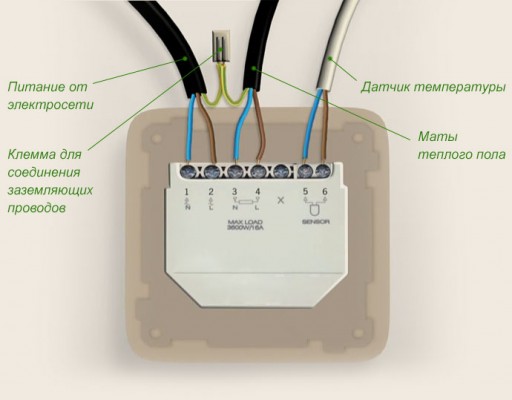
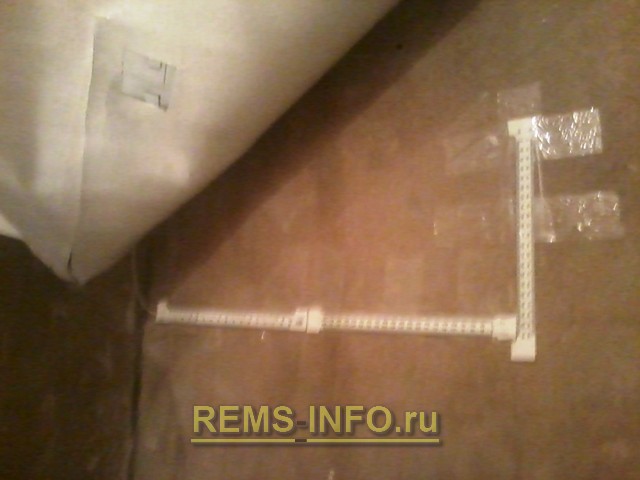
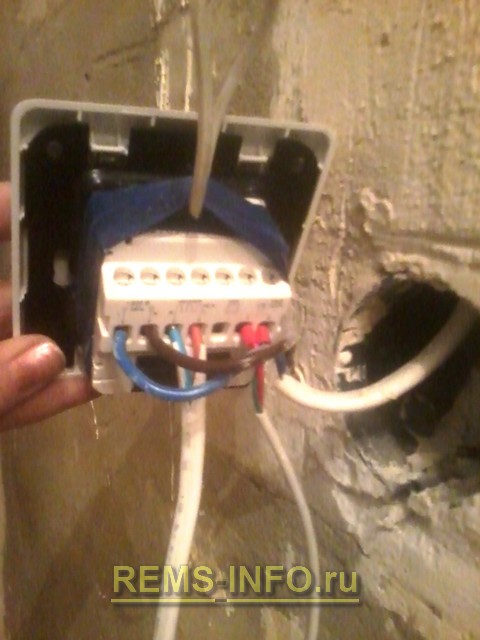
Mounting of the temperature sensor
To ensure the necessary microclimate in the room, use thermostats equipped with a temperature sensor. They effectively interact with cable systems, IR film. The function of the thermostat includes the support of the set temperature, its adjustment, optimization of power consumption. Depending on the modification, the functions of the device can be varied.
The principle of connecting the thermostat is the same for any system. We will consider the features of mounting a temperature sensor for heating mats.

One thermostat is able to regulate the temperature of several heating mats simultaneously. Connect the cable systems in parallel, the limiting current must not exceed 16 A, which corresponds to 3600 Watts at 230 V
If the total power of the mats is greater, additional equipment is required for the installation of the thermostat in the form of an input automat, an RCD, a power relay, a protective circuit-breaker in the direction of a special thermoregulator.
To install the controller, you must perform the work in the following order:
- create a special hole in the wall for mounting the box;
- to cut a hole in the wall to install a power wire and create a hole for laying the connecting channel;
- to make installation, adjustment according to the instruction;
- place the sensors in a corrugated plastic tube with a diameter of 16-20 mm.
The tube must be sealed at one end to protect the wires from ingress of solutions, water. From the opposite end, the tube is placed in an installed box.

The permissible bending radius of the wiring is not less than 5 cm. The tube with the sensors is fixed to the floor. It must enter between loops at a distance of at least 20 cm.
It is important to remember that during installation, you can not shorten the heating cable, replace the supply wires, make corrections to the design of the thermostat, carry out repairs and installation with the power supply switched on.
Principle of calculation of floor systems
Before choosing any floor system, it is important to calculate the power of the heater, determine its required length.
To do this, calculate the heat loss of the loggia. Through the window openings there is a lot of thermal energy, so to ensure a temperature of +20 - +23 degrees is quite problematic, especially in the winter season. Therefore it is recommended to install heating equipment in the heating mode.
Before installing a warm floor system on a loggia it is important to pre-heat the room
The recommended temperature of heating mats, cables or infrared films is +26 degrees. This mode is suitable for heat-insulating parquet floors. If a tile, marble or other heat-conducting coating is used as the coating, then the recommended temperature of the cable is + 28- + 31 degrees.
Usually for loggias you need 160-180 W per m 2 for heating and 200-220 W per m 2 for heating mode. Given these recommendations, you can calculate the required cable length, stacking step, system power.
For example, a loggia has an area of 2 m 2. The flooring is a tile, the screed is not planned. Let's take the heating mode, for which 200 W per m 2 is needed. Next, we define the heating area. It is calculated by the formula:
S gr = S total -S pr
Here S pr - the area occupied by cabinets and other furniture. Let's say that the area occupied by furniture is 0.5 m 2. Then
S gr = 2-0.5 = 1.5
The heating mode is selected for the loggia, therefore the required power of the cable is 200 W per m 2.
If the screed is not planned, choose a thin cable system that is able to fully meet the layer of tile glue.
Select the system with the required characteristics can be on the tables that describe the characteristics of the equipment.
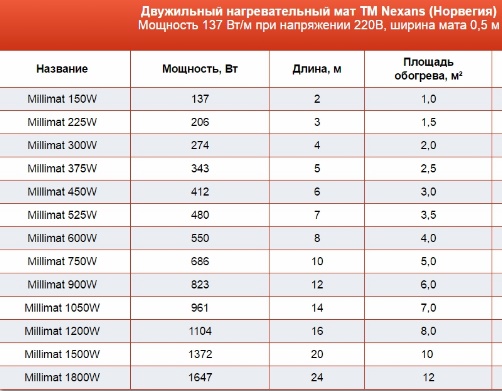
Using specifications mats, you can define optimal model based on individual requirements
Based on the table, by area, we determine the thickness of the mat, its dimensions and length. In our example, the power of the mat is 0.25 kW, and the length is 17 m.
h = (S gr * 100) / L cab
- h - stacking step;
- L cable - cable length in meters.
We substitute values into the formula, and we get:
h = 1.5 * 100 \\ 17 = 8.8 cm
When laying mats or cables, remember that the distance from the walls should be 10 cm.
Useful video about installing systems
The video tells about the features, general principles of installing heating mats:
From the video you can learn about the features of installation and connection of the thermostat:
You can learn about the installation of IR film from the following video work:
Cable systems, IR-film are of high quality, cheap, practical and durable. You can install them yourself without involving specialists. It is important only to choose the right equipment, taking into account the area of the heated surface, the type of coating and other factors.
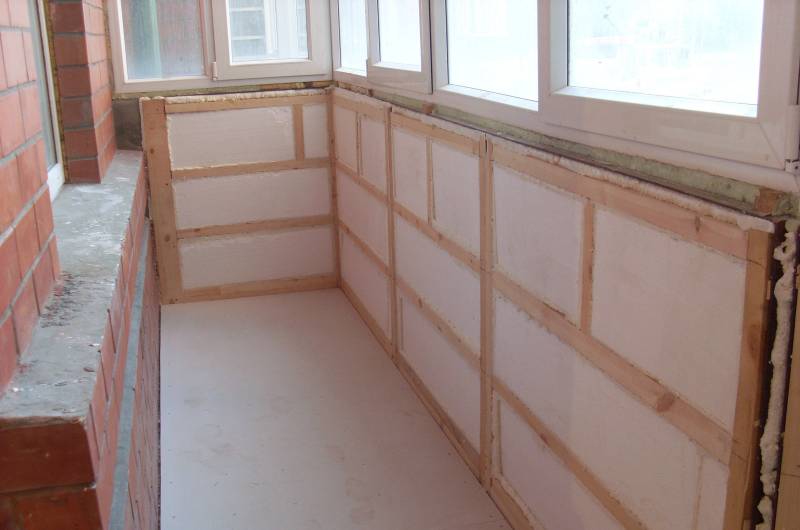
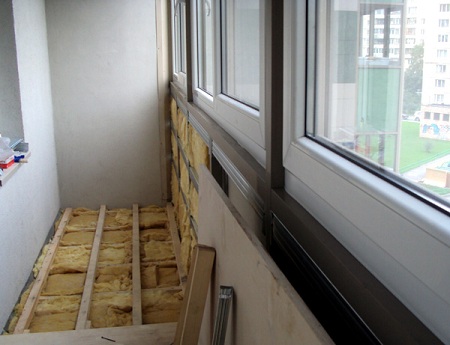
Laying a warm floor on a balcony or a loggia is possible only after full insulation of the floor, ceiling and walls. An important condition is the installation of heat-saving plastic windows. If this is not done, the system of the warm floor will be ineffective. Also, the final goal of the work is determined in advance - that the feet are warm or just for heating the room. In the second case, it is better to buy a heater. It is quite easy to make the floor insulation on the balcony with your own hands. The main thing is to follow the instructions.
Styling Features
Before laying a warm floor it is important to make the right thermal insulation. This stage of work is mandatory in any case. Otherwise, the system will be inefficient. Installation of a heater can significantly reduce costs. The minimum thickness of insulation is 5 cm. Most often used:
- Extruded polystyrene foam;
- basalt cotton wool;
- styrofoam.
The floor of the balcony is usually made of concrete or wood. In the first case, the warm floor is laid on the rough surface, and the top is poured with a screed. In the second case, the system fits between the lags. In both cases, the installation of a warm floor is carried out quickly and without unnecessary effort.

When using mineral wool for floor insulation, laying the vapor barrier film is mandatory. It will avoid getting moisture on the heater from the room.
Water floor from heating
The most widespread are the systems of water heating. They are tie-wrapped hoses. The water floor is connected both to central heating, and to the electric boiler.

Pipes are laid on a heater, and then concreted. Any system is laid on such a system. Lay a warm floor on the balcony with your own hands and you can without the help of professionals. However, this requires thorough preparation.

The only drawback of the system, a lot of difficulties in the process of installation, if the balcony is in the apartment, and not a private house. The process is labor-intensive, and permission of the relevant authorities is required to begin work.

Features of the water floor
Small rooms of balconies are ideal for installation of warm floors. The additional heating system is laid on the insulated surface, which is previously leveled. It is not recommended to install a concrete screed on a balcony because of its large weight.

Thanks to the installation of the system, the level of the balcony floors is compared with the level of the interior rooms. However, you must first obtain permission to redevelop. This will help to get rid of possible problems in the future, if the apartment will need to be sold. The main difference between the water warm floor - under it lay thick insulation.

The first thing to begin with is the diagnosis of the state of the balcony plate. If chips are seen in the corners, it is necessary to weld the reinforcement and reinforce it with concrete. Small cracks cover with cement mortar. If the system is laid down also in the room, the level of the floors is leveled. For this purpose, a cement screed is used. However, before starting work, it is necessary to calculate the load on the balcony slab and compare it with the permissible.
Many builders argue that this method of insulation is more suitable for loggias. Simplicity of installation, relatively low cost and the ability to connect the system to central heating explains the popularity of this type of heating. Over the water system can be mounted even a laminate or stone.
The process of laying the water floor
First create a solid foundation. From the surface of the rough floor remove all debris, the remains of the old coating. If there are any irregularities, a cement screed is arranged.
After preparing the rough foundation, perform the following actions:
- The dew-point is vapor barrier.
- Fold the mineral wool. If under the concrete slab there is an unheated balcony of neighbors from below, in the cold season the water heater can freeze.
- Lay the waterproofing layer.
- On the base, using a special fastener, mount the heater tube. This helps to ensure its stability. For reinforcing a grid of 5 mm thick rods is used. The cells must be 150x150 mm in size.

The water floor can be connected to the central heating. To do this, it is necessary to connect the circuit up to 20 m² to the flow and return, to install a valve having a "unibox" adjustment on the return. The latter completes the circulation process when the floor is heated to the set temperature, and turns on after it has cooled down.
Heating cable
Laying an electric warm floor on the balcony is quite difficult. In the process of laying such a warm floor you need to take into account a number of subtleties. When choosing this option, it is worth remembering that the floor will rise by 15 cm. In addition, the execution of the coupler takes quite a lot of time. In the course of the work, the following actions are performed:
- Dismantling of the old base, leveling the surface.
- Warming of walls and floor with foamed polyethylene with foil side up. Gluing joints with adhesive tape.
- On the perimeter of the base, glue the damper tape, which will protect the floor from deformation during the temperature expansion of the screed.
- To fix on a heater a grid for stacking a cable.
- Lay the cable in advance by calculating the pitch. You need to orient yourself to the area of the room. Recommended power cable floor heating - 250 W / m².
- Then you need to install a thermal sensor and a temperature controller, call the circuit to verify the correct connection. Photograph the finished system. It is necessary to always know exactly where all the elements of the system are.

After this, it is necessary to prepare the mortar and pour the screed into which the warm floor will be placed. Its thickness is usually 4-5 cm. After complete hardening of the solution, it is possible to proceed to laying the finish coat.
Important! When laying the heating cable of such a warm floor system as a floor covering, laminate and parquet board can not be used.
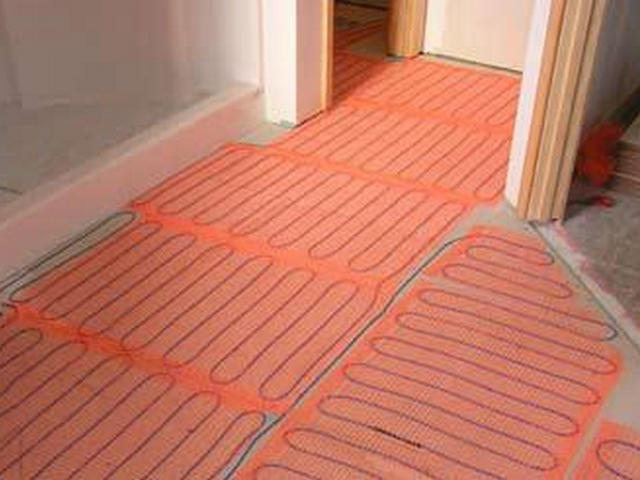
Heating mats
The cable is laid in this type of warm floor in steps of 5 cm, each heating core is made of a material that has a high degree of resistance. The main advantage of the system - high-quality mats have a low electromagnetic field, which increases the safety of such a warm floor for a person.
Other advantages of the system:
- the thickness of the floor increases insignificantly;
- if necessary, the mat can be cut into several pieces - it is important not to damage the cable;
- heating mats are a ready-made structure that is ready for installation.
You can install the underfloor heating yourself. The concrete substrate is used as a substrate. It is thoroughly cleaned from dirt and dust. To ensure a better coupling, the substrate is primed.
Before performing the installation of a warm floor, the mats are checked for operability using an ohmmeter. Next, they will equip the room for the thermostat. For wires in the floor and the wall, grooves are made. The temperature sensor is installed directly in the floor. It must not be placed near the heating cable.
After carrying out all the actions, you can start laying the mats. They are placed directly in the adhesive mastic under the tile. After the work is finished, the mats are working.
Infra-red floor installation
To install a film floor, ready-made kits are used. It includes:
- film;
- thermoregulator and temperature sensor;
- wires;
- insulation.
The minimum film thickness for the balcony is 200 W / m². When laying a film, it is important to observe several conditions. For example, they need to be placed 5 cm from the walls. All live busbars should be located on one side. Cut the film only in the places designated for this. The film must be faced with a matte side up. It must be ensured that the end of the corrugated tube extends between the heating elements.
Power cables must be connected according to the instructions that are provided with the film. First, the knives are separated by the knife, then the contact is pressed, and then the wires are connected. Each contact group is closed with an insulator.
For a floor of a loggia such floor approaches ideally. It is easier to pack, and the requirements for operation are much less. Leading wires are output in a special groove in the wall. After that, the system is checked for operability, and then covered with a polyethylene film to protect it from moisture penetrating from the side of the room. To lay polyethylene it is necessary lapping, fastening on joints with a building scotch. In this case, the balcony can be laid parquet or laminate.
What kind of floor to use for your balcony depends on its location, such as (insulated or remote), as well as the financial possibilities and purposes of creating heating. First of all, choose the type of system - water floor or electric (cable, mats, film). Finishing of the floor is also taken into account. For example, under a laminate it is impossible to lay the cable system. Under any cover lay water system heating.
Who invented to remodel balconies in winter gardens, mini-gyms, workrooms for certain is not known. But this man, probably not long puzzled over where to place the exercise bike, pots with figs and a computer. A small piece of the apartment, taken out of its borders, may well become a favorite place, warm, cozy, comfortable. If you decided to radically change the functional purpose of your balcony, then you have to spend a lot of effort to turn this islet of cold into a warm oasis. Putting reliable double-glazed windows, having warmed walls and a roof, you, certainly, will achieve certain results, however, the floor under legs will still be cold. The only solution to the problem will be the installation of a heating element, which is ideally suited convectors and radiators, and an additional installed system of floor heating on the balcony will create a comfortable and cozy atmosphere.
A warm floor on the balcony is an incentive for original ideas
On the pluses of the warm floor on the balcony you can talk endlessly. This is the opportunity to use the system as a basic heating, and to save space for an already small balcony, and ease of installation (for a film floor), and a bunch of pleasant moments. However, even such a seemingly positive heating system on all sides has several disadvantages.
- Expensive. It is much cheaper to buy an oil radiator or a "breeze" type heater, but calculate the electricity costs that will increase by about two to three times with the onset of the first autumn frosts and you will give 1000-1200 instead of the usual 300-500 rubles. And now attention! The system of the warm floor consumes about 3-4 rubles a day. Total, for a month your counter will wind only 100-120 rubles more than usual. Saving is obvious!
- Complexity of installation. This item refers to the cable system of warm floors, however, with a competent approach and skillful hands growing from the right place, it is not difficult to install the structure. However, the time will still go away enough, because you will have to make a screed, and this will take more than one day from life.
Features of installation of a warm floor on a balcony
The process is slightly different from its installation in other premises of the apartment. The fact is that the walls of the balcony do not have those characteristics of strength and thermal conductivity that are inherent in the walls of the house, so before installing a warm floor, you will have to warm the balcony.
To do this, it is necessary to lay a heater not only on the side walls, but also on that part of the wall that adjoins the balcony, and also on the floor, whereby it is desirable to cover the floor with a vapor barrier material, and glue all the joints between the walls and the vapor barrier surface with metallized tape. Thus, your balcony will turn into a real "thermos", which keeps heat and does not allow its leakage.
Before installing a warm floor you need to insulate the walls and the concrete base
And now, in more detail about the features of mounting different types of electric underfloor heating (it should be used for the insulation of the balcony).
Installation of cable heating system
Cable heating sections are used in the presence of a screed with an obligatory layer of insulation and waterproofing, otherwise the bulk of the heat generated by the system under the floor will go down and actively heat the ceiling to your neighbor.
Cement-sand screed should have a thickness of at least 45 mm, and the heating cable in it should be located at a depth of about 30-35 mm from the top edge. Finish work best tile tiles - it is characterized by high thermal conductivity, which means it will instantly heat up, giving your heat to your legs. However, to take advantage of all the possibilities and delights of the cable floor heating system, you will be able to only after three to four weeks - this is how long it will take the screed to dry up completely.

Cable floor heating - long and expensive
Mounting of the system based on heating mats
This system is advisable to use in the event that the use of cement-sand screed is not possible.
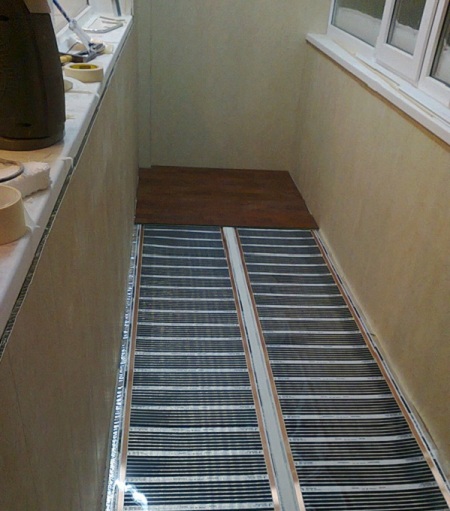
The heating mats can be placed directly on the adhesive composition intended for laying the tile. Substrate here will serve as a leveling layer, the old ceramic coating, concrete, etc. After laying the last tile floor is ready for operation - do not wait a day, but you can immediately enjoy the warmth and comfort.
True, the system has a couple of drawbacks - it can not accumulate heat, which means that it can only be used as an additional source of heating and has a fairly high price if we compare its cost with the cost of a cable floor heating system.

The tile can be laid directly on heating mats
Installation of infrared film floors
- The easiest to install. Put the sheets, fixed them with tape and ready. The basis of such a system are heating elements that radiate heat rays. They are able to warm up the floor, walls and objects, and they, in turn, give heat to the environment without heating the air. Thus, inside the room is created not only a comfortable temperature for a person's stay in it, but also ideal conditions from the point of view of air purity and its hydration.
Infra-red floors are compatible with all types of flooring: laminate, tile, parquet, linoleum and even carpet.
Film warm floor - an ideal way to "warm" the balcony
With a warm floor system, you can realize your ideas: turn an old, trashy balcony into a gym or cinema, a game room or a study, a greenhouse or a bar. Whatever the ideas and dreams, the main thing is that they are embodied in life.
You will not be surprised by the conversion of the balcony into a study or a cozy recreation area. This idea is increasingly used by the owners of not only new buildings, but also old ones apartment buildings. When building a new room on a loggia you will need to do it yourself, because builders, as a rule, do not even bring electricity here. Next, we will tell you how to make an electric floor heating on the balcony with your own hands, by providing a few small instructions with video examples!
Heating cable
The most laborious process is laying the heating cable on the balcony or the loggia. If you decide to do just such an option of electric underfloor heating (as in the photo), then note that the height of the room will be reduced by 12-15 cm (because of the screed and insulation).
Also, you should understand that installing the heating cable and pouring the screed under it will take a lot of time. If you understand all this and still decided to make the heating of the balcony with a cable, then follow the instructions below:
- Remove the old floor covering and level the surface under the screed.
- Make the insulation of the floor and walls using foamed polyethylene with a foil coating. Joints must be glued with a metallic tape.
- On the perimeter of the balcony, glue the damper tape, which during the thermal expansion of the screed protects the floor from deformation.
- On the insulation layer, fix the mesh or mounting tape to fix the electric warm floor to the loggia.
- Fix the heating cable with the same pitch, which you need to calculate, focusing on the area of the room and the recommended heating power - 250 W / m2.
- Install the thermostat and the temperature sensor in a suitable place.
- Call the chain to make sure that everything is properly connected and working.
- Take a picture of the finished electrical heating system so that if you need repair, you know exactly where it is.
- Prepare a cement-sand mortar and fill the screed with a thickness of 4-5 cm.
- When the solution has solidified completely (in the summer it is enough to wait a few days), you can proceed to laying the tile or linoleum flooring.
If you decide to make an electric warm floor on the balcony using a heating cable, consider - laminate and parquet board in this case can not be used as a floor covering.
Have you decided to insulate the balcony on your own? The film infrared warm floor on the balcony is an excellent solution to your question. In just two hours without special skills and with a minimum set of tools you will make your balcony even more cozy.
For a long time there was a desire to equip a balcony not only for storage of a bicycle, sledges and tools, but also to try to use it with greater efficiency. Especially when you consider its area - about 5 m2, almost the whole room! On the warmed balcony you can easily arrange a winter greenhouse, a playroom for children or a private office. I will share my own experience of how to arrange a film warm floor on an ordinary balcony.
I will make a reservation at once - all work is executed by female hands that speaks about accessibility of new technologies even to non-professionals (education at me humanitarian). So do not judge strictly, men!
From a variety of options insulate the balcony and make it cozy even in winter, stopped on the infrared thermal film floor, as it is distinguished by its energy efficiency, ease of installation and acceptable price policy.
Consumables
From consumables for installing a warm floor film on the balcony you need:
- ordered cloth through the online store of the film floor of the required length (widths 0.5, 0.8, 1.0 m).
- thermoregulator (the sensor must be included to measure the floor temperature)
- heat-reflecting substrate (polyethylene with a mirror surface)
- copper two-wire wire, calculated from the length of the edge of the film floor to the thermostat (need a cross-section of at least 1.5)
- set is insulating (sold on the Internet in addition to the film floor).
Laying the infrared warm floor on the balcony
Installation begins from the floor of the balcony, which should be maximally leveled (I have a chipboard and foam under it for insulation). Uneven flooring can cause the film floor to break through in the future.
At the first stage of work it is necessary to lay the temperature sensor of the thermostat. To do this, cut the furrow on the floor surface, into which we place the thermal sensor, fixing it. The sensor should be located directly under the heating elements in 15-20 centimeters from the edge of the film. The sensor contacts are connected to the thermostat.

Thermal sensor.
The sensor in the shtrobe is better closed from above with a dense material (used an old plastic ruler).
At the second stage, we lay the heat-reflecting substrate across the entire floor area. Do not forget to cut a rectangular hole above the temperature sensor so that the substrate does not interfere with the proper operation of the sensor. On the perimeter, the substrate is fixed with a double-sided adhesive tape.

Slot in the substrate above the temperature sensor.
We proceed to laying the linen of the warm floor
Note that from the edge of the film floor to the walls of the balcony should be a distance of 10-15 cm. It is forbidden to lay the film where you plan to install furniture.
We put the heating film down with copper tires and fix the edges with adhesive tape to the substrate. We connect electric contacts. If you are mounting several strips of film, the connection to the mains is done in parallel. For connection we use the clamping contact, from the insulating set. On the one side of the floor cloth we make the connection to the wiring, on the other - the edge of the copper bus is insulated. The contact is inserted by one half inside the film (in the area of the tire the film has a gap between the layers), and the second one from the tire side is pressed. For crimping contacts we use pliers.
Connect copper wire to the contacts and insulate them with insulation from the kit. We lead the wires to the thermoregulator. The wire is attached to the substrate with the help of a stationery tape.
It is important at this stage to check the operability of the entire structure (by connecting directly to the power grid).

Insulated contact.
Insulated copper busbars of the second edge of the blade.
All linen of the warm floor for additional protection is covered with a usual polypropylene film and we fix it with adhesive tape.

We fix polyethylene tape.
At the final stage, we connect our film warm floor to the thermoregulator.
Do not forget to disconnect the power supply before installing and connecting the wiring! You will need to connect to electricity (220 volts).
Thermoregulators are built-in and fastened to the surface. So, fasten the thermostat and connect. All connections are made according to the scheme that is attached to it.
We switched on, adjusted the thermostat, felt ... Heat !!! Working!!!

It took about 2 hours for the entire installation process. So, it is quite possible even for a woman to independently lay such a curiosity as warm floor heating on the balcony and make another corner of your house a bit cozier.