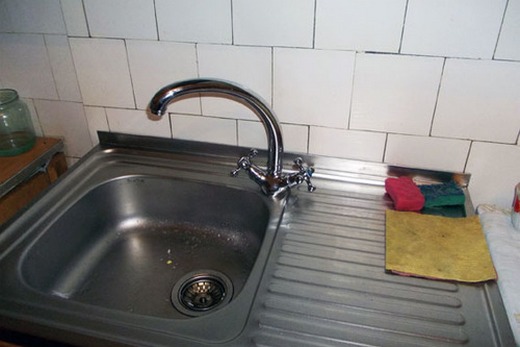
Connecting the mixer. To install a mixer in the kitchen, you will need. Tools and materials that are needed for work
We are so accustomed to the benefits of civilization that we probably do not even imagine a modern kitchen without water. And, if suddenly the mixer suddenly broke down, or in the course of repair it is necessary to change it?
In order not to turn this unpleasant problem into a catastrophe of the "universal" scale, we wrote step-by-step instruction on how to install a faucet in the kitchen. It will help correctly and reliably replace or supply a new mixer.
Adhering to the simple rules written in this article, you will save on two things: the waiting time of the specialist and the money that will have to be given to the master for his work. Of course, there are kitchens with such a twisted layout that it is simply impossible to approach the crane - there will have to be spent.
Select mixer
How to start the installation? First of all it is necessary to purchase suitable device kitchen faucet.
Here it is necessary to consider the following nuances:
- The mixer should fit both under pipes, a sink, a bowl, and to correspond to your wishes in the aesthetic plan.
- It should be durable and easy to use: optimal height, spout and must.
- Material. A quality mixer can only be found among metal models (most often brass, but maybe an alloy). Undoubtedly, there are ceramic and plastic cranes, but the material itself speaks only of the decorative nature of such products, and not its durability.
Types of mixers
Types of mixers
Knowing the basic requirements for kitchen mixers, let's look at their varieties. I must say that each of them has its own characteristics.
And if you are aware of this plan, you can choose the best mixer for your needs.
- Valve device for a water faucet. Old good designs, to which we are so used. The faucet faucets are the gusak itself of the tap and branches with valves for adjusting the water temperature. To date, there are single-sided and two-ventilated mixers. The first are practically not used nowadays, since they do not differ with special convenience. But the two-valve models are very convenient and practical.
- Ball Mixers. They consist of a single lever and a ball module, which allows the lever to move sideways, upwards, to start up water and mix it. Ball structures are more accurate and comfortable in operation, since it is not necessary to tighten the valve tightly - you just need to lower the lever with a light push and the water supply will stop.
Note! This type of kitchen faucet has one minus. The ball module installed in the mixer is very sensitive to hard water and salts contained in it.
Therefore, over time, the lever will turn with an unpleasant raspy sound. Durability to such a mixer can provide a quality filter for water purification.
- Automatic Mixers. A real miracle of technology! The water supply starts when hands are brought to the gander or when the button is pressed. The water temperature is also adjusted by hands, as in the photo below.
Another plus of this device is that if the pressure in the pipes drops, then the mixer will adjust it and you will not get a sharp flow of hot or cold water.
But nevertheless, the automatic models do not differ in practicality. If the pressure in the pipes drops very much or one of the types of water (cold or hot) is absent, the automatic mixer will cease to work at all. Well, the price of such models is not always available to ordinary citizens.
Preparation before installing the mixer
Preparatory actions are very important, so that then you do not have to spend doubly (for example, on new kitchen furniture, floor covering or the call of the same master).
- All surfaces that can be accidentally damaged by tools, mounting parts of the mixer and unexpected water flow, should be covered with a cardboard or a film.
- Then follows the preparation of all the necessary tools and materials:
- Several adjustable wrench sizes;
- Pliers;
- Two drain hoses;
- Two special pins (represent a kind of rod with external thread, and has a connection - a threaded hole and a nut);
- Plate with round gaskets with a hole in the middle (necessary for clamping) - 4 pieces;
- The same plates of dense rubber for sealing - 4 pieces;
- Support plate (preferably of metal, for a more secure attachment).
Important! Drain hoses should be chosen competently. Before buying them, measure the required length. Otherwise, you can purchase too short or too long hoses.
Short - do not reach the desired attachment point. And the long ones will bend under the sink, which is fraught with their rapid wear and unexpected unpleasant "surprises".
- Without fail, we shut off the water. It's important not to forget to do it! Otherwise, you can get burned if the flow of hot water rushes while dismantling the old mixer. It is better not to take chances.
- The sink should be pushed as far as possible, in order to expand the space for more convenient work.
- Then it would be good to check the new mixer for serviceability. For this we test the tightness of the lower fastener with our own hands (it holds the entire structure). Also it is necessary to check the tap: for this, turn it to the maximum allowed angle - it should not be too tight or, conversely, hang out. If there is one, this is a marriage in the product.
Well, if the mixer fits tight enough, and the mount does not scroll, then you can continue the installation.
Sanitary repairs for owners of houses and apartments cause constant headache and loss of money due to periodic purchases of consumables and hiring plumbing.
And since the main problem is the process of restoration of water-reinforcement valves and replacement of sanitary equipment, we will consider in detail how self-installation mixer on the sink without the need for hiring workers in housing and utilities and extra money costs.
Types of pipes to create a flexible and rigid connection of the mixer with water-reinforcement.
Depending on the quality of the required connection, the size of the shell, the water head and the financial possibilities, three types of connecting pipes are offered for sale:
- Chrome-plated brass tube is a rigid and high-quality connection using a chrome-plated copper or stainless steel pipe. The installation requires precise and accurate bending, which takes a lot of time and effort, but in return a high-quality and most stable connection is obtained with the possibility of placing in the cavity of the wall or in concrete.
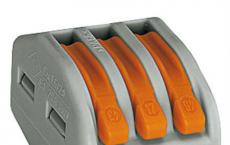
- Flexible bellows hose - (cheap and most affordable type of connection) metal hose made of stainless steel, without rubber internal inserts, but completely flexible due to the tube formed in the form of an accordion. It is widely used to create a flexible mixer connection with water-reinforcement.
- Metal-plastic heat-resistant pipe - allows to create connections of medium hardness, but with the need to use additional transitional needles for a metal-plastic pipe and end-pieces with internal threads. This type of connection is used less often than others and only when absolutely necessary.

Check mixer assembly before purchase
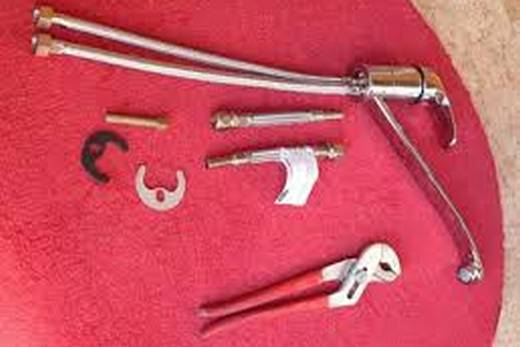
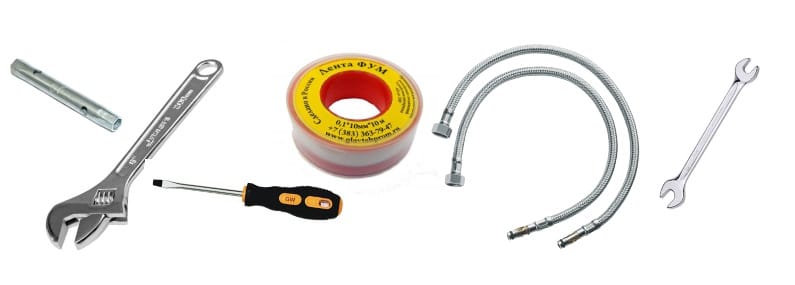
A set of tools and materials
Since it is necessary to install the mixer on the sink with high accuracy and proper quality, for the installation work you should prepare a standard set of tools for plumbing:
- Large and small pliers.
- Adjustable and gas keys.
- Screwdrivers different types of and size.
- Hexagons.
- Carob wrench 12 × 14 mm.
- Vinyl tape, MUF tape (Fluoroplastic Universal Material) or patch.
- Roulette.
Perhaps additional tools may be needed. Therefore, before buying and installing, you should study the installation instructions of the manufacturer of your mixer and proceed from this data to prepare an accurate set of tools and materials.
Preparing for mounting the mixer
Before carrying out installation work, measure the distance between the water valve and the mixer mounted on the sink. To do this, install it in a special shell socket and lightly lock it. Using a tape measure or a measuring tape, measure the distance between the connecting hoses, the flexible connection of the mixer and the threads on the water pipe taking into account all angles and future bends.
Note!
In any case, installing the mixer on the sink requires knowing the total distance between the components and further adding a small margin of length.
On average, you need to buy tubes or hoses 50-100 mm more than the exact size for a more comfortable fixation. If you are in any doubt, then at the outlets experts can advise and help you to choose the material and length of the connecting pipes necessary for more accurate fixing.

The quality of the parts should not be in doubt
Mounting the mixer to the sink
The purchased mixer and its components must first be folded together in the order in which they will be attached to the sink. Thus, you can avoid ridiculous mistakes during installation. The entire system of the standard mixer is assembled and installed on the sink in this order:
- With the help of special nuts and rubber gaskets, the connecting tubes are screwed onto the mixer and fixed in the working position. For a denser connection on the thread, you can rewind a few packs or MUF tapes.
- A rubber sealing ring is placed at the base of the mixer in a specially designed place (groove). It helps to avoid water leakage under the shell bottom.
- Pipes are passed into the opening of the shell, and the mixer is installed in the required working position.
- From the bottom of the sink to the bottom of the mixer is connected a gasket and a special clamping pin in the form of a crescent. After this, the final fixing of the whole system is carried out with the bolt and nut and adjustment of the mixer in the working position.
But that the installation of the mixer on the sink by its own hands was complete and did not lead to undesirable consequences, the whole system should be completely sealed and carefully fixed in the place intended for it. If the diameters of the connectors do not match, you need to install adapters or replace the mixer with a suitable one. Also, you can not pull or loosen the connections, you need to carefully twist everything by hand and tighten a little with a wrench or a wrench.

It is necessary to prepare the water supply
Pipeline preparation
Before starting work, inspect the pipeline for cracks and rust on the thread surface. In the presence of damages, it is necessary to carry out appropriate repair and repair work. If the diameter of the pipe is different from the diameter of the mixer tubes, adapters are used for connection, which are sold in construction shops and are selected according to the required diameter.
To increase safety when a mixer breaks down, a valve or a valve is installed between the pipes and the pipeline for emergency water shut-off. It can be connected using the thread of a pipe and a valve, increasing the tightness of the MUF tape or the stick, twisting and fixing it in the required position. To check the tightness, close the valve and open the water supply from the pipeline. In the case of a quality connection, you can proceed to install the mixer.
Mounting the mixer with a soft joint
When installing with a soft joint, use a flexible bellows or rubber hose, which is easy to bend and can be installed in places with sharp bends of the surface and when it is impossible to apply a rigid connection. Since it is necessary to install the mixer on the sink correctly and without errors, in the beginning hoses are connected to it and only then they are connected to the water-resistant fittings - to the left hot water, and the right one is cold. Connect both tubes with valves with union nuts and sealant in the form of a pakli or MUF tape, after which everything is tightened and the tightness of the system is checked.

Secure the lining
Mounting with rigid connection
Metal-plastic and metal tubes are bent and adjusted before fixing the mixer to the sink. At the same time, there should be a suitable length, and bends small and neat without sharp corners and distortions. Connections as a result should not have excess tension or pressure, this is fraught with consequences in the future.
Note!
It is possible to form microcracks in places of strong inflection and further complete destruction of the walls.
The finished tubes are connected to the mixer as indicated in the previously described method and only after that the mixer is mounted to the sink. Upon completion, the pipes are connected to a water pipe and the entire system is checked for leaks.
Many may doubt their abilities and capabilities, but if you take into account all the nuances and follow a simple instruction, then the question of how to install a faucet on a sink with your own hands will not bring problems and complexities, and the result will surpass any expectations.
Mounting the mixer on the sink video:
According to the statistics of the company "Your Home master"It is the kitchen faucet that is most prone to wear. Everyday use during cooking, sudden temperature changes and switching from hot water to cold - all this does not add life to the mixer in the kitchen. Thanks to the company "Your Home Master" it became possible to replace the mixer in the kitchen at an affordable price.
The cost of replacing the faucet in the kitchen
As a rule, the mixer in the kitchen is located in the technological hole of the kitchen sink and is pulled to it by one or two nuts from the bottom. If you have access to the space under the sink, the cost of replacing the faucet in the kitchen is:
- 500 300 rubles for dismantling the old mixer,
- 1200 900 rubles for installing and connecting a new mixer.
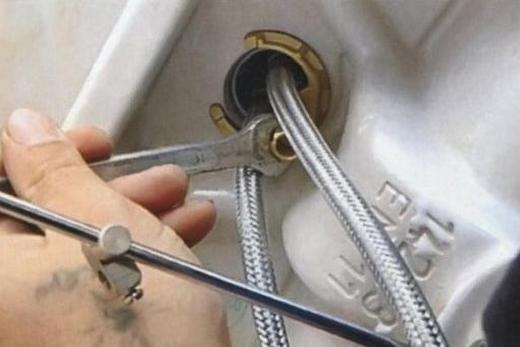
First of all, it is necessary to block the flow of incoming water and unscrew the fasteners of the flexible mixer feeder to water pipes. Then dismantle old mixer. To do this, you need access to the pad space to successfully unlock the fasteners. If access is difficult or impossible, to the price of the mixer installation work in the kitchen it is necessary to add the cost of dismantling the sink, and only then remove the mixer from it. Then the plumber of the company "Your Home Master" will install a new mixer, fasten the flexible liner "herringbone" to the mixer and water pipes.
The final stage will be the control of leaks in all water connections.
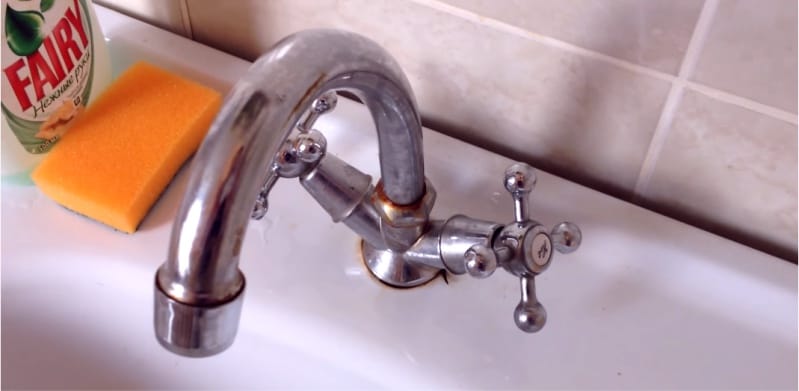
Repair of kitchen faucet
Not at each malfunction it is necessary to replace the mixer assembly, sometimes it can be repaired. If the mixer in the kitchen leaks, you can try to fix it, replacing only the plastic or ceramic inner cartridge. In the presence of leakage from the connection of flexible pipes with pipes, it is possible to replace the rubber or fluoroplastic gasket, and the leakage will cease. To successfully perform the repair, you will need tools and consumable sealing material, which is always with the plumber of the company "Your Home Master".
HideEvery second at least once in his life faced the problem of replacing or installing a faucet on a sink. And the majority in this situation had a question, but how to change the tap in the sink with your own hands?
It turns out how to remove the faucet from the sink, and install a new one on the strength of any person who does not necessarily have special skills.
How to install a faucet on a sink - the general course of work
Before you start installing the faucet on the sink, you need to determine the connection method that will be applied. - using flexible hoses or a variant with a rigid connection. Which way, depends on the variety of the crane itself. When buying it, you need to consider the dimensions of the shell, so that the water jet does not splash with a small bowl or a short spout.

Flexible hoses for connecting the crane to the main water supply
And also should have such tools:
- Large size pliers,
- The gas wrench,
- Flat and cross screwdrivers,
- Horn key (12 x 14),
- Hexagons,
- Vinyl tape,
- Adjustable wrench.
A set of tools for fastening the faucet to the sink
It should be taken into account that exclusive and expensive models of cranes have installation features, therefore it is necessary to study the installation instructions from the manufacturer in advance.
How to fix a faucet on a sink - a flexible connection
To protect the external coating of the crane from various mechanical damages during its installation, the tape is wound on it.
And also during the installation you need to "try on" the installed crane more than once. Repair is carried out according to the following sequence of installation of the crane on the sink:
1.
So take off the old tap
2.- Unscrew the clamping nut using a key, and after the screwdriver, fasten the screw.
- Remove the tap and place the installation of a new product cleaned.
Pre-put on the gander o-ring and remove the nuts from the hairpins. 2) Insert the liner. Bottom studs are attached, while tightly fitting the hermetic ring.
5.1) Push the connecting hoses into the special hole in the sink.
Installation of connecting hoses
2) Install the crane in its place.
Installation of the new crane is complete
6. 7.
Additional fastening from the bottom of the sink
8.Important!
Use the tool after the faucet has been installed manually. That is, the key is brought to the "final touch", which is half the turnover.
- Namely: to the left hose - hot water, and to the right - cold.
- Nuts are tightened manually, and after - tighten them with a wrench. Important! The hoses should not stretch, twist and bend over!
- For strength on the threaded connection, wrap the foil tape or the linen (linen seal). Winding is wound in the course of the nut thread, making a minimum of about 14 turns.
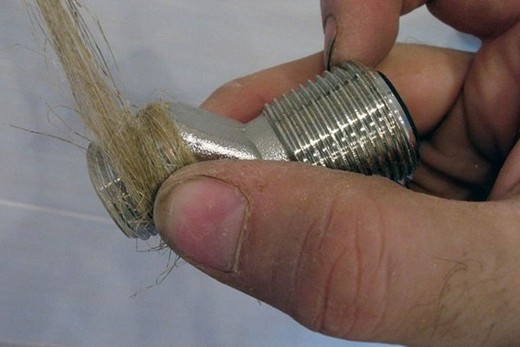
Накрувка пакли на резьбу
10.
A sample of mounting a faucet with flexible liner
How to screw the faucet to the sink - a rigid connection

Scheme of rigid connection of the crane to the sink
Most often in practice it turns out that flexible hoses of standard manufacture (30 cm) do not "reach" to a cold or hot inlet. In this situation, a fitting-nut of the appropriate length is the best alternative to a flexible connection.
Installation of a crane on a sink with a rigid connection provides a longer period of operation without the need for repair. And also has its own characteristics.
The preparatory stage is the same as when the faucet is fastened to the sink using flexible mounting.
After work is carried out according to the following algorithm:
1. For full access to the sleeve (collet), twist the corner needle into one of the entries in the tap so that it is directed at the most free place under the sink. This further facilitates the connection of the pipe.
2. Perform a hydraulic seal between the crane and the sink with a gasket.
3. Install the valve in the mounting hole.
4. Seal and reinforce the bottom of the faucet using another gasket.
5. Screw the straight needle to the stop.

Installed needles in the tap
6. Determine the length of the feed pipes and leave the required size. Superfluous cut with a special tool for cutting pipes (pipe cutters). By the way, the metal-plastic perfectly takes the necessary form when bending.
7. Pipes are fixed with clamping sleeves using the necessary keys.

Rigid connection is more durable, flexible is easier to repair
Before you screw the valve to the sink or remove it, you need to decide on the interior design of the room. First you should pick up the sink, and after the tap to it. Correct installation of the faucet on the sink is a guarantee of convenience in use, long trouble-free operation, comfort and reliability.
So, you bought a mixer to replace the old one or to equip the sink with a new headset and decided to take on the installation yourself. On the one hand, it is very easy to connect and place a mixer on the sink with your own hands - anyone can do it. On the other hand, even having some experience, but not knowing the basic rules, you can do the work poorly or even damage the product at all, for example, knocking down the carving, bending the carts, etc. Another reason why you still have to go to the plumbing - is the lack of a set of plumbing tools. But this problem is completely solvable, because you can always ask something from friends.
We tried to explain as clearly as possible how to install the mixer in the kitchen with our own hands reliably and correctly.
List of necessary tools and spare parts
Before you start to install kitchen equipment yourself, you need to prepare and buy everything you need. You will need:
- Sealing tape FUM - it is better not to take linseed, because it swells from the water, and then it will be difficult to remove the piping;
- Horn key for 10 or 11;
- Tubular key - is needed to tighten the hard-to-reach nut in the process of mounting the mixer to the sink;
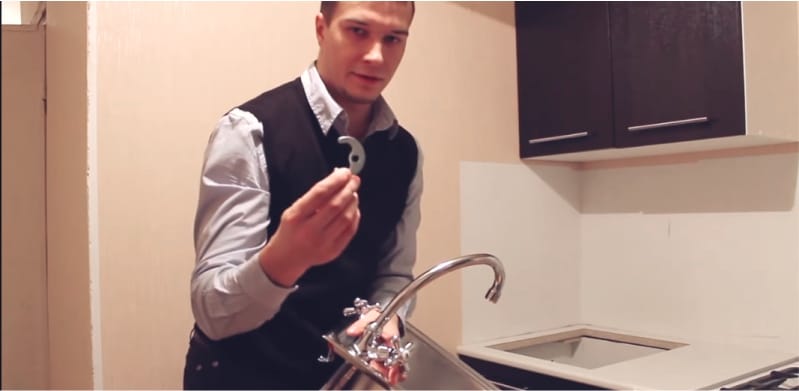
- Mounting kit - it should have rubber sealing rings, that is half-washers (2 pcs.), One horseshoe-shaped metal half-cup, a stud (1 or 2) and a nut. Such a set is attached to the mixer, but if you wish, you can buy a thicker and stronger seal ring, as not always manufacturers include quality gaskets;

- Pliers, small key, screwdriver - sometimes they are also needed;
- Also useful rag, basin and a flashlight, so you can see everything;
- And finally, the main thing - 2 plumbing pins - are attached to the kit, but it is better to buy others, since the factory ones are often short and made of silumin;
Perhaps, on podvodkah it is necessary to focus attention. Keep in mind that:

- Submarines need such a length that they are not wrung, but bent in the form of a semicircle, that is, they should not be too long or, conversely, short in the tightness. Most often the length is 86 cm;
- If the factory supply is too short, it is better not to try to increase it, but buy a new one;
- Also, do not buy silumin hoses, especially if you bought a siluminamine mixer - at least the liners must be reliable;
- Installation of flexible sub-assemblies is easier than connecting rigid ones, but they are considered less reliable, so it is better to install them together with tap-offs;
- In the set of leaks must be gaskets;
- Replacing the old faucet in the kitchen most often involves replacing and old leaks, because they also wear out.
Step 1. Dismantling of the old mixer and preparation for installation
Before installing the faucet in the kitchen, you need to cut off the water (do not block the riser) and on the bottom of the sink, just in case, put a rag so that small parts do not fall into it, and large ones do not damage.
Of course, replacing the faucet in the kitchen requires dismantling the old faucet. For this you need:
- First, disconnect the old hoses from the pipes of cold and hot water with hands or a carabiner wrench. Do not forget to put a basin underneath them and drain the rest of the water, after which the threads of pipes must be cleaned clean.
- Then with the help of the tubular key, it is necessary to unscrew the clamping nut on the hairpin (or two studs), which fastens the mixer to the sink (directly below it). When you unscrew this nut, the metal half-washer is removed.
- Now you need to pull out the mixer together with the hoses from the sink hole. Well, that's all, you can proceed to the next step.
Step 2. Assembling the mixer and the leaks
The installation of the mixer in the kitchen begins with its assembly, that is, with the connection to flexible hoses or rigid carts.

- If you have a double-acting faucet as in the photo on the right, then, most likely, you first need to collect it. To do this, insert the spout (tap) into the body to the restricting ring and manually, without too much tightening, screw them to each other.
Now take the FUM tape and wrap it around the end of the line.
- Winding the tip of the tip is not necessary, since the hose already has a gasket.
Then insert the end of the first piping into the corresponding hole in the mixer as in the photo below and screw it first with your own hands, and then tighten it with the carabiner key for 10. In the same way, tighten the second hose.


- It is very important not to tighten strongly, otherwise the lining will be damaged! But it's not good to hang on too.
Finally, screw the pin-pin (or 2 studs) with the thread upwards into the hole that fits it. Our assembled mixer almost ready to install. It remains to pass both puffs into the O-ring, bring it to the base of the mixer body and fix it there as shown in the photo to the right.
Also see our other materials:
Step 3. Install the mixer on the sink
And now it's time to put the mixer on the sink.
- By the way, it is more convenient to install the mixer on the still unconfined sink, as it is not very convenient to work under the table top (in this case, the installation is done this way).
In the landing hole of the sink we put the ends of the hoses, put the mixer and ask someone to hold it, so that it would be convenient for you.
Then from below under the countertop or from the bottom of the removed sink we put on the padding the second rubber clamping washer. As a result, it turns out that the two rubber seals will protect the body both above and below the shell. Now we also mount the horseshoe metal washer (photo below).
From below put on the pin-nut and twist it with the help of:
- Tubular key, in case you need to replace the mixer on an already installed sink. The photo below shows the attachment from below.

- The locksmith key - in case you install the mixer on a new or removed sink. Of course, after this you need to install the washing itself on the countertop and only then proceed to connect the mixer to the pipes of cold and hot water.
- Tighten the nut tightly, but not too much!
Step 4. Connecting to pipes
Finally, we connect the hoses to the water outlet pipes considering that:
- The hot water outlet is from the right pipe;
- The cold output is from the left pipe.

- Sometimes cold water is discharged through a pipe that is on top, and hot water - through the pipe from below as in the photo below.