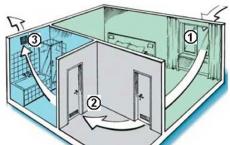
How to connect a telephone socket: the wiring diagram and the installation rules. Types of telephone sockets. The scheme for connecting a wired fixed telephone to the PBX.
To connect a telephone socket, you need the following:


And, of course, you will need a power socket.
Types of sockets
The way to install it depends on which type of outlet is selected.
Sockets are divided into the following types:
Wall-mounted euro outlet
Outlets of external type
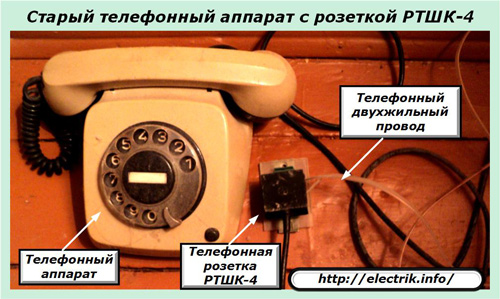
Sockets of Soviet type
Installation of Soviet-type sockets - RTSK-4 was previously carried out together with a capacitor, which checked the line and notified about its employment at the time of the call. Now the sockets are installed without a condenser, which greatly simplifies this process.
In order to more clearly illustrate the process of connecting the telephone socket, consider an example of installing an external universal outlet - RJ-11.
How to connect an external power outlet
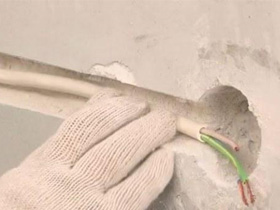
Before proceeding with installation, always wear protective gloves.
Important! During a call, the voltage in the telephone line increases by 100-120 volts, so working with a socket without gloves presents a serious threat to life and health.
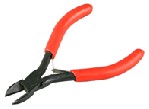
Now you need to use a side cutter or a special tool to work with the cable to strip the wire of the telephone line, having cleaned it from the insulation by 4 cm. The cores must be flat, so they need to be straightened.

Important! Isolation should be removed very carefully, trying not to make incisions on copper wires, otherwise they can easily break.
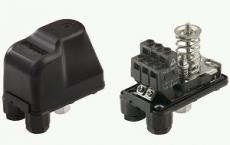
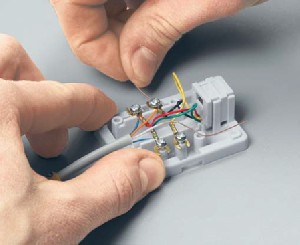
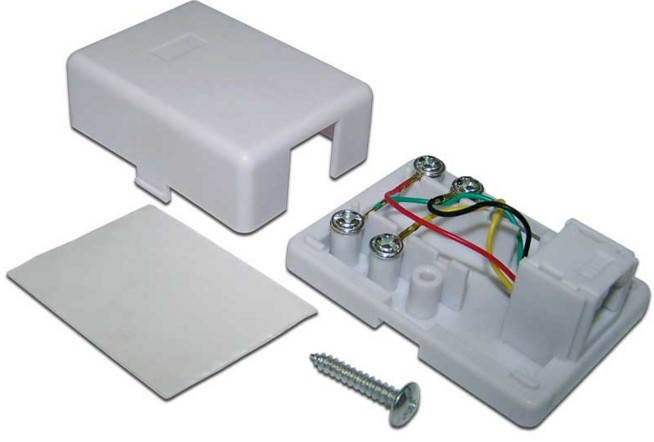
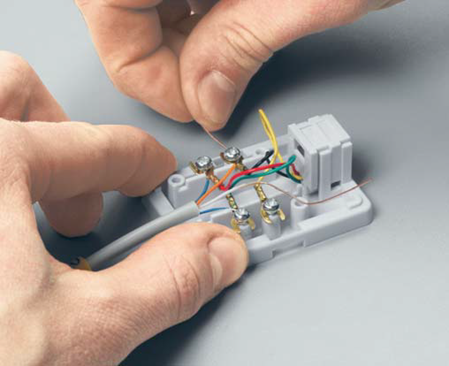
When the wire is ready for the upcoming work, you can start to connect. To do this, open the socket housing and familiarize with its contents.
Inside the outlet you can see the following:
To connect the phone for home use, only two terminals and two wires are sufficient. Because at first glance the contents of the box may seem strange, because there are as many as 4 terminals. But the remaining 2 are used to connect another telephone line.
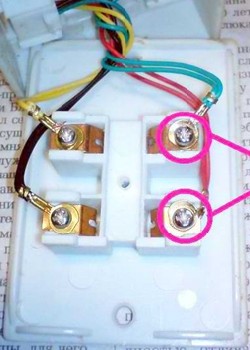
In our case, you need 2 terminals (in the figure they are circled in red), to which the telephone line will be connected. Next, connect the wire to the red ("minus") and green ("plus") wires, screwing the wires to the metal screws.
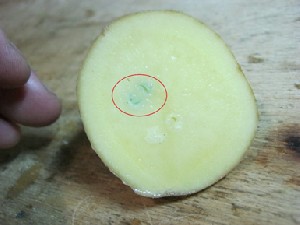
In order to observe the correct connection, the polarity of the line must be checked with a multimeter or tester.
Advice! If at hand suddenly there was no tester, you can use the usual potatoes. To do this, cut the potatoes in half and insert the ends of the cable into it: the color will change around the "plus".
Not all telephones require strict observance of polarity, in most cases it is not important.
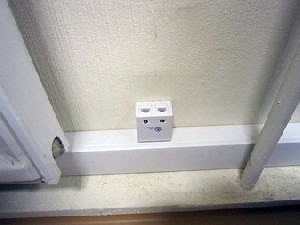
After all operations are completed - the lid comes back and snaps into place. Then the box is attached to the wall using self-tapping screws or a double-sided adhesive pad.
After connection, it is necessary to check whether there is a connection.
Installation of a hidden type socket
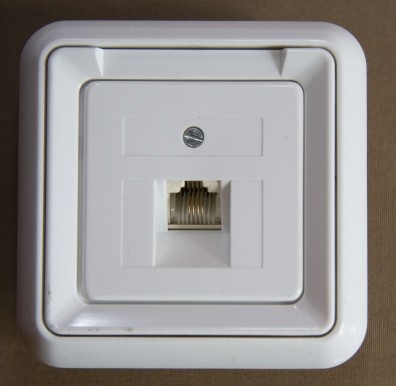
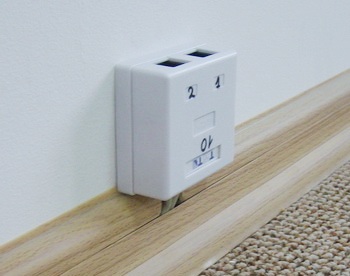
Another common species telephone sockets - rosettes of hidden type.
They look like this:
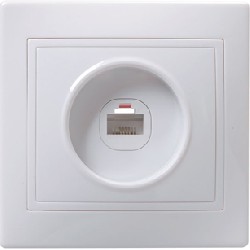
They are very convenient, because they do not protrude from the wall and look neat. And although the process of connecting them does not differ from the connection of external outlets, it will be necessary to tinker, since it will be necessary to mount holes in the wall.
To connect a hidden socket, in addition to all the already listed tools (screwdriver, multimeter, side cutters, cable), you will also need a pad, a punch and fasteners.
Before proceeding to the device of a hole for cable laying, it is necessary to prepare a perforator by selecting an appropriate nozzle with a diameter equal to the diameter of the box itself. Next, you need to drill a round hole and install the appropriate padding.
In order to bring the cable to the socket, it is necessary to continue the groove in the wall, which, after the device in it wires, is plastered. The finished groove should be filled with a cable so that there is still about 10 cm of wire remaining in the tray.
Then follows the same process of connecting the cores of the cable to the terminals, as in the case of an external telephone socket.
Afterwards, the box is mounted in a jar and is securely attached to the wall using spacer screws. The decorative cover is fixed on top - the installation process is over.
It's good to feel like a master of your house and a master of all trades. But if the process of connecting the telephone socket with your own hands seemed too complicated for you, then do not run to the masters.
Video, telling about the process of installing a telephone and electrical outlet, will clarify all the incomprehensible moments of installation:
This is another article from the pro section. To date, almost everyone has a home phone in their home. Each phone is connected to a special outlet. In this article, we'll show you how to connect a telephone socket.
Connecting a telephone socket is not so common. In comparison with conventional rosettes they are installed quite rarely. If you need to install a telephone socket, then we'll talk about this in the article.
Types of telephone sockets
Telephone sockets can have several types. The main types include:
- Built-in euros telephone sockets.
- External telephone outlets.
- Telephone sockets of the old model.
These products can differ only in appearance. The connection of the telephone socket in this case is practically the same. Now to study telephone sockets it will be possible visually:
In this photo you can see that this outlet has 4 contacts. You will need to connect a telephone contact to these wires. The connection of a telephone socket of this type must be carried out on the wall. Also today you can find built-in telephone sockets. This type of device you can see in the photo below:
As you can see, this design is complicated. Here you can see not only the complexity of the design, but also the complexity of the connection. If you need, then you can read about.
Features of telephone socket connection
The installation of the telephone socket itself presupposes compliance with certain features. If you install a telephone socket Lengard, then you no longer need to clean the wires. This product has a special function of self-cleaning. Cable connection in this case will be done by turning the mechanism by half turn. You can see this process in the photo below:

After completing this step, you can pick up the phone and check for a beep. If the buzzer does not appear, then you should check the polarity. If the phone still does not work, then check the integrity of the contacts.
Connecting the telephone socket according to the scheme
In most phone outlets there are only two contacts. The telephone cable will have as many contacts. An ordinary telephone socket contains only two contacts, that is, 3 and 4. Sometimes a telephone socket can have unnumbered contacts. In any case, you need to follow the color markings shown below.
The installation of information switches on one side may seem simpler than electrical lines. After all, they do not have a 220/50 strain dangerous to human life. But the installation and connection of a telephone socket is not as simple as it seems at first glance. This is due to the wide variety of stationary devices that are used in everyday life, as well as the connectors through which the connection is made. Next, we'll show you how to connect a phone socket with your own hands, providing all the necessary diagrams and photo examples.
Connector Varieties
Below are the types of connectors of the new sample:
Step-by-step installation instructions
So, how to install and connect a phone socket? First of all, it is necessary to check the presence of the device connection diagram. From the tools you will need a screwdriver, an electric drill and the telephone socket itself.
Note: in operating condition, the line voltage can rise to 120V. Therefore, to limit yourself from such unpleasant moments when you are installing and connecting a telephone socket to the network, it is better to use.
Before proceeding with installation, it is necessary to de-energize electrical network. Then, using side cutters or a knife, remove the insulation from the conductors. Do this carefully so as not to damage the veins. After all, if they are damaged, they will easily break down. Strip the cable for a length of 4 cm. About that, read in our article.

Using a tester, determine the polarity of the conductors. Typically, the telephone socket has a red positive conductor and green - a negative one. But it is better to check, since it is not known how the installation and connection was made. If the device is not at hand, then the connection is made according to the existing plan (the diagram is attached to the device).
The subsequent action after checking the polarity is the connection of the cable cores, as shown in the photo below. After that, a telephone socket is fixed on the wall. After installation, you need to connect to the network and test the installed device.
It should be noted that the housing can also be of a disassembled type. How to install and connect hidden socket for phone? First of all, it is necessary to apply marking on the wall where the device will be installed. Using a perforator, make a hole and fix the elements of the structure with screws. Installation is completed by attaching the protective housing and testing the device that was installed.
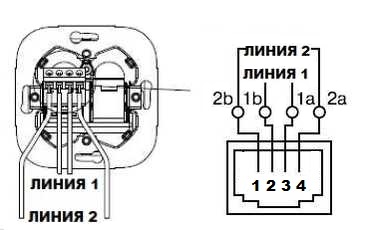
If, at home, you need to install and connect a phone outlet to 2 outputs (installing several phones with different phone numbers), then one thing should be considered: installation takes place with a large number of conductors. But on the whole there are no significant differences in the work.
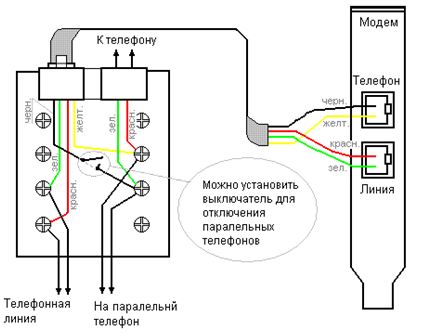
Connection diagrams
The method for determining the polarity without a device has several advantages. It has been tested more than once. There are many options and when there is installation and connection of the device, there is a possibility to get even more confused.
The telephone socket is installed according to certain schemes. Such a scheme is developed in advance. As a rule, polarity does not really matter. But some telecommunication devices may refuse or work incorrectly, if this is not taken into account. The device connection diagram is given below:
In order to simplify the installation, manufacturers carry out marking of contacts (the scheme and designation must be attached to the device). It can be in the form of numbers that are written near the contacts or on the diagram. Or the wires are designated by a certain color.
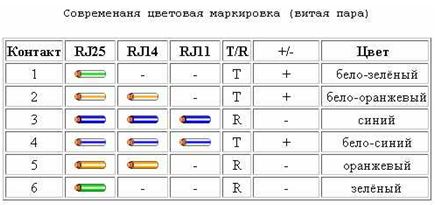
How to correctly mark the veins of twisted pair cables, when installing and connecting the outlet, is indicated in the tables below:
Well, the last thing I would like you to provide - useful tips to connect the telephone socket with your own hands. So, consider the following nuances when installing:
- To date, the most popular is the internal socket for the phone. Since it is able to harmoniously fit into any interior of the room and it is not very noticeable. But when installing it, you need to take into account the fact that the walls can be damaged. And time to spend more.
- Purchased products should be from proven manufacturers. These include the company of Legend and Vico. After all, they have already positively proved themselves in the modern market.
- If the number of contacts on the case of the purchased device has not been specified, then it is necessary to familiarize yourself with the rules for marking the wires in color. So to indicate positive contacts use green, blue and orange together with white. For negative contacts use the same colors, only without white.
- The telephone socket of the old format has a different standard of marking. Therefore, if you are installing such an adaptation, then you need to know these rules. For example, for black plus, orange and green color is used. For minus - yellow, blue and red.
During the development of communications, several standards have been created for connecting fixed telephones to operating lines. Virtually all of them are used to some extent in everyday life and in industrial enterprises.
Within the networks of large organizations, existing for several decades, one can meet simultaneously working models various designs, mounted at different times. The features of their device must be taken into account before installing and connecting the telephone set.
Purpose and standards of telephone sockets
The main task of the outlet is to provide a quick-disconnectable and reliable connection of telephone sets to operating communication lines created by a stationary part located - a socket or "mother-contact" and a movable plug inserted into it: "dad-contact".
Features of the design
Any electric outlet communication systems consists of:
1. casing-stands made of dielectric materials: plastic or ceramics;
2. spring-loaded metal contacts ensuring reliable transmission of network currents to the telephone set through a plug and cord;
3. terminal clamps, providing the connection of wires from a fixed network.
All these devices are referred to as low-current circuits. They can be manufactured for installation:
1. hidden in the wall way;
2. The overhead method.
The installation features affect the types of installation and connection of sockets, which must be taken into account, combined with the design of the telephones used.
Features of the main standards
For the telephone line, only two wires used to create a closed circuit for the current loop, and two contacts were also used to connect them to the outlet.
If you cut off the plug and the outlet and twist or otherwise connect the metal wires of the phone and the working network in pairs, and then wrap the tape with tape, the connection will work. This principle was used to create an all-in-one connection through a special branch box.
He works reliably and now. Only for its realization modern designs of contact systems and reliable methods of their isolation from harmful environmental factors are applied.
Under current conditions, there is integration of low-current circuits, telephone line systems and computer networks. Equipment for them is constantly updated, modified.
Inside the low-current systems, sockets are created, created according to different RJ standards with several pairs of contacts. They have the technical ability to connect a telephone. This is often used by specialists, using only two contacts from all available.
Overview of typical models of detachable joints, their types are given in Table 1.
Types of standards for low-current connectors
Table number 1
| Name | Appointment (for phones) | Notes |
| Connectors RJ-9 (P4C4) | Connecting the handset in the unit | Analog RJ10. RJ22 |
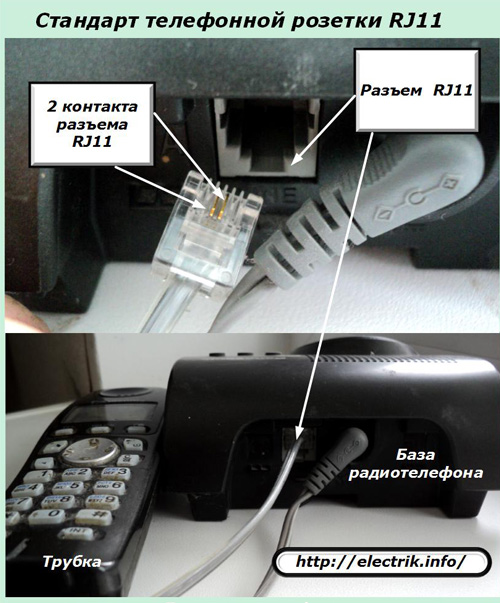
| Connectors RJ-11 (P6C4, P6C2) | 2 circuit wiring contacts | |
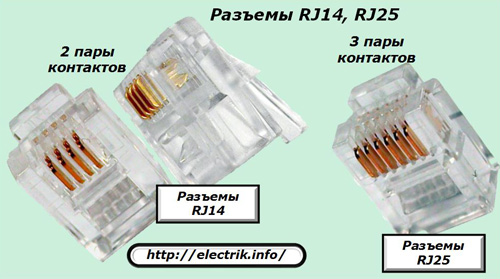
| Connectors RJ-14 | Connecting the telephone to the line | 4 circuit wiring contacts |
| Connectors RJ-25 | Connecting the telephone to the line | 6 circuit wiring contacts |
| Connectors RJ-45 (8p8s) | Connecting computer networks or telephone to the line | 8 pin connection scheme |
| РТШК-4 | The USSR standard for connecting a telephone set to a line | |
| Connecting the telephone to the line | ||
| Connectors TAE | Connecting German and French phone models to the line |
Differences of connectors
РТШК-4 - telephone socket for four contacts for plug-in connection with capacitor

The standard has been working since the eighties. The plastic plug and socket housing has a dielectric key, which prevents improper connection of the electrical circuit.
When installing several phones on the same line, a corresponding number of parallel-connected sockets RTShK-4 were created. A capacitor with a capacity of 1 μF was mounted at the end of the line for technical tests and creating "busy" effects on the side of the calling user.
Connectors RJ-11
Now telephone sets, sockets and plugs are equipped with an RJ-series connector that has the same housing, dimensions and design for connecting one, two, three or four pairs of electrical circuits. However, they can be supplied different constructions plastic locks with special cutouts, excluding the installation of individual RJ11 plugs, 14, 25 in RJ45 connectors.
They must be taken into account when connecting different manipulators. Otherwise, you can not learn electrical contact or even break the connector, break its case.
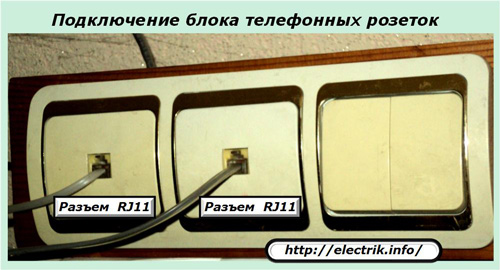
The RJ11 interface is designed exclusively for a telephone line with two wires. It can be used not only for one phone, but it can be used by several devices assembled in blocks for various devices.
The RJ11 connector is widely used not only in stationary models, but also for connecting the base of radiotelephones, allowing to talk at a certain distance from it by means of radio signal transmission technologies between the tube and the base by air through an electronic receiver and a transmitter.
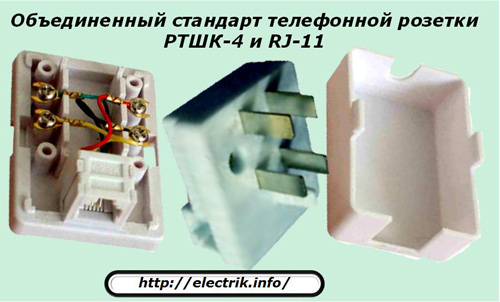
Combined RJ-11 connectors with RTSC-4
The method of connecting telephone sets via combined adapters equipped with integrated connectors is implemented in a composite design, which makes it easier to install an additional accessory.
Connectors RJ-14, RJ-25
Their appearance corresponds to the previous design of RJ11. The difference lies in the number of contacts and possible differences in plastic locks.
Connectors RJ-45
They are created for low-current circuits with four pairs of contacts, allowing the use of circuits for connecting complex communication facilities and computer systems used in modems, laptops and other similar devices.

Ways of marking the switching circuits
The sockets are connected in accordance with a pre-designed scheme. The design of the telephone usually allows not taking into account the polarity of the connection. However, for some devices this is technically unacceptable: they may not work correctly or refuse.
To facilitate installation and troubleshooting in the circuit, manufacturers carry out marking of contacts. It can be implemented:
1. by putting figures near the contacts or by marking them on the installation diagram:
2. allocation of wires in a certain color.
In practice, there may be several ways of switching wires. They are shown in Tables 2, 3, 4.
Marking for connection of cores of twisted pair cables to the socket
Table number 2
| Contact No. | Type T / R | +/— | |||
| RJ-11 | RJ-14 | RJ-25 | |||
| 1 | — | — | White-green | T | + |
| 2 | — | White-orange | White-orange | T | + |
| 3 | Blue | Blue | Blue | R | — |
| 4 | White-blue | White-blue | White-blue | T | + |
| 5 | — | Orange | Orange | R | — |
| 6 | — | — | Green | R | — |
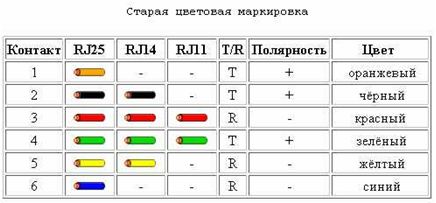
Old marking for connecting the veins of cables to the outlet to an outlet
Table №3
| Contact No. | Connector name, color | Type T / R | +/— | ||
| RJ-11 | RJ-14 | RJ-25 | |||
| 1 | — | — | Orange | T | + |
| 2 | — | The black | The black | T | + |
| 3 | Red | Red | Red | R | — |
| 4 | Green | Green | Green | T | + |
| 5 | — | Yellow | Yellow | R | — |
| 6 | — | — | Blue | R | — |
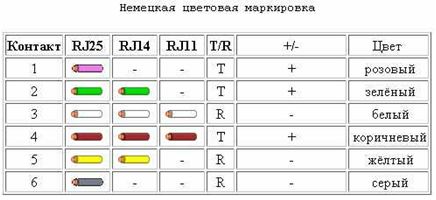
German marking for connecting cables to the socket
Table №4
| Contact No. | Connector name, color | Type T / R | +/— | ||
| RJ-11 | RJ-14 | RJ-25 | |||
| 1 | — | — | Pink | T | + |
| 2 | — | Green | Green | T | + |
| 3 | White | White | White | R | — |
| 4 | Brown | Brown | Brown | T | + |
| 5 | — | Yellow | Yellow | R | — |
| 6 | — | — | Gray | R | — |
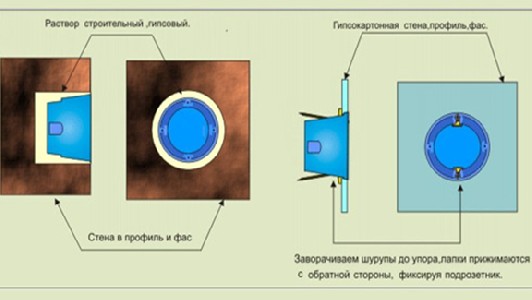
Schemes for connecting telephone outlets and plugs
Let's take a look at the example of the RTShK-4 connector used for communication not only with the terminal subscriber, but also for an additional line - communication between the secretary and the director.
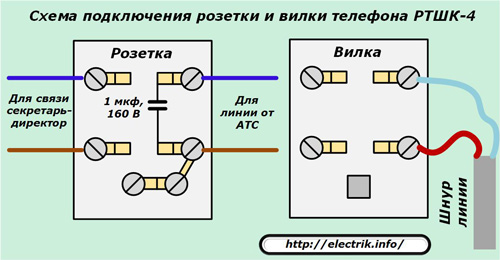
One pair of contacts is activated on the line coming from the PBX, and the second - to establish additional communication over the service channel.
The diagram shows the location of a 1-μF capacitance with a working voltage of 160 volts. Now they refused to connect, the capacitor stopped mounting. The quality of communication is almost not affected.
The construction of the connectors RTShK-4 is already outdated. They are gradually being replaced with new, more convenient devices that take up little space. But, the electrical circuit of connection basically did not change in any way. For the operation of one phone it is still enough to create a closed electrical circuit with a line of automatic telephone exchanges from two wires.
Modern telephone sockets are usually combined in the composite blocks used in the composition with other communication devices: computer equipment, fiber-optic cable networks, electrical devices.
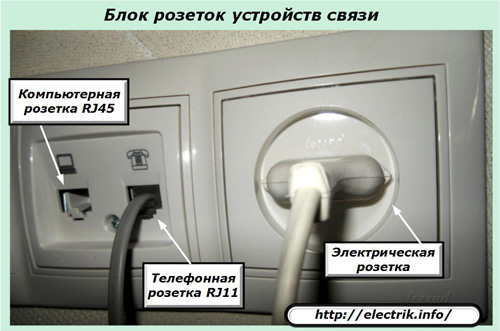
Such blocks are concentrated in one convenient for maintenance and hidden from prying eyes.

Hazardous factors of telephone network
Whatever the "experienced" electricians-signalers who were "hit" by the current from the voltage of the ATS line, safety issues need to be paid attention.
The connection of the telephone socket is usually carried out under voltage of the rest of the communication line. Its value is about 60 volts. If it is possible to catch the moment of incoming call, then a sinusoidal variable with amplitude up to 120 volts passes through the network.
It may well create a path of current through the body of the wizard that performs the connection. If the hands are wet or sweat on the body, the conductivity will increase dramatically. Painful sensations will become very unpleasant, will cause convulsive reactions. It is better to avoid them with the protection of hands with thin dielectric gloves and observance of other technical measures of safety rules.
Ways of installation of telephone sockets
Taking into account certain technical aspects, telephone sockets are mounted in the same way as ordinary electric sockets. These moments are already described in the article:. Read it: there are already disclosed methods of preparation and fastening for open and closed systems wiring.
Also useful material on this subject you will find in the article for the installation of wiring and low-current circuits. This method is used in the event that the repair is completed, dirty work can not be performed, and the telephone wiring must be laid beautifully and neatly.
Modern plastic cable channels can be selected for any design of premises. They are equipped with numerous accessories, including electrical and telephone sockets.
Thus, in order to install and correctly connect the telephone socket, it is necessary to select its model in accordance with the dimensions and technical specifications, corresponding to your telephone set, and also take into account the recommendations stated in the proposed material.
It's easier to connect a telephone socket with your own hands than an electrical outlet. And most importantly, it is safer, because there is a safe voltage for a person in the outlet. But at the same time, take into account that when the subscriber is called up, a voltage of 120 volts is applied to the line, while it hits the hands well.
To connect the telephone line, use the only 2 wires of small cross-section. There are absolutely no difficulties in connecting the phone with my own hands. And how to do it or connect several phone outlets you will learn further from this article. If, after proper connection, the phone does not work, which is unlikely, then it is necessary to swap the wires.
In your house or apartment you can install any number of telephone outlets- all of them to the line are connected in parallel, i.e. one wire is connected to the first contact and from there goes to the first contact of the subsequent outlet. The second wire comes to another socket contact and leaves it also, but only on the second contact of the next one.
The waybill phone socket is quite easy to understand- We twist the bolt or we use a screwdriver to snap the latches, in specially marked places. The internal socket is installed in a junction box or a block completely analogous to an electrical socket.
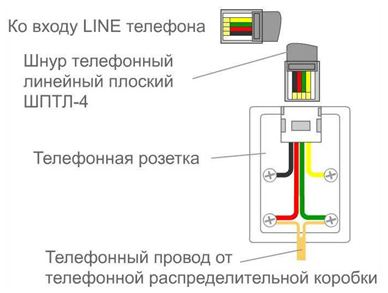
Wiring plan for telephone socket
If you have an old telephone set, then buy a universal telephone socket, which has both a modern connector and an old 4-pin connector with a fifth plastic tab. The old socket outlet is connected very simply - 2 wires sit on the right contacts with respect to the plastic tab, which will be on the bottom. But you need to make sure that in the plug from the phone the wires are connected mirror-wise to the same pins as in the socket.
Today, 3 modern telephone type connectors are used and accordingly 3 types of telephone sockets:
In any type of outlet A telephone cable with any type of RJ11, RJ14 or RJ25 connector can be turned on. They are the same in size and differ only in the number of contacts.
Consider, that according to the generally accepted color-coding scheme, to connect a single line in an overhead outlet, those contacts are used, from which the wires of red and green colors depart to the connector.
To connect a telephone socket in the house or apartment a two-wire wire is used. Telephone socket in offices can be connected as a six-, four- or two-core flat telephone cable, and a twisted pair (for a computer network).
Features of connecting a telephone socket Legrand
When installing the telephone socket Legrand there is no need to clean the wires, thanks to the built-in self-cleaning mechanism. The cable is connected by turning the contact mechanism by a quarter turn, as shown in the figure. 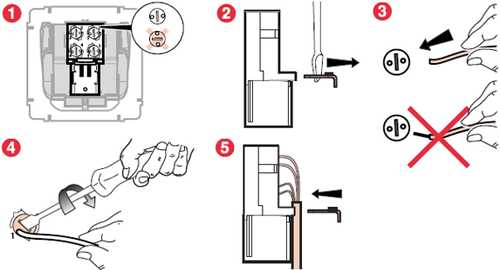
After completion of all work Lift the handset, if the buzzer does not appear, change the polarity by replacing the wires with the contacts. If that does not help, then check the wiring diagram, as well as the integrity and reliability of the wire contacts.
Related materials.