Electric sockets and household plugs. Electrical plug how to connect, repair, adapt
Electrical plug - this is a plug-in product, intended for operative connection and disconnection of electrical devices to the mains.
Any electrical appliance is connected to electrical network through the socket using a cord with a power plug at the end. Sometimes plugs fail, and replacement is required. There is no international standard for plugs, it happens, they bring electric appliances from other countries with plugs that can not be inserted into the outlets installed in the apartment. You have to cut these forks and install suitable ones on the cord. This is not a difficult but responsible job, since the reliability of the electrical appliance as a whole depends on the correctness of its performance.
Kinds of electric plugs
At present, all electrical appliances in Russia are produced with cords with two kinds of unshielded plugs of type C in accordance with GOST 7396.1-89. The body of each plug is usually marked with a specifications - the maximum permissible current and the permissible supply voltage. This does not mean that this the appliance consumes a current such force, but only indicates that the plug is designed to transfer current to such a value.
C5 (analogue of the European electric plugs CEE 7/16) - with round pins 4 mm in diameter, converging slightly to the free ends, the pins are insulated for a length of 10 mm from the housing and the plug C5 is rated for load current up to 6 A (1300 W), without a grounding contact.
C6 (analogue of the European plugs CEE 7/17) - with round pins 4.8 mm in diameter, with a grounding or without grounding contact, the plug is rated for load current up to 10 A (2200 W).
A lot of instruments are still in operation, with cords equipped with collapsible forks of the type C1-b with round pins 4 mm in diameter and rated for load current up to 6 A (1300 W), without a grounding contact.
The device of electric plugs
The device of a non-separable electrical plug
The design of non-separable electrical power plugs of any type is the same. The pins are mounted at a distance of 19 mm into the plastic bar and the conductors are pressed into them. On the bar there are two protrusions that serve to circumvent the wire. A bypass is necessary to avoid breaking the cord of the plug in case of applying considerable force to it. For example, extracting a plug from electrical outlet for a wire that is strictly not allowed.

Pins and wire are filled with molten plastic. Thus, a sealed waterproof plug housing is formed with a securely attached power cord.
Disassembled electric plug assembly
In the recent past only plug-in plugs were used to connect electrical appliances to the power grid. And even now there is a large number of them in operation. Without a collapsible fork, you can not do it if you need to replace a failed cast. The demountable fork is good, which allows you to use it repeatedly. It can easily be removed from an unnecessary electrical appliance and installed on another cord during repair.
The device of the demountable electric plug C1-b
In front of you is a fork of the type C1-b, designed for connection to the electrical network of power up to 1200 W.

It consists of two halves of the body, two brass pins, a pinch cord and fasteners.
Disassembling C6 Electric Fork
We will consider the device of a collapsible plug with a grounding contact of the type C6, designed to connect electrical appliances with a power of up to 2200 W. On the brass fork pins are pressed contact pads with thread for screwing the wires. The pins themselves are fixed in the base of the plug.

The body has a grounding contact in the form of a strip of brass with thread to fix the ground conductor. There is a strap for fixing the wire with a plastic gasket.
Malfunctions of electrical plugs
Forks are arranged simply and with the correct connection of the cord and observance of the rules of their operation, they function without fail in the function assigned to them until the end of the life of the appliance. But still failures happen.
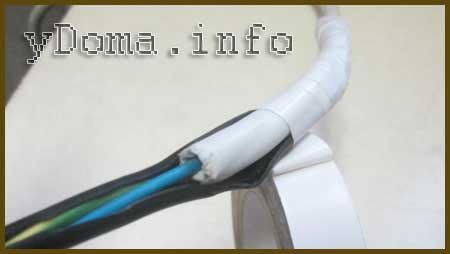
Faulty cast electric plugs
The need for replacing cast forks can occur in the following cases. Not a quality crimping of the conductor in the pin at the factory, grinding the cord at the outlet from the plug housing and because of a malfunction of the outlet. More often the cord is rubbed off by electrical appliances with C5 plugs, which are intensively moved during operation, such as a hair dryer, mixer, soldering iron and many others.
On close inspection, sometimes it is possible to visually locate the site of damage by sharp bending of the cord during its bending or swelling of the insulation. If the inspection failed to detect a defect, then ring the wires with a tester . This requires you to get to the opposite ends of the wire, which is not always possible. You can use a thin sewing needle, pierce its insulation in the place of passage of one conductor first and ring the pin-needle chain. If the wire is full, call the second conductor. To prevent accidental contact of the wire at the point of the break during the continuity, it is possible to slightly twist the wire and the plug in opposite directions.

Check the integrity of the wire can be and phase indicator. Attention! Work is required very carefully, so as not to get an electric shock. Touching a needle stuck into the wire with a bare hand when the plug is inserted into the socket is deadly! It is necessary to pierce the insulation, insert the plug into the socket in such a way that there is a phase on the tested wire. Touch the phase indicator to the needle, if there is no glow in the indicator, wire in the clipping. The second conductor is also checked. Insertion and removal of the needle is performed when the plug is removed from the socket.

In case of the integrity of the wires, the fault must be sought elsewhere. Since the needle is thin, then after its removal, the hole will be tightened, it is not necessary to isolate the puncture site.

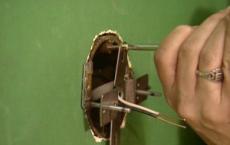
I did the photos during the repair of the failed hair dryer. As it turned out, I wiped one of the conductors inside the fork, in a flexible place. I had to cut the cord at the outlet of the fork and connect the wires to the new demountable plug in the manner described below.
Another plug may fail due to poor contact in the outlet , in which it was inserted. If the pin badly contacts the contacts in the outlet, a lot of heat is released, the pin warms up and melts or even charring the plug body in the place of contact with it. As a result, the pivot will begin to swing, which is not permissible. The plug has to be replaced.
In order to check the reliability of the plug-to-socket contact, it is necessary to remove the plug from the outlet after the appliance has been used and immediately touch the pins. If slightly warm, then this is normal, and if very hot, then you need to repair the lines to replace the outlet.
Faulty electrical forks
The demountable plugs have the same faults as the non-selectable ones, but in addition the disassembled plugs are often refused due to poor connections between the cord conductors and the pins. The reason is a violation of the density of the adjacent wires to the pins due to the lack of a spring washer. Over time, from differences in temperature, a gap is formed, the contact is broken and released thermal energy. The spring washer selects this clearance, which ensures a long-term reliable operation of the plug.
With bad contacts in the plug, its pins heat up strongly and melt the body until charring. A plug with a charred housing must not be used and it must be replaced. If the case is not damaged, then disassemble the plug, clean the wire and the place of its contact with the probe with sandpaper until it shines. If the wire is badly burnt, cut the damaged part by the length of the breakage of the insulation and connect it to below the recommended technology. It is also necessary to replace the screws and washers. As a rule, they are highly oxidized, and it is impossible to remove scale from them.
How to change the electrical plug on the wire
If there was a need to replace the plug on the wire, you first need to determine its type, based on the power consumption of the appliance and the need for its grounding. In order not to hesitate, it is best to replace a faulty electrical plug with the same type of plug.
How to change the electrical plug to C1-b
If you need to replace the plug on the cord, then you need to start by preparing the ends of the wires to connect. To do this, cut the cord 3-5 cm from the fork. If the plug due to poor contact in it is very hot, then usually the insulation of the wire in the vengeance of the output from the plug becomes rigid and this part of the wire needs to be removed. Further from the wires removes insulation for a length of about 20 mm and at its ends are formed rings . In the rings are inserted screws, which are first put on the spring (rougher), and then flat washers. Grover need necessarily.
Then screw the screw into the pin until it stops. In the same way, the wire is attached to the second pin. The pins are installed in the body protrusions in special round grooves. Next, a wire is laid on the wire and pressed with two screws to the housing. If the insulation of the wire is thin, then to prevent it from rubbing at the point of exit from the plug, it is desirable to put a rubber or PVC jacket on the insulation.

It remains to connect the halves of the body and tighten them with a screw and a nut. If the halves do not completely touch, then the wires passing next to the tightening screw interfere, you need to push them away. To do this, unscrew the screws at the rings slightly, turn the wire and tighten the screws back. If you do not do this, you can break the plug when tightening. If you connect a cord with three wires to the bipolar plug, then the conductor yellow green color (grounding) from the insulation and do not need to be connected anywhere.
How to change the electrical plug for C6
Preparation ends of the wires for connection to the C6 plug of the cord is carried out exactly as for the C1-b plug. The technology of assembly is similar. The main thing, if there are no forks in the kit, be sure to find and install these spring washers. To connect the cord to the plug in the ends of its wires, pre-formed in the rings, you need to insert the screws with washers and tighten to the contact pads of the plug. Note, yellow - green the wire may only be connected to the ground terminal. It is usually located in the middle between the contact pads of the pins.

If the cord is two-wire and there is no yellow green wire, the grounding pin in the plug remains free.
How to replace a faulty electrical plug C5 or C6
with the help of wire extension
In practice, you can face a situation where the mains plug has refused, the electrical appliance is urgently needed, and there is no collapsible plug for replacement at hand. In the shop to get far, and not every village has a store of electrical goods. But even from such a seemingly desperate situation, there is a simple way out.
Practically in any household there is a faulty electric appliance, for example an electric kettle. From it you can take a plug for repair and replace the faulty one according to the instructions below.
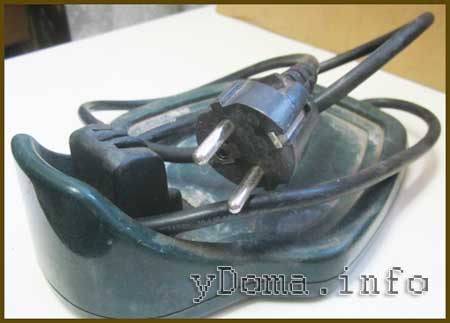
The photo shows an old stand for electric kettle , from which the wire with the C6 fork leaves at the end. The length of the mains wire at the electric kettles is usually small, but, nevertheless, if the length of the wire of the appliance that needs to replace the plug was insufficient, then we can take advantage of the case and make the wire longer. In this case, the wire from the electric kettle stand needs to bite off its maximum length. Sometimes at the bottom of the stand a piece of wire is wound on the coil. Therefore, its length can be greater than it is obvious. If you do not need to increase the wire of the electrical appliance, it is enough to leave about 15 centimeters of the cord.

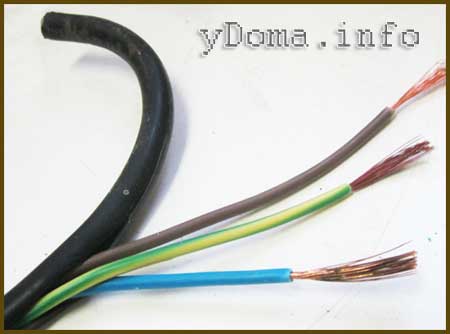
Next, you need to carefully, so as not to damage the insulation of the wires, cut along the shell of the cords for a length of about 10 cm and pull the wires out of the shell. Attention, the shell does not need to be cut off. Usually in standard cable three wires of different colors. Brown (phase), light blue (zero) and yellow - green (grounding conductor).

In the next step, it is necessary to adjust the length of the conductors in such a way that the places of future wire twists are shifted relative to each other by a couple of centimeters. When adjusting the length of the wires, it must be taken into account that the single-colored wires must necessarily be connected together.
Further removes insulation with wires of wires for a length of about 15 mm. If one of the cables is missing yellow - green wire, it should not be removed from the existing insulation, since it can not be connected anywhere. He must remain free.

At the next step, stripped copper wires from insulation unite with each other by the method of twisting. For a good contact, only three turns of the crook are sufficient.

For a reliable long-term contact, solder with a soldering iron. To remove possible sharp edges of the solder and the ends of the wires, the place of soldering must be treated with sandpaper. If you do not loose twists, then high power contact with time can be disrupted.
You can do without soldering, if you put a piece of thin-walled copper or brass tube with an inner diameter a little more than the diameter of the wire insulation before laying on wires. After twisting the wires, move the tubes to the junction and flatten them in several places with side cutters.

Next, the connected wires are refilled into the previously cut shell of one of the cables. Isolate the connection is not necessary, because due to the shearing of the twisted strands of exposed wires do not have the opportunity to come into contact.

Next, the connected wires are refilled into the previously cut shell of one of the cables. Isolate the connection is not necessary, because due to the shearing of the twisted strands of exposed wires do not have the opportunity to come into contact. If the distance between twists is less than 10 mm, then they need to be covered with an insulating tape.
Now it remains only to cover the place of cable connection with one layer of insulating tape, and the work will be completed.

As you can see, on the cord of the electrical appliance using the extension of the wires, a working plug is installed, and the electrical appliance can now be connected to the power grid for further operation.
Spliced cables were taken in white and black colors specifically, for clarity. If you match the color of the plug and PVC insulating tape to the cable of the appliance, the connection point will be almost invisible.
Which fork is better, demountable or cast?
There is a reasonable question, and which plug is better? Certainly, cast. Its main advantage is the absence of low reliable split mechanical contacts of the current lead with the plug pins. Conductors are connected in one of the following ways: they are welded by spot welding, soldered or soldered. In addition, the plug is sealed, which increases the safety of its operation.
The only drawback is the impossibility of re-installation. If the wire wobbles at the entrance to the plug, and this often happens in electrical appliances, which have to be constantly moved during operation, for example an electric hair dryer, then you have to cut off the plug and throw it out, and replace it with a demountable one. It is possible to replace the entire cord with a new one with a cast plug, but then it will be necessary to open the electrical appliance, which is not always possible.
Adaptation of non-standard plugs
Sometimes electrical appliances equipped with plugs are brought from foreign countries, which can not be inserted into the outlet, although the product can be connected to the existing power grid by the eclectic characteristics. If the wiring is with a grounding conductor, the output from the position is the connection of the plug through the adapter adapter, but it still needs to be found, or pruning a non-standard plug and replacing it with a collapsible C6. If the ground wire is not in the socket or the device does not require the first class of protection, then you can independently modify the plug.
Particularly relevant is the issue of adapting adapters for connecting cellular phones, office equipment, laptops, since the pins come directly from the adapter housing, and it is not possible to replace them with a fork.
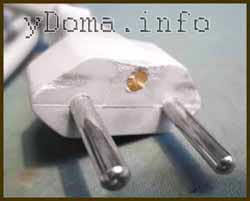
Adaptation of the electrical plug IEC 60906-1
I got a polarized plug of the standard SEV 1011 or IEC 60906-1, I will not say for sure, because they are almost the same. The distance between the pins of the plug was 19 mm, the diameter of the pins was 4 mm, like that of the C5 plugs. But unlike the C5, there was an additional grounding prong that did not allow the plug to be plugged into the power outlet.

He clamped the fork in a vice and carefully, so as not to damage the necessary pins, the hindering pin cut down on the metal with a hacksaw.

Without a grounding prong, the plug is easily inserted into any electrical outlet
Adaptation of the British electrical plug BS 1363
When creating a home computer network, I had to modify the Huba plug. The hub got to me accidentally and lay around idle, since it could not be connected to the 220 V power supply network because of the non-standard English fork BS 1363.

As you can see in the photo, the pins in the plug of BS 1363 adapter hub are three and they have a flat shape. Two pins located on one horizontal line are intended to supply the supply voltage, and the third one, vertical, is intended for grounding and proper plug connection.

When measuring caliper , the width of the pin was 6.5 mm. The distance between the inner planes of the pins is 16 mm, which corresponds to the distance between the pins of the plug C5, the analog of the European plug CEE 7/16. Thus, if the width of the flat pins of the BS 1363 plug is reduced from the outside by 2.5 mm, it will fit into any outlet intended for C5 or C6 plugs. It remains to work for small, remove the third pin and excess metal from the pins.

The vertical pin, it turned out to be completely plastic, was clamped in the vice, and cut through with a metal hacksaw. Horizontal pins in turn, too, were clamped in a vice and cut with a file, up to a width of 4 mm.

The photo shows the place where there was a vertical stylus and a left-justified width. The sharp angles formed on the pin after filing should be blunted with the help of fine sandpaper.

After removing the excess pin and reducing the width of the remaining pins, the English plug BS 1363 became adapted for connection to sockets intended for connecting the C5 plugs. Therefore, it was easy to connect the Hub to the power supply network.
A key condition for the creation of a communication system is the adjustment of the structured operation of the cable system, which can not be realized without computer outlets. What types of connectors for automation of communication offers the modern market and what features of installation has a computer outlet, let's consider in the article.
To connect computer equipment and any other peripheral equipment, use a computer outlet of the RJ-45 standard. It corresponds to common standards and communication standards, designed to automate most tasks.
The device includes a plastic housing, inside of which there are from one to four connectors.
A computer outlet is a device whose main function is to transfer the connection from the network card of the computer to the cable networks
For the organization of a home network, devices with one or two connectors are most often used. In devices with two connectors, the first is for connecting to the information cable going to the computer, and the second is for switching with the panch panel
The information transmitting cable, referred to as a "twisted pair", is simply wound up in the module assigned to it with a contact. Through another twisted pair of information goes into the network.

Telephone modules of the RJ11 standard are equipped with two-pair connectors with four contacts, and telecommunication devices of the RJ45 type are equipped with 8 contacts
Externally, the computer connector RJ45 is similar to the analog phone RJ11. But the main difference between devices is the number of contacts. In telephone models there are 4 contacts, and in information - 8 pieces. For this reason, if the computer RJ45 socket can be used as a telephone, it will not be possible to connect the computer equipment to the RJ11 connector.
Image Gallery


Categories of information outlets
From what category the computer outlet belongs to, the distance to which the signal will be transmitted with minimal distortion depends, as well as the data transmission speed itself. When equipping office and household networks, these types of outlets are more often used:
- RJ-45 Cat.5 - are designed for the organization of 100BASE-TX networks with a frequency band of 125 MHz at a data transfer rate of 100 Mbit / s.
- RJ-45 Cat.5е - more "advanced" version, which allows data transfer for two pairs within 100 Mbps, for four pairs - 1000 Mbps.
- RJ-45 Cat.6 - designed for the arrangement of networks "Gigabit Ethernet" and "Fast Ethernet". Bandwidth of the device up to 1000Mbit / second.
There are several basic parameters that separate computer outlets. One of them is the method of installation.
External and internal connection points
Depending on the method of installation, the devices are divided into two types:
- External - apply when the device needs to be placed on the wall surface. On the back side of the device for outdoor installation there is a connector equipped with knife contacts. If they are pressed into the wire, the insulation breaks through the veins, which makes the installation much easier.
- Internal - assume installation inside the mounting box with the penetration of the device into the cavity of a concrete, brick or plasterboard wall. The connector of such devices is usually removable. It is removed, and after installation into a walled-in wall, grip the plastic screw.
Enclosures of devices for outdoor installation are made of strong non-flammable type technopolymers. Due to this their outer surface is resistant to UV rays.

The use of internal sockets provides a presentable appearance of the wiring, but complicates the maintenance of the equipment in the event of a breakdown
Manned and collapsible models
Depending on the type of equipment, the devices are divided into two types:
- With built-in modules. In the complete models, the motherboard and connectors are built-in. They provide an invariable type of shielding.
- With removable modules. In devices of this type, the modules are separated from the front panel. This solution allows you to make any combination: "UTP" and "FTP" of different categories - 3, 5, 6, 7.
Completed devices with integrated modules are affordable and easy to install. But in the event of a breakdown, you have to replace the entire structure.

Devices with a plug-in module benefit in that they are easy to maintain, and the flexible module, if necessary, will not be replaced in accordance with the needs of the system
The main criterion that should be followed when choosing a device is the availability of additional ports. For example, if you need to maintain several units of equipment, it is worth choosing a double outlet type RJ-45. In a two-module model, a computer can be connected to one RJ-45 port, and a telephone can be connected to the second RJ-11.
There are also models in which both modules are designed to connect computer equipment. But the ports differ in the category and type of shielding. The use of such devices allows you to save the expense item by combining the modules to your needs and category of equipment.
Give preference to products of proven manufacturers. This is a guarantee that the products are manufactured in accordance with generally accepted norms and standards. Qualitative devices will easily be combined with any type of computer equipment and can safely withstand the strain of Russian networks.
Component Requirements
Connecting a computer outlet can not be performed without a set of accessories. Separately have to buy:
- Cable (lan) of the corresponding category.
- Connector (jack) - device in the form of an eight-pin plug for connecting the cable to the computer port.
- Patch Panel - provides the ability to quickly switch between active network equipment and work points. The number of ports of the device depends on the number of connected equipment and can vary from 10 to 50.
To connect the RJ45 cat.5e socket, a four-pair shielded twisted pair cable is required, equipped with a common foil screen type KVPef-5e 4x2x0.52. If you connect the model RJ45 cat.6, you will also need a four-pair twisted pair cable, but already of the KVP-6 type 4x2x0.57.

The standard version of the cutting in Russia is the standard EIA-5688; its marking designation is indicated by the Latin letter "B"
The eight-core cable for the Internet includes four twisted pairs. The second wire in each twisted pair has white insulation and is marked with a white stripe.
Information cables are divided into several categories, starting with the third. The higher the category, the higher the transmission standard.
For data transmission in 1 Gb / s two-pair cables are used, and within 10 Gb / s - four-pair analogs. The difference between them is not big in price. Therefore, when planning to use more conductors in future, it is better to immediately acquire a four-pair network.

When installing connection points, preference should be given to shielded cable types that are most protected from interference. Shielded cables are suitable for a wide range of tasks: telephony, smart TV, Ethernet.
In the case of equipment installation, the length of the cable is not sufficient or one of its sections is damaged, you can use the socket-to-socket adapter. When connecting the connector to build up the cable, in order to avoid mistakes, you just need to orientate the color coded inside the box.

The RJ45 "socket-to-socket" adapter allows you to quickly connect twisted pairs equipped with a connector of the appropriate standard, without sacrificing signal loss
When choosing a patch panel, be guided by the category of the outlet. On sale there are devices category "5", "5e" and "6".
The end of the information cable is equipped with a connector 8P8C, called in professional jargon as a "jack". It has a transparent case through which multi-colored wires are visible.
This element is often mistakenly termed RJ45. But in fact, the RJ45 is the accepted standard, and the exact name of the 8P8C connector. Today, for the connection with the equipment, the standard for connecting a twisted pair of TIA / EIA-568-B wires has been adopted since 2001.
When connecting an Internet cable, two circuits are allowed: T568A and T568B. But in our country the wires are located mainly using the "B" scheme.

The TIA / EIA-568-B wired-pair connection standard implies the sequence of cores in this order: (1-2) -white orange with orange, (3-4) -white-green with blue, (5-6) white-blue with green, (7-8) - white-brown with brown
When connecting 10BASE-T and 100BASE-T networks, the TIA / EIA-568-A standard is used. To be afraid that, when connecting a twisted pair, you can accidentally mix something up, it's not worth it. Modern router models are designed for both options. Therefore, they are able to automatically flip the signal.
Rules for the location of points of connection
If you are not a fan of "garlands" of interwoven wires, you should seriously consider the issue of placing outlets. After all, every manipulation of installation and transfer of connection points implies at least a cosmetic repair in the room.
Connecting a desktop computer requires the use of at least five outlets. Therefore, the best solution will be to install a block that includes several points: for a modem, a monitor, a system unit ...

When choosing the location for the installation of information outlets, it is best to focus not on the "European standard" - 15 cm from the floor level, and the number of connected equipment
For the sake of justice it is worth noting that it is also possible to connect computer equipment without using outlets. But this way of installation is too complicated in execution. And besides it is completely not justified, especially in those situations when it is necessary to work with large networks.
In addition, no one can confidently guarantee that in the near future from this point of connection will not be "fed" yet another smart TV, computer or any other device.
Technology of installation of computer outlets
In order to connect a computer outlet with your own hands, there is nothing complicated. You just need to adhere to the actions of a given sequence.
Selection of the necessary tools
To carry out the work, it is necessary to prepare:
- a perforator equipped with a crown of appropriate diameter;
- cross-cutting knife for stripping;
- screwdriver Set;
- tester.
In addition to the basic set of tools, it is necessary in advance to take care of the purchase of crimping pliers. This tool costs about 10 dollars. So for a one-time job it makes sense to rent it.
Cable installation and installation of the janitor
The first step is to connect the cable to the installation point. It can be laid open or closed way. The first method involves laying the cable in plastic boxes equipped with removable covers, or placing the skirting behind the walls.

By placing the cable in an overhead way and "planting" it on a DIN rail, you can not only simplify the installation procedure, but also facilitate the maintenance process
Widely spread and so-called modulo napladnoy method, involving the fastening of the cable on the wall with the help of special dowels option "quick installation."
To implement the second method, stitroids are made, into the cavity of which the cable is laid. To do this, using a perforator, equipped with a special crown, make a circular niche in the wall. The diameter of the crown must match the size of the box.

Mounting box connection points are buried in the hole in the wall and fixed with screws and dowels
The end of the supplied cable is cut off, leaving a reserve for the possibility of a subsequent multiple connection. The excess end should be neatly laid around the circle inside the box, avoiding the fracture of the conductor.
Connecting device contacts
To connect the socket, use the cross-blade knife blades to remove the external protective insulation, freeing the end length of 5-6 cm. This procedure should be carried out carefully so as to avoid damage to the conductor insulation.

Under the removed insulation, four multicolored pairs of conductors twisted in twos should appear; in some cables there is also a thin shielding wire
Each pair is neatly leveled. It is not necessary to clean them, because the platform device itself provides reliable contact. From the socket housing remove the front panel, unscrewing the fixing bolt.
Some models of sockets are equipped with special latches, which work by the type of clamps. In such models, in order to remove part of the fittings and gain access to the internal mechanism, it is necessary to gently rotate the clamp-handle located on the rear face.

Each vein is inserted into the slots of the outlet, being guided by the connection scheme with colors under each number, placed on the upper edge of the device, or else attached in the instructions to it
All veins alternately in accordance with the color are inserted into the retainer. The end of each core is fixed with a clamping bolt. To drown every vein as deeply as possible, use reverse side clerical knife.
Color coding marking of all terminals greatly simplifies the process of joining the computer outlet and twisted pair. Do not worry, if the vein does not come to the end. When the clamp is returned to its original position, the notches located on each side will push the wires through to the end.
When all the conductors are brought into the seats, the protruding pieces are neatly trimmed.

The core with the cores connected is placed in the same place, turning the lock-handle in the opposite direction
Using an open mounting method, the device body is fixed to the wall, guiding the computer connector down and the cable inlet up. When the installation method is closed, the socket is buried in the socket prepared for it, fixing it by means of spacers.
At the final stage with the help of the tester check the correctness of the connection. If the tester is not at hand, you can plug in the cable that is connected to the computer, but not yet installed in the socket.
After confirming the correct connection, it remains only to screw the front panel.
To connect the connector from the end of the cable, remove the insulation. Each pair is untwisted and aligned, directing in different directions. If a shielding thin wire is provided, it is also bent to the side for a while.
When laying out pairs in a certain sequence, they are guided by the "B" scheme described above.

Tightly laid in one row, the wires are leveled and trimmed, leaving a length of 10-12 mm so that the insulation of the twisted pair begins above the latch
Twisted pairs with the cut off ends of wires lead into the cavity of the connector. The connector must be snap-down. Each conductor is laid on a separate track, trying to push it to the limit.
The connector with the wires laid in it is inserted into the pliers. To seal the connector, you need to smoothly move the handles of the tongs together.

The protrusions, which are present in the landing nests of the mites, will push the conductors to the micro-knives, while they already cut through the protective shell and provide a reliable contact
Ideally, if the connector body is "planted" into the socket normally, there is no need to apply any effort. If you need to re-make the cable, you just need to cut off the end again and perform the same actions, but with another "jack".
Installation technology double socket is similar. The only thing - from the router will have to bring two cables, because a parallel connection for network equipment is not used.
Video: the subtleties of competent editing
Example of installation of the outlet Viko RJ45:
How to properly crimp the wires:
Knowing how to connect an internet outlet, you can always upgrade your home network on your own. The main thing is to stick to the scheme and not get confused in the color designation of the wires.
The socket is a special connector in the wall for quick connection and disconnection of electrical appliances. In this article, let's look at what kinds of sockets are, and consider their technical features.

Types of connectors
Devices with a voltage of 220 V are divided into four varieties:
- Fittings produced by Soviet standards. Such nests are still in progress, but are gradually being replaced by Euroset. The main drawback of Soviet standards is insufficient contact, the cause of which is the loose fork of the fork.
- Eurostandard. Fittings made to European standards are practically devoid of shortcomings. The only drawback of such nests is their hard landing, which is why the fork needs to be removed with effort. A distinctive feature of the European sockets is a deep landing area and round holes for a fork.
- American standard. The device differs from the European pattern, primarily in the shape of the holes for the plug - rectangular instead of round. Also worth noting is the weaker (in comparison with European products) contact american outlets with plugs.
- The universal standard. This product provides the ability to connect to it both American and European plugs. Most often, universal fittings can be seen on imported equipment.
In fact, the variety of sockets is even greater. Below is the short description the most common types of this electrical accessories.
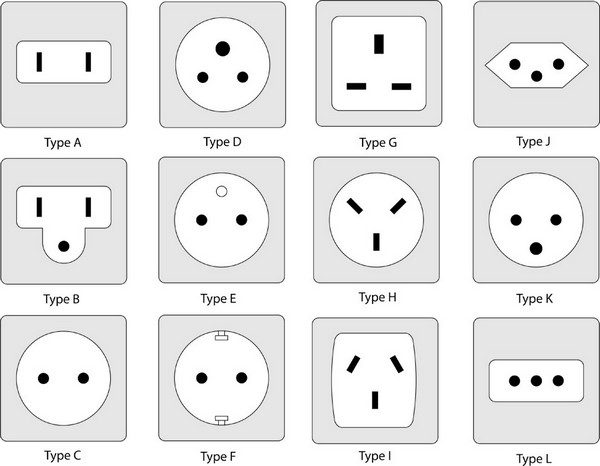
Types of electrical outlets
Legend:
- A is one of the American options. Also, such nests are common in Japan. A characteristic feature is the absence of a grounding contact.
- B - another American version, but with grounding.
- C - European standard. It is used both in European countries and in Asia. On the sockets of this type, except for C6, there is no grounding.
- D is the British standard.
- E - French type of accessories.
- F is an earthed socket with ground.
- G is another British option.
- H is an Israeli version of the accessories.
- J is the Australian type of performance.
- K is the Danish variant.
- L - Italian execution of accessories.
In the countries of the former USSR, the most suitable type of outlet is the European one. Under this fittings all household appliances sold in this region of the world are fitted.
Grounded and ungrounded devices
Without grounding, high-power electrical appliances can be unsafe for people. And the grounding contact can be present or absent not only in the electrical appliance, but also in the building as a whole. The fact is that not every structure has a third (grounding) wire. However, here it is important to clarify: if the grounding wire in the house is present, there is no need for grounding sockets.

Sockets without grounding are used only to provide consumers with low-power electricity. Almost all models of household appliances with a power of more than 300 W are manufactured with the expectation of connection to the ground loop. The plugs of these devices can be plugged into sockets without grounding, however, there is no need to talk about safety in this case.
Thus, the earthing is necessary, and if before the installation of the sockets the electrical wiring was replaced, it is necessary to choose the fittings in which there is a third contact.
Built-in and overhead sockets
There is a firm belief that embedded outlets are used in case the wiring is hidden, and overheads are applied when the wiring is external. This is partly true, but this rule does not always work. Below we will consider the features of the location of the outlets in more detail.

A feature of the built-in hardware is that its interior is hidden from the eyes, since it is installed in the wall. Use of such sockets is possible both with external and hidden wiring. In this case, it is necessary to install a hidden sub-socket. Also available are retractable sockets - they are also classified as built-in sockets. Retractable fittings are most often used for embedding in countertops.
For overhead fittings, the ease of installation is typical: there is no need to make a hole in the wall and install a jar. Mounting of the overhead fittings is possible directly on the wall. However, before installation, you need to drill a couple of dowel holes with a stopper in the wall. The downside of the overhead fittings is that it clearly protrudes from the wall, which is far from always aesthetically pleasing. At the same time, one must understand that retractable sockets are, in most cases, interchangeable with built-in sockets.
Additional power outlets
Fittings for connecting the plug seems to be a simple device to which it is difficult to come up with any new functions. However, with all this, there are models of sockets, the task of which is to provide the consumer with additional functionality.
As examples, we will distinguish the following types of sockets:

In addition to those outlets, which are described above, there are other types of sockets. For example, hardware is produced specially designed for connecting computer equipment, telephones and televisions. Some devices can provide operation of only one consumer, and others (tees) - just a few.
Outdoor sockets by degree of protection
Garden outlets, which were mentioned above, have different degrees of protection from moisture:
- The IP44 is designed to protect itself from splashes of water. The device is equipped with a protective panel that covers the contacts during their use. This device is recommended to be installed at a sufficient height from the ground level to avoid excessive contact with the spray bouncing off from the horizontal surface.
- The model IP55 is protected more thoroughly and can be used for installation on poles, fences, the outside of the arbor, etc. The protection class allows to protect the nest from the influence of water jets. However, these garden outlets should not be placed too low: they should be installed above the snow level. A prolonged stay in the water leads to failure of the IP55 model.
- Model IP66 has the highest degree of protection from moisture. Such devices can be used in car washes or other objects exposed to a powerful moisture. For a private home, this protection class is perhaps excessive. In addition, it must be borne in mind that the cost of such hardware is high.
There are such types of podrozetnikov:

Also, there is a classification of podzoetnikov depending on the size of the installation boxes. The most popular type of podrozetnikov consumers is recessed into the depth of the wall by 40 millimeters. The internal diameter of the device is 60 millimeters. The maximum internal diameter is 70 millimeters.
Specialized sockets
These types of sockets are rarely used for domestic purposes. Nevertheless, sometimes such cases happen.
So, we can distinguish two types of specialized outlet accessories:
- Devices for large consumers and long work. In a private house, such appliances can be useful for electric ovens and hobs. The main difference between such fittings and sockets used for domestic purposes is the power level and the binding of the grounding contact. Such devices are not used very often, as consumers prefer fixed connections - without a connector, where an automatic switch is used as a protective measure.
- Fittings, mounted in the flap on the rail. Its purpose is to connect consumers to the system located near the electrical panel. Also, such sockets are good at ensuring the functioning of high-power electrical appliances. For example, an outlet on a rail - good decision, if you need to connect a transformer welding equipment. In this case, the wiring can be calm: it will not burn.
Marking of sockets
It should be noted: the main indicator, according to which the sockets differ, regardless of their capacity and the availability of additional functions, is an indicator of the current strength. Each device is oriented to a certain level of current, and this indicator is critical for the normal functioning of the system. If you connect a weak device to an excessively powerful consumer, the socket will melt, a short circuit will occur and, in the worst case, a fire.
If you look at the device, you can see the letter "A" on it, as well as one or several digits. The letter "A" stands for amperes, and the numbers indicate the current strength. Most of the sockets are designed for 16 amperes. In this case, there are exceptions - both to a smaller and to a greater extent.
When choosing the outlet, it is necessary to take into account a number of factors: technical characteristics of consumers, operating conditions, safety of use, aesthetic appeal. Before buying it is recommended to consult with a specialist who will help to make a choice in view of the whole complex of circumstances.