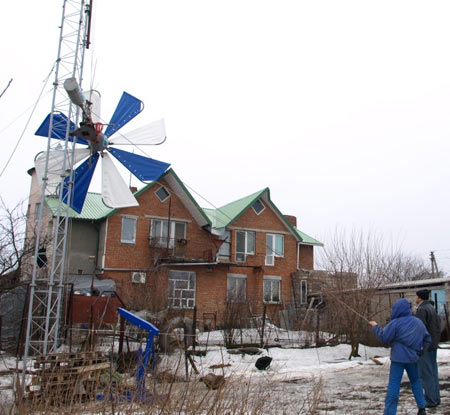
Generator 12 volts with your own hands from the car. We create a wind power plant with our own hands.
The wind energy has been tamed by people for a long time. An example of this is the sailing ships, thanks to which, in the past, seafarers discovered new lands and created a picture of our real world. Also, all probably know the windmills, which were for our ancestors the only mechanized means of labor. They still help people to this day.
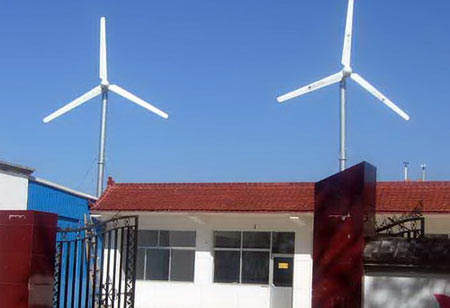
Example of a wind generator for installation on the roof
Currently, wind energy is of great interest as an alternative source of electricity. Let's try to figure out whether this excitement is justified around such methods as wind power stations.
Wind power stations
These newfangled devices for generating electricity represent a certain number of generators using wind power for work, combined with other auxiliary equipment. The most advanced countries in the electricity sector are Germany and Denmark. Studies show that energy consumption in these countries is significantly lower than their neighbors. Also, due to the fact that they are introducing renewable energy to other countries, their budget shows a significant increase.
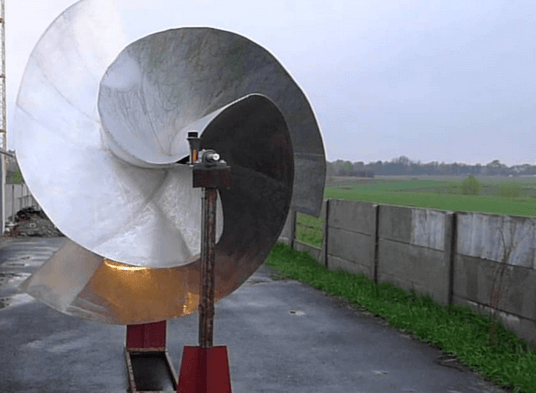
Wind power plants are of two types: with horizontal and vertical arrangement of the axis of rotation.
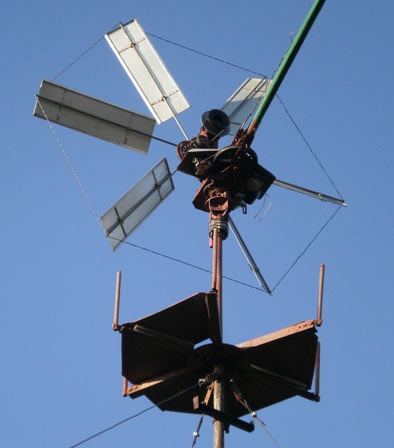
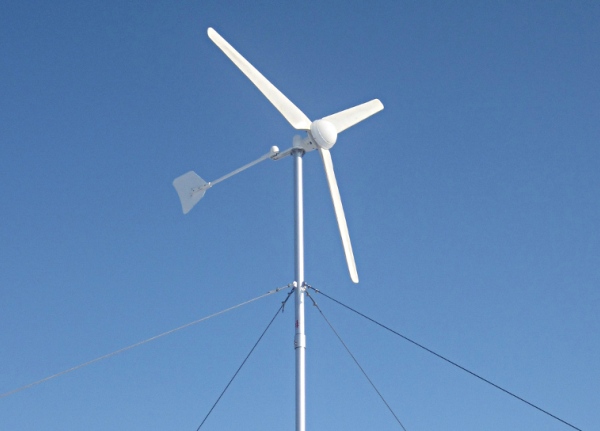
So it looks like a horizontal wind generator
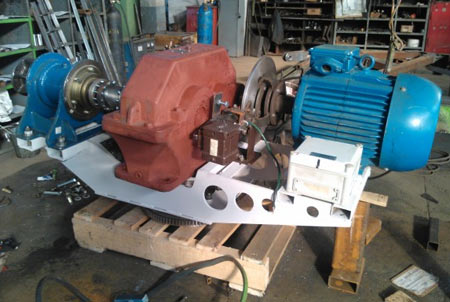
The first type is also called propeller, and is used most often, since such windmills have the highest efficiency. They are distinguished by a more complex design, including a device for orientation to the wind. Homemade manufacture of propeller type wind turbines is difficult. Such installations operate only at high wind speeds, therefore their use in conditions of weak winds is inexpedient.
The second type is vertical wind generators, they have a simpler design, and are unpretentious with respect to wind speed. The downside of such devices is their low efficiency. Any of the types of windmills has a significant disadvantage - this is a low quality of the received electricity, which obliges to take measures to eliminate this shortcoming. As compensators, stabilizing devices, converters and batteries are used.
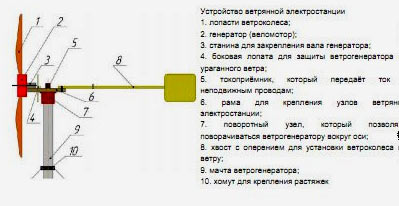
horizontal wind generator circuit
The design of a standard wind farm has the following components:
- wind motor;
- element, guiding the engine in the wind;
- reducer;
- generator;
- charger;
- accumulator battery;
- inverter (DC to AC converter).
If we do not delve into technical issues, the process of generating electricity by wind farms can be described as follows:
Before installation of the wind generator in a particular place, a number of preparatory measures are carried out. 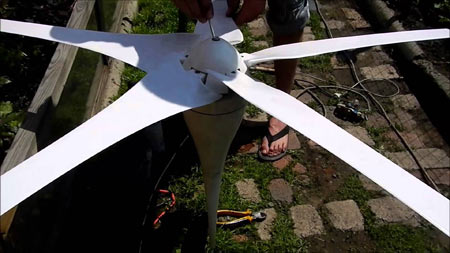 In this area, the direction and strength of the wind is studied, and if the location turns out to be promising, the question of the profitability of erecting the station is being solved.
Choosing a wind farm
Now in every region of our country you can find organizations offering windmills for the house. The choice of one or another device is made based on the needs of the consumer of electricity. For example, for a multitude of diverse electricity consumers, a powerful installation is required.
In order to make possible the operation of agricultural machinery, it will be sufficient to design a low-power generator. In any case, the calculation and installation of systems using renewable energy resources is best entrusted to specialists. The purchase of a particular type of windmill is preceded by a thorough analysis of the wind speed on the site.
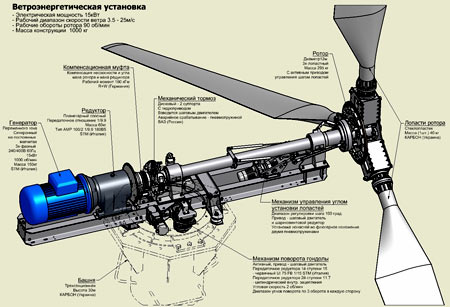
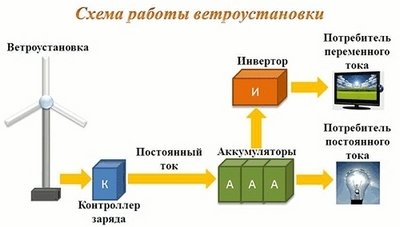
Scheme of wind power plant
Also it is necessary to take into account such moments as average annual electricity consumption and peak loads, as well as the terrain landscape. If within a radius of a hundred meters from the windmill there is a building or, for example, a tree, then the mast should have a height exceeding this obstacle by 10 meters. It is possible, of course, to lift the windmill even higher, however it will be economically impractical.
The positive side of using wind generators
- The inexhaustibility of wind energy.
- A simpler device and faster payback, compared to other alternative energy sources.
- Stable electricity production.
- Environmental Safety.
Negative sides of windmills
How much are the wind generators
Windmills vary depending on the strength and wind speed used. The market presents various units in a wide range. A plant with a capacity of up to 6 kW can supply electricity to a store, a cafe or even a small agricultural land.
If there is a need to supply electricity to a medium-sized village, the capacity of the power plant should be about 18-25 kW.
On average, for simple windmills for the house, suppliers will ask at least seven hundred thousand rubles. Installations for solving more serious problems will cost much more, three million is a very real price.
Small wind power
As it was said above, wind power plants are very noisy structures. 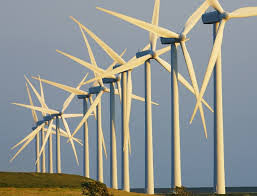 However, there are also options that are suitable for those places where a high noise level is unacceptable. Small objects, such as shops, can be provided with electricity by such silent installations.
The most popular options at the moment are vertical models, which have the following advantages:
- noiseless operation, eliminating vibration;
- protection from strong gusts;
- protection from lightning;
- ability to adjust to the direction of the wind.
Wind turbines for the house can be easily installed with their own hands, and they are easy to operate. There is such a variant of domestic wind generators, like a sail-type windmill. Perhaps he can scare off someone with his external unattractiveness, but his use can be justified even in a weak wind. As well as standard windmills, such units are neutral with regard to environmental pollution, are inexpensive and almost silent.
Prospects for the development of power plants that use wind power
It is said that there will be enough natural resources for our time, however, the time when alternative energy will take the leading position among all options for generating electricity is not far. Even today, in many countries, wind power stations for the home can be found. In our country, alternative energy is developing at a slow pace, which can be explained by poor financing from the state.
Also, the slow development in our country is conditioned by the large reserves of cheaper energy resources. Be that as it may, consumers in our country are faced with high energy tariffs, especially in remote areas. For such places, alternative energy sources are very appropriate, since often there is no centralized energy supply at all.  In defense of the development of wind power in Russia, we can note the fact that our territories have a huge wind power potential. The Far North and the Far East of our country can be attributed to the most windy zones.
In some regions of Russia, wind energy is very actively used, for example:
- Chukotsky Autonomous District.
- Astrakhan Region.
- Republic of Bashkortostan.
- Komi Republic.
- Kaliningrad region.
- Rostov region.
- Murmansk region.
As practice shows, wind power plants and other alternative energy sources are at least twice as effective as power stations that use traditional types of energy. Therefore, in order to obtain the same number of electric power it is necessary to build twice as many stations. Reasoning in this vein, one can come to the conclusion that there is a huge overrun of materials and occupied space, which negatively affects the ecology.
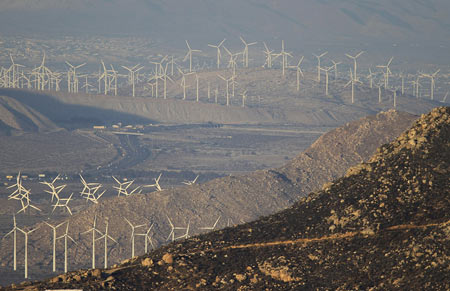
wind farm in California
Investments for the construction of windmills are comparable to the cost of building a nuclear power plant, with the calculation of the generated capacity. If we talk about the cost of the generated kilowatt of electricity, then contrary to beliefs it is non-zero. All due to the fact that there are operational costs.
It can be concluded that the renewability of energy is somewhat arbitrary, since non-renewable materials are used for the construction of wind farms, the production of which, by the way, is far from being environmentally friendly.
Development alternative energy, in which wind energy is used, is proceeding slowly because of the enormous laboriousness of the process of manufacturing equipment, the need for large areas and the instability of work.
How to make wind power stations with your own hands
It's no secret that the cost of windmills is very high, and not everyone can afford it.
An example of a homemade windmill
Therefore, more and more "Kulibin" attempts to make such installations themselves. In order to make a windmill with your own hands you will need:
- Plywood or sheet iron.
- Tree.
- Steel strip.
- Steel pipe.
- Bearings.
The first thing to do is weld the rotor spider and the shaft. In those cases where wood is used instead of metal, glue must be used to attach to the axis. The blades are fastened with bolted joints at the same distance from each other. When the drum is assembled, the joints are treated with paint. The next stage is the creation of the frame. To do this, you need corners and ball bearings.
After another coat of paint is applied, the lower end of the axis is complemented by pulleys. Next, it is necessary to hook the belt onto the pulley and connect it to the generator. Such self-made windmills have a capacity of about 800 W, and are designed for wind speeds up to ten meters per second.
Domestic Windmills
To provide electricity to the house, in which a family of four lives, a windmill with a capacity of 10 kW is required at least. More suitable option, providing several low-power wind generators, combined in a common system.  In order that nothing could affect the power supply of the object, it is recommended to use several types of alternative sources in one system. In the end, it turns out that if the wind energy is weak, can help out, but if this is not enough, you can resort to the help of a diesel generator.
The price of electricity is steadily growing and, naturally, each owner tries to optimize the costs of its payment. Here, all means are good - starting from the means of economy, technology with a low energy consumption index, energy-saving lamps, and ending with the use of multi-tariff electricity meters. Nevertheless, there will always be a tempting prospect of getting electricity not from the state, but from nature. One of the most effective such devices remains a wind generator, which is used in the West practically on an equal footing, and even more widely than the classical TPP or nuclear power plant.
The price and efficiency of the generator
Naturally, the most practical solution for obtaining electricity from wind energy will be a powerful device capable of generating required amount energy to provide consumers throughout the house. Wind generators with their own hands on 220V can be of different capacities and we will consider the principles of manufacturing each possible device from what may be at hand at every diligent master.
But to begin with, it is worthwhile to carry out at least a preliminary calculation of the wind generator and its profitability. For example, a household appliance for 800 kW of Russian assembly will cost one and a half thousand dollars for one kilowatt. Expensive. The Chinese products, not differing in reliability and accuracy of nominal values, will result in $ 900 per 1 kW. Also expensive. Note that this is only the generator itself, without peripheral equipment. This is actually an unrealistic price for a private trader, so we will try to use everything that is at hand and make our own autonomous system.
How to determine the power of the windmill
Calculating the power of the wind generator is a complex and time-consuming process that is applicable to a particular source generator. The easiest option is to use a dynamo from a tractor or car. Such a device does not actually require modifications and can be used in the energy supply system "as is". Of course, you can talk for a long time about devices on neodymium magnets, only, for example, in the village of Arkhipovka Orel they were not in life and never will be, and decommissioned tractors - darkness.
The most important indicator of any generator is its efficiency. Unfortunately, in an autotractor device it is not too high. The neodymium generator can reach 80%, and ours - no more than 55-60%, but with this data, without additional modifications the device can produce about 300 watts. This is not enough, but it is enough to provide direct current electricity to LED lighting, video surveillance systems, and if the converter is used, a TV with a low energy consumption class, a single-chamber refrigerator. And this is only one generating set, but nobody prevents them from making three or five pieces. Now about the propeller, which will rotate the dynamo.
Vertical or rotary wind generators?
Paddle vertical generators are one of the most popular in the world, however for their construction it is necessary to accurately calculate the blade, its shape and dimensions. As the experience of creating such devices by enthusiasts shows, the most effective lobe generators are with an adjustable blade rotation angle. The average size of each of the six blades is 650x120 mm, and the most effective angle of rotation relative to its axis is about 12 degrees, although experiments can be performed in each particular case.
The rotor windmill for the house is made with a horizontal arrangement of the generator axis, on which the rotor is mounted. It can be performed according to several schemes, which are presented below. The simplest version is the production of a rotor from a cylindrical container. It can be like a plastic barrel, a gas tank, after all, a pan. The container should be divided into four segments, each of which is attached to the hub. The hub is mounted on a metal frame, the approximate drawing of which is shown in the figure.
A low-power windmill for the house can be assembled with a modest set of used equipment and parts:
To connect the device to a network of electrical networks, wires with a cross-section area of at least 4 mm² are used. The finished installation is connected according to the scheme shown on the photo through the fuses 8, which is opened by the switch 9 for maintenance and repair. The nominal value of the resistor 1 is selected experimentally, and the ammeter 5 can be installed at the output of the converter 5 at will. Also, for the convenience of using the design, a variable resistor 4 can be used to adjust the voltage. More detailed scheme inverter is shown below.
Thus, it is possible to assemble a wind generator to ensure a minimum electricity demand. Spend and produce energy with the mind, successful all work!
generator;
car battery, than fresh and the more capacity, the better;
inverter for 300-700 W;
cylindrical capacity;
car or tractor charging relay (depending on the generator voltage);
control device (voltmeter);
The inexhaustible energy that air masses carry with them has always attracted people's attention. Our great-grandfathers have learned to harness the wind into sails and windmill wheels, after which he spent two centuries aimlessly rushing through the vast expanses of the Earth.
Today, again, he found useful work. Wind generator for a private house from the category of technical novelties becomes a real factor in our life.
Let's get acquainted with wind power plants, evaluate the conditions for their cost-effective use and consider the existing varieties. Home craftsmen will receive in our article information for reflection on the topic of self-assembly of the windmill and the devices necessary for its effective work.
What is a wind generator?
The principle of operation of the household wind power station is simple: the air flow rotates the rotor blades, mounted on the generator shaft and creates an alternating current in its windings. The resulting electricity is stored in batteries and, as necessary, consumed by domestic appliances. Of course, this is a simplified scheme for the work of a domestic windmill. In practical terms, it is supplemented by devices that perform electricity conversion.
Just behind the generator in the energy chain is a controller. It converts a three-phase alternating current into a constant one and directs it to charge the batteries. Most household appliances can not work from the "constant", so the batteries are put by another device - an inverter. It performs the reverse operation: converts a direct current into a household alternating voltage of 220 volts. It is clear that these transformations do not pass without a trace and take away a fairly decent part (15-20%) from the initial energy.
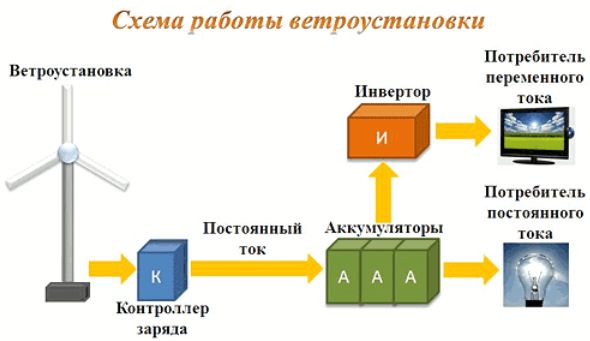
If the windmill is paired with solar battery or another generator of electricity (gasoline, diesel), the scheme is supplemented automatic switch (ATS). When the main power source is disconnected, it activates the backup.
To obtain maximum power, the wind generator must be located along the wind flow. In simple systems, the weathervane principle is realized. To do this, at the opposite end of the generator is fixed a vertical blade, unfolding it towards the wind.
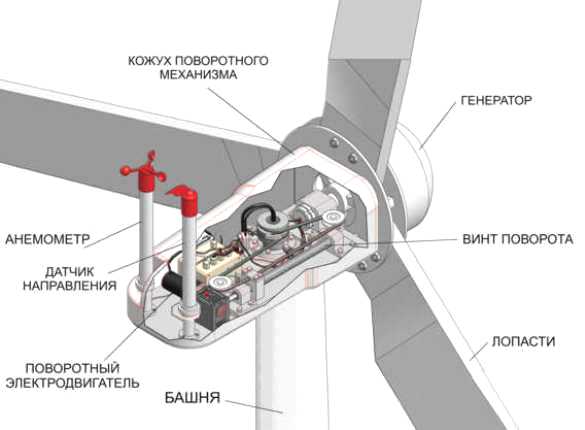
In more powerful installations there is a rotary electric motor controlled by a direction sensor.
The main types of wind generators and their features
There are two types of wind turbines:
- With a horizontal arrangement of the rotor.
- With a vertical rotor.
The first type is the most common. It is characterized by high efficiency (40-50%), but has an increased level of noise and vibration. In addition, its installation requires a large free space (100 meters) or a tall mast (from 6 meters).
Generators with a vertical rotor are energetically less efficient (efficiency is almost 3 times lower than for horizontal ones).
Their advantages include simple installation and reliability of the structure. Low noise allows you to put vertical generators on the roofs of houses and even at ground level. These facilities are not afraid of icing and hurricanes. They start from a weak wind (from 1.0-2.0 m / s), while a horizontal wind turbine needs an air flow of medium strength (3.5 m / s and above). According to the shape of the impeller (rotor), vertical wind generators are very diverse.
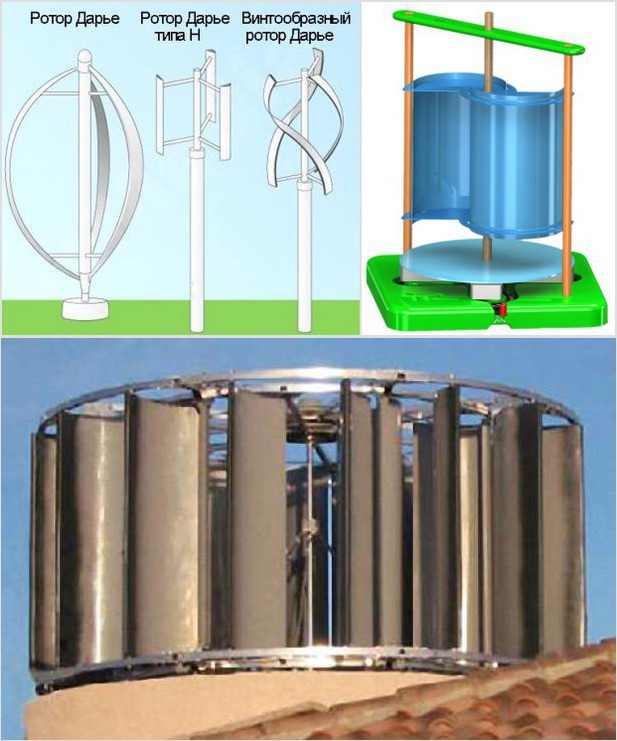
Rotor wheels of vertical windmills
Due to the low speed of rotation of the rotor (up to 200 rpm), the mechanical resource of such installations is significantly higher than the values of horizontal wind generators.
How to calculate and choose a wind generator?
The wind is not natural gas, pumped through pipes and not electric power, uninterruptedly arriving by wire to our house. He is whimsical and unstable. Today, a hurricane tears up the roofs and breaks trees, and tomorrow is replaced by a complete calm. Therefore, before buying or independent manufacture The windmill needs to assess the potential of air energy in its area. To do this, determine the average annual strength of the wind. This value can be found on the Internet on request.
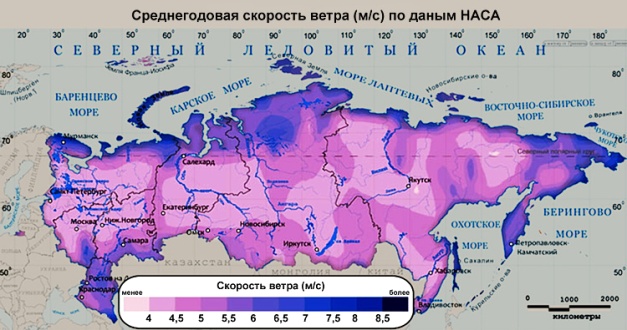
Having obtained this table, we find the area of our residence and look at the intensity of its coloring, comparing it with the scoring scale. If the average annual wind speed is less than 4.0 meters per second, then there is no sense in putting a wind turbine. It will not give you the right amount of energy.
If the wind power is sufficient to install a wind power station, then you can proceed to the next step: selecting the generator power.
If it is a question of an independent power supply at home, then the average power consumption of 1 family is taken into account. It is in the range of 100 to 300 kWh per month. In regions with a low annual wind potential (5-8 m / s), this amount of electricity can generate a 2-3 kW wind turbine. In this case, it should be borne in mind that in winter the average wind speed is higher, therefore, the generation of energy in this period will be more than in the summer.
Choice of wind generator. Estimated prices
Prices for vertical domestic wind generators with a capacity of 1.5-2.0 kW are in the range from 90 to 110 thousand rubles. Package at this price includes only a generator with blades, no mast and additional equipment (controller, inverter, cable, batteries). A full power plant together with installation will cost 40-60% more expensive.
The cost of more powerful wind turbines (3-5 kW) is from 350 to 450 thousand rubles (with additional equipment and installation works).
The windmill with our own hands. Fun or real savings?
Let's say right away that it's not easy to make a wind generator yourself. A competent calculation of the wind wheel, transmission mechanism, selection of a generator suitable for power and speed is a separate topic. We will give only brief recommendations on the main stages of this process.
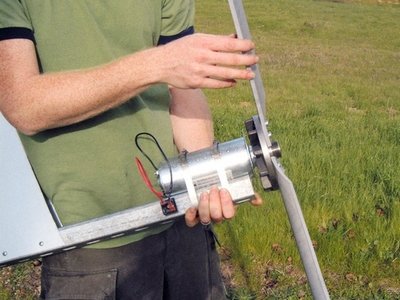
Generator
Car generators and electric motors from washing machines with direct drive for this purpose are not suitable. They are able to generate energy from the wind wheel, but it will be insignificant. Autogenerators need very high speed for efficient operation, which wind turbine can not develop.
In motors for stylalki another problem. There are ferrite magnets, and for a wind generator you need more efficient ones - niodymium ones. The process of their self-assembly and the winding of current-carrying windings requires patience and high accuracy.
The power of the device assembled by the hands, as a rule, does not exceed 100-200 watts.
Recently, among the home-brewers are popular motor-wheels for bicycles and scooters. From the standpoint of wind power, these are powerful niodim generators, ideally suited for working with vertical wind wheels and charging batteries. With this generator you can shoot up to 1 kW of wind energy.
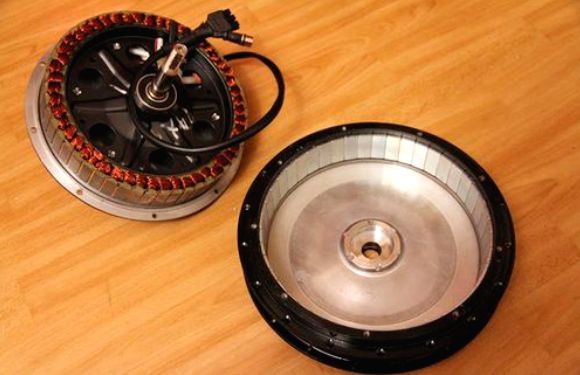
The motor-wheel is a ready-made generator for a homemade wind power station
Screw
The sail and rotor screws are most easily made. The first consists of light curved tubes fixed to the central plate. On each tube stretched blades of strong fabric. The large sail of the screw requires the hinged attachment of the blades, so that in the event of a hurricane they develop and not deform.

The rotor design of the wind wheel is used for vertical generators. It is easy to manufacture and reliable in operation.
Homemade wind generators with a horizontal axis of rotation work from the propeller screw. Home craftsmen collect it from PVC pipes with a diameter of 160-250 mm. The blades are mounted on a round steel plate with a mounting hole for the generator shaft.
![]()
Electricity steadily becomes more expensive. To feel comfortable outside the city in hot summer weather and on a frosty winter day, it is necessary or thoroughly spent, or to look for alternative sources of energy. Russia is a huge country with large flat territories. Although in most regions we have slow winds prevailing, low-income terrain is blown by powerful and violent air currents. Therefore, the presence of a wind generator in the farm of a suburban real estate owner is often justified. A suitable model is chosen based on the site of application and the actual use targets.
Wind turbine # 1 - rotor type construction
You can make an uncomplicated rotor-type windmill with your own hands. Of course, it is unlikely that it will be able to supply a large cottage with electricity, but it is quite possible to provide a modest garden house with electricity. With its help it is possible to supply with light in the evening time outbuildings, to illuminate the garden paths and the adjacent territory.
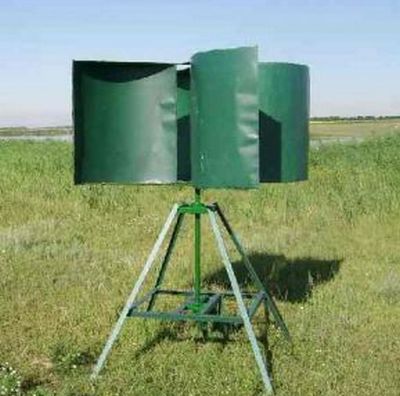
So or nearly so it looks like a rotor wind generator, made by own hands. As you can see, there is nothing super complicated in the design of this equipment
Preparation of parts and consumables
To assemble a wind generator, whose power does not exceed 1.5 kW, we will need:
- generator from the car 12 V;
- acid or helium battery 12 V;
- converter 12V - 220V for 700 W - 1500 W;
- large capacity of aluminum or stainless steel: bucket or bulky pan;
- car charge relay battery and charge indicator lamp;
- semi-hermetic switch of "button" type for 12 V;
- a voltmeter from any unnecessary measuring device, you can automotive;
- bolts with washers and nuts;
- wires with a cross section of 2.5 mm 2 and 4 mm 2;
- two clamps, with which the generator will be attached to the mast.
To perform the work we will need scissors for metal or a Bulgarian, a tape measure, a marker or a construction pencil, a screwdriver, keys, a drill, a drill, and wire cutters.
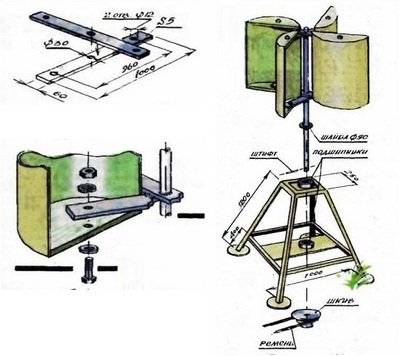
The course of design work
We are going to make a rotor and remake the generator pulley. To start working we need a cylindrical metal container. Most often for these purposes, fit a pan or bucket. Take a tape measure and a marker or a construction pencil and divide the capacity into four equal parts. If we cut metal with scissors, then in order to insert them, we must first make holes. You can also use the Bulgarian if the bucket is not made of painted tinplate or galvanized steel. In these cases, the metal will inevitably overheat. Cut the blades, not cutting them through.
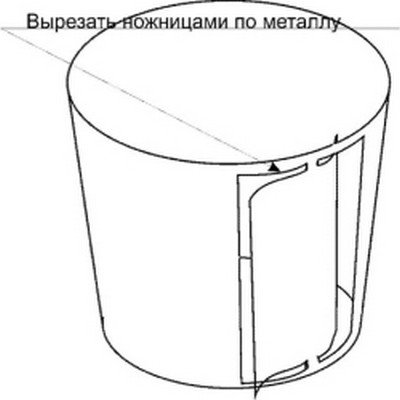
In order not to be mistaken with the size of the blades, which we cut into the container, it is necessary to make careful measurements and carefully count everything
In the bottom and in the pulley, mark and drill the holes for the bolts. At this stage, it is important not to hurry up and arrange the holes with symmetry to avoid imbalance when rotating. The blades should be bent, but not too hard. When doing this part of the work, we take into account the direction of rotation of the generator. Usually it rotates clockwise. Depending on the angle of bending, the area of exposure to wind currents also increases, and hence the speed of rotation.
![]()
This is another version of the blades. In this case, each part exists separately, and not in the capacity of the container from which it was cut
Once each of the blades of the windmill exists separately, you need to screw each. The advantage of this design in its increased maintainability
The bucket with the prepared blades should be fixed to the pulley using bolts. On the mast, use the clamps to install the generator, then connect the wires and collect the chain. The circuit, the colors of the wires and the marking of the contacts should be rewritten in advance. Wires must also be fixed on the mast.
To connect the battery, use 4 mm 2 wires, the length of which should not be more than 1 meter. The load (electrical appliances and lighting) is connected by means of wires with a cross section of 2.5 mm 2. Do not forget to put the converter (inverter). It is connected to the network to the contacts by a 7.8 wire of 4 mm 2.
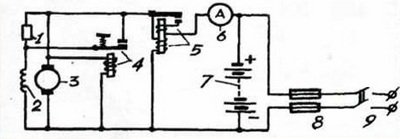
The wind turbine design consists of a resistor (1), a starter winding of the generator (2), a generator rotor (3), a voltage regulator (4), a reverse current relay (5), an ammeter (6), a battery (7), a fuse (8) , the switch (9)
Advantages and disadvantages of this model
If everything is done correctly, this wind generator will work, without creating problems for you. With a battery of 75A and with a converter of 1000 W, it can feed street lights, burglar alarms, video surveillance devices, etc.
The scheme of the installation demonstrates exactly how the wind energy is converted into electricity and how it is used for its intended purpose
Advantages of this model are obvious: it is a very economical product, it can be easily repaired, does not require special conditions for its functioning, it works reliably and does not disturb your acoustic comfort. The shortcomings include low productivity and a significant dependence on strong wind gusts: the blades can be broken by air currents.
Wind turbine # 2 - axial construction on magnets
Axial windmills with iron-free stators on neodymium magnets in Russia until recently did not do because of the inaccessibility of the latter. But now they are in our country, and they are cheaper than originally. Therefore, our craftsmen also began to produce wind generators of this type.
Over time, when the capabilities of the rotor wind turbine will no longer provide all the needs of the economy, you can make an axial model on neodymium magnets
What should be prepared?
As a basis for the axial generator, you need to take the hub from the car with the brake discs. If this part was in use, it must be disassembled, the bearings should be checked and lubricated, and the rust should be cleaned. The finished generator will be painted.
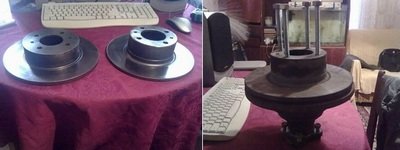
To clean the hub from rust, use a metal brush, which can be put on the drill. The hub will look great again
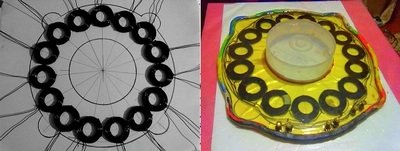
Distribution and fixing of magnets
We have to stick the magnets on the rotor disks. In this case, 20 magnets measuring 25x8 mm are used. If you decide to make a different number of poles, then use the rule: in a single-phase generator there should be as many poles, as many magnets, and in three-phase it is necessary to observe a ratio of 4/3 or 2/3 of the pole to the coils. Place magnets followed by alternating poles. In order for their layout to be correct, use a template with sectors printed on paper or on the disc itself. Magnets are correctly placed. Before fixing them with epoxy resin, it is necessary to make skirting boards from plasticine, so that the sticky mass can solidify, and not the glass on the table or floor
To fix the magnets, you need to use a strong adhesive, after which the strength of the glue is further strengthened with epoxy resin. It is filled with magnets. To prevent the spreading of the resin, you can make curbs from plasticine or simply wrap the disc with adhesive tape.
Three-phase and single-phase generators
A single-phase stator is worse than a three-phase stator, because with a load, it gives a vibration. This is due to the difference in the amplitude of the current, which arises because of the non-constant return of it at a time. The three-phase model does not suffer from this deficiency. Power in it is always constant, because each other's phases compensate: if one current falls in one, and in another it builds up.
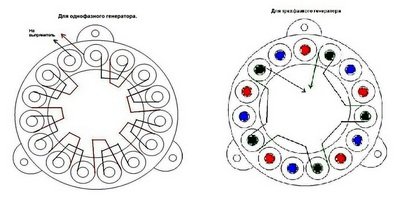
In the dispute between single-phase and three-phase options, the latter emerges as the winner, because the additional vibration does not extend the life of the equipment and irritates the hearing
As a result, the return on the three-phase model is 50% higher than the same single-phase indicator. Another advantage of the absence of unnecessary vibration is acoustic comfort when working under load: the generator does not buzz during its operation. In addition, vibration always disables the wind generator before it expires.
Coiling process
Any expert will tell you that before winding the coils you need to make a careful calculation. And any practitioner will do everything intuitively. Our generator will not be too fast. We need the charging process of a 12-volt battery to start at 100-150 rpm. With such initial data, the total number of turns in all coils should be 1000-1200pcs. It remains to divide this figure by the number of coils and find out how many turns there will be in each.
To make the wind generator at low speeds more powerful, you need to increase the number of poles. In this case, the frequency of the current oscillation will increase in the coils. It is better to use a thick wire to wind the coils. This will reduce the resistance, and, therefore, the current will increase. It should be noted that with a large voltage, the current can be "eaten" by the winding resistance. Simple homemade machines can quickly and accurately reel quality coils.
The stator is marked up, the coils are packed into place. To fix them, an epoxy resin is used, the flow of which is again resisted by plasticine edges
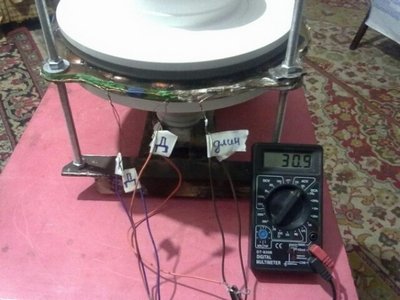
Because of the number and thickness of the magnets located on the disks, the generators can vary significantly in their operating parameters. To find out what power to expect as a result, you can wind one coil and scroll it in the generator. To determine the future power, it is necessary to measure the voltage at certain revolutions without load.
For example, at 200 rpm, 30 volts is obtained at a resistance of 3 ohms. We subtract the voltage of the battery from 12 volts from 12 volts, and divide the resulting 18 volts by 3 ohms. The result is 6 amps. This is the volume that goes to the battery. Although in practice, of course, less is due to losses on the diode bridge and in the wires.
Most often, the coils are made round, but it is better to stretch them out a little. In this case, copper in the sector is more, and coil turns are straight. The diameter of the inner hole of the coil should match the size of the magnet or be slightly larger than it.
Preliminary testing of the resulting equipment is carried out, which confirms its excellent performance. Over time, this model can be improved
When making a stator, note that its thickness should match the thickness of the magnets. If the number of turns in the coils is increased and the stator is thicker, the interdisk space will increase, and the magnetic flux decreases. As a result, the same voltage can be produced, but less current due to the increased resistance of the coils.
As a form for the stator, plywood is used, but it is possible to mark out sectors for coils on paper, and make curbs from plasticine. Strength of the product will increase the glass fabric placed on the bottom of the mold and over the coils. Epoxy should not stick to the mold. To do this, it is smeared with wax or petroleum jelly. For the same purpose, you can use film or tape. The coils are fixed to each other motionless, the ends of the phases are led outward. Then connect all six wires with a triangle or a star.
The generator assembly is tested using a hand rotation. The resulting voltage is 40 volts, the current strength is about 10 amperes.
Final stage - mast and screw
The actual height of the finished mast was 6 meters, but it would be better to make it 10-12 meters. The base for it needs to be concreted. It is necessary to make such fastening that the pipe could be lifted and lowered by means of a manual winch. A screw is attached to the top of the pipe.
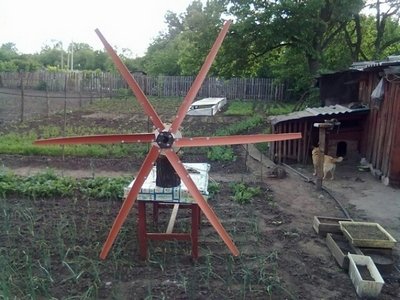
PVC pipe is a reliable and fairly light material, using which it is possible to make a wind turbine screw with a predetermined bend
To make a screw you need PVC pipe, whose diameter is 160 mm. From it, it is necessary to cut a six-bladed two-meter screw. With the shape of the blades, it makes sense to experiment to strengthen the torque at low revs. From a strong wind, the screw must be taken away. This function is performed using the folding tail. The generated energy is stored in the batteries.
The amounts that have to be paid for utilities, are growing every year. This is especially true for electricity. But not everyone knows that you can get it literally from the air, or rather - with the help of wind force.
Thanks to which this is possible, they are called wind generators. The purchase of such equipment will not be expensive. However, you can save by making a vertical windmill with your own hands.
Unlike other ways of obtaining energy, windmills have a lot of advantages, such as:
- environmental friendliness
- operation without fuel
- energy saving
- uncomplicated service
- the use of an inexhaustible source of energy
In addition, a good wind turbine will make the house an autonomous point for the extraction of electricity.
There are practically no wind generators, however, they have minor drawbacks:
- high cost of plants (factory models)
- noise
- excess energy requires additional batteries
- power variability
The last drawback is the most significant, however, you can get rid of it by adding batteries to the installation. In addition, the effect of wind generators depends entirely on the variability of weather conditions.
As you can see, the advantages of a wind generator are greater, which indicates the profitability of its use.
Who benefits?
There are a lot of kinds of wind generators, and even more subspecies. Which device should be installed on one or another depends on the following factors:
- wind speed on the ground
- purpose of the device
- estimated cost
Before installing the windmill directly, you need to think several times: will the costs pay off. To begin with, determine the speed and direction of the wind on the proposed site for installation.
You can obtain this information in two ways: independently or by contacting a local weather service. The first option requires a portable station, which can be rented or purchased.
Plus, independent measurements in their accuracy, however, a full study will take at least one year. The data obtained in the meteorological service will have approximate values, but they do not require expenditures for and time for additional calculations.
To install a windmill, the wind speed for the year should be at least 4.5 m / s-5 m / s.
At values of about 4-5 m / s, the energy generated by the average power generator will be 250 kWh per month. This is enough to provide electricity for a house for 3-4 people with heating and hot. For a year the windmill can produce up to 3 thousand kWh. The cost of installing such a wind generator is about 180 thousand rubles.
Creating your own installation is much cheaper. In this case, it is necessary to take into account the constant growth of electricity tariffs. Thus, the wind generator can become good alternative source electricity.
Where to install
The choice of a place to install a windmill is one of the most important milestones. The best option there will be a free elevated point. It is important that the wind generator is not located below the level of the nearest and buildings, which will interfere with the flow of wind.
Most suitable places for installation of wind generators: steppes, banks of reservoirs, deserts and elevations. In such areas, strong and constant winds are most often blowing.
In multi-apartment or urban environment, the generator can be placed on the roof. This procedure should be agreed with the relevant authorities. In order to ensure that the vibrations of the windmill do not harm the roof, it is worth exploring its design.
That noise from the generator did not annoy, it is necessary to establish it on distance of 15-25 m from inhabited buildings.
One of the main parameters of the windmill is the location of the rotational mechanism (shaft) relative to the earth's surface. On this basis, the devices are divided into horizontal and vertical.
The first work on the principle of a windmill: the mechanism rotates in search of wind and the blades from the slightest air flows come into motion.
This type of device generates a large amount of electricity, which will be a lot for a private house.
Wind turbines with a vertical axis of rotation will be the ideal solution for providing electricity to a small site or private production.
In addition, such a device has the following advantages:
- regardless of wind direction
- not exposed to weather conditions
- works even at low speeds
- the area of the blades is 2 times greater than that of horizontal windmills
The vertical wind turbine has disadvantages: low efficiency and high noise level. But, these disadvantages are insignificant, in comparison with the general use of the device.
So, the horizontal windmill can be installed directly on the roof, and the vertical windmill should be kept at a distance.
How to turn the wind into heat
Even from a low-capacity windmill, you can get heat for the whole house. One of the easiest to perform is a heating system with natural circulation.
Installing a vertical windmill with your own hands for heating, you can save a decent amount. In addition, when using the system natural circulation together with wind generator no need to spend money on the pump.
The heating scheme includes:
- Boiler
- Conductive straight pipe (for delivery of heated water)
- Radiators
- Return pipe (for delivery of cooled water back)
The boiler is installed below the level of the entire system. This is necessary to ensure the natural supply of water.
With the help of direct and return pipes The radiators are connected in series with the top and bottom of the boiler, respectively. The water heated in it will be squeezed out, falling alternately into the radiators.
Such a system will significantly save on heating the house. In addition, it will regulate the temperature in the room.
Wind generator components
To design even the most simple vertical windmill with your own hands (220 V), you need to purchase the main components:
- rotor - mobile part of the generator
- blades
- mast - can have different construction (tripod, pyramid)
- stator - it contains coils with copper wire
- battery
- inverter - transfers DC to AC
- controller - designed to "brake" the generator when its power exceeds the set value
For the manufacture of blades it is best to use sheet plastic. Other materials are subject to severe deformation and damage. The larger the area of the proposed part, the denser the plastic should be.
When choosing a material, it is important to make sure that this is a high-quality PVC, otherwise you will have to spend again on new components and make complex calculations.
Thus, to create your own windmill, you will not need expensive or rare parts.
Vertical wind turbine versus horizontal
To understand which construction of the windmill works more efficiently, it is worthwhile to consider in more detail the features of each of them. The horizontal generator has the following advantages:
- effective in any direction of air flow
- occupies much less space compared to the vertical
- it operates at high speeds even with a slight wind speed
- has a simple construction
- does not make noise
In addition, horizontal type wind generators are made of light materials, and can be installed even on a lamp post. When placed along the road, such structures work even in windless weather.
The service life of wind generators of both types is approximately the same. Proper care and maintenance allow them to work effectively for up to 25 years. In horizontal windmills, the main load comes from the hub and bearing assembly. Vertical products experience greater pressure on the blades.
The biggest difference between these kinds of windmills is their price. The horizontal costs for owners of such structures are much more expensive.
Such a windmill is better to use zones with increased turbulence and frequent changes in wind direction. Vertical are more suitable for terrain open type with a constant wind speed above 4.5 m / s.
Based on the results of the comparison, many summer residents choose the vertical type of wind generator.
Preparing the details of a vertical windmill
Blades are made of different materials. The main condition - they should be easy.
The simplest version will be the manufacture of blades from the PVC pipe.
They are less exposed to sunlight and are strong enough.
For the vertical windmill, 4 PVC parts and 2 of the tinplate are created. The latter are cut in the form of semicircles and fastened on both sides of the pipe.
Mounting the blades occurs on the frame in a circle. Rotation radius of the blades will be equal to 690 mm. The height of each blade is 700 mm.
When assembling the rotor, the following parts are required:
- 6 neodymium magnets and 2 ferrite magnets
- discs with a diameter of 230 mm (2 pieces)
On one disk, you should place neodymium magnets, while not forgetting to change their polarity, alternating during installation. Between them it is required to observe an angle of 60 degrees, with a diameter of 165 mm. On the 2 disc, you should attach the ferrite magnets according to the same scheme. Then they need to be filled with glue.
In order to start the manufacture of the stator, it is necessary to wind 9 coils of 60 turns. Usually this is used copper wire with a diameter of 1 mm. The coils are then welded together as follows:
- beginning 1 is connected by the end 4
- 4 - from 7
The second phase is assembled in exactly the same way, only soldering occurs from the second coil, and accordingly, the third phase is drunk with 3 coils. From plywood, you need to make a special shape. It is packed with a piece of fiberglass, and then a coil.
The final stage is the filling of the structure with glue. After a day the stator is ready for operation.
Now that all parts of the generator are made, they need only be connected:
- In the upper there will be hairpins later. For them you need to make holes (4 pieces). They are designed to smoothly "land" the rotor in place.
- In the stator holes are also made for the bracket.
- On it lies the lower rotor (magnets up).
- Then the stator is stacked.
- The second rotor is placed on top of the magnets. The parts are fixed with each other using nuts.
The vertical generator requires a detailed consideration. Its main disadvantages include low efficiency and more details in comparison with the horizontal. On the other hand, such a product can work efficiently even with a small wind.
The horizontal generator is more reliable, because it can withstand strong gusts of wind. Noiselessness of this type of construction is also one of its most important advantages. You can install a horizontal windmill even on the roof of a residential building.
Thus, to collect the main parts of the windmill is not very difficult.
Wind turbine construction
The wind generator is a wheel with blades attached to it, a reducer (converts and transmits torque), a battery and an inverter.
Assembly of the product is carried out as follows:
- Preparation of three-point reinforced foundation.
- The mast is made of strong pipes (you can take water pipes). She must carry the rotor above the attic.
- Screw the generator to the finished mast.
- Attachment of a frame with blades to the generator.
- Fastening of the mast to the foundation and its additional fixation by means of a stretching.
Collection electrical network is also carried out in a certain sequence.
The windmill should produce a three-phase alternating current, which is converted into a constant current by means of a bridge rectifier. A standard car relay is used to monitor the charge level. An inverter is connected to the battery, which emits 220 V AC.
Thus, the following results of the work of the finished windmill at different wind speeds are obtained:
- 5 m / s - 15W
- 10,4 m / s - 45 W
- 15.4 m / s - 75 W
- 18 m / s - 163 W
There are several ways to increase the generation of energy by the generator. For example, if you increase the height of the mast to 26 meters, the average annual wind speed rises to 30%. At the same time, electricity is produced 1.5 times more. This is provided by eliminating the influence of buildings and trees on the speed of air flows.
So, to make the windmill work effectively, you need to calculate its design characteristics in advance.
Care of the windmill
As regular maintenance of the structure, the following procedures are carried out:
- lubrication of moving parts (at least 2 times a year)
- screwing of bolts and electrical connections
- checking mechanisms for rust and loose stretches
- blade breakage monitoring
The most common damage to the windmill is the detachment of the blade. In winter, they have a crust of ice. Frequent cleaning will prolong the life of the structure.
Painting parts is made as necessary. Once a year, you need to completely inspect the structure for damage.
Homemade windmill differs greatly in power values from factory products. This is due to inaccurate calculations. A horizontal wind turbine with a theoretical power of 101 W will give out only 90, and a vertical wind turbine at 69 W will produce about 60.
In order not to be disappointed in the low indices of the self-made design, it is worth making it with the calculated parameters 2 times higher than necessary.
Thus, the assembly of a vertical windmill is a fairly simple option for providing a residential house with electricity. This is due to the simplicity of the assembly of the structure, the low cost of the project and the high efficiency of the device. In addition, it requires minimal maintenance, and electricity is constantly produced. On how to make a windmill on your own, presented on the video:
Found an error? Select it and press Ctrl + Enterto let us know.