The device of a drain tank with the button. Other possible malfunctions. We make the float mechanism
If the installed capacity for draining the toilet water is working correctly, no one thinks about its internal arrangement, the principle of operation and the procedure for carrying out repairs. It's another matter when the water is not getting to the required level or it is badly merged into the bowl of the toilet bowl. This is where you will need a scheme for installing a toilet flush tank: with a button, lever or any other device.
Storage Capacity Device
The design of the toilet bowl with the button is almost the same as the model equipped with a lever. And the purpose of both varieties is completely the same - taking water from water supply network, storage and quick drain on the signal from the mechanical shut-off valve.

Nevertheless, there are some differences. Of course, it is easier to press than to raise the lever, but there is plenty of opportunity to break a more complex design. According to statistics, the repair of the toilet bowl - the drain tank with the button - is several times more likely to be made than the fixing of the sanitary unit with the lever drainage method.
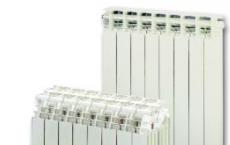
In addition to the various mechanisms of draining the water, the tanks are classified according to the type of material. Features of each of them are given in the table.
| Material | Description |
| Cast iron | Tanks of cast iron were used at the beginning of the last century. This is a very reliable and sturdy material, which is practically non-corrosive. And now in some apartments you can find similar devices. However, new models are not produced due to the high cost and complexity of the production process. |
| Faience | A faience cistern is included in the delivery of a classic toilet bowl. Special fastening holes and accessories allow to fix the container directly on the bowl, providing excellent tightness and ease of use. |
| Plastic | Polymers usually make drainage tanks designed for concealed installation and installation in a country toilets. In the first case, the button is located on the front surface of the container, otherwise it will not be possible to use it. Dacha drain cisterns are characterized by a strong casing and are equipped with the necessary fittings for securing separately from the bowl of the toilet bowl. |
The toilet flushing system with a button or two is constructed according to a scheme that is different from the one you saw in the old storage tanks. We will talk about its features in the next section.
Modern drainage tanks
With one button
The number of buttons that the drain tank is equipped with does not affect the device layout of the valve installed inside the tank. Moreover, if the holes in the body and the dimensions coincide, you can replace the mechanism and enjoy an adjustable descent.
Consider how the toilet tank with the button is arranged in more detail:
- The float, by means of which the level of water in the tank is measured, can be made of plastic or metal. In the latter case, the price of the mechanism is slightly increased.
- This device is connected to a ball locking mechanism that opens and closes the inlet pipe through which water enters the tank.
- To smoothly fill the tank and reduce noise, the nozzle is also equipped with a diaphragm with a lever that adjusts the head of the jet.
- Adjustment of the water drain is made with a siphon and a special gasket that closes the outlet.

Note!
There are indiscriminate and collapsible siphons.
The second is preferable, as they are easier to maintain: you do not need to remove all the fittings, just remove and rinse the rubber valve itself.
Now let's look at how to assemble the toilet bowl with a button and disassemble it, if necessary. It should be noted that the need for dismantling the reservoir occurs only in the event of a clogging of the membrane. Otherwise, the mechanism is so reliable that it does not require maintenance.
The hardest part is to pull out the button itself when disassembling the storage tank, which, if twisted by its hand, freely rotates around its axis.
The instruction for dismantling is extremely simple: before twisting, you just have to press it and hold it in this state until it is completely removed.
When finished with the button, you can flush the membrane.
This is done as follows:
- the faucet that is standing on the pipe that supplies water to the tank is blocked;
- from the container all the liquid is drained;
- then unscrew the nut connecting the siphon with the inlet pipe;
- after that, the whole mechanism is dismantled and the membrane located in the lower part is cleaned.

With two buttons
This mechanism is used to save water. By using this or that lever, you can release half the volume of liquid into the toilet bowl or the whole.
The design of the toilet bowl with two buttons is practically the same as a one-button version. Only the exhaust fittings have been slightly modified.
Another difference is the way of dismantling. It is unlike the order of disassembly of a storage tank equipped with only one button.
In this case, you need to act in such a sequence:
- Press the two buttons simultaneously, releasing the special mounting groove located on the bushing.
- Inserting a screwdriver into this slot, you can remove the first button, and then - the second.
- Below them is a fixing screw holding the upper part of the tank.
- Unscrewing it and removing the cover, you get access to the drain valve of the tank for cleaning, adjustment or replacement.

Advice!
To avoid problems with the operation of the drain tanks, get high-quality and expensive mechanisms.
Having saved a little money now, you can face many problems in the future.
The order of maintenance of the tank with the button
Common problems
The device of the toilet bowl with the button, as you could see, is as reliable as possible.
If you still have any problems in the work of the product, you need to act according to the following scheme:
- Close the water, unscrew the button, remove the top of the tank and visually inspect the interior of the tank. For convenience, you can pre-drain the water.
- Particular attention during the examination should be given to the outlet membrane. More often problems with a tank are connected with loss of tightness of this knot.

- In most cases, the membrane needs to be cleaned of debris, but it is better to replace it with a new one. The fact is that because of the poor quality of water in the pipes, silicone or rubber of the sealant is rendered unusable and ceases to fulfill the function assigned to it.
- If the tank is not full, you need to adjust the level of the float. Achieve the desired volume can only be experimentally: pouring water and draining it.
- If it is necessary to replace the valve, it is advisable to purchase a complete repair kit consisting of a diaphragm and a bush. When installing, do not forget to equip the parts with gaskets.

The quality of work and the longevity of the tank is greatly influenced by the correctness of its installation. If you do not want to use the services of specialists, you will have to fix the capacity yourself.
This is done like this:
- Before installation, the purchased tank must be prepared: install drainage valves, nipples, gaskets and so on. All the necessary actions are described in detail in the accompanying documentation of the container.
Advice!
Screws and nuts must be twisted by hand, without exerting excessive force.
Using keys or pliers, you can damage fragile plastic parts that are not designed for this effect.

- After assembly, the container is fixed on the toilet bowl. For this, metal bolts are used, equipped with rubber gaskets, to which are screwed plastic nuts with petals from below.
- The joints should be sealed with rubber gaskets and a sanitary gel. After treatment, the latter must be allowed time for polymerization.
- Then. It must be installed with a crane, in order to cover the water access in the tank if necessary.

Conclusion
Knowing the features of the design, the principles of operation and the order of maintenance of the drain tanks, you will be able to solve the problems yourself, without resorting to the help of plumbers whose services are sometimes quite expensive. In order to avoid troubles with plumbing equipment, it is necessary to correctly connect it to the engineering networks of the apartment or house. You can find out about the order and rules of work execution from the video in this article.
The toilet has long been one of the necessary equipment for a comfortable life. This plumbing device is designed for long trouble-free operation. Breakdowns are rare, and most often they are associated with a flushing mechanism. Home master can easily carry out the repair of the toilet tank with its own hands. Let's talk about the most common breakdowns of the device.
Before you repair equipment, you need to get acquainted with its device and the principle of operation. The toilet itself consists of a bowl and a bowl full of water. That capacity is called the drain tank. The water in it enters the bowl, where it flushes its contents into the sewer system. The drainage system is activated by pressing the lever or the button. It depends on the model of the equipment.
On sale it is possible to find the drain cisterns of various types. There are several classifications of such equipment. According to the location of the tank relative to the bowl, there are two main categories.
Fully Separated Designs. It is assumed that in this case the tank and bowl are separated. This is the first of the existing options for the toilet. The height of the location of the tank may have different modifications. A high position assumes that the drain tank is at a distance of a meter or more from the bowl. Elements are connected with each other by a pipe. This option was recently the most common.
Separate design with a low-lying tank. In this case, the mechanism of water drain can be not only a lever
This is due to the fact that the high position of the drain tank ensures high speed and good pressure of water entering the flushing. Today such models are used less often. Popular modifications with hidden in the attic space or under the false ceiling drain tank.
Another species - built-in tanks, which are equipped with hanging toilet bowls. They are fixed in a special installation. The low position of the tank suggests that it is attached to the wall a short distance from the bowl. They are connected by a short pipe. The drain valve is located on the tank body. Since the height from which water is drained is less, its speed and head are somewhat lower.
Drain tank at toilet bowls-compacts is placed directly on the bowl. To do this, it is equipped with a special shelf. Such models are very convenient in installation and operation, but the water head and its speed at washout are minimal. Compacts are produced with trapezoidal and triangular tanks. Such toilet bowls are called angular. They fit very well into the corners of the rooms, it is especially convenient to install them in small bathrooms.
Toilet bowls-monoblocks. The design is a toilet, in which case the drain tank is built. Such equipment is very easy to install. It is only necessary to bring water and connect the device to the sewer. This can be considered the main advantage of the candy bar. When there are serious breakages in any part of the candy bar, it often has to be changed, since monolithic execution often prevents full repair.
Drain device: types of mechanisms
Inside each drain tank there is a water drainage mechanism. Today there are several varieties of this design:
- Lever. It is a lever, by pressing on which the descent of water into the bowl is activated. It is mounted in separate toilet bowls, in tanks with an upper and lower arrangement.
- Pneumatic. The trigger is activated by pressing the button on the pneumatic chamber, which is connected to the exhaust valve by means of a flexible duct.
- Shtock. To open the drain valve, it is necessary to raise the vertical stem, which is displayed on the top of the tank cover.
- Button. The drain mechanism in this model is started by pressing the button on the cover of the tank. There are two-button variations in which one of the buttons is responsible for draining the half of the tank, the second for draining all the water in the tank.
All tanks are filled with water strictly to a certain level, after which their filling automatically stops.

Lever release mechanism. Used most often in old models of drain cisterns or in stylized antique design devices
Depending on the method of supplying water to the tank, valves can be built in different types of. The non-meltable valves can be lower and side. In this case, there is a special camera in the design, resembling an inverted glass in its appearance.
The principle of the device is based on Archimedean force. It changes its value depending on the degree of filling of the tank and changes the position of the chamber that blocks the water supply.
The lateral float valve is of membrane type or piston type. In any case, it blocks the water when a certain amount of liquid enters the tank. All fittings can be represented as independent interchangeable elements or as a single constructive kit.

The drain tank of the toilet bowl with the bottom water supply. The most problem-free and noiseless option, therefore, is particularly popular in urban apartments
By the type of plumbing connections, all the drain tanks are divided into two groups.
- Lateral. The connection is connected to the right or left. The tank is usually equipped with two holes. The non-working is covered by a special plug. The main drawbacks of such tanks are noise when filling the tank with water and a non-aesthetic connection of a water pipe, which can not be disguised.
- Lower. The water supply pipe is connected from the bottom of the tank. In this way, you can hide the tap. In addition, when the container is filled with water, a minimal noise is created.
Each of the varieties of drain tanks finds their customers and is used in various models of toilets.
Main components of the drain tank
Structurally, all variations of the drain tanks are arranged approximately identically. Each of them has three main mechanisms.
Draining or shut-off valves is designed to regulate the discharge of water into the bowl of the toilet bowl. Prevents leakage of liquid from the tank. In the process of filling the tank, the water in it helps to ensure that the shut-off valve is pressed to the drain hole as tightly as possible, which prevents the water from draining into the bowl. If there is a constant leakage of water, this may be due to malfunctioning of the shut-off valve.
Filling valve is combined with the water supply device. Designed to control the level of liquid in the drain tank. It stops the water supply as soon as it reaches a certain level. To determine the amount of liquid in the tank, a float connected by a rod to a filling valve is used. Regardless of where the filling is located - the valve on the side or bottom - the float is placed vertically in the tank. In older models - horizontally.
Overflow and discharge mechanism The valve is equipped with a start button or lever. It is designed to prevent water from pouring out of the tank when the float valve breaks down. The overflow system is connected to the drain, when the start button is pressed, it is activated. Excess water is diverted to the sewer. An important element of the mechanism is a float cock. Leakage of water from the tank is most often associated with its functioning.

The float valve in older models was ubiquitous. The float rises together with the water arriving in the vessel and at a certain level closes the valve
It should be understood that all common faults of the drain tank are associated with these mechanisms. And to eliminate problems, these elements must be replaced or regulated. If there are chips or cracks on the surface of the tank, most likely, it will have to be replaced. Despite the statements of manufacturers, most of the modern adhesives used for repair, can not cope with this task.
Troubleshoot common problems
Practice shows that the malfunction of the waste tank is very diverse. We will consider only those that happen most often.
Leaking water to the floor
Sometimes around the toilet starts to appear pure water. The reason for this phenomenon is most likely the wear of the sealing ring, which is mounted between the bowl and the tank in the toilet bowl compact. Alternatively, a leak in the gasket of the fixing bolts may lead to leakage. It is very easy to detect these faults. Sufficiently attentive visual inspection.

To replace the O-ring between the bowl and the drain tank, it is necessary to remove the lid, the valve and dismantle the container
If the diagnosis showed a problem, you can try to tighten the fasteners. You need to do this very carefully, so as not to destroy the gaskets. If the positive effect is not observed, you should remove the reservoir and change the seal and gaskets. This is done like this:
- We overlap the water supply, completely drain it from the tank.
- We remove flexible water supply.
- Remove the tank cover, find the fasteners and carefully unscrew them.
- We remove the drain tank.
- We remove the old sealant, we clean its seat on the tank and on the toilet.
- On the prepared place we put a new sealant, from above a drain tank.
- We put in place fasteners and carefully tighten them.
- We connect flexible liner, then open the water.
Similarly, the replacement of gaskets is carried out. In this case, after the tank is removed from its place, the dismantling of the gaskets that have served their ends is carried out. Their seats are also cleaned, after which new ones are installed. To seal the joints, experts recommend additionally lubricating them with silicone.
The drain tank does not receive water
A frequent breakdown is the case when the water is very poorly supplied to the tank, and sometimes does not fall into it at all. There can be several reasons. We offer instructions on how to properly repair the toilet flush tank in this case. First of all, you need to check the condition of the flexible supply hose. If it fails, water can not enter the tank. To do this, shut off the water supply, then disconnect the piping from the toilet.

If a filter is not installed on the water supply pipe, the contaminant particles and rust get into the drain tank. As a result, the intake valve can easily be clogged and must be cleaned
From the tank do not disconnect the hose. Now we direct the hose to the toilet and open the shut-off valve on the water pipe. If the piping is in order, the water will flow into the toilet. If this is not the case, we continue to look for a malfunction. If the water does not run, turn off the water, completely disconnect the hose and replace it with a new one. Another reason why water does not enter the drain tank is the clogging of the narrow part of the inlet valve.
To get rid of blockage, you need to clean the gap with a thin wire or needle. Then we unscrew the valve on the inlet branch pipe and wash the remains of the blockage. After the water starts to flow freely into the tank, tighten the valve and place the float and the valve with the lever in its original position. It happens that you can not clean the valve. In this case, it must be removed and replaced with a new one.
Constant water leakage into the bowl
Sometimes water constantly flows into the bowl. The cause of this malfunction is the failure of the float device, which does not shut off the water supply when the tank is full. If this occurs, it can be assumed that the water inlet valve in the tank has broken, the float or lever that operates the drain mechanism is not working properly, is in the wrong position.
If the tank is an old model, repair work should begin with a survey of the float. This plastic hollow container. Very often, as a result of prolonged use, cracks appear on it, through which water penetrates into the float and it begins to sink. If so, the node needs to be replaced. To do this, the fixing screw is loosened, on which the float is held and a new part is mounted.

As a result of long operation, the float can break down, then water gets into the part. The float becomes heavier and does not cope with its functions
There are no floats in more modern models of floats. To close the input valve, a unit called a drain column is used. It can be equipped with a mechanism regulating the filling level of the tank. This column is often repairable. In case of failure, the node requires a complete replacement.
Water leakage is possible if the inlet valve is faulty. His work needs to be meticulously checked. We perform the following operations:
- Carefully inspect for damage and malfunctions lever, located next to the valve.
- We lower the water and watch the filling of the container.
- Move the rocker arm. It must be in such a position as to block the inlet valve. If the lever is bent, we correct its configuration.
- If the lever does not move, then the node responsible for its movement is jammed. We are replacing this node.
Another reason why water constantly leaks into the bowl. This is a malfunction of the intake valve itself. It can break due to pressure spikes in the water supply. In this case, it will have to be replaced. To do this, the assembly is dismantled, after which a similar part is purchased in the store. It is put in place. Similarly come in the event of failure of the exhaust valve. It also needs to be dismantled and replaced.
Wear or breakage of internal fittings
It happens that several faults appear immediately or the nodes are already very worn out. In this case, the easiest way is to change the reinforcement - the inside of the toilet bowl. You should start by studying the tank unit. As we already know, despite the general principle of operation, drainage tanks have a large number of modifications. In detail, consider the replacement of the internal valves of the drain tank with the bottom line.

If the body of the tank is full, and the "insides" do not work, the best way out is to completely replace the internal fittings
Before starting work, we prepare the pliers and wrenches. Then we perform the following operations in sequence:
- We overlap the water supply to the tank and drain the water from it.
- Open the lid of the tank. If it is with a button, then first it is dismantled. Depending on the model for this, we need to either unscrew it or remove special clips.
- Disconnect the water supply hose.
- The top part of the drain column is turned at a right angle and removed.
- We find fixing bolts holding the tank on the toilet, and carefully unscrew them.
- We put the tank on the toilet.
- We find fasteners fixing the drain column and inlet valve, and unscrew them.
- We take out the old reinforcement and prepare a new one.
- Install everything in the reverse order and put the tank in place.
When installing a new drain column, you need to consider some points. The assembly is mounted above the outlet and fixed from below by a special threaded cuff. The inlet valve, together with the mechanism regulating the filling of the tank, is placed above the inlet, after which the unit is fixed at the bottom of the tank with a threaded cuff.
Noise when filling the tank
This is not a failure, because all the mechanisms function properly. However, too loud filling of the tank most often causes discomfort and it would be desirable, that the capacity was typed more silently.
Usually noisy tanks with an upper line. To solve this problem, first of all, you need to inspect the inlet. There are models where you can adjust its diameter. If the filling of the tank is too loud, the cross-section of the hole must be reduced. In this case, the water will flow more slowly, but annoying loud sounds will disappear.

A complete set of internal valves for a drain tank of a modern model can be bought in any specialized sanitary ware shop
If the diameter of the hole can not be adjusted, you can try to modify the internal structure of the tank several times. To do this, you need to find a rubber or plastic tube, the cross section of which must match the diameter of the inlet. The length of the part should be about 25-30 cm.
We put the tube on the inlet, fix it so that when water enters it does not disrupt it. Then lower the second end of the part to the bottom of the tank. Actually, that's all. Now the water will flow into the tank through the tube, which will noticeably reduce the unpleasant noise. The liquid will no longer fall under pressure from a height, but will fall right into the bottom of the tank.
Problems with two buttons
This modification is very popular, because it saves water. Sometimes she starts to lose buttons. In this case, first remove the cover from the reservoir. To do this, the water pipe, then the tank is emptied. Then use a screwdriver to carefully unscrew the plastic nut located near the buttons. Now the cover can be removed. We press directly on both buttons and release. Sometimes they get in their place.

A drain tank with two buttons helps save water, so these models are preferred to buy by those who monitor their spending
If it is not, check the button shaft. If it is clogged, the parts will not be able to stand in place. In this case, we clean the shaft and install the buttons. If this does not help, you may need to change the entire node. Carefully dismantle it, we buy in the store a similar detail for all characteristics and put it in place. One-button model is also being repaired.
Useful video on the topic of the article
How to replace the valve tank:
Remove the cover from the tank with the button:
What to do if a leak in the flush tank valve is detected:
The repair of the toilet bowl tank is simple enough and is available to anyone, even a beginner plumber. Nothing complicated in the repair work. Knee breakdowns are diagnosed very easily. If you want, you can quickly and efficiently repair the drain tank or, if the valve is completely out of order, replace it with a new one.
Experts advise novice masters in case of problems with the tank casing (for example, a crack appeared) not to do cosmetic repairs, but to replace the entire tank. Most likely, all efforts spent on repairs will be futile, that is, time and money will be wasted.
Debugged plumbing is the main condition of modern man's comfort. But in the work of the toilet tank drain can come crashing, so you need to be able to quickly fix the breakdown. This will save time, money and nerves.
Construction device
The tank for draining water into the toilet is in the form of a small tank that operates on the principle of a water seal. The water is washed off in different ways: automatically when the button is pressed or by driving the lever that opens the free passage to water.
The drainage mechanism successfully performs its functions due to the important components of the reinforcement:
- The stopper membrane of the siphon with the lid prevents water from flowing away.
- To enter the water in the drain tank there is a special lever connected to the water pipe.
- The volume of the tank is regulated by a float. It works in conjunction with the lever and valve, connecting with them with a spoke.
- The overflow level tube is located to monitor the level of liquid in the tank.

The toilet bowl of the old sample has features in the form of vertical movement of the piston under the action of the lever for flushing. The overflow of the water supply from the side is due to the float reaching the preset level. Similar models produce a set of water and a sink with significant noise.
Modern designs have a different arrangement of the reinforcement, it is closer to the bottom of the tank. The float rises on a plumb rod as the water is filled. With the help of the thrust acting on the membrane, the level of the liquid in the tank is limited. Due to the lower water supply, flushing and filling is almost silent. 
Characteristics of the main tank types
In modern designs, the tank is most often attached to the toilet bowl, connecting with it in a single unit. The separate arrangement assumes the integration of the vessel into the wall. There are also suspension options. Communication with the toilet is through the pipe. The advantage of such drainage devices consider the presence of a powerful head of supplied water, increased several times.
There are also tanks with differences in the triggers. Prevalence was obtained by button models operating in one mode (one button) or in two (two buttons). The device is designed to save water. Under the action of one button, the container is emptied completely, the second mode - to use half the tank. In one-button versions, it is possible to adjust the partial supply of liquid.
In the suspension versions of the tank for flushing, levers or chains are used. Here, the water is drained mechanically by pushing the lever, turning it or pulling it by the chain.
According to the material of manufacture,
- cast iron;
- faience;
- plastic.
The strength of containers from cast iron is confirmed by the time of their service, but they look old-fashioned. The configuration of faience structures is diverse. They are one with the toilet. The plastic built-in tank is usually flat.
Depending on the types of drain tanks, breakdowns occur, and appropriate methods for their elimination are selected. Next, consider the most common problems. 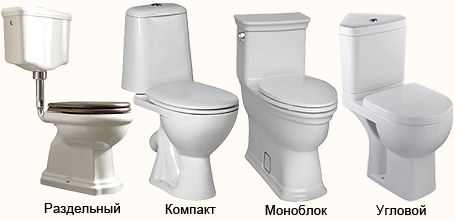
From the tank water flows into the toilet
If liquid from the tank flows to the floor, it is necessary to pay attention to the condition of the sealing ring closing the connection between the tank bottom and the toilet flange. In case of deterioration of accessories, it is replaced with a new one. During the installation of the gasket, it is better to lubricate it with a silicone of a liquid consistency, which will improve the wear resistance of the part.
The cause of leakage may also be a weakening of the mounting bolts. Careful pulling or replacing them will eliminate leakage.
If water constantly flows into the toilet, first of all it is necessary to determine the cause of the breakdown:
- A twisted lever led to the float lowering to the bottom of the tank. You can manually remove the misalignment by bringing the lever to its normal position.
- When the float is damaged, worn, water enters the pear, preventing it from returning to its original position. Excess liquids have to be discharged into the toilet. You can replace the parts of the drainage mechanism yourself, by blocking the arrival of water for a while. To prevent the occurrence of a malfunction, you can pay attention to the material from which the float is made. Resistant to damage are different floats, the manufacture of which used stainless steel or special plastic. For short-term sealing, the hole can be sealed, the bay is heated with plastic. It will help for a while and seal the hole by wrapping the parts with a plastic bag.
- Often the cause of leaks can be found in the worn-out seals, the check valve. If these consumables fail, they are replaced by new ones.
After the repair is completed, it is important to pay attention to the position of the lever and the float in relation to it. If the components of the mechanism are not correctly installed, they are adjusted.
There is no water in the tank or it comes in slowly
The presence of dirt in the narrow part of the intake valve, its full clogging is a common cause of such a malfunction. Before starting repair, the reservoir is freed of water, then unscrew the damaged part of the drainage mechanism together with the lever and float. Taking a long needle or a piece of thin wire, the passage is cleared. The inlet tube is subjected to the procedure. To do this, pre-loosen the valve. After checking the elimination of breakage, twist the valve and install the valve in place.
Slow filling of the tank often occurs due to the fact that the pressure in the water supply system is at a low level. Due to the weak water pressure, the membrane-type valve is difficult to cope with its functions. With such problems, it is better to replace the membrane with a rod.
Repair and adjustment of the float
The main elements of the drain mechanism are the float. It regulates the amount of water supplied to the tank, prevents its transfusion. If previously spherical structures often went out of order, then modern, similar shape to the glass, less affected by the effects of water.
Adjustment of the float is carried out:
- by turning the lever to the selected level;
- movement on the axis with a wheel.
If it is necessary to repair the float, it is easiest to replace it with a new one. In order not to make a mistake in the choice, disconnect the failed element. Acquired in the store of the same brand, suitable for a specific draining mechanism. The installation of the new is as follows:
- After shutting off the valve, discharge the drainage tank from the water.
- With the help of a wrench, remove the pipe through which the liquid is fed.
- The old float is removed, replacing the new one.
- Adjust its position.
- The water supply pipe is put in place.
- Turn the valve allows the filling of the tank.
You can restore the float to its working state by clearing it of accumulated dirt.
Repair of buttons
If the button is malfunctioning, it is necessary to clear the shaft of the element from the blockage by depressing it. The malfunction of the button's functions, when water does not go off after pressing, is due to a break in the connection between it and the drain valve. Reconnect the connection can be a piece of copper wire or the acquisition and installation of a new one.
Similarly, coping with the problems in the work of a two-button construction. The fall can be corrected quickly: by unscrewing the lock ring, raise the buttons to the appropriate level. Sometimes their situation comes back to normal after a few clicks.
Other possible malfunctions
There are in the work of the drainage mechanism and other breakdowns:
- The cause of the failure of the lever is a thrust violation. Replacing an item with another involves buying a new one. For the time being, the fittings can be replaced with a thick wire, but it will not last long.
- If the filling is excessively noisy, the lid is opened and the muffler tube is put on the union.
- If the liquid in the reservoir is constantly poured, it is possible to avoid a malfunction by adjusting its filling level. The level of the edge of the overflow tube with side water supply should reach a point ten millimeters below the hole. The tube is turned clockwise, set to the required height and locked by turning it counter-clockwise.
If you put a new plumber in your house, including a toilet, be sure to pay attention to the correctness and reliability of the connection of all the components of the equipment. From the tightness of the connections of the nodes the uninterrupted operation of the device depends.
A properly working toilet brings a high level of comfort to your home. However, any plumbing may break. Especially often, troubles occur in older devices. The destructive effect on the components of the toilet flush system is the poor quality of water. Hard water with foreign impurities gradually disables the equipment. Every homeowner should know how to fix the toilet bowl.
Flush tank assembly
At first glance, the drain system in the toilet looks simple enough - it is a faience or plastic container, automatically filled with water, which is then used for washing away sewage.

The main components of the toilet bowl
- Fittings responsible for filling the reservoir with water
- A mechanism that initiates the drainage of water from the tank (rod / lever or single- / dual-mode button).
Such basic elements of a drain tank are available in almost all models, even in older devices of the Soviet period. They may differ in performance materials and in appearance, but their main tasks: the control of the set and the initiation of the flow of water remain the same.
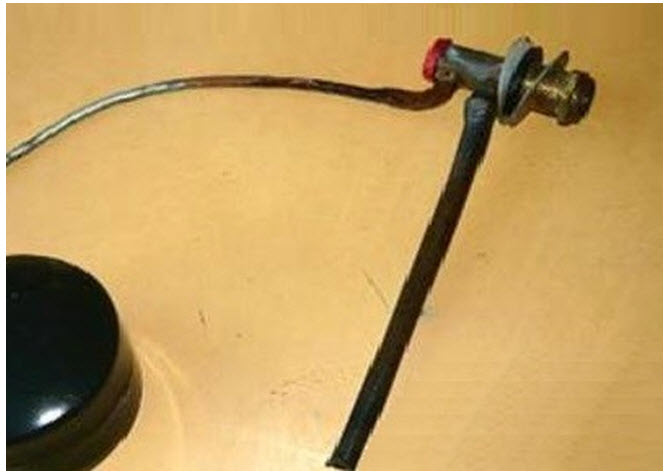
The main types of the design of the downcomers for the toilet are the float mechanism and the drain column.
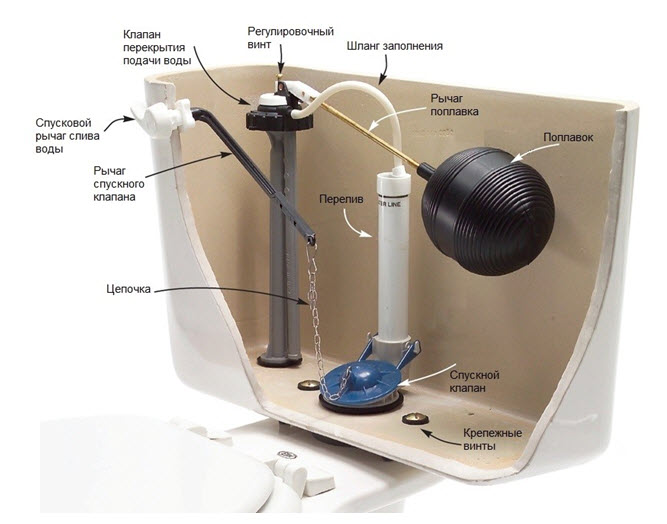
The figure shows the arrangement of a classic tank with a float mechanism. Such internal fittings were equipped with drain cisterns of the Soviet period and continue to be used at present on devices with a side drain lever.
All the main components of the waste tank are interrelated. Damage to one element can cause failure of all equipment.
We make the float mechanism
One of the most common breakdowns of the mechanisms of the toilet bowl is a constant flow of water. The reason is a malfunction of the float device, which must shut off the water supply to the tank when it reaches a certain level.
The main reasons for this behavior of the float mechanism can be the following factors:
- breakage of the water inlet valve in the tank;
- the wrong position of the lever responsible for activating the drain mechanism;
- incorrect operation of the float.
In older models, inspect the float. This is a hollow plastic container. Long-term operation may cause cracks in it. Then the inside of the float penetrates the water from the tank, and it sinks. Such a node is easiest to replace - the float is usually fastened to a screw with a nut.

In modern models of drain tanks there is no hollow plastic float. The inlet valve is closed by another unit - a drain column, which is easier to replace entirely. Some models of drain columns have an adjustment mechanism that determines the level of filling the tank and the amount of water drained.
![]()

Check the operation of the intake valve in the tank
- To understand how well the valve closes in the reservoir, inspect the lever, located next to the valve.
- Release the water and observe the filling of the tank.
- Stir the rocker arm.
- When the lever is placed in a certain position, it must lock the inlet valve. If the lever is bent during operation, adjust its configuration.
- If the knot that moves the lever is jammed, replace it.
Another reason for a permanent discharge may be malfunction of the inlet valve. In this case, in spite of the working function of the float mechanism, the tank is constantly filled with water and constantly fuses. Damage to the valve may occur due to water pressure jumps in the pipelines. In this case, the valve is easiest to replace - it's a fairly simple device that can be found in almost any hardware store. Remove the valve and get a similar one.
Permanent leakage of water from the tank to the toilet can also occur cause of failure of the exhaust valve. This device should not be repaired, it is better to replace it entirely with an identical one. If, after dismantling the exhaust valve, it is found that the rubber seal of the siphon is worn, replace it. It is worth this detail is not expensive.

What should I do if the toilet bowl makes a loud noise?
The noise of water filling the drain tank can cause discomfort to your household. Typically, this problem occurs in toilet bowls with an upper water supply. This problem can easily be eliminated in two ways.
- In some models of tanks the diameter of the inlet can be adjusted. Reduce its section. The tank will fill slower, but it will not produce annoying sounds.
- Also, several modify the internal armature of the tank:
- find a plastic or rubber tube about 30 centimeters in length;
- set it so that one end of it is clothed in the inlet, and the other end is lowered to the bottom of the tank.
Now the water will not arrange a "waterfall", and silently through the tube will fill the tank capacity.
Replace the bolts in the leaking toilet bowl
Most models of toilet bowl tanks are attached to the shelf using bolts that pass through the bottom of the tank. Metal bolts are corroded and can rot away after a while. Water in this case will leak through the holes, drip onto the floor.

Bolt replacement algorithm
- We close the tap of water supply to the tank.
- We drain the remaining water from the toilet bowl.
- Dismantle the inlet valve of the tank.
- We dismantle both connecting bolts securing the tank to the toilet bowl.
- The tank is on the rubber cuff. We raise the tank and remove the cuff. If necessary, replace it.
- We clean the junction points, free them from dirt.
- We assemble the equipment in the reverse order with the insertion of new bolts. When tightening the bolts, do not use excessive force so that the sanitary ware does not burst.
- We check the efficiency of the reservoir and the absence of leaks.

The drain tank does not receive water
The reason for the fact that your toilet tank has stopped filling up with water, there are three types of malfunctions.
- At the initial stage check the condition of the actuating flexible hose. To do this, close the water, disconnect the hose from the basque body and open the shut-off valve slightly, by directing the end of the hose to the toilet. Water will flow from the working hose. If water does not flow - the flexible supply hose must be replaced with an identical one.


- Also, the reason for not clogging of the incoming valve. It can be absorbed by impurities contained in tap water. You can try to clean the valve opening with a thin long object.
- The inlet valve can for some reason completely fail. In this case, in case of unsuccessful attempts at cleaning, the valve must be completely replaced.
We change internal armature of a drain tank
Malfunctions in the valve armature can occur avalanche. In this case, you can not change the worn parts, and replace the internal valve of the tank completely. Examine the valve assembly that is in your tank. The discharge tanks are produced with various constructions internal reinforcement. In particular, the toilet bowls differ in the type of water supply - the flexible hose can be connected to the top, side or bottom of the tank.
![]()
We'll figure it out, how to replace the internal fittings on the tank with the lower water supply. To carry out these works, a minimum set of tools is required: spanners and pliers.
- Close the shut-off valve.
- Dismantle the drain button. It can be unscrewed or fixed on clips.
- We dismantle the top cover of a drain tank.
- We unscrew the fastening of the supply hose to the drain tank and disconnect it.
- Turning by 90 degrees, remove the upper half of the discharge column.
- We unscrew the bolts securing the drain tank to the toilet bowl.
- We put the drain tank on the toilet.
- We unscrew the nuts securing the inlet valve and the drain column, we dismantle the rest of the column.
- We install the internal armature of the tank and collect the equipment in the reverse order.


Installing a new column
- An empty column is placed in the empty tank. It is above the outlet.
- From below, the drain column is fixed with a threaded cuff.
- Above the inlet there is an inlet valve with a filling adjustment mechanism.
- The inlet valve is fixed by a cuff thread from the bottom of the tank

Eliminate leaks in the drain tank
To eliminate leaks in the reservoir, you must carefully check all the places of the threaded connections. You can put under them pieces of toilet paper or paper napkins, which will be visible even the smallest drops. If a leak is detected, the connection point of the pipelines is collected again using an additional sealing tape.

We replace the drain tank
Any internal nodes the toilet bowl can be replaced. But this can only be done if you find an identical device.
Every year on the market there are tanks with new designs of internal reinforcement, which may be incompatible with previous generations. In this case, having run around the shops, you can decide to buy a new tank. It is easier to solve this problem if in your toilet the tank and toilet bowl are made as separate elements of the structure. There are models of sanitary equipment in which the tank and bowl of the toilet bowl are made as a single unit.
Replacement of the toilet bowl is subject to detection of cracks in the sanitary faience. In this case, no repairs can help, the process of destruction is irreversible. A temporary measure may be to dry the tank and apply a thick layer of silicone sealant to the crack area.

As you can see, the cost and duration of repair of the toilet bowl depends on the nature of the damage. Some faults can be eliminated by replacing the elements of the internal reinforcement. In the case of detecting cracks in the shell of the tank, or the inability to purchase suitable fittings - it will be necessary to replace the drain cistern, and perhaps the entire toilet set.