How to make plumbing in the bathroom with your own hands. Wiring and installation of plumbing equipment by one's own hands: general provisions and useful advice
Repair of a bathroom or toilet room is often associated with the replacement of sanitary equipment, as well as pipes. The procedure is very responsible and rather complicated. However, you should not hurry up and call the plumber: it's quite possible to correctly wiring and install the equipment. At the same time, a certain amount will be saved, which will not be superfluous for family budget. However, in order to make the result of the work only happy, it is necessary to get acquainted with the stages of the plumbing works.
We plan forthcoming work
Begin repairs should be with careful planning of upcoming events. Piping is one of the most important elements that form the system of sewerage and water supply. On how competently it is planned and executed, the functionality of the structure largely depends. At the planning stage, several important factors need to be identified.
We select the method of installation of the pipeline
Pipe laying can be carried out in a closed or open way. Both these schemes, in principle, are equally reliable. They differ in the features of operation and maintenance. Outdoor installation involves the installation of pipes over walls or floors. If desired, they can be hidden by various decorative designs. The main advantage is easy access to communications. If you need to connect new elements, maintenance or repair, you do not need to destroy the decorative cover hiding the pipes. In addition, the slightest leakage or other problem will immediately become apparent and timely eliminated.
With concealed laying, the pipes are mounted directly into the wall, which, of course, is more aesthetic. However, maintenance and repair of communications is very difficult. As well as inspecting the parts for leaks or other problems. With concealed installation it is advisable to install sensors that will report a water leak. In any case, in order to gain access to the pipeline, it is necessary to open the wall, which is the biggest disadvantage of this type of installation.

Open version of the distribution of pipes is most simple in performance, maintenance and repair. Not aesthetic appearance can be closed if desired with decorative accessories
Importance of Pipe Material
As experience shows, it's the easiest way to arrange plumbing with polypropylene or metal-plastic pipes. These are reliable, lightweight parts that are easy to handle and easy to install. For the implementation of joints of metal-plastic structures, different types of fittings or crimp couplings are installed using special ticks. Due to the fact that special equipment for the installation is not required, the metal plastic can be mounted even in the most inaccessible places.

Metal plastic pipes can be connected by means of fittings or crimp sleeves. In the second case, special mites
The poly propylene pipes is carried out in the form of a welding seam. For work you will need a special device, which is best to rent or take from your acquaintances. This moment must be taken into account when selecting pipes, because it is almost impossible to make connection of polypropylene elements in hard-to-reach places. An additional argument for the choice of polypropylene will be the ability to easily fix an unsuccessfully formed joint, which is very valuable for beginner plumbing.
Wiring diagram device
Choose a breeding scheme water pipes it is possible from two variants: a tee or a collector one. The second is considered the most practical and convenient. He suggests that when installing sanitary ware in the bathroom or toilet room, each device will be connected separately, which significantly reduces the pressure drops in the system and allows repairs without disconnecting the pipeline. The variant differs by the extreme simplicity of installation and the minimum of connections, however it is more expensive than the tee-scheme. It is somewhat more difficult to perform. Experts recommend that at its assembly to install on each of the branches of the main system shut-off valve, so as not to overlap the entire structure in the event of a breakdown.
The result of planning will be a scheme for the placement of plumbing equipment and pipe routing. It is performed after accurate measurements of the room and the devices that will be installed in it. With the help of such a plan it will be much easier to determine all the necessary details and their number, as well as to prevent possible misunderstandings with the output of the setting angles during the installation of equipment. It is very good to number each part of the wiring in the order in which the assembly will be done. You can also make a list of all the elements with the type of connections and the length of the fragments.

An example of a pipe layout scheme. Performing a self-similar drawing for ease of installation, it is best to number all the elements and designate their dimensions
Rules for assembling a structure
Begin the installation of pipes and sanitary ware with the analysis and removal of old equipment. It should be done carefully enough to not add work to unnecessary destruction. After dismantling and cleaning the premises in accordance with the plan, a new pipeline is assembled.
The following rules should be observed:
- The pipe, which is suitable for the apartment, should have a larger diameter than the wiring elements of the room.
- Filters will help to protect equipment from clogging with rust and debris found in tap water.
- Pipes intended for laying in a wall should not be connected by threaded connections.
- Check the water pressure, if necessary, increase the pressure.
Before starting work, the pipes cut into fragments of the required length can be numbered according to the scheme. So it will be easier to carry out the installation. After the pipeline is assembled, the sanitary equipment is installed: the operation will be simpler, referring to the manufacturer's instructions. The devices put into place are connected with flexible hoses and hoses, after which it is necessary to check the build quality and open the shut-off valves.
It is not so difficult to complete the piping and install the plumbing equipment, without even resorting to the help of qualified plumbing. A little patience, accuracy in the performance of work and careful familiarity with the instructions will bear fruit: the new equipment in the bathroom will only please with its impeccable work.
The reason for the performance of plumbing works in apartments, may be a breakdown of the pipeline or the desire to perform major repairs to the bathroom. Installation of the water pipeline is easy to arrange independently, for which you need to learn the skills of working with tools. Regardless of whether the water pipe will be dismantled or installed in the new building by oneself - these actions are carried out in a similar way.
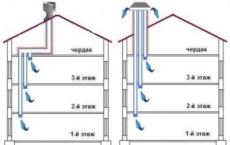
The principle of pipes for water supply in new buildings
In the process of work, a plan should be clearly formulated, in which the pipes in the bathroom will be piped for the water supply or, if necessary, completely replaced. It is expedient to divide it for convenience into several main stages. The owner is required to draw a plan for the proposed location of communications in a new building, but for simplicity, such a scheme can simply be downloaded from the Internet, and then start repairing yourself. What should be indicated on the diagram:
- necessarily indicate the amount of material and indicate its size, which will fit the water pipe;
- arranging plumbing reasonably indicate the presence of a toilet bowl, a bathtub, sinks and other sources that require water consumption or for which a replacement is required;
- the circuit must clearly transmit all the information for installation. That is, it is ideal to think through all the details and indicate where the water supply will be located;
- note the color of hot and cold water supply (it is possible for each of them will need different pipes).
The piping in the bathroom should not be complicated, since you will do your own work and too much patience will be required. Everything should be done as simply as possible: pipelines should be stretched on the floor and rise in the walls to each consumer strictly perpendicular. Such a water pipe will be correct, the old risers will be replaced in the same way.
The use of propylene pipes for laying is available and reliable, but an additional tool may be required to help solder and reliable hermetic pipe connections. With this equipment it is easy to manage by oneself, but for newcomers the assistant does not interfere. Let's go directly to the instruction, how pipe laying is carried out in the bathroom.
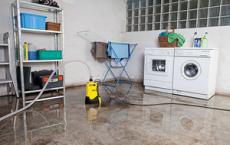
- In our case, the latent installation of sanitary ware will be carried out, as it does not damage the design of the room and is very convenient in terms of repair, if you put it right. The first step is to prepare grooves for pipes in the walls and floor. It is important that the stems fit the size of the material.
- After the installation of the valve is carried out and a filter of maximum purification is subsequently connected to it, since the water entering through the central water supply is rather dirty.
- Mount the counter to the pipe to monitor the flow of water and, if desired, you can install.
- Mount the pressure sensor from above on the pipe. It will be especially useful if the water supply to the room does not have stable head and may exceed the norms.
- The next stage is the installation of the collector, which is very convenient when connecting to each individual customer. Such a water supply system is typical, both for apartments and for the private sector. In series, the device connects the shut-off valves to each output, in the case of their use, the adapters are screwed into three tubes.
- As a result, all the holes in the walls must be hidden by plaster. After the piping in the bathroom has been completed, it is possible to finish all the surfaces.
Note! All pipe connections must be visible, since wall-bound joints are very difficult to remove if the water pipe has broken or replacement of gaskets and sealants is required.
When all the pipes are properly installed, those that are brought to the bath, shower or any household appliances are fitted with special threaded fittings to back side they are attached to a hose that is connected directly to consumers.

The scheme of hot water supply in the apartment from heating
Many owners who live in a new building are inclined to believe that autonomous heating, from which you can connect the hot water at any convenient time. Also this gives the possible optimal temperature conditions in each room.
We propose to study the scheme in detail, as it is done by one's own hands.
It is important to note that the implementation of DHW in the apartment should not be carried out according to the rules for installing cold water supply. Thus, water will simply cool in the pipes, which will lower the temperature of the air in the room. On the basis of this, it is recommended to make a water pipe in a tempered way. That is, the liquid will be heated and fed to the source of the fence, and then return to the water heater.
For the arrangement it is easier to use metal-plastic pipes and copper fittings. Such material is sufficiently hardy and durable. But the majority of apartment owners give their vote in favor of polypropylene pipelines, this is the installation now and consider.

To begin with, you will need a diagram, you can do it yourself or find a suitable one on the Internet. Carefully study it and analyze whether all the prepared materials correspond to what was noted. Then you can proceed with the installation:
- the water heater can be installed in the toilet, kitchen or bathroom, it is from it that we measure the desired length of the tube with a margin of 1-1.5 cm. This place will be needed to install the fitting;
- properly cut off the pipe, if necessary, clean the blockages;
- if the equipment is two-circuit and it was already working - we must turn it off and let the water out of the system;
- now you can connect the harvested pipe to the heater with fittings. At this stage, it is important to thoroughly solder all together so that the joints are sealed. Beforehand, your pipe should be connected to the fence site and at the other end a fitting is also installed, from which the hose will go to the tap;
- back from the same source you need to connect another pipe, which will return the cooled water to the place of heating.
Attention! It is necessary to use polypropylene pipes correctly, taking into account that in the event of an error, you simply can not remove the fittings, they must be cut off, and this affects the initial size of the material.
One of the most important stages of the capital repair of housing is the replacement of old sanitary ware and pipes with new ones and changing the location of plumbing fixtures. Let's try to figure out how the pipes are routed in the bathroom, how plumbing is installed by oneself and what tools and materials are used.
Typical projects of high-rise buildings suit not all, and the apartment owners try to remake the plumbing according to their preferences. This set of works is very troublesome and time consuming, however, if you study the theoretical side of the question well and follow the instructions exactly, most of the work (if not all) can be done on your own
Creature detailed scheme Pipeline laying is an important part of repairing any, even the smallest bathroom. With the help of the finished project, not even the specialist will be able to assess all the advantages and disadvantages of the new arrangement of plumbing fixtures, determine the most appropriate way of laying pipes and make a list of the necessary materials in the right amount, as well as tools.
It is more convenient and easiest to draw up a scheme in several stages. First, you need to draw a plan for the bathroom with a doorway. In this case, you do not need to measure the size of the room in steps or by eye, with an approximate indication of the location of plumbing fixtures. There is a roulette for this. On how accurately measured, depends on your comfort when using a sanitary unit.
The wiring diagram can be drawn by hand or using one of the computer programs. It will be clear and obvious
Next, we indicate in the drawings the location of all plumbing fixtures, taking into account the scale. Properly arrange the plumbing is very important, you can not rush and you need to think it through. All instruments should be positioned in such a way that there is enough space next to each of them. For convenience, you can cut out from the cardboard the conventional images of devices and move them along the drawings, choosing the best location.
Which is better: a serial or a collector circuit
Today, two conventional wiring diagrams are used - serial and collector.
Sequential (or as it is called plumbing-tapered) system is considered classical. It is used in all standard multi-family and private houses with small bathrooms. The system is very simple - from the central risers through which hot and cold water is supplied to the apartment, it is laid under one main pipe, from which every sanitary appliance in the apartment is fed.

For each device a tee cuts into the pipe. Thus, the entire length of the pipes in the house or apartment is relatively small, so this layout is considered the most inexpensive
The scope of work on installing bathroom plumbing for own bathroom is also not very large. However, the advantages of the sequential circuit are no longer there. The most important drawback of this type of connection is that all devices are powered from one pipe, and when one device is running, the head drops all the rest. That is, when the washing machine pumps water, the pressure in the kitchen faucet will be very weak, and vice versa.
Another drawback lies in the way of shutdown. If one plumbing fixture breaks, then in order to repair it, you will have to completely shut off the water in the apartment.
The collection system is used in those houses where there is a big load on the water supply system. In this case, all plumbing points are connected to the collector.

The manifold is a large diameter distributor with a certain number of outlets. For each output there is a separate tap
Most often the collector is hidden in a special closet or a closed niche - for aesthetic reasons. Each plumbing device is connected to the collector separately, through a personal tap. With this method of connection, a large number of pipes will be required, and installation work will take a long time.
Although with the connection of such a system will have to tinker, the advantage is obvious: the pressure in all plumbing devices will be stable in any mode of operation of the water supply. In addition, each device can be disconnected or dismounted if necessary. In this case, there is no need to cover the water completely - it is enough to close the tap on the desired tap.
Arrangement of wiring in the bathroom
The layout itself in the bathroom is not large in scale, so you can do without professional calculations to determine the pipe diameters. Water supply sta- tions are most often made of an inch pipe or a quarter-inch diameter pipe. Paving is usually done with pipes with a diameter of half an inch.
As for the sewer riser, it is necessary to take a pipe DN 100 for it, for the distribution - DN 50. It must be remembered that the sewer pipe, which is in a horizontal position, should be laid with a slight bias towards the riser - about 3 centimeters per meter of length.
Selection of the method of installation of the pipeline
The fastest and easiest way to lay is open. In this case, all pipes remain in sight. However, it is not suitable for people who are serious about the design of the bathroom. In this case, it is necessary to make a hidden laying of pipes. This method involves laying the pipe in a specially made channel (strobes), which is laid in the wall.

An open method of installation: all pipes are in sight, which is very convenient in case of repair or connection of additional sanitary equipment
Concerning sewage pipe, then it is laid in a special channel, which is then closed and topped ceramic tiles. It goes without saying that with the hidden method of laying, the requirements to the quality of pipes and their connections are greatly increased.

Closed laying of pipes is done in pre-made grooves in the wall. Pipes are completely hidden under the finish. For installation, only polypropylene (PP)
Below we will tell you which pipes can be used for laying inside walls, and which ones can not be used. When planning to make a hidden laying of pipes, place the devices so as not to build the walls of the building, as it is forbidden to do so by building codes.
Dismantling of old pipes
With modern tools, dismantling old pipes will not be difficult. If they are hidden in the walls, they need to be opened with a perforator. Then cut the pipes Bulgarian.
Carrying out the dismantling of old water pipes, you need to remember the safety precautions. For example, a cut-off wheel on a bulgarian can burst from an inadvertent movement of the tool and at high speed to fly the unlucky master straight to the face. Therefore, when working with such an electric tool you need to use special glasses or a transparent visor from Plexiglas, and to protect yourself from dust - at least an unpretentious cheap respirator.

Cutting off old pipes bulgarian, you must always use a visor or glasses, as well as gloves to protect your hands from burns and injuries
In general, the dismantling of the old pipeline is as follows:
- Completely block the water supply.
- Cut or untwist the root cranes, if they need to be changed.
- Install new cranes on the branches of risers (in this case it is better to use ball valves).
- Renew the water supply.
- If there is such an opportunity, the water is drained.
- All plumbing devices are disconnected from the water and sewerage.
- Pipes are untwisted or cut.
If the old pipes stay on the dowels, it is enough to cut off the dowel heads so that they do not interfere with the finish. Before you cut off old parts, you must put on dense plastic bags on new, newly installed cranes. Packages tightly wrapped with a lace or tape. This is necessary to protect the new shut-off valves from dust and dirt, which will be abundant in the shattering of walls and dismantling of old equipment.
Which pipes to choose
A metal pipe, which until recently was used wherever possible, is rarely used today. This is due to the shortcomings of the material: the complexity of the installation (the need to attract a professional welder to work), the predisposition to corrosion, the deposition of salts and scale on the inside of the pipes and, consequently, a reduction in capacity.
It should also add a very considerable cost of a metal pipe.
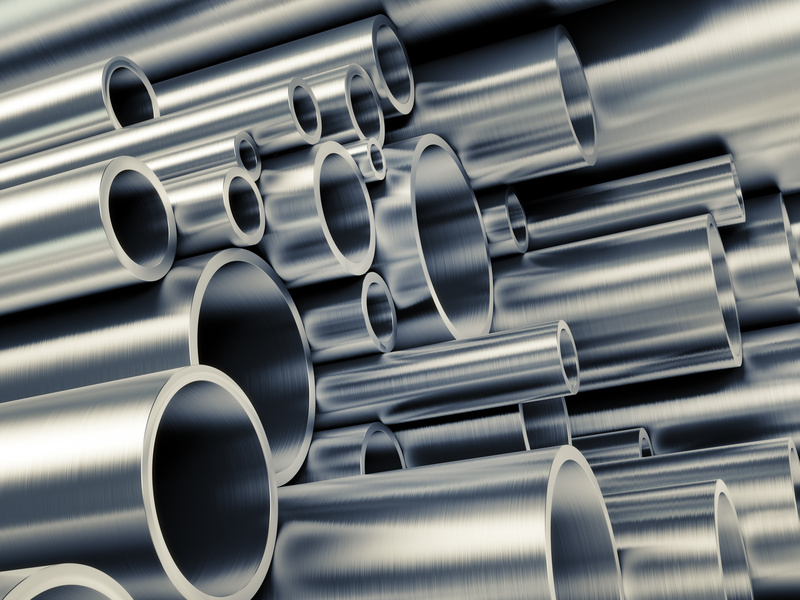
Metal pipe - a classic in plumbing. It is used less and less often due to the complexity of installation, high cost and higher weight than plastic analogues
Today, mainly plastic (plastic) pipes are used for laying the plumbing and installing sanitary ware in the bathroom. They lack all the disadvantages that are inherent in metal products, and are inferior only to them in the strength and melting point, which in this case does not play an important role.
Let's list the pipes, starting with the cheapest.
Polypropylene (PP). Very light, corrosion-resistant material. The surface of the pipe is smooth, thus achieving a low hydraulic resistance. Polypropylene pipe is available in two variations:
- PN 10 and PN 16 are for only cold water and are designed for a pressure of 10 and 16 atmospheres, respectively.
- PN 20, PN 25 - are used for the installation of a heating system, intended for the supply of hot water, are designed for a pressure of 20 and 25 atmospheres.
These marks to prevent expansion under the influence of temperature have a special reinforcement of aluminum or fiberglass. The main feature of the polypropylene pipe is thick walls, respectively, large connecting fittings. But all the details are quite cheap and very simple and quick to assemble.

Polypropylene pipes and fittings to them are one of the cheapest and most reliable sanitary products. Ideal for flush mounting in walls
Polyethylene pipe. It has several variations:
- HDPE (made of low pressure polyethylene);
- REX-A, REX-B, REX-S - cross-linked polyethylene (all of the above brands are manufactured in different ways);
- PE-RT is a polyethylene having a molecular seal.
More often polyethylene pipe used for outdoor wiring.

Polyethylene pipe - strong, elastic and durable. Fittings for polyethylene are quite expensive. Used mainly for laying in the ground
Metal-plastic pipe. The walls of this pipe consist of different materials, as the name implies - from several layers of polyethylene and an aluminum layer. Such a pipe and fittings to it are more expensive than polypropylene and polyethylene. However, they are considered more durable, and at the same time have a modest size. The pipe itself is very well bent and keeps the shape.

The metal-plastic pipe is durable, well bends and holds a shape, easily cut. Fittings and valves of small size, neat, but more expensive than PP and HDPE
A little higher, we mentioned the hidden distribution of pipes. For this method, only polypropylene pipes are suitable, since they are welded into a monolithic construction when assembling plumbing, and the possibility of a leak is practically excluded.
Installation of wiring from polypropylene
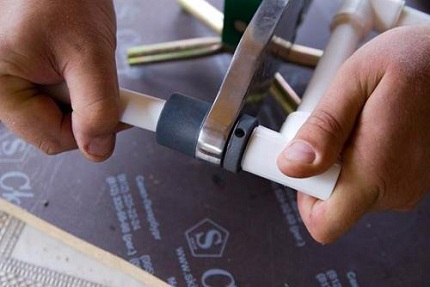
The main advantage of PP pipes is their strong connection. For this, a special soldering iron is used, which heats the ends of the pipes almost to the melting point. After heating, the parts are tightly pressed against each other, after which they are connected tightly - a monolithic construction is obtained.
In order to make a connector or transition to a metal pipe, use a special fitting with a metal thread inside. A soldering iron for heating pipes is quite simple and inexpensive device, which can be bought at any specialized store. As a rule, together with a soldering iron nozzles for pipes of different diameter are sold.

Soldering iron for PP pipes ("iron", as it is sometimes called) is excellent for equipping the water supply system and installing wiring from polypropylene pipes
A little earlier, when soldering irons were still a rarity in domestic shops, folk craftsmen made soldering irons of irons, fastening to them appropriate attachments. For cutting polypropylene pipes, special scissors are needed, otherwise the cut will be uneven and sloppy.
The PP pipes are mounted very simply: the tips of the parts are heated and pressed against each other. Such a connection is a single whole, it is no longer torn
If the polypropylene pipe has reinforcement from aluminum foil, the cut must be cleaned with a special tool - scraper. In its absence, buy a pipe with fiberglass reinforcement. A cut of such a pipe does not need cleaning. In the same way you can act if you buy a pipe from an unknown manufacturer.
The fact is that reinforcement with fiberglass is inexpensive, so the probability of buying defective goods is much lower. By laying a hidden wiring, on polypropylene pipe It is necessary to put on a special insulation made of foamed polyethylene. Thus, you will ensure that there is enough free space to expand the polypropylene under the influence of temperature.
How to properly connect the washbasin
First you need to calculate the height of the installation. In most cases, it is not more than 80 cm. However, if the house has small children, the washbasin can be omitted a little. After the height is determined, mark the wall. Orienting on it, we mark a horizontal line on the wall surface. After this, you need to measure the width of the rear wall of the washbasin and put this distance down from the mark.
Detailed scheme for installing the washbasin in the bathroom with all dimensions. Usually, instructions and drawings are attached to the new plumbing
Before you mount the brackets on the wall, you need to accurately calculate the distance between them. It is not difficult to do this: turn the washstand over, put the brackets on top so that they fall into the special grooves. Next, measure the distance between the brackets and transfer it to the wall.
Now you can make holes, beat dowels, tighten bolts. Next, you need to install a mixer on the sink, then fix it with bolts and washers, check the location of the sink by level and fix it with nuts.
We install a rubber gasket on the drain hole and install the drain, connect it to the siphon. Using the adapter we connect the siphon drain pipe to the sewer. Using flexible hose-tips, we connect hot and cold water to the mixer.
How to install a sink on a pedestal
In this case it is very important to properly markup. We put the pedestal, on top of it we set the sink in such a way that the sink is exactly in the center of the stand. We check its location using the building level.
![]()
The process of installing a sink with a pedestal is not very different from the installation of a conventional washbasin: in addition, we mount an element that masks the pipes under the sink
After that carefully mark on the adjacent wall the place of the fastenings for the bowl. The entire structure can be temporarily dismantled to make holes in the wall. After that we beat the dowels, turn the screws, put on the cushion nuts. Now it remains to tie the bowl of the sink to the wall. The main thing here is not to overdo it, as ceramics can crack if you tighten the nuts too much.
Inside the pedestal you need to install a siphon and connect it to the washbasin, and the drain pipe to the sewer.
The most popular model of a toilet - floor. If the floor in the bathroom is tiled with ceramic tiles, you need to put something soft under the toilet bowl - for example, a piece of linoleum or rubber. To connect the toilet to the sewer, you need to use a special cuff. One of its ends is connected to the tap of the toilet, and the other to the sewer pipe.
To the floor the toilet is fixed with special pins, which are inserted into the dowels, fixed in the previously made holes.

The toilet bowl, as a rule, is sold in the already assembled form. You can only attach it to the floor and connect it to the water supply and sewerage.
In some cases, the toilet is glued to the floor with epoxy glue. In this case, the toilet can not be used for about 12 hours, until the glue completely solidifies.
Video instructions for installing sanitary equipment
With advice on the device layout and self-assembly sanitary equipment can be found in the following videos.
How to make the distribution of PP pipes:
Useful tips for welding PP pipes and installing plumbing:
Within the framework of this publication we gave only general information on the replacement of plumbing and piping - this topic is too extensive to be fully disclosed in one article. However, we hope that this material will help you in planning and carrying out repairs in the bathroom, choosing materials and replacing plumbing fixtures.
The main functional purpose of the Murol drainage system is to effectively protect the main structural elements of the building - the facade and the foundation from the impact of water, which drains from the roof during heavy precipitation. Modern drainage system Mural is worthy of separate words of praise, where in one finished product the European quality standard, a low price category, and also great opportunities for a full operation of the water disposal system, both a residential house and an industrial building are successfully combined.
Almost any experienced builder and expert will tell you, the Grand Line drainage system is the embodiment of unsurpassed quality and reliability in operation. If we look at the installation instructions for the drainage system of the Grand Line, then we note that the finished solutions have a high European quality of execution. The main technical components and components are made of hot-rolled galvanized steel roofing type, which has a two-sided polymer coating based on polyurethane. The modern drainage system of the Grand Line is not susceptible to corrosion, has a sufficient service life, and is not influenced by external factors, including the negative effects of ultraviolet radiation, aggressive materials of a chemical nature that can enter melted or rainwater.

The brand of the drainage system Grand Line first saw the light in 2005, and since that time the products have been modernized and improved many times, as a result of which it was possible to qualitatively design a water disposal system for a residential house or a production building in a factory. It should also be noted that the composition of the Grand Line drainage system is being improved every year, and high-quality polyvinylchloride, improved galvanized steel, modern materials based on plasticizers and stabilizers, and imported plasticizers are used as the main materials. All these factors allow the exploitation of the popular Grand Line drainage systems in any climatic zone of the world.
Swedish technologies for sewerage systems for the building are recognized as advanced and are in high demand in many European countries. Concern Lindab from Sweden produces a large group of building materials, among which Lindab watercourses are a high step in popularity. The processing of steel and the creation of steel structures and products is a priority area for the development of the Swedish concern. The Lindab drainage system is implemented in all European countries, including in the post-Soviet countries, where high international quality standards are adopted. According to official statistics of the company, Lindab watercourses are sold in Eastern Europe and CIS countries with a share of up to 25% of the total volume of all products.