How to make a wire connection correctly. Connection of wires in a junction box: video, circuits, photo
To date, invented a bunch of a variety of ways to join. But, for some reason, the way to "bite, twist and rewind with electrical tape" is not inferior to its position.
But there is also something that is fundamentally wrong.

The reason is that twisting in a spiral two wires from different material, for example, copper and aluminum, is categorically not correct. The fact is that during the oxidation of the aluminum wire, a galvanic vapor is released, which will eventually break the connection. And the more current passes through this connection, the earlier it will collapse. And, if the load on the wires is not constant, then constant heating-cooling will only worsen the condition of the wiring.
This connection of wires can be dangerous. So, as the sparks in the joint can lead to a fire.
Fortunately, there is a sure way out of the situation.
For example, here is a kind of thing called a polyethylene terminal strip:
You can buy such an uncomplicated gizmo in any construction shop. And if you pull out a brass sleeve from it, you can clearly see how the wiring is connected:


Use this design can be shoved into it at the same time not one wire:

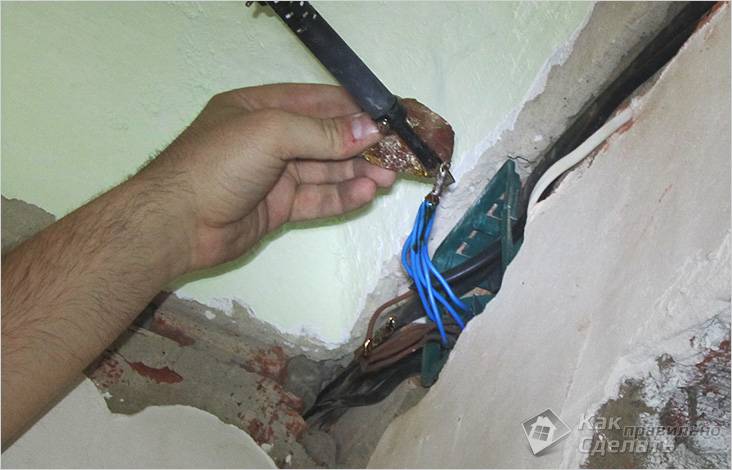
Having disassembled the electrical connector, one can see a plate with a clamping surface, and also a hydrophobic gel, which protects against corrosion.
In the article we will talk about the types of connection of electrical wires between each other. The connection method is chosen based on the environmental conditions, the number of conductors, the material and the cross-section of the conductors.
The easiest way to connect in an electrician is to twist two wires together. Conventional twisting is not provided for by the Rules for the installation of electrical equipment, as a way of connecting because of its unreliability, but it is often found today. For twisting, you need to take 2 wires, remove the insulating layer of centimeters by 5, twist the bare cables, cut them to one level and fix with an insulating tape.

To connect the wires with soldering, you need the following:
- soldering iron;
- rosin;
- sandpaper;
- solder.

Algorithm of actions:
- Remove the insulation layer from the cables.
- We clean the wire with the emery paper to a metallic luster.
- Twist the cable.
- Warm the twist with a soldering iron (do this better from the end of the twist, so as not to damage the insulation layer).
- We immerse the strand into molten rosin.
- With the help of a blowtorch we weld the braid with solder.
This method has the following advantages:
- the connection of wires is more reliable than in most other options;
- soldering can be done at home.
However, the soldering of cables also has disadvantages:
- take a lot of time. This is quite inconvenient when connecting electrical cables on an industrial scale;
- if the connection needs to be disassembled, the soldering site is cut off and a certain part of the cable is lost.
This method is considered the most reliable, but requires special skills. Welding is often used in the installation of high-voltage electrical networks. The list of wires necessary for welding:
- welding machine;
- individual protection means;
- flux for stripping from oxidation; welding location;
- metal brush;
- electrodes.

Welding of wires
For welding, the following algorithm of actions is performed:
- Strip the cores of insulation (4-5 centimeters).
- Cable twisting. As in soldering, it is recommended to bite wire with pliers to the same length.
- Fill the flux with an electrode.
- Press the twist to the electrode.
- Weld the contact with a welding machine.
- Remove the electrode.
- Strip the resulting welding with a metal brush.
- Secure the welding with insulation.
The disadvantage of welding is the aforementioned complexity of the process and the inconvenience of using it at home.
Terminal blocks
Convenient and modern way of connecting wires. Currently, there are several types of terminal blocks.
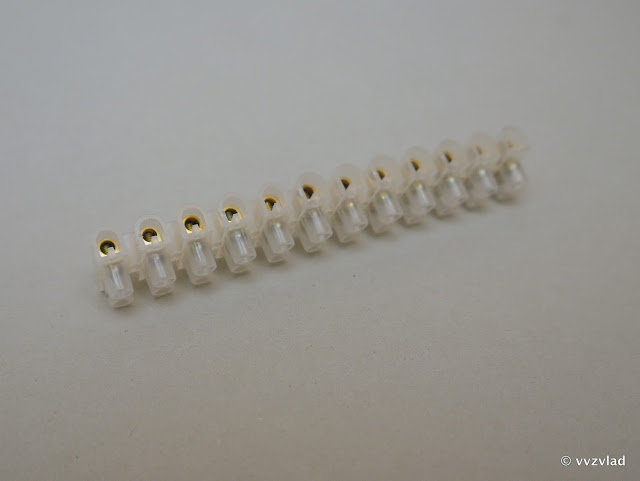
Polyethylene Terminals
One of the most common terminals, because they are sold in every store. Cables in this case are connected using two screws, which are located inside the terminal board.

The advantages of such a connection are ease of use, low cost. But polyethylene terminals have a lot of disadvantages:
- it is impossible to connect aluminum cables, because the terminal screws compress the metal and, due to its structure, the pressure starts to deform, which leads to a deterioration in contact;
- it is impossible to connect stranded wires (this is due to the design of the terminal block);
- brittleness of the material (brass, which is used in this case, has the property of easily deforming if the screws are tightened tightly).
Plastic screw terminals
They have a similar clamping mechanism, but they are better and more reliable due to the materials used.
Self-clamping terminals
The most common firms are Vago. To connect the cables in this way, it is sufficient to strip the cable to the required length and insert it into the special terminal of the terminal block. The metal plate inside the mechanism presses the cable, thus fixing it securely.

- can connect between 2 to 8 cables (depending on the type of terminal block);
- it is possible to connect aluminum cables, since the metal plate gently presses them and does not deform;
- easy to use.
The minus of the self-locking terminals is that getting the cable, without damaging the terminal strip, is quite problematic. But still you can do this if you start turning the cable in its axis and slowly getting it out.
Terminal blocks with Vago lever
There are terminal blocks from the plastic housing on the outside, levers and internal metal clamping plates. To create a contact, you just need to clean the wires to the required length, insert them into the connector of the terminal strip and hold the lever.

The main advantages of this terminal are:
- the possibility of using different types of veins (copper and aluminum);
- reusable use (opened the lever, took out the cable and inserted a new one).
From the disadvantages it can be pointed out that when installing networks such terminals take up a comparatively large amount of space.
They consist of a transparent plastic body and several pointed metal teeth with a plate. In this version, the cable is simply inserted into the terminal board (without removing the insulating coating) and the cable is clamped with pliers. Thus, metal incisors break through the insulation of the wires and create contact between them.

This method of connection is simple and does not require special skills. However, these terminals have several drawbacks:
- can be used only for the connection of cores with weak current (telephone wires, cables for lighting);
- one-time use. To disconnect the contact, it is necessary to cut off the wires at the base of the terminal board. Thus, part of the wire is lost.
PPE (cap for twisting)
(PPE) is a simple and reliable method of connection. They consist of two parts - an outer cap of a conical shape made of plastic, not subject to combustion and an inner metal spring.
To connect using PPE, you must:
- Strip the cores of insulation.
- Twist the wires together in a helical manner.
- Insert into the cap.
- Twist a couple of times clockwise.

Pros of PPE:
- can connect 2 to 8 cores depending on the type of PPE;
- ease of use;
- if necessary, you can disassemble the connection without damaging the wire;
- can withstand large temperature changes. However, before industrial use of PPE, it is strongly recommended to test it for contact overheating.
Cons of PPE:
- it is impossible to join together aluminum and copper veins because of their different structure. In this case, it is possible to oxidize the wires and attenuate or completely lose contact (at best) or short circuit the network (at worst), which can lead to a fire;
- if you pick up caps of the wrong diameter, they can fly off the connection or vice versa to transfer it.
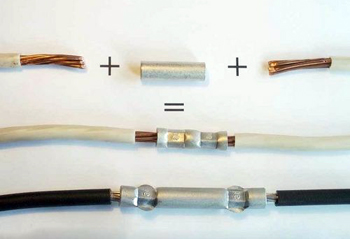
Connecting sleeves
To use such a sleeve, it is necessary to clean the wires, insert it inside and compress the sleeve with pliers. The advantage of this connection is that the sleeve does not reduce the resistance in the veins and as a result can last for a long time. There are also special sleeves for connecting copper wires with aluminum ones. The disadvantages are the one-time use.
This type of connection can be made at home. Its advantage is that it is possible to twist together aluminum and copper wires. The connection requires the following:
- insulation tape;
- a bolt with a nut and three washers;
- pliers or spanners for swiveling the bolt.

Procedure:
- We clean the wires.
- We twist the loops at the ends. It is best done with a bolt.
- We put on a bolt: 1 - a washer, 2 - a wire, 3 - a washer, 4 - a wire, 5 - a washer. Then on top of all this, wind the nut and twist the resulting connection.
- We wind the contact with an insulating tape.
The undoubted advantage of this design is that it is possible to connect wires from different metals.
The disadvantages are that this method is more expensive in time than the use of PPE or terminal blocks.
This method differs from all described above. The clamps serve not to connect the wires, but to branch off from an already existing electrical network. In this case, the insulation layer is removed from the cable by the size of the clamping, the terminal strip is put on the wire, the branch cable is inserted and the clamping is tightened.
Pros of this connection:
- there is no need to cut the cores of the wire for subsequent connection;
- reusable use of the clip;
- the possibility of connecting together aluminum and copper wires.
By the minuses can only be attributed to the fact that such clamps are most often used in backbone electrical networks and at home will be simply impractical.
In contact with
With the development of new technologies, mankind is beginning to live much more dangerously. For example, electricity, gives us comfort, but at the same time can be unsafe for life. In today's article, we will discuss ways to connect electrical wires and consider the safest options.
For the purpose of connecting current-carrying conductors, various materials are used that have special properties and capabilities. Each of these products is optimal for certain conditions.
There are only five basic options wiring connection :
- welding;
- soldering;
- twist;
- bolted fastenings;
- plastic terminal clamps.
Each of these methods has been used in practice many times, but the method of twisting conductors is considered unsafe, without the use of additional connections or good insulation.
Methods of connecting wires: the procedure for carrying out the operation
Screwing is considered the most common way to fasten several conductors together. For this method, it is sufficient to remove the insulation from current-carrying veins, and tightly twist them together.
Important! To maximize the reliability of such a connection, it is recommended to remove the insulation material by at least 5 cm. For good contact, the wires are pressed with pliers.
The method of soldering two conductors takes a little longer than the previous one, but it is more reliable. The ends of the conductors are covered with tin or rosin, after which they are carefully soldered. Such a fastening does not create a large resistance in the conductors.
The welding method is similar to soldering, however it requires more attention and attracting specialists for such work.
Connection terminals are the most popular and advanced option. Similar fasteners are used in panel devices and distribution boxes. Convenience of connection consists in the ability to use current-carrying veins of different cross-section and material of manufacture.
Do not yield to the pads and spring fasteners. The method of such a connection is no less reliable, but operational. With the help of this, everyone will be able to wiring. In the home arrangement, the use of bolt clamps and joints is practiced. The only drawback of such fasteners is mandatory and strong insulation. Such devices hold multicore wires and conductors with different cross-sections.

How to connect the wires of different sections?

Insulation of conductor connections: notes
There are a lot of options used as insulation for joints of live conductors. Typically, the traditional ways of connecting conductors use special insulating plastic caps (PPE). Such tools are not very reliable, but will provide the best contact if the veins are twisted, welded or welded.
It is recommended to apply the twisting technique only for the lighting system, since such a connection for power circuits is unfavorable. In a domestic environment, simplified wire connections are used that do not require a specific qualification and are produced quickly enough.
Attention! Wire the wires correctly; fix it with soldering, welding and provide insulation.
You may be interested in:
Remember - the reliability of the electrical connection depends on your safety, as well as the safety of your neighbors. A third of all fires according to the Ministry of Emergency Situations are due to faults in the wiring. It should also be borne in mind that the installation of wiring done as something can become a source of significant trouble and unplanned repairs in the apartment. In fact it is necessary to open walls and search for malfunctions or to lay new electroconducting, that is anew to do repair of a dwelling.
Avoiding these troubles will help meet a few simple rules for installing electrical wiring.
Simple wiring connection rules
It should be borne in mind that aluminum, which is often used because of cheapness instead of copper, in the air  oxidized and covered with a protective film of alumina, which conducts electric current poorly and creates additional resistance in the joints. Also aluminum is very fluid. Under pressure in the screw clamp, the aluminum cores are gradually deformed, so that the connection is weakened. Therefore, the screw connections of aluminum cores must be periodically tightened.
Copper conductors do not have such shortcomings. Copper oxides do not conduct electricity much worse than copper itself. 
We can draw the following conclusion.
- Ensure a minimum resistance at the joints of the electrical conductors. Carefully clean the veins before installation. Take measures to protect the veins from oxidation.
It should also be noted that copper and aluminum form a galvanic pair. And in the places of their contact, under the influence of electric current, the process of electromechanical corrosion begins. Therefore, such a connection will not be either high-quality or durable.
Hence the following conclusion:
- Direct connection of copper and aluminum conductors is not allowed. For connection, use only special adapters.
When installing the wiring in your apartment, follow the simple rule and you will protect yourself from having to look for a breakage site by opening the walls.
- Do conductor connections only in specially designated areas. Simply put, the wiring connections must be in special closed boxes, to which free access should be left. And only solid wires should be embedded in the walls.
Ways of connecting electrical conductors
Application of cable lugs
To connect multi-core wires to different consumers, cable lugs are used.
Their goal is to put together all the wires of the conductor and make the connection reliable. This is especially useful if large cables are used for wiring installation. The sleeve after the winding, the cable is pressed by a special tool, and the tip itself is fixed with a bolted connection in the device.
For conductors of small diameter there are tips of very different shapes. It should be noted that the tips differ in the type of material. Copper should be used only with copper conductors, and aluminum - with aluminum. Copper-tinned can be used with both materials.
Now consider the standard ways of connecting the wiring, which are most widely used.
Conventional Wiring Modes
To connect the conductors of different materials, you can use terminal blocks. This is the most common type of installation, good for its versatility. The shoe itself consists of many similar cells, into which the connected conductors are wound on both sides and clamped with screws. From a single piece of terminal connections, you can use a knife to separate the required number of cells or even one cell. This connection is not necessary to attach and can be left on the weight. 
But it should be borne in mind that stranded wires in this way are not recommended to be connected. For their installation in terminal boxes, the cores must be pre-inserted into the sleeve or tinned.
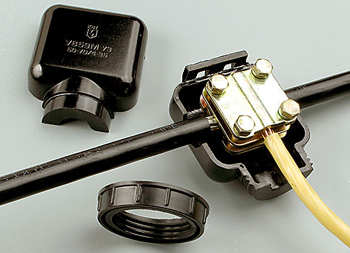
Cable clamp
The method of cable clamp ("nut") is good in that it allows to connect to a thick cable of a branch without cutting the cable itself. Also there are special clamps allowing to connect conductors from different materials (aluminum and copper). This method is especially valuable for mounting in multi-apartment buildings, where often trunk cables are made of aluminum of considerable diameter, to which the copper branches leading to the apartments are connected. Bared wire is inserted between the clamp plates, after which it is crimped with screws. The connection is ready.
Non-collapsible way of connecting the wiring with the help of spring terminals. Such a device inside  it contains a special filler protecting metal from corrosion. The installation of electrical wiring is convenient for them - inserted, conductors and everything. But the cost of such a device is not small, and pull the wires without breaking the spring terminal then you can not.
Connecting busbars
Connector buses are installed in switchboards on electrical insulators. They serve to connect only the ground and ground conductors. To this conductive plate, the conductors are fixed with screws. This is the usual installation of electrical wiring for apartments.
Special Wiring Modes
Now let's look at the most reliable ways of installing wiring.
Soldering and welding conductors
Conductors can be connected by soldering and welding. This is a reliable connection if it is performed by all rules. But the method of mounting the wiring has significant drawbacks in that it requires the use of special equipment, and for soldering, additional materials, solders and fluxes, are also needed. But if you have the skill of soldering copper, then you should use this method of wiring installation, as the most reliable one.
How to twist electrical conductors
There are ways to connect conductors that are not recommended. But because of its simplicity and low cost, such installation of electrical wiring is widely used. Wire twisting is very common. Therefore, it remains only to recall how best to perform the connection with twist.
The bare ends of the cores for twisting should not be less than 4 cm. In order to obtain a sufficient density of twisting, it is necessary to exert a certain force and to make the tension of the twisted wires. For multicore wires, the effort of the fingers is sufficient. Single-core conductors must be twisted with pliers.
How to isolate the bare ends of conductors
Twisted connections need protection. The protection for such a wiring installation is usually an insulating tape, which due to different colors can be used as a marker for each phase. But the vinyl tape has a temperature limitation, it is applied from -20 to +40 degrees Celsius.
Also, shrink tubes are used to protect the exposed joint. Before installing the wiring harness, the tube is put on one of the wires. After twisting, it moves to the junction. Then the tube is heated (you can use open fire) and it shrinks in size under the influence of heat and tightens the connection. 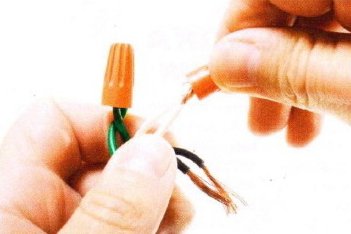
Also, there are special caps that are designed to isolate wire strands. Their scope of application is limited by the diameters of the obtained twists, so they are more often used in the distribution boxes of residential premises with standard wiring diameters. The cap is screwed onto the place of twisting and squeezes it with a spring. Also, there are caps with a special gel that protects the installation site.
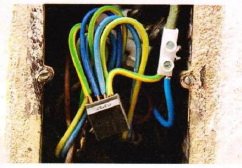
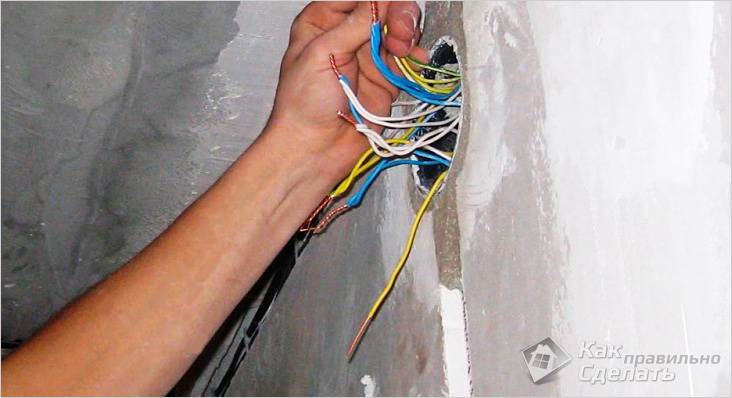
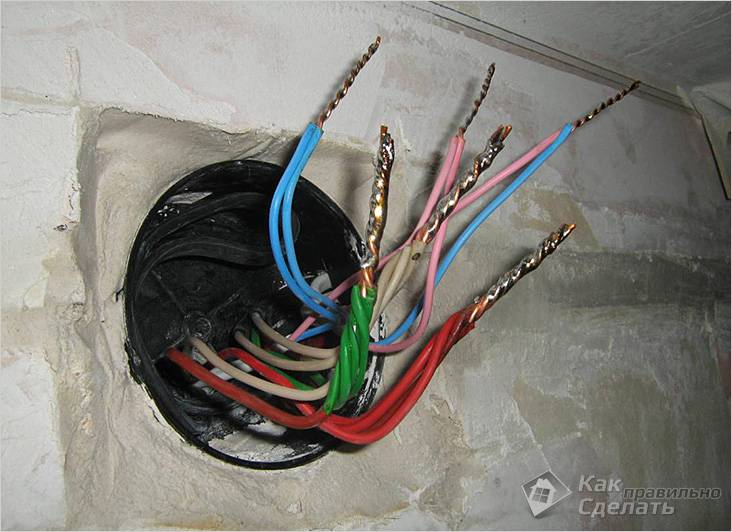
No wiring diagram can do without any connections, branching of wires or cables . For this purpose a special box is designed. It is located under the ceiling and is a round or square box made of polymer material.
In this material, we will tell you how to make connections correctly, demonstrate diagrams, photos and video instructions.
Why use a junction box
There are cases when when installing wiring disregard the installation of such valves, believing that this is just a waste of time, since the box must first be installed, then make a thread to it, which will lead to additional difficulties. It's easier to just make twist, insulate and corny plaster the wall . But here it is necessary to think a little beforehand, since in this case important aspects are missed:
- There is no free access to the wires. For example, if you do not have an outlet in the room or the light is gone, and after checking it turned out that the problem is that there is no voltage. How to check? Completely clean the finish? Tear off the wallpaper, plaster to get to twist? It will ruin your repair.
- If you want to install an additional outlet. It is not always convenient to connect it by laying the wires from a previously installed outlet. Thanks to the junction box you can easily make new connections.
- The normative document of the SAE states that "the connections and branches must be accessible for inspection and repair", therefore, it is impossible to neglect the installation of such a distributor.
- The absence of such distributors contradicts the norms of fire safety.
As you can see, the distribution box plays an important role. But its installation is only the beginning. It remains to connect all the wires in it. What is the best way to do this? Let's look at some ways.
Types of connections

What is the problem when connecting wires? Ensure good contact of the conductors with each other so that the chain does not tear, and there is no risk of a short circuit. In order to ensure this, you can act in several ways:
- The twist.
- Pressure testing.
- Welding.
- Soldering with a soldering iron.
- Use of screw contact clamps.
- Bolted connections.
These are years proven methods that you can use to ensure reliable contact. Let's take a closer look at each of them. You will learn how to properly combine wires with any of these options.
Scrolling

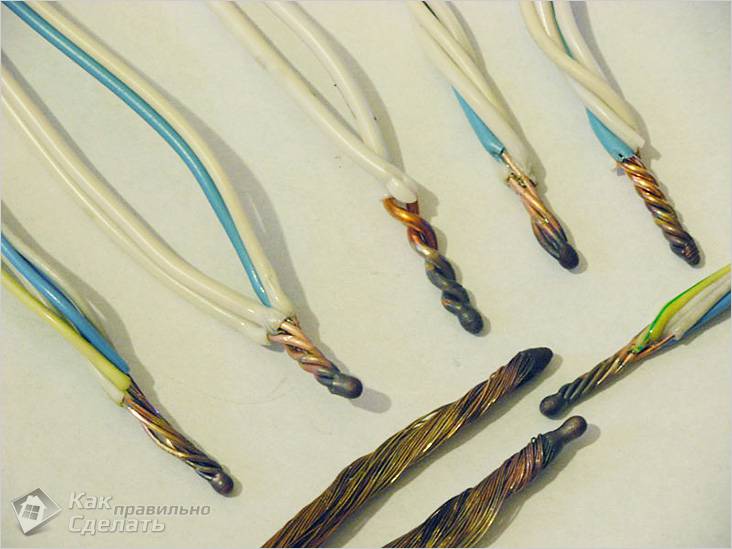
Such twisting in the junction box is officially prohibited. In the seventh edition of the regulatory document PUE, Chapter 2, paragraph 2.1 / 21 lists all types of permissible connections, but they are not twisted. And this is not surprising, since such a contact is sensitive to an impulse current and has a large transient resistance. Over time, contact will deteriorate and just burn out. Due to the fact that the contact area is small, under heavy load heating occurs, and the contact is further weakened.
This option is chosen because of its simplicity. It is enough just to clean 10-20 mm of insulation and twist the wires together with pliers. So did our fathers and great-grandfathers. But such a connection is often unreliable, especially if an aluminum core is used.
Crimping by connecting sleeve

Quite a reliable method for which you will need to purchase a connecting sleeve. You need to choose it based on the diameter of the bundled beam. Depending on the wires that you connect, the material of the sleeve itself is chosen. For copper wires, the sleeve should be copper, for aluminum wires - aluminum. For the connection to be reliable, the sleeve is crimped with a special tool called a press jaw. This technology is quite effective and stands, along with the rest methods, in regulatory documents.

To connect in this way you need:
- Remove the insulation, taking into account the length of your sleeve.
- Twist the wires into a bundle and insert them into the sleeve.
- Press the sleeve with a press clamp.
- The place of twisting is insulated with heat shrinkage or an insulating tape.
In this work, pliers are not recommended, since the connection will not be reliable enough. It is much better to buy press jaws or lend them to good neighbors.
Welding
This method can be called the most reliable and safe, because the wires are connected by fusion and become one. Due to the fact that welding will not be oxidized, this contact will not wane over time. But to carry out such work you will need skills in working with welding equipment.
In addition to the skills, you must prepare:
- welding machine for 24 volts, power more than 1 kW;
- welding gloves to protect the skin;
- glasses or a mask for welding;
- sandpaper for stripping wires ;
- clerical knife for stripping;
- carbon electrode;
- flux, thanks to which the melt will be protected from the effects of air.

After all the tools and materials are ready, it remains only to make welding, which will not be difficult. The work can be divided into several steps:
- Remove the insulation by 60-80 mm and sand it using sandpaper. The veins should shine.
- Connect the wires by twisting, screwing one on top of the other so that the ends are at the level of each other. It is recommended to make a length of at least 50 mm.
- Pour the flux into the recess of your electrode.
- Put the "mass" of the apparatus on the bare wire, turn on the welding machine and press the electrode to the top of the twist.
- Hold the electrode until a certain ball is formed, called a contact point. Usually it takes 1-3 seconds.
- It remains to clear the point from the flux and insulate the place of welding with a shrink tube or tape.
This type of connection will serve for a long time. In some old Khrushchevs, such welding lasted 50 years and stably fulfilled its function.
Soldering with soldering iron
The method is very similar to welding, only in this case the wires are connected using solder. For these works you will need a soldering iron. For work you will need:
- soldering iron;
- fine sandpaper;
- rosin (flux);
- brush for applying rosin to;
- tin-lead solder.
The operating procedure is the same as for welding:
- Removal of insulation and stripping with sandpaper.
- The twist.
- Application of flux.
- Direct soldering. The soldering iron melts the solder, which must flow into the twist itself, reliably connecting the wires together.
Often this method is soldered copper wires, but if you buy a special solder for soldering aluminum, then you can solder copper and aluminum.
Use of screw contact clamps

This method is fast, simple and effective. And most importantly, these clamps can combine dissimilar metals. For example, if you need to connect aluminum and copper conductors, which in itself is known to be contraindicated. Such clips are very simple and compact, and their cost can surprise you pleasantly.
![]()
To connect the wires with clamps, only 2 steps are needed:
- Remove the 5 mm insulation.
- Insert into the clamps and tighten the screw.

That's all, as you can see, everything is very simple and fast. It is important only to control the force with which you pinch. If the screw is tightened too much, the conductors can be damaged. Especially you need to be careful when working with aluminum wires.

The only drawback of the screw connection is that when working with a multicore cable, it must be crimped with a special attachment to ensure normal contact and integrity of the wire.
Bolted connections

This connection is quite reliable, but cumbersome. For modern junction boxes it will not work because of its size, but for large boxes of the old model - just right. By this method, it is possible to combine both homogeneous and dissimilar metals. The work is performed as follows:
- The bolt is put on a steel washer.
- From the conductors, the insulation is removed, and they form in the form of a ring.
- The first ring is put on the bolt.
- Then on the turn another steel washer, which is placed on the bolt after the first.
- The second connecting cable is put on top.
- All this "sandwich" is clamped with a nut.
- In the end, everything must be insulated.
It is this kind of construction that makes the contact cumbersome. If you need to connect several pairs of wires, then this option will not be the best.

This method can be called the most modern, popular and easy to use. All you need is to buy special terminals in the store. Inside these terminals there is a special paste that does not allow metals to oxidize. Due to this, various metals can be inserted into such connections.
The work is as follows:
- 10 mm of insulation is removed from each wire.
- The lever, which is on the clip, rises.
- The conductors are inserted into the connector.
- The lever is lowered to the home position.
If your clips do not have levers, they need to be inserted until the terminal clicks into place.

We examined the most reliable methods by which it is possible to combine wires in a junction box. This is a very important stage in the conduct of electrical work, as 70% of errors in the work consist in the wrong connection of conductors. But if you, even if you do not have the experience of such works, will use the methods that are given in this article, you can easily do everything according to the requirements of the standards. But which of these methods to choose depends on your ability and desire.
Video
This video shows how the wires are connected in a junction box:
All about the use of wires or crimping of the tips you will learn from the material provided in this video:
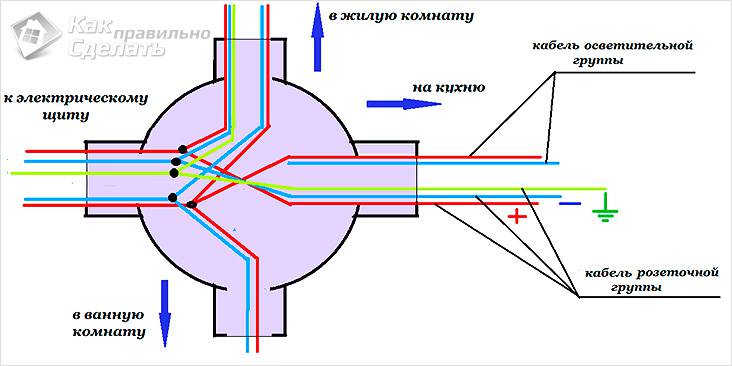
Scheme