How to change the cartridge in the mixer: signs and causes of failure, instructions for replacing the cartridge. Replacing the cartridge in the mixer: detailed instructions for repair in the photo and video
Gone are the times when only faucets controlled by crane-boxes were available for sale. Modern instruments are equipped with lever valves, through which water opens and closes with one movement of the lever. The main functional element in the mixer is a replaceable cartridge. With its help water is mixed from different pipes. As the cartridge wears out, the cartridges are replaced, as repairing them is unprofitable. Consider how the cartridge is replaced in the mixer. Such work can be carried out independently.
All replaceable cartridges, which are used in modern mixers, are divided into 2 categories: ball and ceramic:
- Ball cartridge. The flow of water is controlled by a hollow metal ball with several holes. When the ball is rotated, its holes coincide with the voids in the valve body. There is a mixing of hot and cold water. At present, such a design is obsolete. The disadvantage of such devices is the rapid formation of lime scale on the ball, especially if the mixer has not been used for a long time.
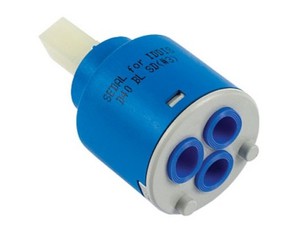
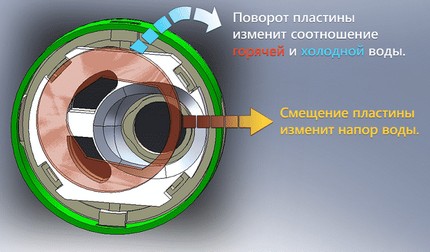
- . Its control element is a cermet plate with holes that fits snugly against another same plate fixed on the bottom of the cartridge. When the plate is vertically displaced, the flow of water is regulated, and when it is turned to the sides, the flow temperature changes. Modern cartridges for faucets shower cabins, kitchen sinks, washbasins - it's all ceramic products. They can differ in body material and design, but the principle of their work is always constant.
The principle of operation of a single-lever mixer
Single lever mixer is very convenient to use. One lever controls the temperature and pressure of running water. By setting the lever to some constant position, the next time you do not have to adjust the water temperature. The cartridge for the single-lever mixer ensures the separation or mixing of the flow, the reduction or increase in pressure. To control the mixer, it is enough to turn the lever upwards for a certain step, after which, by turning in some direction, a temperature adjustment is made.
When to change cartridge
Replacing the cartridge in the mixer with your own hands is necessary when the following problems occur:
- The lever began to move much more difficultly, with jams or jerks. Ideally, the lever should move freely, without applying effort to it;
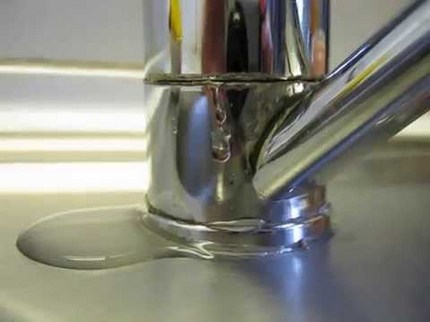
- When the position is closed, water flows from the tap. That is, it can not be completely blocked;
- When the lever is in a constant position, water can change its temperature;
- The lever position does not correspond to the water temperature. For example, instead of hot water, tap water comes from the tap, and vice versa;
- The mixer flows from the inside, as evidenced by the accumulated water around it. Thus the gaskets of the mixer itself are not damaged. This can happen if the plastic cartridge body bursts.
Causes of cartridge damage
A cartridge failure usually occurs for one of the following reasons:
- The mixer was operated incorrectly or subjected to mechanical influences, impacts;
- Low-quality materials of the cartridge and the mixer itself;
- Unsatisfactory water quality. Very dirty water containing solid particles can damage the cartridge very quickly. The plates are rubbed, their slipping worsens, they start to seize;
- Hydraulic hammers, which lead to excessive stress on the elements of the cartridge.
With the need to replace the cartridge in the mixer, almost all owners of these plumbing fixtures are confronted. It is rare that the cartridge serves 10 years. In conditions of worn out water systems, with frequent accidents and low quality of supplied water, the average cartridge is able to perform its functions regularly for a maximum of 4-6 years. Therefore it is important to know how to change the cartridge in the mixer with your own hands. Practice shows that it is not difficult for even a less experienced person to do such a job.
If it happened that our separate article will appear from it. In it you will find tips for elimination and prevention.
Tools that may be needed
Before you start to replace the cartridge, you must prepare all the recommended tools so that you do not get distracted by their search and do not get irritated if they are not there. You also need to purchase a new cartridge.
If you are not sure of the type of your cartridge, ask the knowledgeable people about it or find out in the store. If you disassemble the mixer, and then go look for the desired cartridge on the old model, then deprive the house of water for an indefinite time. If this is not a problem for you, then you can go to the store with the old cartridge to make it easier to pick up exactly the same.
For work you will need:
- set of screwdrivers. This includes flat and cross-shaped screwdrivers of different diameters;
- swivel or pipe wrench;
- pliers;
- clean rags;
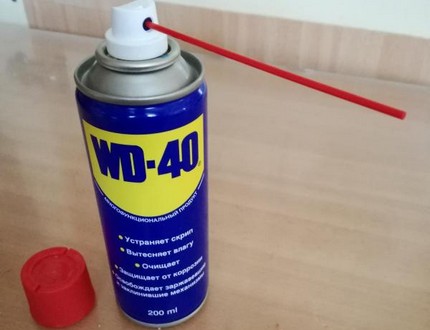
- liquid WD-40 (should be in every house);
- hex key.
If all of the listed tools you have, then the question of how to replace the cartridge in the mixer, goes to the finish line.
Sequence of work
Repair of the cartridge mixer is simple, in a few simple steps. The most important thing is not to rush and do not apply physical efforts to the mixer. Otherwise, you can easily break it. We will analyze how to change the cartridge in a mixer in the bathroom or in the kitchen, without damaging the plumbing fixture.
The procedure for replacing the cartridge is as follows:
1. The house completely shut off the water supply.
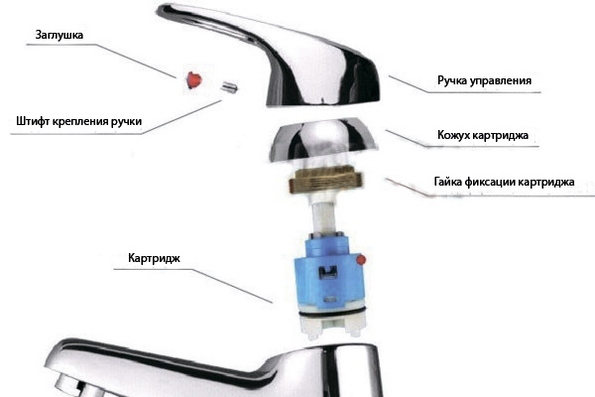
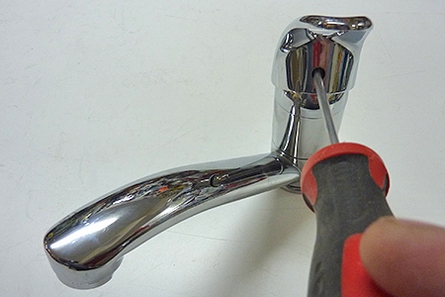
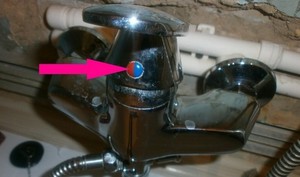
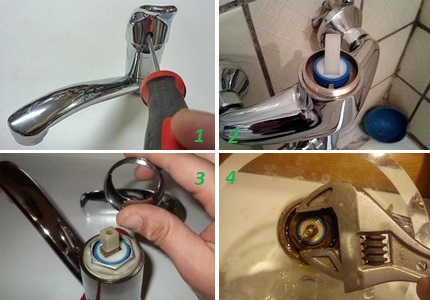
2. The decorative blue-red plug on the lever is removed. Lifting up the lever, it can easily be found in the front of it. The plug can be easily removed using a screwdriver or a knife.
3. Loosen or loosen the screw holding the lever in place. A small screwdriver is used for this. If the screw is a hexagon, use the appropriate hexagonal wrench.
Tip: If the screw does not unscrew, squirt the liquid with WD-40. After a few minutes the agent will dissolve the calcareous deposits, and the cork will easily exit the nest.
4. The lever is easily removed from its place.
5. The chromed decorative cap is unscrewed. It may be difficult to unscrew if the mixer has been used for a long time. Use WD-40 to shift the attached cap.

6. Under the cap, you can find a large nut that fixes the cartridge in the body of the mixer. It must be unscrewed with a wrench, selecting the appropriate diameter.
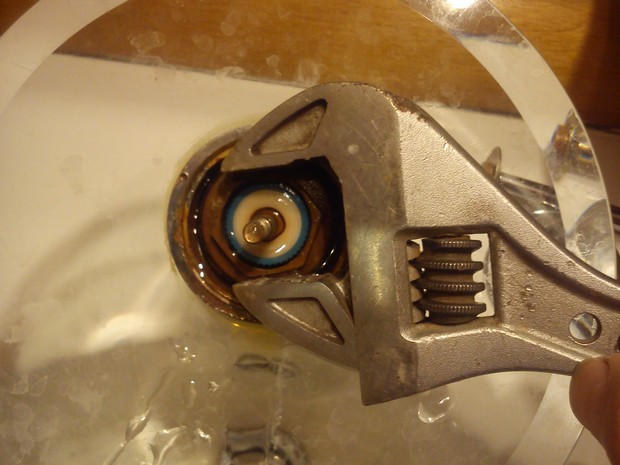
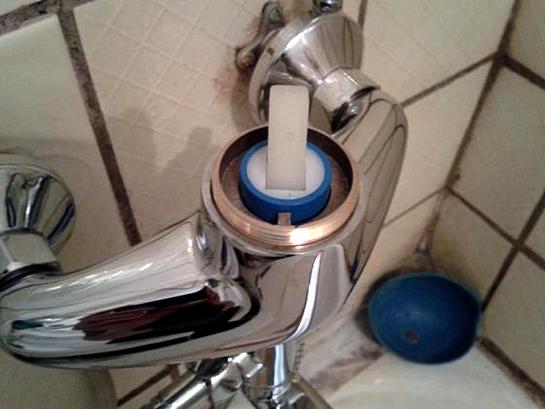
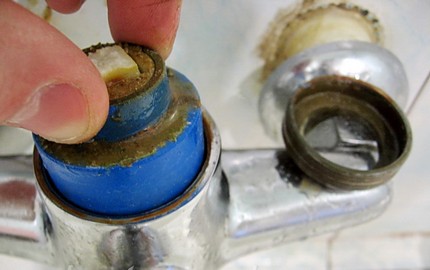
7. After performing all these manipulations, the cartridge can easily be pulled out of its slot.
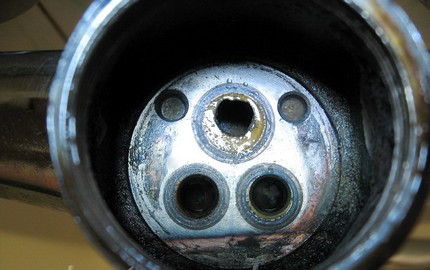
8. The place where the cartridge stood, must be cleaned of traces of rust, dirt, garbage got there. It is better to do this with rags. If this is not done, then the deposits accumulated in the mixer will not allow the new cartridge to be sealed there.
9. A new element is installed in the mixer seat. During the installation, you must carefully monitor the protrusions on the cartridge body exactly coincided with the existing recesses in the body of the mixer. If this condition is not met, the mixer will flow.

10. The mixer is assembled.
11. Turn on the water supply, and then check the tightness of the mixer. If there is a leak somewhere, the mixer is disassembled again, the cartridge is removed, the cause of the leak is clarified and eliminated.
The replacement of the cartridge in a shower mixer, kitchen sink or wash basin is practically the same. Only the models of used cartridges can differ. If your mixer is equipped with a thermoregulator, sensors or motion sensors, then it is better to entrust this work to professionals, since the design of these devices is quite complicated.
How the replacement of the cartridge in the mixer video will demonstrate clearly.
Any expert will say that the correct way to avoid making mistakes when choosing a cartridge for a mixer is to remove the defective product and, together with it, go to the store. Acquire the same - "one in one." The fact that quite often on sale are found, the features of the designs which assume the use of only one, "their" cartridge. How to act in different situations, what to look for - you can learn about this from this article.
Features of different models of cartridges
The principal difference is in performance. Cartridges can be ceramic (with plates) or ball. But there are some nuances that distinguish one from others. The main parameters can be the same, but the manufacturer is different.
When this part of the sanitary ware goes out of service, its independent repair (even if it is of a demountable type) is not carried out - only replacement. So which cartridge for the mixer is still better to choose?
Knowing some of the features of trademarks will somewhat facilitate this task:
- Hansgrohe - durability and reliability. This is determined by some constructive nuances of the rotary handle of the product. Specialists say that they also allow a significant reduction in water consumption.
- Vidima - low cost, warranty - up to 5 years.
- Oras - the virtue of such cartridges is universality. In case of breakdown, it is not difficult to pick up an analog.
- Grohe - are characterized by an increased resource, as the spraying on the working parts of the plates increases their strength many times.
When dismounting a failed cartridge, you do not need to exert much effort, as there is a risk of breaking its plastic casing. If it "stuck", it is enough to process the grooves with a "liquid key" (WD-40), and after 5 to 10 minutes, the part can be easily removed from the socket.
When purchasing a mixer, it is advisable to purchase a spare cartridge. It is inexpensive - from 23 to 40 rubles, depending on the type. But households will not have to sit without water, while the owner is looking at the outlets for what is needed to fix the malfunction. The procedure is simple - remove the failed sample, install a new one, and with a broken product - in the shops, look for exactly the same.
If for some reason the old cartridge is not (for example, lost), then you can make measurements at the place of its installation on the mixer. What you need to determine:
- Diameter of the shell. Typical sizes (mm) - from 35 to 40.
- The length of the rod.
- Feature of the "seat".
In order not to engage in frequent repairs, do not purchase parts of an unknown manufacturer. It is better to pay more and buy a product of a well-known, well-established brand. Such spending is fully justified, especially since we are talking about relatively small amounts.
On a note! If there are problems with the mixer, first of all you should look for the faulty part from the same manufacturer as the plumbing device itself!
The popularity of stylish and comfortable single-lever faucets is growing. Decorating bathrooms, kitchens and bathrooms, they confidently displace the familiar constructions equipped with valves. However, sooner or later, this modern household device can also break down. Most often in single-lever mixers, a cartridge comes out of operation, which can be replaced independently, without recourse to specialists.
Mixers with cartridges: varieties and operating principle
Practical, comfortable and durable articulated mixers are in great demand among the population. Their design is quite simple.
Ball cartridge

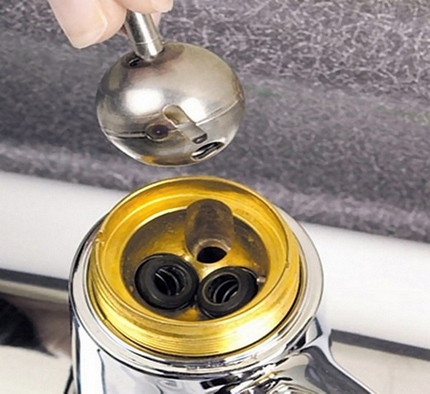
At the heart of the device is a ball, which has one inlet and two outlet openings. It is located between two seats, made of fluorinated hard rubber with holes for cold and hot water. In the pipeline the water presses on the ball, which reliably contacts rubber "saddles".
This ball rotates by moving the lever of the mixer and can occupy any position in which its openings with inlet nozzles coincide partially, completely or completely do not coincide.
The water pressure from the tap and its temperature depend on the mutual position of the inlet nozzles and the holes in the ball.
Saddles and a ball are almost always placed in the cartridge, but there are models in which the saddles are attached to the body of the mixing valve. A significant drawback of this design is that if the mixer is not used for a long time, then because of the calcareous deposit formed between the insert and the ball, it can fail.
Disc cartridge with cermet plates
This is an absolutely reliable device that can last up to ten years.
Single lever mixers.
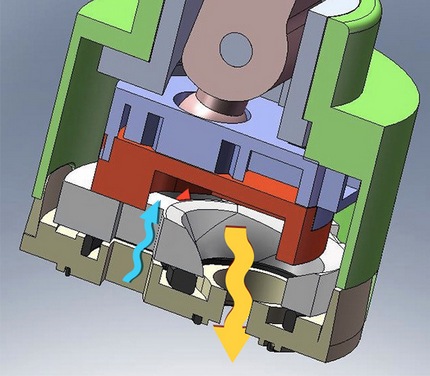
In such a device, water, getting into the cartridge, mixes there and then flows into the spout. The temperature and pressure of the water is regulated by the position of the ceramic discs. By moving the lever, the upper disc, displacing, occupies a certain position in relation to the lower one. Water is blocked in case of tight connection of the protrusions of the upper disc with the holes of the lower one. The tighter the fit, the weaker the pressure. The temperature of the water depends on the degree of overlapping the upper disk access to cold or hot water.
Two-valve mixers.
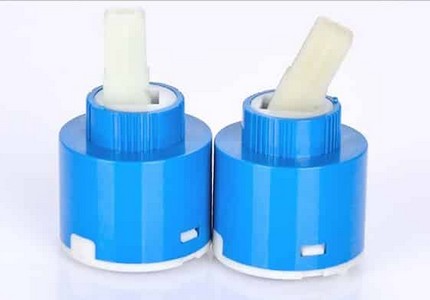
 In such devices, two cartridges are used: one for cold water, and one for hot water. Both cartridges equipped with ceramic plates, located in a metal sleeve. The holes through which water enters are opened or closed by displacing the cartridges relative to each other.
Consumers prefer these devices. Their metal parts replaced with ceramic ones, so mixers with disk cartridges are easy to use and durable.
Basic malfunctions of mixers at breakage of cartridges
The life of the device is affected by water quality. Being in constant motion, it delivers particles of sand, metal and rust to the mixer system and destroys the surface water pipes. This leads to damage to the product.
The main types of faults:
- the lever of the device goes tight, which makes it difficult to adjust the water temperature;
- it is not possible to achieve full head or water shut-off;
- the water temperature changes with the same position of the lever;
- when moving the lever it is impossible to achieve the inclusion of one type of water (only cold or only hot);
- the water supply is not regulated. It flows only hot or cold.
How do I replace the cartridge in the mixer?
 Before buying a new product, you need to know its characteristics: the length of the rod, the landing part and the diameter. It is best to take off the old part and bring it to the store.
Tools and materials that will be needed to repair the device:
- hex key or flat screwdriver;
- pliers;
- adjustable wrench or wrench;
- liquid WD-40;
- paper napkins or clean cloth.
With the job of replacing the cartridge in the mixer, you can cope even without having special knowledge and skills. First of all, the supply of hot and cold water must be cut off. If the valves are faulty, you will have to consult the plumber for help. When they work in an uninterrupted mode, repair of special difficulties will not deliver.
Sequence of actions when replacing the cartridge in the mixer.
- The lever of the mixer rises to the highest position.
- In front of the bottom of the device is a cap with a blue and red mark, which should be removed using a screwdriver or a knife.
- Under the cap is a small cog, which will need to be unscrewed to remove the lever. To unscrew the cog fully is not necessary, it is enough only to weaken.
- After removing the lever from the construction, you can see a chrome plated decorative cap, which should be easily unscrewed by hand. If the mixer is used for a long period of time, this may not be possible, so it will be necessary to use the adjustable wrench number one. Adjust it so that it does not break the cap.
- After the decorative cap is unscrewed, access to the nut holding the cartridge opens. It is unscrewed with the same key and the cartridge is removed.
- Before installing a new device, you must clean the seat for it. During many years of operation, dirt accumulates in the mixer, which will prevent the cartridge from being sealed. The solid particles of ceramics, which were formed as a result of the destruction of ceramic discs, can also interfere with this.
- When installing a new device, make sure that the protrusions on it coincide with the holes in the seat of the structure.
- After that, the nut is twisted, a decorative cap, joystick and cap is installed.
This completes the repair of the mixer cartridge. Now follows check for leaks and working capacity. To do this, the water supply opens. If the replacement of the cartridge in the mixer has been performed correctly, the device will work without any problems. All repair work should be done carefully, so as not to damage the decorative coating.
 Buying the device, you should remember that there is nothing eternal and sooner or later the mixer can break, and you need to replace its individual parts. Therefore, it is recommended to choose a model for which the components are available for free sale. Then the repair of the mixer and replacement of the cartridge can be made at any time.
When choosing a product, special attention should be given to which cartridge is installed in it and whether its analogs are available for free sale. If this part of the device can only be ordered from an authorized distributor, then it is necessary to inquire about the availability of representatives of this product in your region.
In expensive mixer models ceramic discs are used High Quality. Their long service life and high degree of interfacing are achieved through the use of modern high-precision equipment and subsequent polishing with ultrasound.
For the cartridge to last a long time, it is recommended to install a water filter. But, if there is a breakdown, then, following the advice of experienced professionals and consistently taking steps to replace the cartridge, you can do it yourself and use the mixer for a long time.
With the equipment of kitchen sinks and shower cabins, single-lever mixers are the most widely used. They are easy to install and convenient to use. The main functional mechanism of such models is a cartridge, the resource of which is limited. What steps involves the replacement of the cartridge in the mixer and what nuances to take into account when repairing the crane equipment, we will consider in more detail.
The main purpose of the cartridge is to mix hot and cold water streams, and also to regulate the intensity of their supply, ensuring trouble-free operation of plumbing equipment.
When equipping single-lever mixers, two types of devices are used: ball and disk. They are approximately equal in terms of service life. But nevertheless the bulk of mixers for household use is equipped with mechanisms of disk performance.
In the event of a breakdown in the main functional mechanism of the plumbing fixture, replace the cartridge as soon as possible in the mixer
This is due to the fact that in the legal plane with the production of ceramic disk mechanisms, the situation is much simpler. Not all manufacturers have a license to manufacture ball type devices. In order not to pay for the right to issue, companies are easier to stamp the disk devices in demand on the market.
Steel ball-type devices
The design of the ball joystick is a locking element in the form of a hollow steel ball, equipped with three communicating holes: two input and one output.
A hollow element, fitted into a cartridge sleeve made of high-strength rubber, is connected to the transmission mechanism by means of a lever
The temperature and flow head are set depending on the position of the openings of the inlet pipes and the cavities of the ball. The larger the area of alignment, the stronger the flow. When the lever is turned or tilted, the ball walls overlap one or both of the holes, allowing flow from the nozzles with hot or cold water fall and mix inside the cavities of the locking element.
The main drawback of ball devices is the vulnerability to the deposits that form and accumulate inside them during operation. They worsen the smoothness of the pressure of the mechanism, provoking the disabling of the joystick.
In the design of most models, the ball and saddle are placed in a single cartridge housing, but there are also variants where the base is attached directly to the inner walls of the crane
Based on the diameter, height and landing part, these types of devices on the market are presented in a wide range. Therefore, when changing the cartridge on the mixer, it is important to select and install a completely identical spare part.
To protect yourself from mistakes in the selection, leading to unplanned waste, buying a new "core", it is advisable for the sample to take with them the old one.
Disc "cores" of metal-ceramic plates
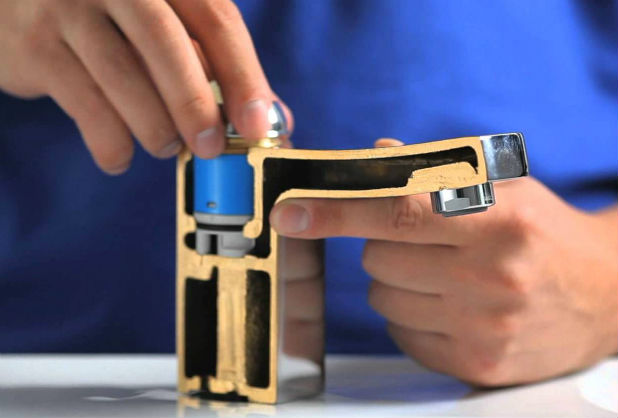
Disk cartridges are equipped with two smooth plates that are closely adhered to each other, made of cermet. The lower plate is securely fixed in the "core", and the movable upper plate is connected to the control rod, due to which it freely rotates about its axis.
In devices of the cylindrical type, water flows are mixed by displacing the discs relative to each other, as a result of which the apertures completely or partially overlap
In the mixing cavity there is a metal mesh, the main purpose of which is to suppress noise. In some models, the role of the noise reducer is performed by the figured protrusions.
The base for fixing the handle of the single-lever device is the stem. It is attached to the upper ceramic disc, if necessary can be removed.
Adjustment of water pressure in cylindrical "cores" is carried out by moving the upper plate. It is equipped with projections and depressions that cover the holes of the lower disc. The more closed the holes, the weaker the pressure.
With the lever position set, the troughs and the "core" protrusions fit tightly, as a result of which the water supply from the tap is completely blocked
To increase the tightness of the design, most of the models have rubber gaskets at the bottom of the mechanism. To prolong the life of ceramic elements, a metal net is provided. It acts as a coarse filter.
Popular Cartridge Sizes
When buying a replacement element, it is important to pay attention not only to its shape, but also to the location of the holes for the rod. The sizes of replacement cartridges are standardized for each mixer model.
In the sanitary equipment of Hansgrohe and Blanco trade marks, the locking devices can differ substantially even depending on the type of crane installed
Most manufacturers use cartridges with a size of 28 mm, 32 mm and 35 mm when equipping the mixers. In the products of Kaiser and Grohe trade marks, it is often possible to find functional mechanisms with dimensions of 40 mm and 46 mm.
Among the most commonly purchased products include products with a diameter of 40 mm. They are identified by the marking d40. In addition to the standard sizes, many original models often have accessories of 18 mm, 20 mm and 22 mm.
The diameter of the product has no serious effect on the operating parameters of the mixer, it's all about the dimensions and shape of the sanitary equipment
When purchasing a cartridge, specify if there is a return of the product and whether there is a guarantee for it. Please note that in case the device does not work, it can be returned or replaced in the store not later than two weeks from the date of purchase.
Common causes of breakdowns
Problems encountered in the operation of both types of devices are usually associated with wear of moving parts. The reasons for this can be poor quality materials used in the manufacture, mechanical damage to equipment and the impact of water hammering, creating excessive stress on the elements of the "core".
The key reason for the failure of the working part of both the disk and the ball mechanism is the poor quality of tap water supplied by the central system
In conditions of worn out and outdated water supply systems, the average cartridge can last no more than 4-6 years. The following signs will indicate that it needs to be replaced:
- the course of the lever became less smooth (with jamming or jerking);
- it is difficult to regulate the head of the water flow;
- water flows are not mixed, regardless of the position of the crane handle;
- the water continues to flow with a trickle even when the valve is closed.
The failure of the mechanism can also be indicated by the reverse situation, when at a static position of the lever the water flows spontaneously change temperature.
Leakage equipment, in which the gaskets remain intact, is likely to indicate that the plastic housing of the mechanism has burst
The cost of the cartridge for the mixer is insignificant in comparison with the price of the plumbing equipment itself. Periodic replacement of this element is an economically advantageous measure, which can be realized on its own, without the involvement of plumbers.
Disc cartridge replacement technology
Virtually all single-lever cartridge-type cranes are similar in structure. As a rule, they are a single design, placed in a metal or plastic housing. The replacement technology described below is suitable for each of them.

When repairing the equipment, it is better to replace the "core" entirely, and not to disassemble it into its component parts, since individual elements for practically disposable devices are on sale quite problematic
How to change the cartridge itself in a kitchen faucet or shower mixer, we will disassemble step by step. The whole process even for a beginner takes 30 minutes.
Selection of the necessary tools
In addition to purchasing a new cartridge, you should prepare the tools in advance so that you do not get distracted by their search while you work. To carry out repairs, you will need:
- gas and adjustable wrench;
- a screwdriver with a straight slot;
- pliers;
- pliers with a narrow working part.
When disassembling some types of mixers, a hexagon may be required. To remove the old calcareous deposits useful special cleaning fluid type WD-40.
Automotive fluid WD-40 is able to dissolve and displace dirt, rust and limescale, greatly simplifying the disassembly of "fused" parts of the mechanism
To remove contaminants from the mixer seat, prepare a clean rag or cut of cotton fabric in advance.
The sequence of disassembly of the device
Before replacing the disk cartridge in the mixer, to prevent flooding, block the inlet valves with hot and cold water. To verify the absence of water in the system, turn the lever mixer.
Disassembly of the device is carried out in the following sequence:
- Use a slotted screwdriver to remove the plug on the front of the valve, on which the hot and cold water marker is located.
- Using a hexagon or a thin screwdriver, unscrew the locking screw located under the plug. It connects the handle to the control rod.
- Remove the rotary lever from the stem. Usually this stage does not cause difficulties, but sometimes you have to make small efforts.
- Remove the chrome decorative ring, which acts as a protective cover.
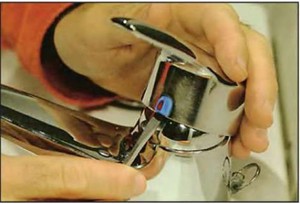
- With a wrench or pliers with a narrow working part, unscrew the presser brass nut that holds the ceramic cartridge.
- Remove the defective cartridge by pulling it slightly toward you, or gently rocking from side to side.
If the nail holding the ceramic cartridge "mesh" with the device, treat it with a WD-40 liquid. Having moistened the rusty nut with a "Vedeshka", in a few minutes you can unscrew it and remove it from the nest without much difficulty.
When unscrewing the chrome decorative cap and during the dismantling of the cartridge fixing nut, do not use excessive force to avoid damaging the equipment
But it should be borne in mind that this method can damage the eccentric, and therefore represents a danger to the equipment.
Thinness of cartridge installation
The extracted cartridge is carefully inspected for cracks and other faults. If they are found, they go to the store, not forgetting to take with them the failed element.
Having bought a new cartridge instead of the extracted defective part, proceed with its installation. Before installing a new unit, it is necessary to thoroughly clean the seat from the accumulated rust and dirt in previously prepared cuts of fabric. If this step is neglected, the accumulations accumulated on the bottom will not allow the new device to be sealed.
When mounting the cartridge on the seat, it is important to ensure that the projections of the device and the recesses in the mixer housing are completely matched. If this condition is not observed, there is a high probability that the equipment will leak when the mixer is turned on.
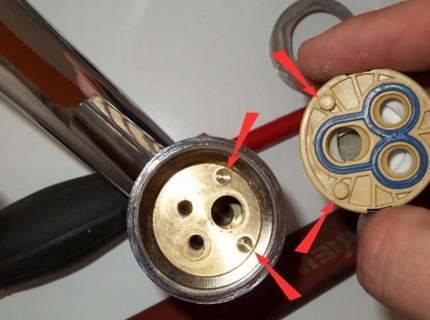
The fact that the protrusions of the cartridge are in the grooves of the body of the mixer will be indicated by a characteristic click, if there is not one, then it is necessary to apply a little more effort
After the faulty element has been replaced with a new one, the structure is assembled in the reverse order.
- First, they are baited, and then tighten the fixing nut with pliers.
- Mount the original protective cover.
- Install the handle and screw it.
- Tighten the locking screw.
- Place the decorative plug in its original place.
After the completion of the assembly, it remains only to verify the efficiency of the mixer. For this, it is necessary to renew the water supply and turn on the mixer, gradually withdrawing the handle and observing whether there is a leak. If it is found, you will have to re-cover the water and fix all the shortcomings.
There are situations when the replacement of the "core" does not give the desired result. The crane continues to dig. In this case, the cause may be hidden in the gasket. Its main purpose is to seal the joint between the mechanism and the bottom of the mixer.
Since the gasket is very thin, even an insignificant corrosion on the housing will not allow it to fit as close as possible to the surface
The only way out of this situation is to disassemble the device and replace the gasket.
How to replace the ball mechanism
Most steps to change the ball cartridge in the mixer are similar to those described in the repair of disk devices.
The main stages of the replacement of the spherical mechanism:
- On the crane lever, remove, using a screwdriver, a decorative plastic overlay.
- The locking screw located under the cover, depending on the configuration of the head, is unscrewed with a hexagon or a Phillips screwdriver.
- Remove the mixer lever.
- The underlay located under the lever, fixed on the valve body by means of a threaded connection, is unscrewed with a adjustable wrench.
- With the help of pliers having a narrow working part, a ball valve is removed from the stem.
- Inspect the rubber saddle of the cartridge and, in case of defects, replace it with a new one.
- Remove the ball and inspect for surface defects. There should not be any rushes. Cavities in the ball are cleaned with rags from accumulated debris.
- Replace the rubber gaskets and assemble the structure in the reverse order.
In the future, in order to protect the plumbing equipment from premature failure, it is necessary to install coarse filters at the inlet of cold and hot water.
Although many modern mixers often have a built-in filtration system, installation of an additional barrier for large elements present in the water will never prevent.
Video guide for selecting and replacing the device
Several useful advice for repair of faucets by one's own hands.
How to properly disassemble the mixer and eliminate leaks:
Elimination of mixer failure with ball cartridge:
The replacement of cartridges in mixers installed on kitchen sinks and in shower cabins is practically no different. But if your mixer has a more complex design and is equipped with sensors and thermostats, it is worthwhile to charge the replacement of functional elements to professionals.
Repair mixer, cartridge replacement
How does the cartridge work in the mixer, their differences, the cartridge in detail, tips on repairing the mixer, video - replacing the cartridge in the mixer ...
More and more often in everyday life we come across so-called single-lever mixers.
These mixers are present in almost all well-known brands represented on our market.
Mixing of water in such a mixer is achieved by means of a cartridge.
How the cartridge with ceramic discs works and works
Cartridge mixer, produces mixing of hot and cold water due to ceramic inserts.
Hot and cold water getting from the water mains to the cartridge passes through the holes in the ceramic inserts, at the outlet of the cartridge it is mixed and further, through the spout and aerator comes out.
Mixer Cartridge Assembly
The cartridge for the mixer can differ in size, quantity and shape of the lower holes.
Any cartridge has a plastic casing, the casing can be dismountable and not dismountable, in case the cartridge is dismountable it must consist of two parts of the casing and the bottom part.
The lower part of the cartridge has several holes with rubber inserts, the rubber inserts serve as sealing gaskets for sealing the cartridge and mixer, the lower part of the cartridge is held in the housing by means of plastic latches.
Inside the body there is a rod on which the handle of the mixer is put on, the bottom of its stem is inserted into the holder of the upper ceramic disc.
Ceramic disks: their two, upper and lower. The upper disc is driven by a rod, it can rotate and move, the lower disc is fixed, it is fixed in the lower part of the cartridge housing.
Ceramic disks have a special hole shape, when the upper disc is rotated, the upper and lower disks are aligned, so that hot and cold water is mixed, and when the upper disc is displaced, the water head is increased or overlapped.
Disks to each other tightly compressed when connecting the lower and upper parts of the body.
Faulty cartridge cartridge
Ceramic cartridge though is a design collapsible, but it is not subject to repair, as to pick up separate accessories it is difficult enough (easier to buy a new cartridge).
Most problems with the failure of the cartridge are due to the wear of the moving plastic parts of the cartridge, as a result of which the ceramic inserts no longer have such a snug fit and begin to flow through the water, otherwise the ceramic plates themselves can wear out.
Sometimes on non-quality cartridges, it is possible to hit sand particles between ceramic discs, which also leads to leaks.
Differences of cartridge for mixer
Cartridges can differ from each other:
The diameter, so the diameter of 40 mm will be marked as d40 ( the most common diameter is 35 mm. and 40 mm.)
Landing part ( when buying it is better to have a sample of the old)
Sometimes the length or thickness of the rod
Repairing the mixer with your own hands (replacing the cartridge)
Before you start replacing the cartridge in the mixer, the hot and cold water supply must be cut off by covering the risers.
We check by opening the tap, that we did everything correctly, and the water is blocked.
1. In the front part of the mixer lever, there is a decorative cap, using a slotted screwdriver, remove it, and unscrew the locking screw of the handle.
You may need a hexagon to unscrew the stopper, so before you replace the cartridge, first select the correct key.
2. Having unscrewed the screw, we remove the crane lever from the mixer body, here we see the cartridge pressed with a wide nut.
If you do not remove the mixer lever from the stem
There is a situation when the handle of the mixer is not removed from the rod, even with a huge effort.
This often occurs as a consequence of "boiling."
Water, detergents, oxidizable metal: all this contributes to the formation of plaque and soldering the cartridge and the handle itself.
Many plumbers in this situation are advised to immediately replace the entire mixer.
But do not lose heart, for a start you can use folk options.
Options for removing the lever mixer:
Use WD-40, pouring it through a thin tube with some periodicity through the hole from the plug and try to get on the rod at the very grip.
This option requires sufficient patience and time, since WD acts gradually and the penetration of lubricant deep into the handle is quite slow.
We all know that the metal expands when heated ( if you are sure that the mixer handle is metal).
Watering hot water from the kettle to the lever for some time you can achieve the expansion of the metal lever, and try to pull the extended lever ( pre-wrapped it in a towel that would not burn your hands).
Well, quite a radical way. If you are already ready to buy a new mixer, you can try simply fold the cartridge cartridge by turning the handle with force.
There are two options:
Either the cartridge stem breaks and you can then remove the rod stock from the handle.
Or the handle itself will break if it is made of a thin and brittle material.
Carrying such repairs. Observe safety!
Work only with the mixer off!
Work should be in gloves and goggles.
In any case, without removing the lever, you can not get to the cartridge.
3. If there is a protective cover, remove it, under the cover is a nut pressing the cartridge to the body of the mixer, unscrew it with pliers with long noses.
Sometimes the cover also sticks to the mixer, use WD-40.
4.
We take out the old cartridge and put a new one in its place, checking the correct alignment of the holes of the cartridge and the mixer guides.
The cartridge should fit into its place without much effort.
5.
We put on the nut and tighten it without much fanaticism, so that we can press the cartridge to the saddle of the mixer.
6.
We put on a protective cover and install the crane handle on the cartridge rod.
The seat of the cover, and the place of connection of the cartridge with the handle must be lubricated, then the next time the cartridge is replaced everything will be normal to unscrew.
7.
Tighten the stop screw of the rod and insert the plastic plug.
video - replacement of a ceramic cartridge in a mixer
When choosing a mixer, pay special attention to what cartridge is installed in the case, whether there are analogues in free trade or the cartridge can only be ordered from an authorized distributor.
Buying a mixer needs to be understood that there is not anything eternal and the availability of accessories in free trade is a guarantee that your mixer can be repaired at any time.
Ask for availability of a distributor or an authorized representative of this product in your area.
In high-end brands, high-quality ceramic discs are used, from conventional ones they are characterized by a high degree of coupling and a long service life, this is achieved due to the use of high-precision and technological equipment with subsequent polishing by ultrasound.
Other materials on the topic:
Choosing a hood in the kitchen is akin to buying a spaceship. About that inside, we know a little, and looks also mysterious. Only one thing is known - the hood in the kitchen is simply necessary ...