How to make a birdhouse with your own hands from scrap materials. How to make a birdhouse with your own hands from scrap materials? Assembly of finished house parts
The long-awaited spring has arrived. There are only a few days left before the arrival of our feathered friends. But birds in the yard of a house or on a plot of land are always a joy. But are we ready to meet them? Are you sure that the birds will want to settle near our house? If not, then get to work immediately!
Today we will look at how to make a birdhouse correctly, what materials are best to use for its manufacture, and also provide some diagrams and drawings.
First of all, you need to decide on the material of the birdhouse. It is desirable that the birdhouse be made entirely of natural materials. Some even make birdhouses out of stone; they look very beautiful and very unusual. It all depends on imagination and possibilities! But most often, ordinary dry boards are used for these purposes (with the exception of coniferous wood).
What types of wood are preferable for making a birdhouse? Take birch or oak. The recommended thickness of the board should be at least 20mm so that the birdhouse retains heat well. There is no need to sand the boards; they must have a rough surface, at least on the inside. If the board is smooth, you can scratch it thoroughly with a knife - this will make it easier for birds, especially chicks, to get out of the birdhouse. It is highly undesirable to use compressed or laminated wood (fibreboard, chipboard, plywood, etc.) for construction - it is very short-lived, not to mention toxic.
You should not decorate the birdhouse with any rustling objects or sparkles, otherwise instead of a cozy birdhouse you will end up with a very natural scarecrow.
Keep in mind that you do not need to make the birdhouse very spacious. If you nevertheless make it larger than in the drawings below, then as many as 4-5 chicks will survive in such apartments, as a result, their parents will not be able to feed them properly. Accordingly, frail offspring will grow up that will not withstand the difficult flight to warmer climes. In a cramped house, only 2-3 chicks will grow up, but they will be healthy and strong.
To make a birdhouse we will need the following tools:
- ruler with pencil;
- nails or screws;
- hammer (screwdriver);
- wood hacksaw,
- drill.
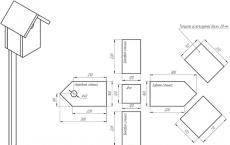
Below is a drawing of a birdhouse of a classic design (Figure 1).
Figure 1 — Classic birdhouse
It is clear that this is the simplest, but far from the only type of birdhouse.
Here is another drawing of the “House” birdhouse, which has a slightly different design (Figure 2).
 Figure 2 — Birdhouse “House”
This model has a non-removable roof. Naturally, this design is inconvenient if you plan to inspect and clean the birdhouse every year before the birds arrive. To make the lid removable, a sleeve is nailed to its lower part, having the same dimensions as the bottom (Figure 1), due to which the lid will hold well. Care must be taken that it cannot be blown away by the wind or knocked down by some crow. The easiest way is to screw the lid to the house with wire. It is most rational to make a flat roof with a slight slope back, and not a gable roof, as in the drawing above - it will begin to leak faster than usual.
Fastening the bottom and walls is best done with screws, but it is also possible to use nails. A strip is placed on the back wall and attached to a pole or tree.
As you can see, the design of birdhouses is extremely simple. The drawings show birdhouses made from 20mm thick boards. You can use others, but only then will you have to adjust the dimensions of the roof and bottom of the birdhouse. You can deviate from the drawings and show your own initiative, you just need to take into account some important notes:
- the total height should be 30–35 cm;
- The size of the bottom of the birdhouse is usually made about 15x15cm;
- the distance from the tap hole to the bottom should be at least 15–20 cm;
- the inlet hole (tap) should have a diameter of about 50mm.
The birdhouse sizes listed above are ideal for starlings and sparrows. The optimal diameter of the entrance varies for different birds. So, for great tits, redstarts, nuthatches and whirligigs, the dimensions of the bottom of the birdhouse should be made smaller - 100x100 mm, the height - up to 280 mm, and the diameter of the entrance about 30 - 45 mm; for small tits and pied flycatchers, the bottom should be about 80x80 mm, the height should be about 250 mm, and the diameter of the entrance should be 30 mm.
Using the example of a classic birdhouse (Figure 1), we will clearly consider the process of its assembly. We cut the boards in accordance with the drawing and get to work.
We attach the front wall of the birdhouse to the side ones using nails or screws We attach the back wall and bottom All that remains is to make a removable lid... We install any perch in front of the entrance to your taste Nail the sleeve to the lid of the birdhouse. In this case, the roof of the birdhouse is made removable so that it can be cleaned. However, it needs to be wrapped with wire or screwed in for reliability. Birdhouse assembly
You should try to knock down the bird house as tightly as possible. It is advisable to coat all cracks with clay or caulk with tow. Nails and sharp, split edges should not protrude inside the birdhouse to prevent injury to birds. It is not advisable to paint the birdhouse; it is enough to treat it with drying oil. If you still decide to paint it, it is better to use oil paints in translucent tones.
As you can see, making a birdhouse with your own hands is not at all difficult. In addition, the activity is quite exciting and very useful.
And finally, I suggest watching a video lesson in English (unfortunately, it was not found in Russian, but in principle everything is clear here), clearly showing one of the methods for making a birdhouse with an unusual - gable - roof. It looks quite original.
Difficult? Here is one of the simplest ways.
 When preparing firewood, choose the log that is most suitable in size and shape and make an original birdhouse out of it!
 Perhaps anyone can make such a house for birds. Cheap and cheerful, as they say.
We will be happy to look at photos of your homemade products, post them in the comments - we will evaluate, discuss, and advise!
When the house for the owners of the site is built, it’s time to think about the other inhabitants of the surrounding area. Our helpers, birds, also need housing. What it will be depends on the type of birds that need to be attracted to the garden.
"Building standards" for a birdhouse
When choosing housing, birds are guided not by the beauty and elegance of the structure, but by its safety and functionality. Birds are guaranteed to settle in the garden if a number of conditions are met:
- the birdhouse is made of hardwood;
- the thickness of the walls of the house is at least 2 cm;
- During assembly, no glue or materials based on it were used: plywood, fiberboard, OSB.
Fresh wood from coniferous trees is unsuitable because it releases resin that glues the feathers together. In addition, birds do not accept strong odors, so nails or screws are used instead of glue to hold parts together.
You can make a birdhouse from an old pine board without resin pockets
The parameters of the house determine which species of birds will choose it. Most birds recognize their future home by the size of the entrance hole. Taphole diameter:
- for starlings - 4.5–5 cm;
- for redstarts - 3.5 cm;
- for tits - 2.8–3.5 cm.
If you cut the entrance too wide, the nest will be easily accessible to predators. There is also a high chance that squirrels or large birds will settle there.
Squirrels are funny neighbors if the owners of the property don’t mind treating them to their berries and nuts
Try not to exceed the standard birdhouse dimensions:
- height - 30–35 cm;
- bottom inside - 12–17 cm.
Otherwise, the birds will hatch too many chicks, some of which will die due to underfeeding. Let the parents better raise 2-3 healthy cubs.
Birdhouses are home to not only starlings, but also sparrows, flycatchers, swifts, all types of tits and redstarts.
Every bird has a favorite house design
It is not necessary to make a perch on the birdhouse. Magpies can sit on it and destroy the nest. The thresholds on the house also do not attract birds. Due to the structure of their paws, it is uncomfortable for them to stand on a plane.
Birds do not need thresholds on birdhouses
Gallery: drawings and diagrams of birdhouses
Restless sparrows are the most common inhabitants of gardens A birdhouse with a flat roof can be made in a few hours A birdhouse with a raised roof is not the safest option for birds A house with a bottom of 12x12 cm is suitable for tits  A birdhouse with a hole diameter of 3 to 4 cm is suitable for the smallest birds. After cutting out the birdhouse parts, sand the cut areas. The simplest birdhouse for redstarts is with a square hole. Wagtails and flycatchers often nest in houses with a hole the full width of the wall.
Birdhouse decoration
The less attention the home attracts, the better for the birds. It is advisable not to paint it or add bright details. A house made of untreated wood is the best option. As a last resort, use odorless paint to match the color of tree bark - gray, brown or dark burgundy.
Birdhouses made of thin plywood that are too brightly colored are used only for decorative purposes - to decorate the garden, birds are unlikely to settle in them
Another thing is decor with natural materials. Pieces of bark, twigs, and moss will decorate and camouflage the nesting area.
Bark and branches hide the home from the watchful eye of predators
Gallery: birdhouse decor
A birdhouse decorated with pebbles may scare away birds due to glare  Small tree cuts decorate the house and do not irritate the birds
  A birdhouse in the shape of Baba Yaga's house will decorate any tree. Wine corks will additionally insulate the walls of the house. The gift birdhouse is covered with carvings. Birds are unlikely to live in a birdhouse made of branches due to the numerous cracks. By gluing the planks onto a birdhouse painted white, we get a half-timbered house
  By gluing the birdhouse with saw cuts, the cracks are sealed with moss. You can stylize the birdhouse as a country house. When making a birdhouse with children, draw cartoon characters on the walls. Birdhouses are often stylized as a fairy-tale house. An interesting solution is to use a water tap instead of a perch. Sometimes bird houses are made in the form of animal heads
  The decor in the form of a tree trunk on the facade really decorates the birdhouse. Garden designers have figured out how to combine a flowerpot and a birdhouse. If you don’t know how to draw, draw a birdhouse with lines using a ruler and paint it
Birdhouse made of wooden planks with a flat roof
Spring is coming soon again and my husband and I decided to make the right birdhouse for our winged friends. Our last house was chosen by squirrels and turned into a nut warehouse; it turned out to be too big for the birds.
Now the choice fell on the simplest design of a birdhouse with a pitched roof.
Tools:
- hammer;
- screwdriver;
- drill and drill bits;
- jigsaw or saw.
Materials:
- meter board 10 cm wide - 1 pc.;
- meter board 15 cm wide - 1 pc.;
- nails and screws.
Step-by-step instruction:
1. Mark the boards according to the drawing.
The drawing is needed so that all the details of the birdhouse fit together
2. We cut out all the parts except the bottom and the roof tenon. Using a chisel, we make notches on the inside of the facade so that the chicks can climb to the exit.
When cutting the board, press it firmly against the surface so that it vibrates less.
3. We get 2 sides of the birdhouse measuring 10x30 cm, the front and back are 15x30 cm, the roof is 15x25 cm. We deliberately increase the roof overhang to protect against predators.
There is no need to sand the surfaces of the boards
4. On the front wall, with a pencil and a ruler, we mark an entrance with a diameter of 3 to 5 cm, depending on the type of birds expected in the garden.
Measure the middle of the bottom and sides of the facade, draw lines and mark the entrance at their intersection
5. Drill a hole inside the tap hole circle.
First, a hole for the jigsaw knife is drilled in the facade
6. We insert a jigsaw knife into it and cut out the tap hole.
Move the jigsaw slowly to prevent the knife from flying off
7. We hammer nails into the outer walls at the fastening points so that the points stick out a little.
If you hammer the nails in early, they are less likely to bend.
8. We assemble the body from the 4 walls of the birdhouse in the following order: facade, side walls, back.
The nails are hammered into the walls slowly so as not to bend
9. Take a board 10 cm wide, apply it to the place where the bottom of the birdhouse will be and mark the cut line. We do the same with the roof spike.
Do not cut out the bottom in advance, first assemble the body and measure the actual dimensions
10. Saw off the listed parts. We insert the bottom into the body and fix it with nails.
11. We nail the tenon to the roof from the back side.
The roof spike protects the birdhouse from precipitation getting inside
12. Place the roof so that a canopy is formed over the entrance. We drill holes for the screws and screw the roof on.
After a year, the roof can be unscrewed to clean the birdhouse
13. The birdhouse is ready.
A birdhouse made from untreated boards will merge with the tree bark and will not attract the attention of predators
Master class on making a birdhouse - video
Duplyanka
Birds include birdhouses made of logs into the category of luxury housing. To make a nest box, the middle of a log 30–50 cm long and 30–35 cm in diameter is hollowed out with a chisel. After drilling the tap hole, boards or saw cuts are nailed to the bottom and top of the body.
Starlings and tits happily settle in nest boxes
Making a nest - video
Birdhouse made of plywood with a gable roof
If you have scraps of moisture-resistant wood-laminated board, you can make a birdhouse from it. However, due to toxic fumes from plywood, most likely, the house will only be a decoration in the garden.
Tools:
- screwdriver;
- drill;
- the drill is slightly smaller than the diameter of the screws;
- core drill with a diameter of 50 mm;
- saw or jigsaw.
Materials:
- plywood;
- self-tapping screws
Step-by-step instruction:
1. Draw a drawing.
A birdhouse with a gable roof is still better made from boards
2. Mark the plywood and cut it.
3. Drill a taphole hole on the façade using a crown. Drill a hole for the perch 4 cm below it. Make holes for self-tapping screws on all parts.
The house is assembled in the following sequence: facade, side walls, bottom, back wall, roof, perch, plank
4. Assemble the case without the back wall.
5. Place the structure with the tap hole down, install the bottom and back wall, and fasten it together.
6. Assemble the roof.
Holes for self-tapping screws are drilled in advance so as not to split the plywood when screwing them in
7. Insert a perch on the facade.
8. If desired, glue the decor and paint.
Birdhouses are painted with odorless products
How to make a birdhouse with a gable roof - video
Gallery: interesting birdhouse ideas
Any birdhouse will be transformed if you cover the roof with tiles. A birdhouse in the form of a barn with a sloping roof will decorate the lawn if you install it on a pole. Making multi-apartment housing for birds is a great temptation, but they will not be able to live together. Old license plates often cover roofs abroad. A birdhouse looks stylish with an irregularly shaped roof Eco-friendly tiles for a birdhouse can be made from wood The shape of the birdhouse does not have to be strictly rectangular Birds love round houses, as they follow the shape of the nest To make an unusual birdhouse, change the shape of the roof Modern birdhouses have strict geometric shapes It cannot be guaranteed that in two families will live in a double birdhouse Birdhouses with a gable roof leak, so it’s better to cover the ridge with tin A plot with a modern house will be decorated with a birdhouse with a sharp roof You can try to scare away cats by placing a plywood specimen on the birdhouse An unusual solution - a roof made of two cuts A rectangular entrance is also suitable for birds Sometimes decorative birdhouses are shaped like “dancing” houses  A modern birdhouse can be very convenient for birds. A wicker birdhouse is very beautiful, but cold due to the cracks
Where and how to hang a birdhouse
The bird house is placed on a tree with a slight forward tilt to make it convenient for the chicks to get out of the nest. The entrance is oriented to the south side so that cold winds do not blow inside. The hanging height is not lower than 4 m above the ground. To prevent cats from getting to the chicks, increase the roof overhang by 5 cm from that indicated in the drawings.
Birds need to be protected from their natural enemies - cats
To protect against feathered predators:
- cover the entrance with tin;
- do not mount a perch on the birdhouse;
- make an entrance under the roof itself.
A long overhang and the absence of a perch are necessary protection measures against predators
To properly secure the birdhouse to the support, strips are screwed to the back wall. For them, the house is tied to the trunk with wire or synthetic cord.
To prevent the harness from growing into the bark, place a wooden or rubber pad under it.
You should not nail a birdhouse to a living tree. This causes great harm to it, especially during sap flow.
Birds are indispensable helpers in the fight against pests of green spaces. The best way to call on them for help and attract them to your site is to make a birdhouse with your own hands. By giving the birds comfortable houses, the owner of a country plot provides himself with peace of mind about the harvest and an excellent mood from a pleasant neighborhood. The birdhouse will be in demand in any case: swifts, nigellas, flycatchers, tits and sparrows are also happy to settle in comfortable apartments.
When thinking about how to make a birdhouse with your own hands, you should first of all worry about procuring the material for building the house.

The material for making a birdhouse can be hardwood boards, for example: aspen, maple, oak, birch, alder
Coniferous wood is absolutely not suitable for building a birdhouse, since it can secrete resin, which makes the inside surface of the birdhouse sticky.
To build a birdhouse, it is also not advisable to use chipboard and fiberboard, which emit toxins harmful to birds. Plywood is far from the best choice: the material does not transmit sounds well, the sufficient audibility of which is necessary for birds in case of danger, and does not retain heat well, making it difficult for birds to nurse their helpless chicks. The inner surface of the wooden boards should be slightly rough. You can add unevenness to a smooth surface by applying horizontal notches with a chisel, which will make it easier for the birds and their chicks to get out of the house.
Before making a birdhouse, you should decide on the dimensions of the future structure. Standard dimensions of a birdhouse: 13-15 cm bottom width and 30 cm height of the birdhouse, and the diameter of the entrance is 3.8-5 cm. Spacious apartments are not always good: in a large house you can shelter more chicks, but will their birds be able to do this? parents?!
Numerous offspring are much more difficult to go out and feed. The chicks, weakened by insufficient food, grow up sick and unable to withstand long-distance flights in the fall to warmer climes. In a compact house, capable of accommodating only two or three chicks, the offspring grow up healthy, capable of further maintaining the strength of the species population.

Ornithologists say that the interior space of bird houses should not be too spacious, but at the same time too cramped
The simplest version of a wooden bird house
The configuration of the birdhouse depends on where it will be attached. If the house will be suspended under the roof of the house, to a balcony or pole, then the design should include additional perches in the form of a thin stick or a triangular shelf, necessary for the “walk” of the feathered owners.
When deciding how to make a birdhouse from wood, which will be placed in natural conditions and suspended on a tree, you can do without arranging a “walking” perch. On the branches adjacent to the nesting site, the starling will rest, delighting others with the pleasant tints of its singing.

When making the simplest birdhouse, you can use the given drawing of a birdhouse with dimensions, which even a schoolchild can figure out
To build a compact and convenient house for the bird family you will need:
- edged unplaned boards;
- two blocks (for hanging the birdhouse on a tree);
- screws or nails;
- steel wire d=1mm (for hanging the house);
- wood glue.
Tools you will need:
- a simple pencil with a ruler;
- (with middle tooth);
- drill, wood drill;
- hammer;
- chisel.
The work is carried out in several stages:
Stage #1 – preparation of wooden elements
Using a simple pencil on the boards according to the drawing, the dimensions of all wooden elements are noted: bottom, walls, roof and perches.

As a result, you should get 7 blanks
The bottom is made in the shape of a square with a side of 13 cm. The difference in the heights of the front and rear walls is 4 cm, this allows you to create an angle of inclination of the roof. For the same purpose, bevels are provided on the upper cut of the side walls. To arrange the roof, you should prepare two parts of different sizes: the first part is shaped like the bottom of the house, the second is a large rectangle to create a canopy.
Some craftsmen believe that a more successful option in arranging a house is a roof tilted forward, which is formed by a shorter front wall.
Stage #2 – cutting out structural parts
Sawing off elements should be done sequentially so that paired parts have the same dimensions. To add beauty to the product, the outer surface of the boards can be additionally planed.

Using a drill or chisel, a hole is made for the flight of birds d = 3.8 cm (can be increased to 5 cm)
A round hole for the entrance to a house is more preferable than a rectangular one, since in nature birds prefer a round hollow, and they are more likely to settle in a house with a round entrance. The location of the hole 5 cm from the top edge allows you to protect the chicks from the grasping paws of cats.
Stage #3 – assembling the birdhouse
The side walls and front façade of the structure are first fastened with wood glue. As the glue dries, the parts are fixed with nails or screws. Using the same principle, the side ends of the bottom are connected to the front and side walls. Lastly, the back wall of the birdhouse is glued and hammered. There should be no gaps.

The roof parts are fastened together. There is no need to attach a roof to the house itself.
Stage #4 – installation of a bird “apartment”
The finished birdhouse can be nailed or tied with wire. For additional protection and to make it easier for the chicks to exit along the surface at a slight angle to the outside, the structure should be tilted slightly forward.
When placing a birdhouse on a tree, it is preferable to use wire to hang the structure, which, unlike nails, will not damage the tree. Additional protection for the tree bark can be provided by wooden blocks, which will act as a kind of lining that absorbs the tension force of the wire.

The house should “look” towards the east or southeast. The optimal placement height is from 3 to 5 meters
Decorative birdhouses
When planning how to build a birdhouse with your own hands, you want to get not only a functional design that is convenient for birds, but an attractive house that will become a bright touch in the design of the site.
There is a misconception that starlings do not occupy houses painted with bright oil paint. But as practice shows, the bird family feels very comfortable in such colorful apartments.
Material on how to build a decorative windmill for the garden may also be useful:

Houses decorated with decorative details look interesting. Some craftsmen create real palaces for birds with balconies and fences
Fantasizing about how to build a birdhouse that will become a real decoration of landscape design, you can take the simplest version of the house as the basic basis of the design, which is only complemented by original decorative elements and played up with color schemes.
Birds may not immediately inhabit the “apartment” they have prepared. It can take a year or even more to settle into new housing. Don’t worry and be patient: your good deeds will definitely be rewarded over time.
Building birdhouses for birds on your own the first time is not an easy task. However, it is completely solvable. This text will describe in detail how to make a birdhouse. By following the following instructions, you will easily understand the features of the process.
You will also be able to select a tool and material and move on to the active phase.
With the right approach, you can build a birdhouse in a few hours. However, for this it is necessary to understand the material that will be used to make the birdhouse.
You can use wood, plastic, plywood, even paper. However, any material requires pre-processing. And for this you need certain devices.
Required Tools
In this regard, everything is quite simple. Before making a birdhouse, you should make sure that you have the various necessary tools. Let's list the main ones. In this case you will have to use:
- Carpenter's hammer.
- Chisels of different widths.
- A hacksaw for wood.
- Wooden hammer.
- Ruler, pencil.
- Drill, drill.
Types of birdhouses
First you need to decide on the size of this structure. The type of birdhouse will depend on this. There are several types of such houses. Namely:
1. Standard birdhouse.
In this case, its dimensions will be as follows:
- length – 16 cm;
- width – 15 cm;
- height – 40 cm;
- taphole diameter – 5 cm.
2. Titmouse. This is a small birdhouse. It will become a wonderful home for birds that are no larger than a tit. This structure is suitable for different types of birds. Perhaps these will be sparrows, redstarts, and pieds. Or the titmice themselves.

In this case, the dimensions will be as follows:
- width – 12 cm;
- length – 10 cm;
- height – 30 cm;
- entrance – 3.5 cm.
3. Wagtail. This type has a protrusion in front of the entrance. Here will be the following sizes:
- height, width – 15 cm;
- length – 30 cm.
4. Triangular birdhouse. This is a house for common pikas. Its hole is through. It has the following dimensions:
- width – 15 cm;
- height – 25 cm;
- entrance – 3x6 cm.
If you just want to make a birdhouse for the forest or have no idea what kind of birds you have in your garden, then make a standard type. You just need to remember that, for example, tits prefer small, comfortable houses. They feel uncomfortable in large ones. But the starlings will not fit in the titmouse. This is important to consider.
This construction is very simple, it can easily be done in a couple of hours. Its disadvantage is that it, of course, is not particularly reliable and will only last for one year.

This house can be made from any small box. To do this, you need to do the following:
- Glue the lid to the box itself. It must be securely attached.
- Cut a tap hole in the lid with a diameter of about five centimeters. The hole should be located no higher than 20 cm from the bottom. For complete convenience, the taphole should be round. To do this, you can glue the edges of the hole several times with wide tape. And it will serve longer.
- The back wall of the box must be very strong. After all, it is the basis. It would be nice to glue plywood onto it. Wooden planks are also suitable in this case. Instead of glue, it is generally better to use small screws or brackets for fastening.
- To protect the birdhouse from moisture, you need to paint it. It is desirable that it be odorless.
- And the very last thing. Wait until everything dries. Then the product should be secured to the base.
You can make a cardboard house in the same way. Only with him there will be more hassle. You'll have to work hard to connect all the parts and give rigidity to the cardboard itself. You can try to make a birdhouse out of paper. However, it is unlikely to be reliable.
Birdhouse from a bottle
Making such a product will not take much time. An hour maximum, maybe even less. To do this, you will need a five or three liter plastic bottle. It all depends on the size of the birdhouse you need. This house is very similar to a feeding trough. Everyone did them in childhood. But there are still small differences.
In such a birdhouse you will have to make a standard entrance. And everything else needs to be done as described above. The only, but significant, disadvantage is that the bottles are often transparent. But birds need comfort and privacy. So in this case, the birdhouse will have to be either painted or covered with paper. This product can be simply attached to a tree by the bottle handle. The care of these structures will definitely be discussed below.
Such a design will take much more time, knowledge and effort. But the result of your work will be a durable and durable birdhouse that will serve the birds for many years. The main thing in this matter is desire. Although it is much more difficult to make a wooden birdhouse, the efforts made will not be in vain. In addition to the set of tools listed above, in this case you will need certain materials:
- Aspen or birch rough-hewn dry boards.
- Odorless paint.
- Wooden planks for reinforcement.
- All kinds of consumables.
 When everything is already assembled, you can begin to construct the house. To do this you need the following:
1. Create a birdhouse design on paper. This is quite significant. You need to measure the birdhouse correctly. In this case, a drawing of the designed product is required. You should also calculate the amount of materials.
2. Then all dimensions should be transferred from paper to material. Using a tool, cut out the necessary parts. Referring to the drawing, we connect all the parts using nails or self-tapping screws. We will get a durable and cozy box. For this house to be very reliable, after connection, not a single part should wobble. 
3. Then we make a ledge for the birds in front of the “entrance” to the birdhouse. This device serves for the convenience of birds who want to get into their shelter. And it usually consists of a small plank. Birds love to rest on such a ledge. It also needs to be secured with nails.
4. Next stage. It consists of making a mount for installing or hanging a birdhouse. Most often it consists of special holes on the back wall of the house. It can also be other fastenings - a clamp or a clamp.
Making a birdhouse with your own hands is not a particularly difficult task. You just need to follow certain rules and listen to the advice of experts:
- The ideal material would be wood, as it is quite durable.
- You need to use special wood. Birch, aspen, alder, and other deciduous trees.
- Fibreboard, chipboard and OSB are not recommended for use. Firstly, they are toxic, and secondly, they are not durable.
- The smell of paint does not attract birds. So its use is not mandatory. If you still decide to take this step, then use odorless paint.
- You don’t have to make a perch inside. But it’s better to attach the ledge from the outside.
- The inside of the birdhouse should be rough so that the birds can move comfortably. If the board is smooth, you will have to put notches on it. This can be done with a chisel.
- It is better to make the entrance round so that the birds do not get injured.
- The roof of this product can be made removable to make it easier to care for the birdhouse.
- It is also advisable to make the roof sloping so that moisture does not accumulate. It won't last long if it's even.
Birdhouse installation

This is an important process. Making a birdhouse, the photo of which is provided in this text, is half the battle. You don't need any special experience for this. But then it needs to be placed correctly. After all, if you attach this house poorly, and even in the wrong place, then it can turn over or, even worse, fall.
There are a few tips to follow in this regard:
- It is necessary to take the choice of location seriously. For example, it could be the end of a house, a strong pole, a tree, a pillar and much more.
- It is better to install the birdhouse no lower than three meters from the ground. And always in a place where a small predator like a cat, marten or weasel cannot reach.
- The birdhouse should be strengthened at a slight slope. That is, it must be placed so that raindrops do not fall into the entrance.
- You can fasten the birdhouse with the same nails and screws. But if you decide to hang the house on a tree, then it is better to use clamps, do not injure the tree itself.
In principle, it is possible to install bird houses during the entire warm season. The birds will settle there in any case. However, the ideal time is early spring. After all, the bird family needs time to settle down and have offspring.
There is nothing complicated in this regard. After you have made and installed the birdhouse yourself, you, of course, want it to serve the birds for as long as possible. And for this you need to constantly look after the house.

How to do this? The answer to this question is quite simple. This does not require any extra costs or additional time. Everything is done simply and quickly. You just need to clean the bird house of dirt and feathers at the end of the season.
Making something with your own hands (a feeder, a birdhouse, various garden structures and much more) is a very exciting activity.
It is not a pity to allocate several hours a week, or even a month, for this work. After all, you are going to do very useful things.
After you make a beautiful decorative birdhouse yourself, the desire to create further will certainly awaken in you. Such crafts will not only create comfort for your garden animals, but will also significantly decorate the interior of your summer cottage.
Having read the above, everyone will be able to figure out how to make a birdhouse. But exactly how it will look depends on individual desire. The main thing in this case is hard work, scrupulousness and patience. All in your hands!
Birds are nurses not only of the forest, but also of the garden. Every summer resident who has fruit trees and shrubs growing on his property knows this. All year round, birds not only delight the ear with their singing, but also help gardeners in their difficult work of protecting trees from pests, destroying small insects and feasting on their larvae. To attract birds, feeders are hung on trees and volunteer helpers are fed during the cold winter season, when it is not so easy to find “prey,” and they also arrange a home for them. Any bird will like a good-quality wooden house; it can not only live in it and hide from bad weather, but also breed offspring.
Nuances that are important to know before starting work

As is already clear, the best birdhouse is made from natural materials, in the sense of wood. Some craftsmen make houses from cardboard boxes or plastic bottles, however, this is not at all the same. In the first case, the dwelling will be temporary and will last one season, if it does not get wet first in the rain. Plastic containers are more suitable for manufacturing, and besides, there is no question of their naturalness. The smell of chipboard or plywood will also scare away birds; the latter is also too thin and the house will be cold.
For a bird house, you should use hardwood boards, but in no case coniferous ones - they contain resin that will stick to the plumage, which is fraught with health problems for the birds. The thickness of the boards must be at least 20 mm so that they retain the heat necessary for the chicks.
There is no need to plan the boards to achieve their ideal smoothness. A rough surface, especially inside the birdhouse and under the entrance, will help birds get inside and move around easily.
Making a birdhouse step by step

First of all, you should draw up drawings of your future home. This will make the process of making blanks easier and will make them even, so that in the future there will be no gaps between the walls.
Birdhouses can be of different sizes and shapes - it all depends on what kind of birds will live in it. There is no need to make “apartments” that are too spacious, because the bird family is small and the young can freeze or grow weak. The standard dimensions of the house are approximately as follows:
- bottom width – 15 cm;
- birdhouse height – up to 30 cm;
- roof – approximately 20x24 cm;
- The diameter of the protrusion (taphole) is no more than 5 cm.
It is better that the back wall is a couple of centimeters lower than the front panel - such a slope is necessary for water to drain. Accordingly, then on the side walls the upper cut will be oblique. The roof should protrude slightly, so its dimensions are slightly larger than the bottom.
 Now you can get started:
- Transfer the drawing with a pencil to the boards.
- Cut out all the details.
- Plan the outer surface of the workpieces.
- In the front panel, cut out the “entrance” in the form of a circle.
- Assemble the birdhouse in the following order: front, side walls, bottom, back wall, roof, entrance. All parts must fit snugly together. It is better to fasten them with screws or nails.
All that remains is to attach a mount to the birdhouse in the form of a strip on the back wall and install it on a tree, wrapping it well with wire. There is no need to paint - the smell of the paint will scare away the birds.