Can I paint with a white enamel bath? How and what can paint a cast-iron bath: an overview of the best methods of restoration
Every time the bathroom cup comes to an unattractive appearance, the owners have to choose - either to replace the bowl, or to apply a kind of restoration by staining. Replacement is a troublesome business that will lead to a lot of side work, but painting by oneself will save the forces, time, and completely refresh the bath. Especially if the conversation about the "cast iron", which after the coloring will last for decades!
Self-painting work
First of all, you need to choose the paint, it will depend on it all the qualities of the bathroom, the period of its operation.
When choosing a dye, you can focus on the following indicators and requirements:
- The bowl will not just touch the water from time to time, the room itself assumes high humidity, so the paint should have the highest degree of moisture resistance.
- The paintwork material should have increased adhesion. And before you paint the bath at home, you need to make sure of a high level of adhesion of the paint to the surface.
- High wear resistance.
- Security. Here it is important to clarify that the paint will be in contact with the skin.
Important! At the heart of the choice of the dye lies precisely the moment of water resistance and adhesion, the layer after staining should not exfoliate from the surface.
You can give a simple advice to pay attention to the colors from Tikkurila, Jobi, Dulux - these are well-known manufacturers who managed to prove themselves well, and the price of their materials, even slightly overstated, but this was originally quality!

In addition to the paints of the above-mentioned firms, many specialists are inclined to three-component dyes. This type of paint is mixed before applying to the surface. However, this is the choice of a professional, and for independent work sufficiently good paint, "half-mint", for example, in which there will already be a priming composition, and a moisture-proof coating.
Preparation
Naturally, the color of the bath at home begins with the preparation of the surface, otherwise all work will be done in vain.
The following stages are noted here:
- Completely removes the layer of fat deposits and calcareous deposits. To do this, you can apply a variety of cleaning solutions, the main thing is not to use chlorine-containing compounds. It is possible to understand that the solution worked "perfectly", because no jets and drops of water are formed on the surface during wetting.
- The top layer of the enamel, gloss, is completely dismantled. To do this, you can use a metal brush, a drill with abrasive nozzles, sandpaper, the main thing - to remove gloss.
- At work there will be a lot of dust, so the bathroom should be ventilated.
Here it is necessary to say that after processing the surface will become rough, and this will further allow the dye to adhere tightly to the metal of the bath. And it will be necessary to pay attention to the evenness of the surface after removing the gloss layer. This point will answer the question whether it is possible to paint the bath at home so that the paint is laid correctly, and the coloring is qualitative.
- All dust and glossy residues are completely removed, the surface is dried. And here the instruction assumes use of a vacuum cleaner, so all must be carefully removed.
- After cleaning, the bathroom is filled hot water and after 20 minutes all the water is drained, now you can wipe the bowl and dry it.
- The final touch goes.
Finishing with the preparation, we note that it will be required:
- Abrasive material, sandpaper, grinding disk.
- Washing and dissolving agent.
- Latex gloves.
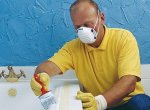
- Glasses.
- Respirator.
Staining
So, we chose what paint to paint the bath at home, now it is necessary to tightly close the windows of the door, and do not let the dust get on the paint during its drying.
For dyeing, a dense brush best suits, and the brush should be chosen with natural pile.

If you have the skills to work with a spray gun, you can also use spraying.
The work proceeds as follows:
- The paint is diluted with diluent, mixed thoroughly.
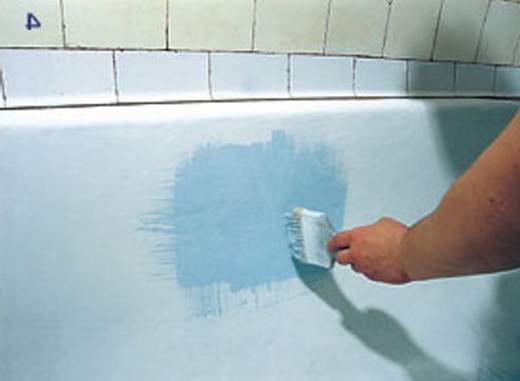
- Brush applied to the entire surface. Staining follows the standard scheme from top to bottom.
- Calculate the paint in such a way that 50% of the whole composition is taken to the first layer.
- The second layer is applied after the first coat has dried completely.
In principle, there is nothing complicated in the process of staining, everything that can be painted on a bath at home is on sale, the tools are all simple, the work itself does not present difficulties, and therefore the process will be successful, and the bathroom will be in excellent condition in a few days .
Advice! Preparing the second layer to apply all the normal composition, not allowing drying.
After 10 days you can safely use, the paint completely dries.
Conclusion
The simplicity of the restoration of the bathroom allows you to paint it in any color, update and do not replace the bowl. The video in this article will help in practical moments, and all the work will go right.
Sooner or later any bath (even expensive and exclusive) loses its appeal. The fact is that for many years of active exploitation the surface layer (that is, the enamel) is thinned. As a result, there are ugly stains, unaesthetic yellow or even red spots, as well as chips and roughness. Hygienic procedures to take in such a bathroom is at least unpleasant, so many people come to the conclusion that an old bath must be replaced. However, buying new plumbing equipment is an expensive pleasure, moreover, dismantling old bath in 99% leads to damage to finishing materials. The ideal option is to upgrade the bathroom. How to paint a bath of cast iron, tin or metal? The easiest way is to use enamel in the form of a spray. Bath, painted with high-quality enamel, again will look chic and aesthetic!
How to paint a bath at home?
Can I update the plumbing that has lost its appeal? It should be immediately said that painting the bathroom will require carefulness and careful handling, but if you follow the instructions, everyone can paint their bath themselves.

Want to know how to paint a bath at home and get an excellent result? In this case, you should purchase all the necessary materials and carefully study the phased work plan. For work you need these materials:
Enamel;
Primer;
Special degreasing agent (traditional acetone can be used);
Lint-free napkins (preferably from natural fabric);
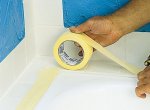
Protective polyethylene film;
Building scotch;
Sandpaper;
The question how to paint a bath with your own hands, many people are asked. This simple and accessible to all event will allow you to quickly update the appearance of the bathroom without buying a new bath.
1
Before we tell you how to update the old bath yourself, we will thoroughly study the preparation process. This stage is the most important and the quality of the new coating depends on its quality. Preparation includes a number of works, including degreasing and cleaning - without this new paint will lag behind the surface in just a couple of months.
Cleaning an old bath with your own hands
How to paint an old bath - turn-based scheme
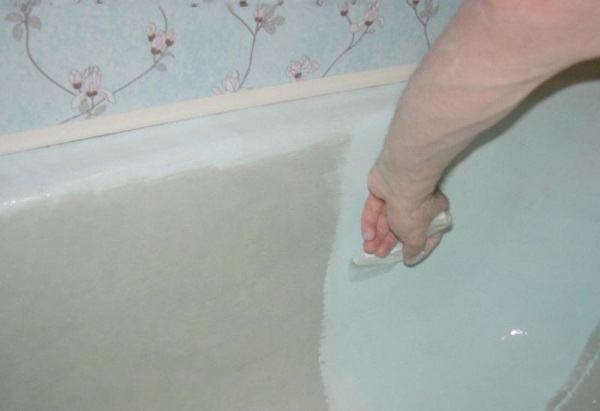
Step 1: Degreasing
During water procedures, a large amount of fat is washed off from the body of a person, which comes out through the pores. Fat settles on the surface and eventually absorbs into the material - it is unlikely to get it out by simple bath washing. Therefore, degreasing needs to be given a lot of time and effort. First of all, you need to wash the bath with a good dishwashing detergent. Apply the selected product to the old enamel or cast iron and leave for half an hour. During this time, the components in the detergent will dissolve the fat layer. Be sure to rinse off the rest of the product with hot water and repeat the treatment again.
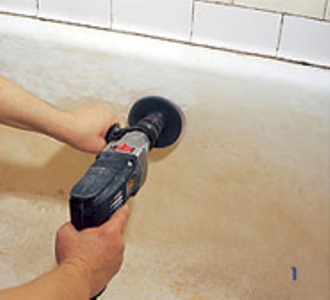
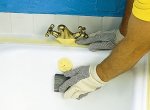
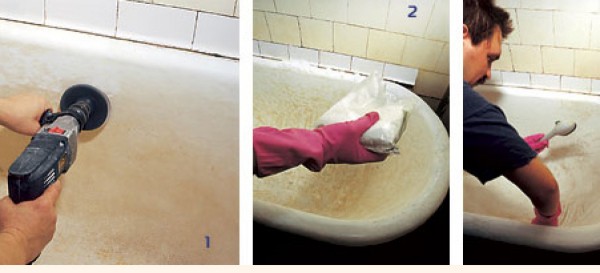
Step 2: Stripping
Zachistka has several purposes: it helps to get to the residues of fat, embedded in the surface and provides the roughness of the bath, so that the paint will perfectly stick to the bath. In addition, it is quite easy to remove the traces of rust, which often appears on a cast-iron bath. For stripping we will need a Bulgarian or a drill with a small fraction nozzle.
Why is it better to use a drill? This tool is less revolving, not as powerful as a Bulgarian, so a beginner who decides to paint a bath with enamel or acrylic with his own hands will have less chance to scratch or deform the coating. Strip the bath until the moment it becomes evenly matte. Rinse the shower with the remains of the old enamel and rinse the surface again.
Step 3: The final stage of preparation
At the last stage, remove the siphon and treat the overflow and drain holes with a small grain of nuggets. Once again, rinse the surface with a detergent and rinse the residue with plenty of water, placing a large container under the drain. Leave the product for a day to completely dry the surface. And finally, once again, walk through the bath with acetone to remove the remaining fat.
2
In shops today you can buy a special enamel for a bath in aerosol cans. We advise not to purchase such material - it is not too durable. This coating will last at least one year. To get a high-quality and durable coating, you need to buy a two-component polyurethane enamel. We compiled a list of the three most famous manufacturers and their products:
- Dulux - special enamel for renovation of old baths;
- Tikkurila - a kit that includes a waterproof primer and paint;
- Jobi - a paint that is not afraid of moisture and damage, an updated bath can be washed at least with a brush.
Enamel for renovation of old bathtubs
You need to paint at least two layers, even better in three. At the same time for each new layer you need to prepare a new portion of paint. Mix the ingredients according to the instructions and start working. Do not forget that after 1.5-3 hours after mixing, the paint will not be usable. Consider this and prepare the necessary portions in the right amount. Before applying a new layer of enamel, be sure to wait until the previous one dries. In addition, the dried enamel must also be degreased.
- To prevent dust and small contaminants from getting onto fresh paint, before closing the work, close all doors and windows in the apartment - do not open them for at least the next 24 hours to avoid deformation of the paint due to temperature changes and humidity levels.
- To renew the bath with paint, use with natural nap. If you can manage the spray gun, you can use it.
- Paint is best applied from the sides to the bottom, so that there are no divorces.
- After the work, leave the bath to dry for 7-10 days.
3
Not everyone wants to paint an old bath with enamel and they choose a method of restoration with the help of liquid acrylic. Here, too, there is nothing complicated. First we hold preparatory work, which we described above, and then just pour acrylic on the sides of the bath - the liquid, draining over the surface of the bath, will fill all the flaws of the old cast-iron bath. Everyone can update the bath with acrylic, but the method has some drawbacks. For example, acrylic very poorly adheres to the old enamel. It is attached to the surface due to its roughness and its integral construction.
Pouring acrylic on the sides of the bath
Once you scratch a new surface, it will begin to break down - gradually the water will begin to wash off a new layer from the bath, tearing the frozen acrylic with whole pieces.
To minimize such risks, it is worth covering the product with two layers of acrylic, with the thicker the layer, the more difficult it will be to damage the material.
Now you know how you can update the old coating in the bathroom - we step by step showed the process of preparation and painting with enamel. Some upgrade process may seem complicated, but if it is a bath that has already become obsolete, then you definitely will not do it worse.
As a rule, replacing an old bath with a new one turns into a full-scale overhaul. In this case, as you know, repairing one room inexorably and smoothly "flows" into the repair of the entire apartment. It should also be taken into account that if the bath is cast-iron (and there are an overwhelming majority in our old apartments), then there is no need to change it. She, and can be exploited for a very long time. Therefore it is worth it only to paint, and it will get an attractive look.
Bathroom Paint
It should be noted that the bath, in addition to being periodically "in contact" with water, is in a room with high humidity. Therefore, the coloring matter must be selected precisely from the calculation for this, and not just buy the paint of the color you like. Bath paint, in addition to moisture resistance, should also have increased adhesion. Simply put, it is good and reliable to "stick" to any surface, otherwise it can not escape its detachment.
Specialists recommend three-component compositions. They are "kneaded" just before painting. To get a little guidance in the variety of colors, you need to know that the leading manufacturers of such goods are Dulux, Tikkurila, Jobi. They contain priming composition with the property of moisture insulation and coating (for example, semi-matt).
It is clear that simply painting a bath is a waste of time. Any surface, before it is applied to the paint, is specially prepared for this.
Preparation of a bath for painting
- removes the layer of calcareous and fatty deposits. Various cleaning agents are used for this. Specialists do not recommend the use of chlorine-containing compounds. It should be borne in mind that special care is not necessary to observe, as the bath is still to be painted. The indicator of good degreasing is the absence of droplets and water jets when wetting the surface;
- the upper layer of the enamel (gloss) is removed. For such work, everything that is at hand is in play. Electric drill with an abrasive nozzle, sandpaper, metal brush. As a result of this surface treatment, it becomes somewhat rough. It should be noted that dust will be more than enough, so you need to take care of the lack of drafts. Well, the protection of the organs of vision and respiratory tracts is also necessary. It is necessary to pay attention to the evenness of the surface after such treatment, because the quality of the color depends on it;
- all the dust is removed. The bathroom is thoroughly dried. It is recommended to use a vacuum cleaner, hair dryers, electric heaters. This will significantly shorten the preparation time for painting;
- in the bathroom is poured hot water. Minutes through 15 - 20 it should be drained and wipe the bath dry;
- a primer is applied.
Bath coloring
In order to avoid dust on the fresh paint, it is necessary to close all doors and windows before painting. Similarly, do not open them and after some time after staining. This period is determined by the drying time of the paint. Approximate data are indicated on the package with the coloring agent.

To qualitatively paint the bath, it is better to use a flat brush. It is desirable that the nap was natural. If possible, use. The coloring composition is diluted and applied with a brush to the entire surface of the bath. Calculate it is necessary so that on the first layer approximately half of the total volume of the paint is consumed. It is better to apply the paint in the direction from the edge to the bottom. After the first layer dries (the time depends on the specific composition), a second layer is applied. Here it is necessary to observe special care, because the general appearance of the bath depends on how it is applied.
- Paint is better to plant not all, but parts. It has a drying time, and it can turn out that it will dry up before it is consumed;
- Use freshly painted bathroom is recommended not earlier than 8 to 10 days.
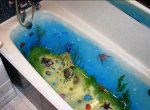
Each product has its own service life, which sooner or later ends. Any thing once comes to naught, and cast-iron baths are no exception. Time and water have their own negative influence and lead to the destruction of the enamel coating. To change a bath is expensive and time-consuming, but there is another option: to restore the product. There are several ways to paint a cast-iron bath, and all of them are quite accessible.
The enamel coating of the baths becomes thinner over time, under the influence of water, rust appears on it, and if the time is not taken, the process can become irreversible. The bottom can simply rust through the holes, and then the bath can not be saved.
The bath, covered with rust and lime coating, looks, to put it mildly, not aesthetically pleasing. Undoubtedly, to put a new bath will be the only true solution in the event that it is planned to do major repairs, change the tile and the plumbing. However, if the repair is still far away, then buying a new bath will bring more problems than joy.
Modern cast-iron baths are expensive, for delivery, too, will have to pay a large sum. Due to the weight of the product, it is unlikely to dismantle the old one yourself and install a new bathtub. It is necessary either to ask friends and neighbors, or to hire people, that again costs. Most likely, it is necessary to do repairs, even if it was not planned.
Image Gallery


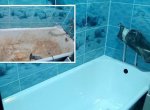
At the same time, the cast-iron bath, having lost its appearance, has not lost its worthy performance characteristics, and can still serve as a faith and truth to its masters. If there are no significant chips and cracks, you can restore the product yourself, and quickly enough, without dirt and high costs.
And one more important argument in favor of restoration: classical cast-iron baths of the old type are superior in quality to modern analogues, the service life of which does not exceed fifteen years.
Image Gallery


Basic ways to update the cover
Today there are three ways to update the cast-iron bath:
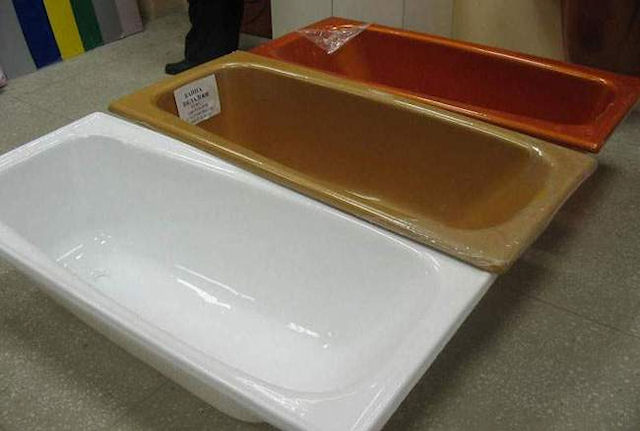
- Paint the surface with special enamel.
- Apply with liquid acrylic.
- Insert the acrylic liner into the bath.
Each version of the restoration of the old bath has both advantages and disadvantages, which we will consider in detail below. To cover a cast iron bath with enamel or acrylic, it is not necessary to be an expert, it is quite possible to cope with this work independently. The main thing is the right choice of the composition and exact application technology.

Restoration of the bath by one of the methods above, allows you to achieve amazing results and turn an old rusty bath into a practically new product
You can also install the liner from acrylic yourself, but this work is more delicate and requires certain skills, so in this case it is better to resort to the services of specialists.
Preparation of the surface before staining
Regardless of the manner in which the cast-iron bath will be painted, the surface must be carefully prepared. This is very important stage, which can not be missed. Proper surface preparation is 99% success.
The process of preparation of a bath consists of several stages. To achieve a good and stable coloration, it is necessary to carry them out in a certain sequence
First of all, the cast-iron bath should be well washed and degreased. Dirt and grease prevent adhesion, will not allow the solution to absorb well into the surface and negate all restoration work. The new enamel may crack and peel in the areas where the fat deposits will remain in the near future.
Acidic chemical means of household chemicals are suitable for cleaning and degreasing. Very effectively cleans the bath of oxalic acid (the solution is treated with a bath and left to act for 10-15 minutes). But it is very aggressive, and at work it is necessary to use means of protection of hands and respiratory organs. It is necessary to wear rubber gloves and a respirator.
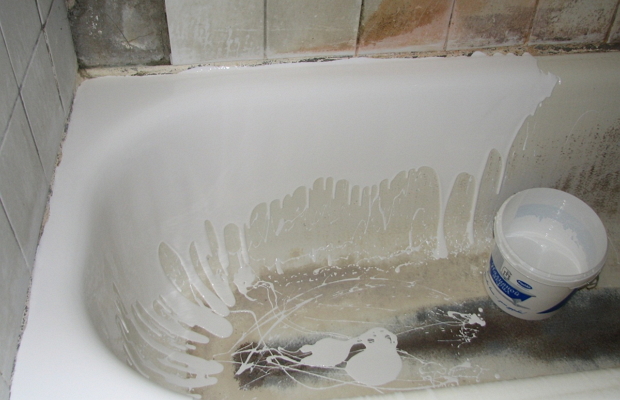
After the treatment, rinse the bath well, and even better fill it with water and hold for 20 minutes, then let it dry. Now there is no less important work - surface treatment with an abrasive, with which the old enamel is removed, and the surface of the bath becomes rough, thereby ensuring better adhesion of materials.
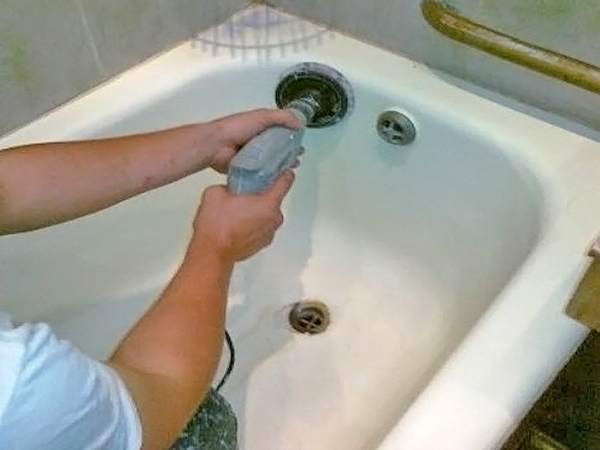
The surface is machined using a drill with a special nozzle in the form of a grinding brush, which scrolls, removes from the surface the old enamel and paint
The areas of the bath, covered with rust, must be cleaned up to the metal, so that in the future it does not come through a new enamel coating. After grinding and polishing the surface, vacuum the bath to remove dust and small particles from its surface, and then treat it again with a liquid acid detergent.
Pour it into the bath and rub it well over the entire surface, leaving it for about an hour and a half. After that, fill the bath to the brim with water and let it stand for about an hour. It is recommended to repeat the washing procedure at least 2-3 times, and then to dry the surface with a hair dryer. To avoid clogging the siphon with dyes, disconnect the tub from the sewer.
If there are chips and cracks on the surface, they must be ground, and then treated with sandpaper, after which it is necessary to remove the formed dust again. This completes the preparation process, you can start painting.
Restoration of the bath with enamel
Enameling a cast-iron bath is an old time-tested method, used for a long time. But it is necessary to distinguish between professional enamelling, which is exposed to the bath in the process of production, and home painting with enamel.

Painting with enamel is the easiest and most affordable way to upgrade an old cast iron bath without laborious dismantling
In the first case, professional compounds are used, requiring preheating of cast iron to a certain temperature. In this way, it is impossible to paint a cast-iron bath at home, and it is not necessary, because today there are easy-to-use and inexpensive enamel dyes for self-application.
Advantages and disadvantages of the method
Among the advantages of this method of painting are:
- inexpensive cost;
- absence of installation works;
- can be used for both cast iron and steel surfaces.
However, there are also drawbacks to this method:
- the coating turns out to be sufficiently thin and brittle, the enamel is very sensitive to household cleaners and shocks. Therefore, the bathroom will have to be handled very carefully so that it can not be damaged inadvertently;
- the coating does not allow to remove strong defects: chips, dents, cracks;
- with the passage of time, yellowness forms on the surface;
- enamel dries long, the bathroom can not be used for about a week.
The coating service life is from 5 to 9 years. Although for those who are going to do repairs in the future and change a cast-iron bath to a new one, such a lifetime will surely suit.
Overview of enamels for bath painting
The question of how to paint an old cast-iron bathtub is by no means idle, as conventional enamels do not fit in this case. It is necessary to use special formulations designed for baths. Before applying any of them, you need to study the instruction and exactly observe the technology, otherwise the coating will not be long to please with its novelty and quickly peel off.

To work with this enamel it is necessary very quickly, because after 60 minutes it hardens and becomes unsuitable for use
Among the enamels of Russian production, Epoxin 51 and 51C can be distinguished. Enamel consists of two components: epoxy resin and amine hardeners, produced in chemical plants in Germany and America. Before use, the ingredients are mixed with each other and applied to the surface of the bath. If desired, you can paint the surface in any color, adding color to the paint.
The composition is stable and, if properly applied, can last up to 9 years. Enamel has a thick consistency, which presents a certain complexity in the work. In addition, it should be noted that the time of use of the prepared solution is no more than an hour, after that the mixture starts to harden and it becomes practically impossible to apply it to the surface.

The drying time of the enamel solution is about a week, during which it is necessary to avoid touching the painted surface
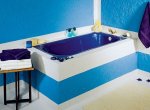
The enamel of Finnish production Reaflex 50 has proved to be very good. It also consists of two components that are mixed with each other before application. The price of paint is somewhat more expensive than the domestic counterpart, but the high cost is completely offset by its excellent quality. Enamel forms on the surface of the bath a durable and resistant glossy coating of white or blue.
There are also compositions of Russian production, which, although they do not enjoy such popularity, as listed above, but have quite worthy characteristics. This enamel Svetlana and Fantasy, which are already ready-made sets, which include, in addition to the enamel and hardener, the means for treating the bath.

The kit includes all the necessary tools for painting a cast-iron bath. The surface dries seven days after staining
The process of coating the bath with enamel
If a two-component formulation is used for painting, it must be mixed before use in the proportion recommended by the manufacturer. But do not mix all the quantities at once. Bath is painted in two layers, so divide the enamel into two parts and first dilute one serving, and after applying the first layer - the second. The time of action of the solution is limited, and if you dissolve all the paint at once, you may not have time to use it.
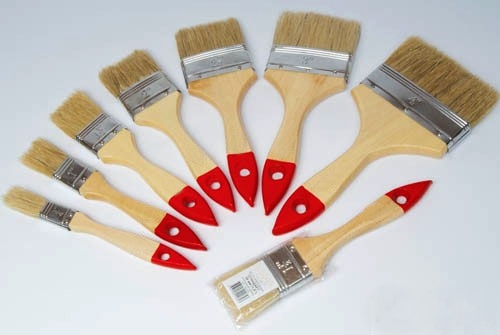
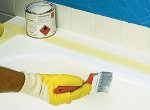
Staining of the cast-iron bath should be done with a special flat brush - flute. It has a wide natural bristle, which allows you to accurately apply the dye composition to the surface without the formation of stains
Enamels intended for home use have a fairly thick consistency, so it is recommended to add to the mixture solvent 646 in a ratio of 10: 1. For the first time, the bathroom walls are painted with one, and the bottom - with two layers.
If there are stains on the surface, they must be removed immediately with one brush stroke upwards. If you let them dry, then nothing can be fixed. The second layer is applied 15-20 minutes after the first. During this time, the paint will dry up, and you will have time to dilute the second portion of the enamel.
The new layer is applied in the same way as the previous one. Use the bathroom can be no earlier than 4-7 days, the exact time specified in the instructions.
Staining is done from the top down, first paint over the edges of the bathroom, and then the side surfaces and its bottom
How to care for a restored surface
The cast-iron bath became as new, but we do not forget that enamelling the bath at home can not provide such a high-quality and stable coating as originally applied in the production process. Therefore, the new surface must be treated very carefully, since its hardness is much lower than the original.
The bath should be protected from bumps and prevent the falling of heavy objects, you can not use abrasives to clean it. Wash the surface only with liquid compounds. It is also not recommended to pour too hot water into it.
Restoring the bath with liquid acrylic
This method appeared relatively recently, about ten years ago. Today it is very popular and is used by both professional companies and home masters. And it's not accidental, he is considered the most effective way restoration of cast-iron bath.
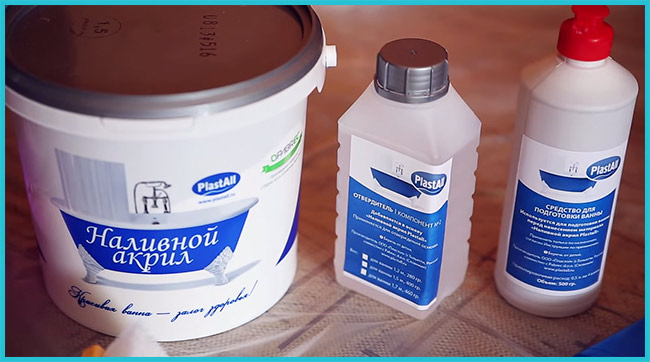
The liquid acrylic consists of two components: acrylic and hardener itself, which are mixed before application. For standard bath length of 170 cm is enough 3-4 kg of solution
The advantages and disadvantages of the method
Liquid acrylic is a truly revolutionary tool, capable literally a few hours before unrecognizability to transform an old cast-iron bath. This method has other advantages:
- high speed processing with minimal labor. With this work a person who does not have special skills can easily cope;
- the coating is perfectly even with a beautiful glossy gloss;
- when properly applied, the acrylic coating retains its performance and external characteristics for 15 years;
- acrylic is harmless, does not emit any unpleasant odors and does not require the use of special protective equipment;
- after three days the bath is fully ready for use.
Among the shortcomings can be identified only one: a relatively high cost compared to enamelling, although the quality and durability of the coating completely compensate for this small disadvantage.
Application of acrylic on a bath
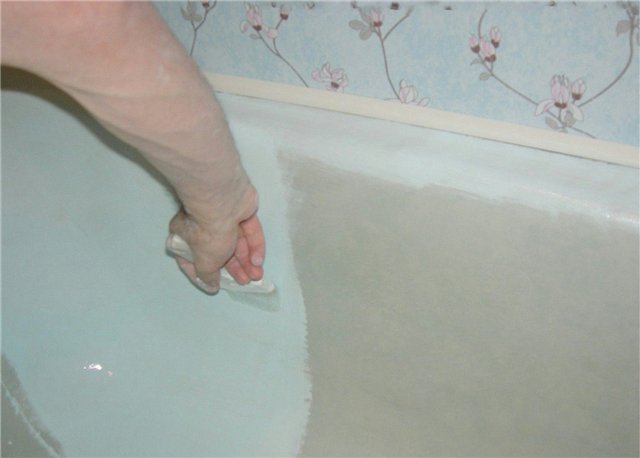
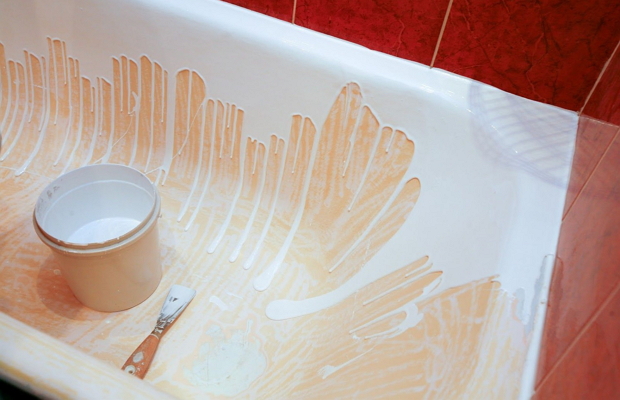
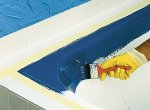
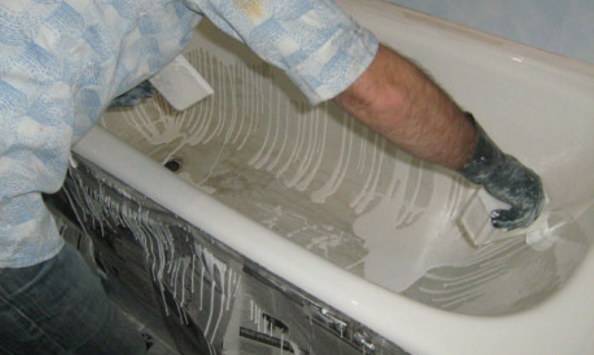
Painting a cast-iron bath with acrylic is much quicker and easier than enamel. For this, you will not need any roller, brush, or other improvised means. Acrylic is simply poured on the bath, and then under its weight gradually flows down the walls, forming an even and smooth coating.

Take a watering can and, starting from the inner corner, move around the perimeter of the bath, gradually pouring the entire upper edge
Before starting work, lay a newspaper or cellophane on the floor, so as not to soil the floor covering with acrylic, which will drain from the bath. Mix the hardener with acrylic enamel. The capacity in which the hardener was placed can be turned into a convenient watering can for applying acrylic, cutting off its nose at an angle.
The application of acrylic begins with the inner sides of the bath, those that are near the wall. Acrylic has a liquid consistency and quickly flows down. After the upper edge of the bath is completely filled with a solution, start a new circle, but not from the sides, but from the middle of the side walls.
After the acrylic stack from the sides of the bath, you need to walk a second time in a circle, filling the composition with no painted areas
All acrylic flows down, but some places on the bottom and walls of the bath are still uncoated. To close them, acrylic should be accurately leveled with a trowel on all non-embedded fragments. Mass, draining, as a rule, rushes towards drainage, so that its clogging does not occur, it is necessary to take it away to the other side with a spatula. At this time, acrylic is already acquiring a viscosity and freezes.
Acrylic is applied in one layer, and this is the end of the bathing job. Now your task is to protect the surface from getting to it particles of dust, debris or drops of water. All this can ruin the cover. Full hardening of the acrylic composition takes place within 1.5-2 days.
Restoration with acrylic liner
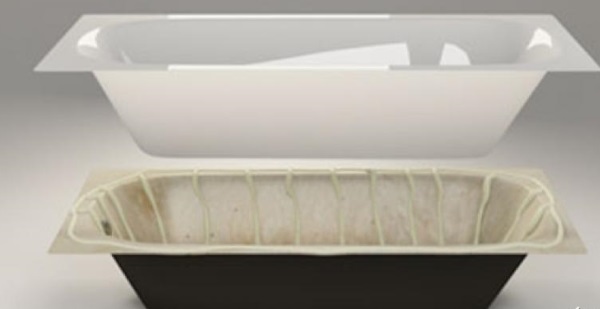
The essence of the method is to install a liner from acrylic into an old bath. The product is made from sheet acrylic, which is heated to the desired temperature and squeezed out using a mold. The thickness of the liner, as a rule, is 5 mm.
Externally, the liners resemble the usual acrylic bath, but they are not a full bathroom and can not be installed separately
The insert made of acrylic has many advantages, the main one of which is long term service. With proper use, it can last up to 20 years. It is very durable, not afraid of mechanical damage and shocks, does not rust and does not become covered with yellow coating. The insert from acryle is easy to clean with usual household means and does not require the use of aggressive compounds.
After the restoration, the cast-iron bath becomes an absolutely new product with a smooth and perfectly smooth glossy surface. The liner can hide any damage and defects of the old cast-iron construction.
However, there are many shortcomings in this method. Liners are made for standard cast iron baths 1.5 and 1.7 m long, so if it has other dimensions, this method of restoration will not work. The insert is superimposed on the bath and must fit it completely. To achieve this, it is required to dismantle the bottom row of the tile, as well as to remove the siphon equipment.
The liner made of acrylic in shape and size must fully correspond to the bath in which it will be installed, even a slight mismatch in dimensions
Before installing the liner, the bath must be prepared, but such thorough preparation as before painting is not required. It is sufficient to remove the enamel coating with a grinding brush, and then degrease the surface with a cleaning agent.
The insert should be tried on, if there are protruding parts, then they will have to be cut with an electric jig saw. Next, mark and cut out drill holes for overflow and discharge. Sealant is applied to the edges of the bath. Installation liner is made on a special foam, which evenly covers the entire surface of the bath.

The insert is inserted into the pre-foamed bath and pressed firmly against its bottom and walls
The acrylic insert is carefully lowered into the container and installed in such a way that there is no distortion. Then the siphon is connected, and the bath is practically filled to the brim with water. In this state, it must be left for a day, to completely dry the foam and sealant.
In this way, you can restore the bath yourself, but it is best to turn to the services of companies that perform work at a professional level.
Useful video about the ways of restoring the bath
Restoration of a cast-iron bath with the help of special enamels:
Coating of the bath with liquid acrylic:
Restoration of a bath with acrylic liner:
Restoration is the best way to update the appearance of the bath, because it allows you to quickly, simply and inexpensively to give a new life to an old cast-iron bath. Each method has its pros and cons, so it's up to you which one to adopt.