Where in 1s 8.3 certificate 2 personal income tax. Accounting info. For training, we will use a demo database
The 2-NDFL certificate is multifunctional and can be used at another place of work, in banks, or the Federal Tax Service to confirm the amount of earnings and taxes paid. Your employee may request it, and it is also intended for mandatory submission to the tax office.
Naturally, in order to generate 2-personal income tax for an employee, he must be hired in the program, and his salary must also be calculated. We will not dwell on this in detail, since all actions have already been described in our other articles.
In 1C 8.3 ZUP and Enterprise Accounting, there are two types of certificates:
- “2-NDFL for employees”;
- “2-NDFL for transfer to the Federal Tax Service.”
In 1C ZUP they are located in the “Taxes and Contributions” menu, and in Accounting in the “Salaries and Personnel” menu.
The principle of creating and filling in both standard configurations is the same, therefore, as part of our step-by-step instructions, we will consider an example on the ZUP 3.1 demo base.
2-NDFL for employees
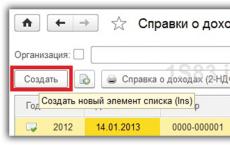
Go to the list of documents 1C 8.3 “2-NDFL for employees”. A separate document is created for each employee for a certain year. Click on the “Create” button.

In the window of the created document that opens, fill out the header. Here you need to fill in the following fields: year, organization and employee. The rest of the data will be filled in automatically. To update them, use the “Fill” button.

In the case when you need to generate this certificate in 1C 8.3 in the context of OKTMO/KPP codes and tax rates, indicate this in the “Generate” attribute. In this situation, you need to select the correct value in the “OKTMO/KPP” field, which is located below.

If you click on the question mark to the right of the “OKTMO/KPP” field, the program will notify you whether income is registered for this employee under the selected code. In the figure above, Igor Valentinovich Bulatov’s income for 2017 at checkpoint “123456789” was registered.
In the case where no income was found, the program note will look like the image below. In this case, income data will not be displayed.

The last tab contains the personal data of the employee for whom this 2-NDFL is being made. They can be edited directly in the document card. If they differ from those entered in the employee’s card, the program will give you a corresponding warning.

You can ignore this warning by making all the necessary changes to the document. We don't recommend doing this. In the event that incorrect data is included here, it is better to correct it directly in the employee’s card, so that in the future both here and in other documents there will only be correct data.
After checking all the data yourself, you can start the software check with the appropriate button and scan the document. Next, the 2-NDFL certificate itself is printed for the employee.

This form is Appendix No. 1 to Order of the Federal Tax Service of the Russian Federation No. ММВ-7-11/485@ dated October 30, 2015, as indicated in its header. It also states that this form is not intended for submission to the Federal Tax Service.

At the end of 2016, the Tax Service approved several new income and deduction codes. Their use in the 2-NDFL certificate is mandatory. The full list of new codes is given in the appendix to the order of the Federal Tax Service dated November 22, 2016 No. ММВ-7-11/633@.
Try to closely monitor new reporting releases and changes in legislation so that you can use only current reporting forms and calculation methods on time.
2-NDFL certificates for submission to the tax authority
This document is also located in the 1C “Taxes and Contributions” menu. Create a new document.
Let's move on to filling out the header. First of all, indicate the year and organization for which the reporting is being generated. Next, OKTMO and KPP are indicated when paying income. Here you also need to indicate the checkpoint and code of the Federal Tax Service, to which this report will be subsequently transferred.
The type of certificate in our case is “Annual reporting”. This field also has the value “On the impossibility of withholding personal income tax.”
The last step in filling out the header will be to indicate the type of certificate: original, corrective or canceling, indicating the correction number.

You can fill out the table part with employees automatically (the “Fill” button), manually, or by selection. For this example, we chose the first filling method.

When you click on any line of the completed line, a separate 2-NDFL certificate will be opened for each employee. This document is essentially a register of employee references.
Be sure to check all the data and post the document. In the future, you can download it or immediately send it to the regulatory authority (if you have the program configured accordingly). You can also print the document by selecting the appropriate item in the “Print” menu.

When printed in one report, certificates will be immediately generated for all employees selected in the document. They are almost identical to the one we formed in the previous example.
As you can see, there is nothing complicated here. The most important thing is to keep records correctly and monitor program updates.
Employees regularly turn to their employer with a request to provide a certificate of income in Form 2-NDFL. It is also necessary to issue this certificate upon dismissal of an employee, since the new place of work requires information about his earnings for the current year to correctly determine the right to tax deductions. The resigning employee is also provided with a certificate for calculating benefits, containing information for calculating average earnings in the event of temporary disability. Let's talk about how to generate certificate data in the 1C program: Salaries and personnel management 8th ed. 3.1, and whether the earnings amounts in these two documents should match.
It is necessary to dismiss an employee using a “Dismissal” document.
In order to draw up a certificate of income of an individual in form 2-NDFL, the program contains the document “2-NDFL for employees”. To find it, go to the section “Reporting, certificates” - “Certificates for employees” - “2-NDFL for employees”. In the window that opens, click the “Create” button.
In the “Year” field, select the year for which income information is generated and indicate the employee. In the “Generate” field, select “Summary”, since you need to create a single certificate for all the employee’s income. Click "Fill". The tabs “13%”, “30%”, “35%”, “15%”, “9%” will be filled in automatically, they will reflect the monthly accrued income, taxed at the specified rates. The right side of the table will display tax deductions, if any.

The “Personal Data” tab is filled in with data about the individual for whom the certificate is being drawn up. This information is reflected in printed form in the section “Data about the individual - recipient of income”. If any data is not filled out or requires correction, you need to change it in the “Individual” card, which can be accessed by clicking on the “Edit” hyperlink. If you edit the data of an individual so that they differ from the data entered earlier, then when posting the document the program will issue a warning: “Errors have been detected in the document. Continue?". If you agree, the document will be posted and can be printed, but the program does not recommend doing this (because the data in the posted document will differ from the data entered previously).

To generate and print a certificate, use the “Certificate of Income (2-NDFL)” button.

The generated 2-NDFL certificate for the employee additionally contains the comment: “Form 2-NDFL is not for submission to the tax authority.”
Now let's talk about creating the second document. To draw up a certificate of the amount of earnings for calculating benefits, the document “Outgoing certificate for calculating benefits” is used. You can find it in the “Reporting, references” section. Click “Create”. A window appears in which you must indicate the date the document was compiled and the employee for whom you want to generate this certificate. In the “Calculation years” field, select the periods for which you need to provide information.
If changes have been made to the credentials, the certificate must be refilled using the “Fill in certificate data” button. If there have been manual corrections in the help, you must click on the “Update (taking into account manual corrections)” button.

We fill out the tabs “Data about the policyholder” and “Data about the insured person”, after which we post the document. Before generating a certificate, the program checks that this document is filled out correctly. We create a printed form using the “Print” button. We select the printed form of the certificate: “Certificate (according to the form of 2013)” or “Certificate (according to the form from 2011)”.
We have been generating certificates using the form since 2013.

As a result, the total amount of income taxed in the 2-NDFL certificate and the amount of wages, as well as other payments and remunerations subject to insurance contributions in the certificate of the amount of earnings for calculating benefits, coincide in this example.
Now let’s look at an example where an employee had periods of temporary disability.
We create a sick leave (“Personnel” - “Sick Leave”) in February from 02/08/2016 to 02/21/2016. The allowance is calculated based on average earnings: total - 1,713.32 rubles. Since benefits for temporary disability due to illness or injury are subject to personal income tax, the tax is calculated on the amount of sick leave, personal income tax is 233 rubles.

We create another sick leave in June by analogy. For this sick leave, the employee was accrued a total of 979.04 rubles, and personal income tax is 128 rubles.

Now let's see how our certificates will be generated based on the new conditions.
We generate a certificate “2-NDFL for employees”. Temporary disability benefits are also included in this certificate and are subject to personal income tax based on type of income 2300 “Temporary disability benefits.”

We generate an “Outgoing certificate for calculating benefits.” Hospital employees fall into the section “Days of illness, child care.” But earnings in general are already less than in the “2-NDFL for employees” certificate, just the amount of sick leave (189526.66 – 186834.30 = 1713.32 + 979.04). This is due to the fact that in this certificate the total amount of income includes wages and other payments subject to insurance contributions to the Pension Fund and the Social Insurance Fund, while temporary disability benefits and maternity benefits are not subject to these contributions.

Let's summarize: the amounts in the two certificates under consideration may not coincide, since the 2-NDFL certificate includes income that is subject to personal income tax, and the certificate for calculating benefits includes income that is subject to insurance contributions. Thus, in the example considered, accruals for sick leave were included in the 2-NDFL certificate, but were not included in the certificate for calculating benefits.
You can generate 2-NDFL in 1C as follows:
- In the employee card - Complete the document –
- In directory list form Employees "Draw up a document" –

- In the document Dismissal – Create on the basis of – 2-NDFL for employees:

- Chapter Taxes and fees– navigation bar: and document log “All documents on personal income tax”; action bar Create –

- Chapter Reporting, certificates – Certificates for employees – 2-NDFL for employees; action bar

In the document form you need to fill in the details:
- "Year", for which you need to generate a certificate and the date of the document;
- "Organization", if there are several organizations in the information base;
- "Employee";
- "Signed"– Full name of the tax agent or his representative.
This certificate can be generated summarized or broken down by OKATO/KPP codes and tax rates. The props used for this are "Form".
"Fill in". The document will be filled in automatically:

Depending on the interest rates, each tab is filled in:

On the bookmark Personal data check the employee's personal information. If you need to edit any data, you can follow the hyperlink Edit employee card to a directory element Individuals.
After finishing editing the individual’s data, click on the button "Save and close". On the bookmark Personal data the information will be automatically updated:

If you edit an employee’s personal data in the document itself, these details will be highlighted in bold. This editing method is not recommended. You can go back by pressing the button. "Undo corrections":

After filling out and checking the document, to receive a printed form of the certificate, you need to click on the button “Certificate of income (2-NDFL)”:

Taxpayer status:
- – the employee is a resident of the Russian Federation;
- – the employee is not a resident of the Russian Federation;
- – the employee is a highly qualified specialist;
- -the employee is a participant in the state program for the voluntary resettlement of compatriots living abroad;
- – the employee is a foreigner and has refugee status or has received temporary asylum in the Russian Federation;
- – the employee is a foreigner and works on the basis of a patent.
Sections 3 and 5 are completed for each tax rate in one certificate:

The tax agent code is manually edited: 1 – tax agent or 2 – if an authorized representative.
How to generate a 2-NDFL report for transmission to the tax authorities
- Chapter Taxes and fees– navigation panel: 2-NDFL for transfer to the Federal Tax Service and document log All personal income tax documents; action bar

- Chapter Reporting, certificates - 2-NDFL for transfer to the Federal Tax Service And 1C-Reporting; action bar Create – 2-NDFL for transfer to the Federal Tax Service:

Filling out the details is practically no different from 2-NDFL for employees: the year for which the certificate is created, the date of provision, OKTMO/KPP are indicated.
When preparing the initial certificate, click on the button "Original". In the help "Adjustment number" – 00;
When preparing a corrective certificate, click on the button "Corrective". In the help "Adjustment number" – 01-98;
When preparing a cancellation certificate, click on the button "Annulment". In the help "Adjustment number" – 99.
Also indicated “Type of certificates”:
- Annual reporting. In the certificate it has the attribute “1”;
- On the impossibility of withholding personal income tax, Where income from which personal income tax was not withheld is indicated. The tabular part of the document is filled out manually. In the certificate it has the sign “2”.
After filling out the necessary details, click on the button "Fill in". The document is filled in automatically if it is not a certificate “On the impossibility of withholding personal income tax”:

To obtain a printed form, click on the Print button – Income Certificate (2-NDFL). Certificates of income of individuals will be generated:

Watch our video on registering personal income tax deductions in 1C ZUP and Accounting:
Creating a 2-NDFL certificate in 1C 8.3 Accounting 3.0
You can create a 2-NDFL certificate for employees:
- Chapter Salary and personnel– navigation bar Personal income tax – 2-NDFL for employees and magazine All personal income tax documents; action bar Create – 2-NDFL for employees:

- In the employee card - Complete the document –
- In directory list form Employees, having previously selected the desired employee and press the button "Draw up a document" –
- In the document Dismissal – Create on the basis of – 2-NDFL for employees.
2-NDFL for transfer to the tax authorities
- Chapter Reports – 1C-Reporting – Regulated reports:

- Chapter Salary and personnel– navigation bar Personal income tax – 2-NDFL for transfer to the Federal Tax Service and the journal All personal income tax documents; action bar Create – 2-NDFL for transfer to the Federal Tax Service:

2 Personal income tax is issued to employees in two cases: upon dismissal and upon request. After an employee of the organization has made such a request, the accountant has three days to issue a 2nd personal income tax certificate. The most common accounting program is 1C ZUP or Accounting. As a rule, an organization has one of two versions of these configurations connected: 8.2 or 8.3. Let's look at how to prepare a document in both programs.
In order to generate 2 personal income taxes in 1C this version, you need to go to the “Taxes” tab.
The program provides for the generation of two types of reports:
- For transfer to the Federal Tax Service;
- to be issued to an employee.
If the document is prepared at the request of the employee, the last item is selected. After this, a window will open containing all the generated certificates, a new document is created here. You must select the employee's full name and the period for which the information will be downloaded. The remaining data is generated automatically.
Mandatory details of the organization are entered into the program when setting up the configuration, and data on the employee when he is hired. Information about income, tax deductions and personal income tax will be downloaded from pay slips.
After filling out, the information must be verified. Data on rewards and deductions can be compared with payslips, and the tax amount calculated by multiplying total income, excluding tax deductions, by the tax rate (usually 13%). 1C 8 in 2 Personal Income Tax also allows manual filling; to do this, you need to enable the editing mode.
In order to generate a document in this program, you need to perform the following algorithm: go to the “Salary” menu, then go to “Accounting for personal income tax and unified social tax”, then select “Information on the income of individuals 2 personal income tax”. In the window that opens, you need to add a new file; to do this, click on the appropriate button.

You need to fill out the following yourself:
- Organization;
- Full name and position of the responsible person;
- taxable period.
After this, you need to select an employee and generate a certificate.
Certificate 2 of personal income tax in ZUP 8.3 is also generated in two types: for the employee and the Federal Tax Service. The procedure for generating reports is very similar to preparing a certificate in the previous configuration. You need to go to the “Taxes and Contributions” menu and select the required type of certificate. Then, using the “Create” button, a document is generated.

The fields that need to be filled out are indicated by a red dotted line:
- Organization;
- employee.
When the specified details are selected, you must click the “Fill” button and the program will fill in all other fields automatically. All that remains is to check for errors and print.
To print, click on the “Certificate of income 2 personal income tax” button, a completed form of the approved form will appear. In the upper right corner there will be a note stating that this document is not submitted to the tax authority.
If certificate 2 personal income tax from 1C is generated for the Federal Tax Service, you need to select this type of document in the initial menu.
The Federal Tax Service of Russia requires information about all income and taxes of individuals, therefore, after filling out the required details, the program will generate certificates with a list of all employees.
Mandatory details are:
- Employer's name;
- reporting period;
- type of certificate – annual reporting;
- type. There are initial, corrective or canceling certificates. A corrective document is used to clarify the data provided, and a cancellation document is used to cancel information that should not have been sent.

In addition to the 2 personal income tax certificates themselves, the ZUP also creates a register of documents, which is also provided to the inspectorate. In the program, reporting looks like a list of employees, each with information about remunerations received and taxes withheld. If you double-click on a person, a separate document will open for him.
The reporting file can be downloaded from 1C (via the “Download” button) for electronic data transfer. When unloading, you must fill out information about the tax authority. If electronic document management is configured through the program itself, click the “Submit” button as soon as the reporting is accepted by the tax office; in 1C this is indicated with a corresponding checkmark.
Reporting in the system can be generated in the context of OKATO/KPP, which is convenient for companies with separate divisions, since in this case the details differ between the head office and the branch.
Important! Reporting is submitted to the inspectorate at the location of the organization or separate unit.
The algorithm for generating 2 personal income taxes in 1C, despite the difference in versions, is very similar. The program separates two situations: when an employee needs a document and when it is submitted to the inspectorate in the form of a report. In the first case, it is formed for each person, in the second - a list for all individuals. 1C allows you not only to prepare and print a document, but also to upload and even send the file via the Internet to the Federal Tax Service.