How to install a hood in the kitchen with your own hands: the correct installation of the duct
Before we tell you how to install the hood in the kitchen with your own hands, we mention that an indispensable condition for the effective removal of kitchen fumes is the correct connection of the hood to the ventilation duct. We will not consider closed operation in the recirculation mode without removing air outside the room. In our opinion, this is ineffective, besides, periodic replacement of the filter cassette filled with activated carbon is required.
- Direct installation of the hood in the kitchen, open or in furniture, depending on the design.
- Connecting the device to the power supply.
- Pipe installation.
- Connecting the pipe to the ventilation duct, while natural ventilation in the room must be maintained.
The form is divided into:
- Separately located, they can have a traditional shape of a chimney cap, or an inclined panel, more convenient from an ergonomic point of view.
- Built-in, they are inserted inside the hinged kitchen cabinet.
The design of the devices is quite simple: a case, a fan, a backlight, a control panel and a mesh with a mechanical grease filter that prevents contamination of the electric motor and fan blades. By the way, it is recommended to periodically wash the filter with warm water and detergent.
Note that installation, like any kitchen appliances, should be carried out in strict accordance with the instructions from the manufacturer that came with the appliance.
Try to place electrical wires and sockets hidden
How to connect the hood to the power supply
The wire for powering the device is not always equipped with a plug, on some models there are simply bare ends designed to be connected through the terminal block. This option is acceptable, however, in our opinion, it is more convenient to plug it into a socket, and the plug can always be purchased and installed separately. In case of repair, it is easier to remove the plug than to unwind the terminal block.
If you do not want the wires to hang out in plain sight, the socket or “tail” for the terminal block should be hidden. Inside the case (10-20 cm above the working surface) there is a free space designed, among other things, for these purposes. For a hood built into furniture, it is better to place the power outlet above the appliance body, there may not be room behind.
The power of the fan motor is low, a standard copper conductive section of 1.5 mm2 is enough, although it is recommended to wire sockets in the kitchen with a section of 3x2.5 mm. Grounding (yellow-green core in the wire) is required, but not all apartments have it.
How to install a range hood in the kitchen
We will not delve into the question of how to install it in the kitchen with your own hands (meaning hanging the appliance on the wall or installing it in a closet). As a rule, the device is attached to the wall with two or four suspensions or dowels. Better watch the video instruction, it's clearer:
The process of installing the hood step by step
Pay attention to ergonomics: an inclined design is more convenient than a fireplace or built-in one.
Installing an island-type device is technically more difficult, it will have to be hung from the ceiling structures. The built-in model is inserted into the cabinet and attached to the side walls. Since the engine vibrates during operation, it will not be superfluous to lay an elastic material between the body and the cabinet, which will serve as a sound insulator. A strip of natural cork or dense foamed polyethylene 3-4 mm thick is suitable.

Built-in model: you will have to cut holes in the cabinet shelves to let the air duct through, remove part of the bottom wall
The layout of fasteners and holes is contained in the instructions. First measure seven times, and only then cut, drill or saw.
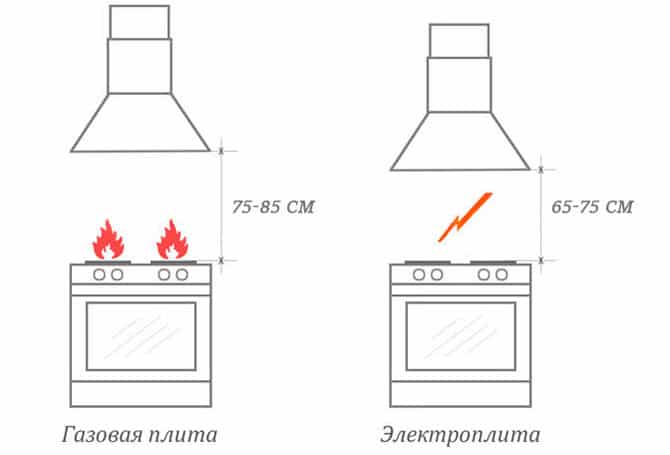
Installation height above the stove
When installing in a kitchen, setting it in height relative to the stove is important both from an ergonomic point of view and from the point of view of safe operation. So, the minimum distance from the electric stove to the suction surface of the device should be at least 65 cm. The device should be placed no closer than 75 cm from the gas stove, which gives more heat. It can be placed higher, the level depends on the height of the family chef. It is recommended that you first “try on” the chimney cap and place it in such a way that the cook bending over the stove does not touch the body with his head.
How to choose an air duct for an exhaust hood in the kitchen
On sale there are various ducts for exhaust in the kitchen:
- Aluminum corrugated pipe of round section. A cheap and easy-to-lay option. The pipe bends well, transition elements are not needed, only clamps are required to fix the corrugation on the sockets of the hood and the entrance to the ventilation. If there is no clamp at hand, a soft pipe can be fixed with wire. The disadvantage of corrugation is questionable aesthetics. When a powerful fan is operating at maximum mode, the pipe may begin to vibrate and, in order to avoid rattling, it should be fixed to the wall or cabinets.
- Rigid plastic pipes are more expensive, including because of the need to purchase transitional elements: corners, turns, connections. The appearance of the plastic is not satisfactory, and the design provides better sound insulation. Rigid pipes can have both round and rectangular sections. The latter have a lower height and are used in cases where the duct must be hidden or there is not enough space for its installation.
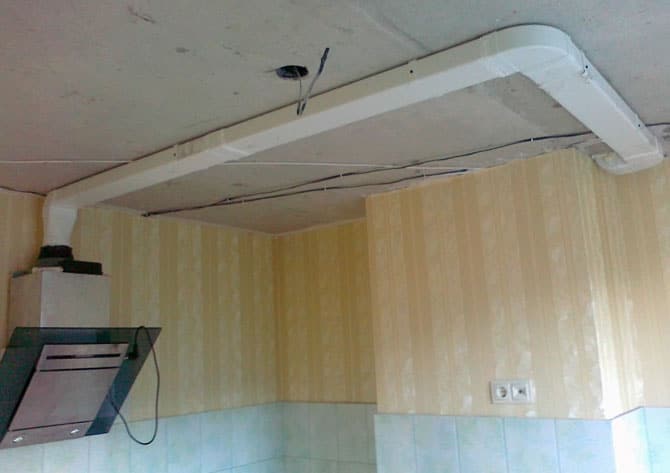
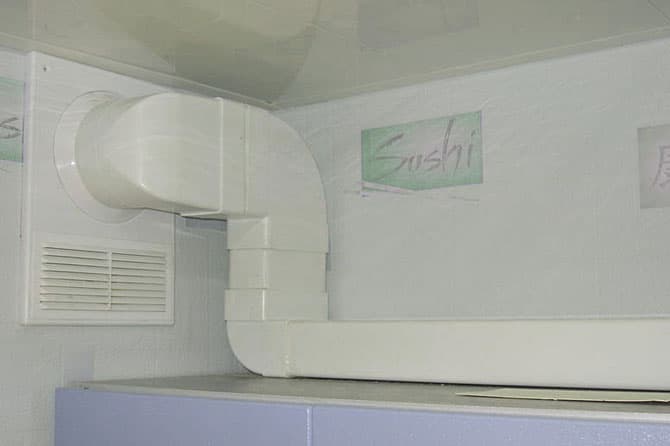
The advantage of flat rectangular pipes is the minimum height. The design, which we see in the photo, will be hidden in the stretch ceiling, almost without taking away the height of the room
When choosing an air duct section, you should focus on the outlet (bell) section of your model. If the cross section is narrowed, the removal of polluted air will be difficult.
Video: competent installation of air ducts
Pay attention to the fact that the master securely fastens the pipes to the building structures and takes additional measures to soundproof the pipes.
Connecting the duct to the ventilation duct
Proper connection of the air duct to the ventilation duct is a guarantee of the absence of unpleasant odors in the kitchen. But it's not as easy as it might seem at first glance. The difficulty is that, by connecting a forced exhaust to the ventilation duct, not to disrupt the operation of natural ventilation. There are two ways to solve the problem.
If possible, it is best to lead the kitchen hood ventilation pipe outside through the wall, making a hole in it
In the presence of an additional ventilation duct
Ideally, if the room has two ventilation ducts, which is found in pre-war houses. Then one of them will work as natural ventilation, an exhaust hood is connected to the second. In a private house, it is better not to touch the vertical ventilation duct and punch an additional hole in the outer wall, into which a horizontal air duct from the device will be led. Outside, we recommend installing a check valve that prevents the penetration of cold air into the pipe and a grate that closes the hole from precipitation.
If the kitchen does not have an additional ventilation duct, this cannot be done! Such installation of the hood significantly deprives the room of natural ventilation.
In the absence of an additional ventilation duct
How to install a kitchen hood with a ventilation outlet in a typical apartment, where there is only one ventilation duct, and there is no way to make a hole in the outer wall? You can not connect to the ventilation duct in the wall only the hood, without leaving holes for natural ventilation. Under the condition of using a gas stove, this can be simply dangerous.
Connecting the duct while maintaining natural ventilation
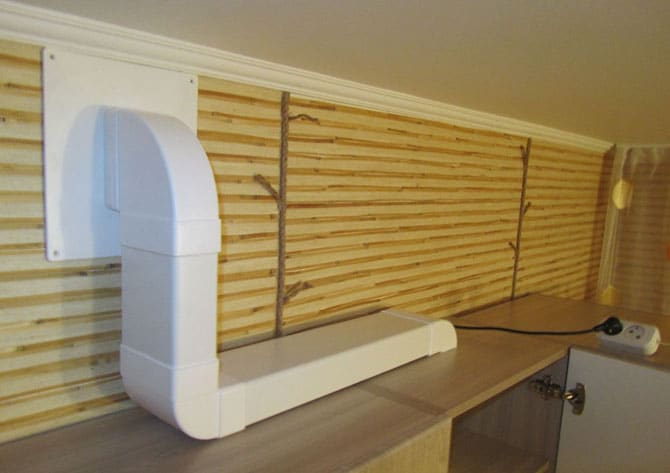
Not the best, but an acceptable simple solution is to connect the duct to the channel through a special adapter with two holes. One is for exhaust, the other is open for natural ventilation. The disadvantage of this method is that when the fan is running, excess pressure is formed in the duct and part of the polluted air will be thrown back into the room.
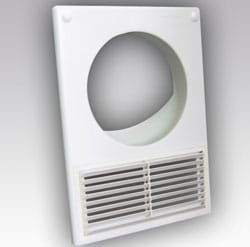 To connect to the ventilation duct in the wall, choose such an overlay with two holes, as in the photo. Please note that the duct inlet has a small elbow, which directs the air flow upwards already in the duct, minimizing its backflow into the room.
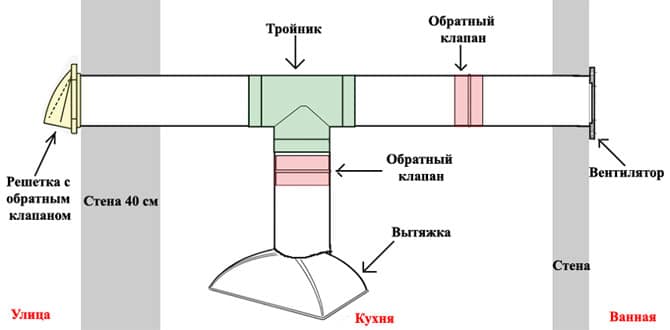
A more complicated, but effective way is to place a tee in front of the vertical ventilation duct. Connect one of its outlets to a ventilation duct in the wall, connect an air duct to the second, and install a check valve on the third one that opens into the room.
It is important that the valve is installed in a horizontal position. When it is not working, the valve is fully open and natural ventilation is carried out in full. We turn on the fan - the check valve closes, completely eliminating the return of the kitchen fumes back into the room.
The video clearly shows how to install a hood in the kitchen with your own hands, completely preserving the natural ventilation in the room. A tee with a check valve at the inlet to the ventilation duct looks somewhat cumbersome, but the device provides the best ventilation mode
We told you how to install a hood in the kitchen yourself. This is a feasible task for a home master that requires accuracy. For those who do not have the skills to handle tools or do not have free time, we recommend entrusting this task to specialists.


