Installing the mixer on the sink: preparation for installation and connection procedure
Plumbing repairs for home and apartment owners cause constant headaches and loss of money due to periodic purchases of consumables and hiring a plumber.
And since the main problem is considered to be the process of restoring water-pressure fittings and replacing plumbing fixtures, we will consider in detail how the mixer is independently installed on the sink without the need to hire housing and communal services workers and unnecessary cash costs.
Types of pipes for creating a flexible and rigid connection between the mixer and water pressure fittings.
Depending on the quality of the required connection, the size of the sink, the power of the water pressure and the financial possibilities, three types of connecting pipes are offered for sale:
- Chrome Plated Copper Tube - A rigid and high quality connection using chrome plated copper or stainless steel tube. Installation requires high-precision and accurate bending, which takes a lot of time and effort, but in return, a high-quality and most durable connection is obtained with the ability to be placed in a wall cavity or in concrete.
- Flexible bellows hose - (the cheapest and most affordable type of connection) a stainless steel metal hose, without rubber internal inserts, but completely flexible due to a tube shaped like an accordion. It is widely used to create a flexible connection between a mixer and water pressure fittings.
- Metal-plastic heat-resistant pipe - allows you to create connections of medium hardness, but with the need to use additional adapter needles for a metal-plastic pipe and end fittings with an internal thread. This type of connection is used less often than others and only when absolutely necessary.
Check the complete set of the mixer before purchasing
A set of tools and materials
Since it is necessary to install the mixer on the sink with high accuracy and proper quality, a set of tools, standard for plumbing work, should be prepared for installation work:
- Large and small pliers.
- Adjustable and gas wrenches.
- Screwdrivers of different types and sizes.
- Hexagons.
- Open-end wrench 12 × 14 mm.
- Vinyl tape, MUV tape (Fluoroplastic Universal Material) or tow.
- Roulette.
Additional tools may be needed. Therefore, before purchasing and installing, you should study the installation instructions given by the manufacturer of your mixer and, based on these data, prepare an accurate set of tools and materials.
Preparation for the installation of the mixer
Before carrying out installation work, measure the distance between the water-pressure fittings and the mixer fixed on the sink. To do this, you need to install it in a special socket of the sink and fix it slightly. Using a tape measure or a measuring tape, measure the distance between the connecting hoses, the flexible hose of the mixer and the thread on the water pipe, taking into account all angles and future bends.
Note!
In any case, installing a mixer on a sink requires knowing the total distance between the components and then adding a small margin of length.
On average, you need to buy tubes or hoses 50-100 mm larger than the exact size for a more comfortable fit. If you are in doubt about something, then in retail outlets, specialists can advise and help you choose the material and length of the connecting pipes necessary for more accurate fixation.
The quality of the parts shouldn't be in doubt
Fitting the mixer to the sink
The purchased mixer and its components must first be folded together in the order in which they will be attached to the sink. In this way, ridiculous errors during installation can be avoided. The entire system of a standard mixer is assembled and installed on the sink in the following order:
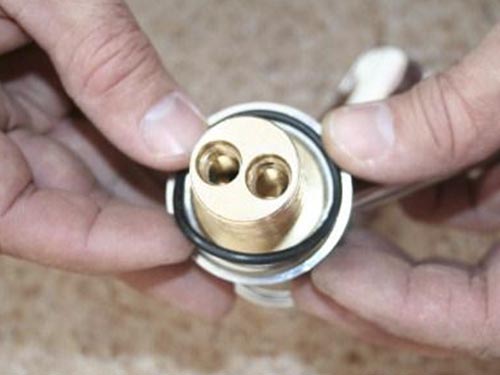
- With the help of special nuts and rubber gaskets, connecting pipes are screwed to the mixer and fixed in working position. For a tighter connection, you can wind a little tow or MUF tape on the thread.
- A rubber sealing ring is placed at the base of the mixer in a specially provided place (groove). It avoids water leakage under the sink bottom.
- The pipes are passed into the sink hole, and the mixer is installed in the required working position.
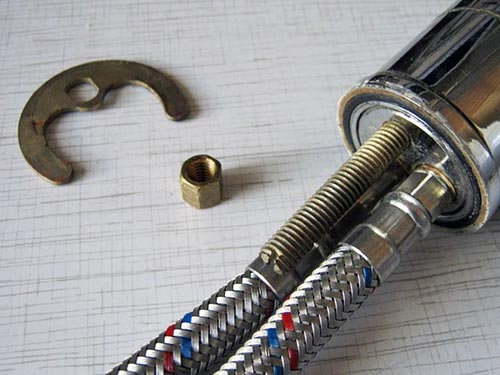
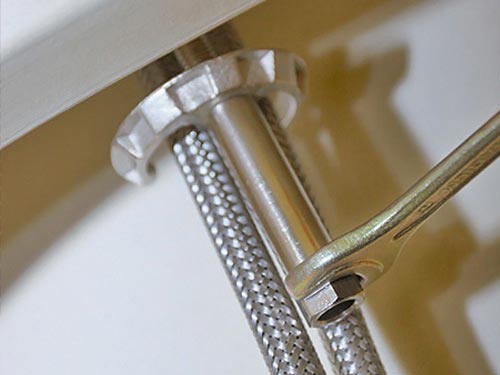
- From the side of the sink bottom, a gasket and a special crescent-shaped pressure pin are connected to the bottom of the mixer. After that, the final fixation of the entire system with a bolt and nut is carried out and the mixer is adjusted to the working position.
But in order for the installation of the mixer on the sink with your own hands to be complete and not lead to undesirable consequences, the entire system must be completely sealed and carefully fixed in the place intended for it. If the diameters of the connectors do not match, you need to install adapters or replace the mixer with a suitable one. Also, you cannot overtighten or loosen the connections, you need to carefully tighten everything by hand and tighten it a little with a wrench or adjustable wrench.
Need to prepare the water line
Pipeline preparation
Before starting work, inspect the pipeline for cracks and rust on the thread surface. If damage is found, appropriate repair and repair work must be carried out. If the pipe diameter differs from the diameter of the mixer pipes, adapters are used for connection, which are sold in hardware stores and are selected in accordance with the required diameter.
To increase safety in the event of a mixer breakdown, a valve or valve is installed between the pipes and the pipeline for emergency shut-off of water. It can be connected using the pipe and valve threads, increasing the tightness with MUF tape or tow, screwing and fixing it in the required position. To check the tightness, close the valve and open the water supply from the pipeline. In case of a good connection, you can proceed to installing the mixer.
Fitting the mixer with soft joint
When installing with a soft connection, a flexible bellows or rubber hose is used, which is easily bent and can be installed in places with sharp bends in the surface and if it is impossible to apply a rigid connection. Since it is necessary to install the mixer on the sink correctly and without errors, first, hoses are connected to it and only after that they are connected to the water-pressure fittings - hot water to the left, and cold water to the right. Connect both pipes with valves with union nuts and a sealant in the form of tow or MUF tape, after which everything is tightened and the tightness of the system is checked.

Secure the eyeliner
Mounting with rigid connection
Reinforced plastic and metal pipes are bent and adjusted before fixing the mixer to the sink. In this case, their length should be suitable, and the bends should be small and neat without sharp corners and distortions. As a result, the joints should not have excessive tension or pressure, this is fraught with consequences in the future.
Note!
There is a possibility of the formation of microcracks in places of strong bend and further complete destruction of the walls.
The finished tubes are connected to the mixer as indicated in the previously described method, and only after that the mixer is mounted to the sink. Upon completion, the tubes are connected to the water supply and the entire system is checked for leaks.
Many may doubt their strengths and capabilities, but if you take into account all the nuances and follow simple instructions, then the question of how to install the mixer on the sink with your own hands will not bring problems and difficulties, and the result will exceed any expectations.


