We connect the boiler to the water supply system with our own hands: connection diagram and insert into the water supply system
Installing a boiler in an apartment or house is a solution to the problem of lack of hot water. You can easily install it with your own hands. To do everything correctly, you need to familiarize yourself with the connection diagrams to communications (including the water supply), as well as the video of the master class.
Types of boilers
Modern boilers are of two types, significantly different from each other according to the principle of water heating:
- Flow-through - heats the water as it is used. The volume of hot water produced by such a water heater is unlimited. At the same time, the power consumption is very high.
- Accumulative - have a reservoir in which water is heated by heating elements. The temperature of the water in the tank is maintained at a fixed level all the time.
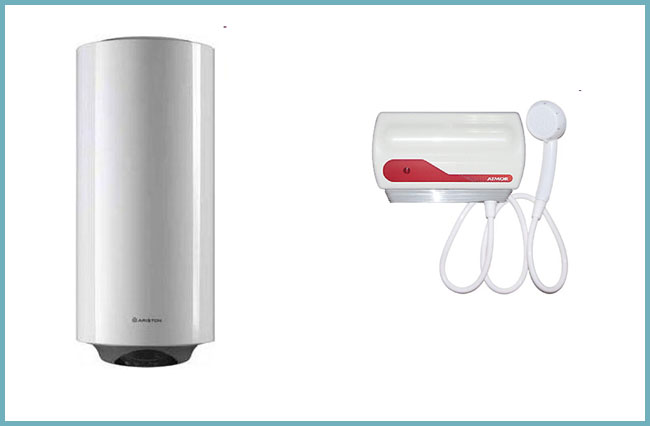
Instantaneous boiler (right), storage (left)
The choice of a boiler with a different storage tank volume is based on several rules:
- 10-15 l - such a boiler will provide hot water for small household needs (for example, a washbasin);
- 50 l - this volume will be enough to supply hot water to a shower cabin;
- 80-100 liters - such a volume of hot water can satisfy all needs for it (bath, shower, kitchen sink).
In everyday life, storage boilers are more in demand. And this is quite justified, because they will provide several points with hot water at once. In addition, there will always be a supply of water in the house.
When the boiler is selected and purchased, you can proceed with its installation. First you need to fix it on the wall. When choosing a wall, it is imperative to take into account the dimensions and weight of the device when filled.
- The boiler should only be mounted on a load-bearing wall, as its full weight can exceed 100 kg.
- The boiler should be located as close as possible to the hot water delivery point.
- Take into account the dimensions of the product and its design features (vertical or horizontal arrangement, upper or lower communications connection).
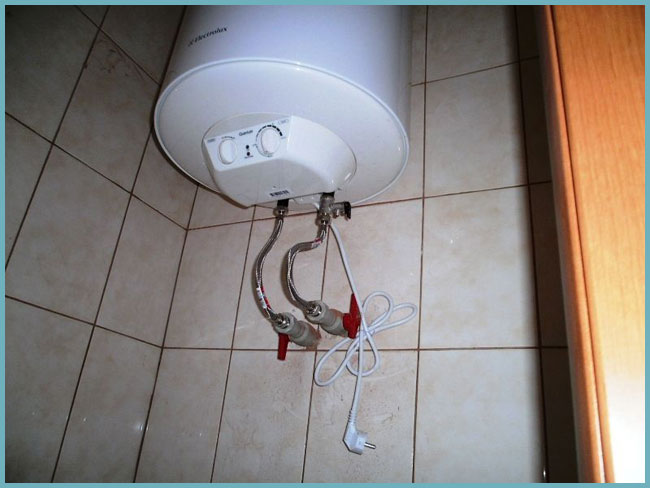
The boiler is mounted on a load-bearing wall
- The boiler can be mounted at any height. It should be remembered that in houses where the water pressure is "not very", raising the boiler to the ceiling is risky, the water may simply not reach it.
Advice. If the pressure in the water supply system is weak, then it is advisable to install the boiler as low as possible for trouble-free operation.
- After installation, the boiler must remain freely accessible for preventive maintenance and repair.
Preparatory work
Connecting a boiler to a water supply system with your own hands is not a super difficult task that any self-respecting owner can cope with.
Preparatory work for connecting the boiler includes:
Advice. When choosing accompanying fittings, keep in mind that cheap low-quality materials will not last long.
General wiring diagram for water supply
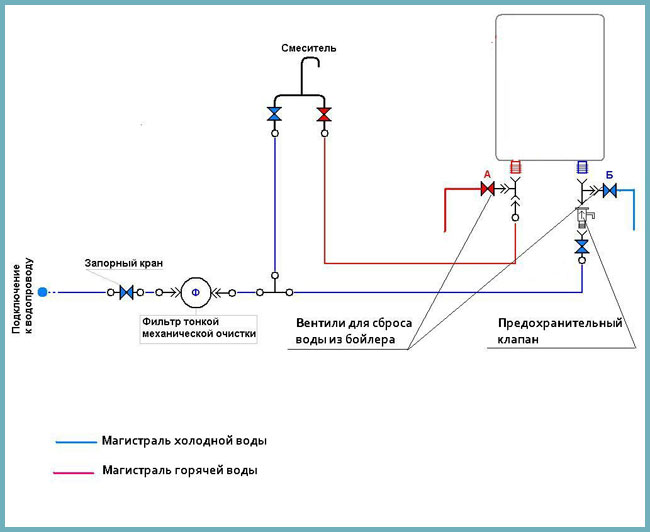
The connection of the boiler to the water supply from any type of pipes is carried out according to one general scheme.
Attention! All work on connecting the boiler to the water supply begins with shutting off the water supply to the apartment.
Cold water supply (top to bottom):
- Mounting the "American" to the boiler water supply pipe is one of the simplest and most reliable options for connecting a boiler. If it is necessary to dismantle the water heater, it can be disconnected from the water supply in a few minutes.
- Installation of a brass tee with a water drain cock. This detail is optional when connecting the boiler. But for the convenience of draining water from the boiler, this is an excellent and durable option.
- Installation of a security system is a prerequisite for connecting the boiler to the water supply. The system includes:
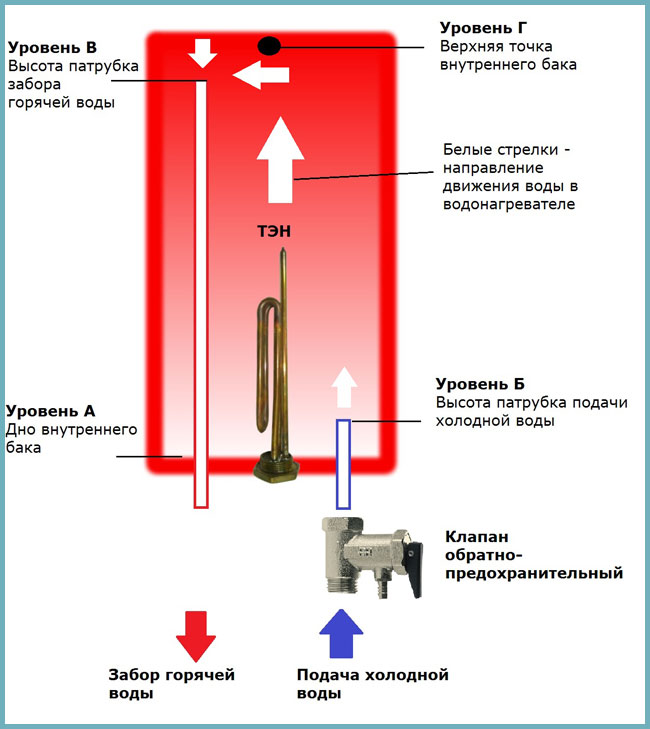
Boiler water supply diagram
- non-return valve - will prevent the outflow of hot water from the boiler in the event of a drop in the pressure of the cold water supply or its complete absence;
- safety valve - in the event of an increase in pressure inside the tank of the boiler, excess water is automatically dumped through this valve to reduce the internal pressure.
Attention! The security system in the water heater kit is not always reliable. To keep yourself out of trouble, purchase a reliable check and breakout valve.
The importance of the security system can hardly be overestimated. So the absence of a check valve in the event of a water supply cutoff (for example, repair of the line) will lead to the emptying of the tank. In this case, the heating elements will still heat up, which will lead to their failure.
The safety valve is equally important in the system. Let's say the thermostat in the boiler is out of order. In this case, the heating elements will not automatically turn off and the water temperature in the tank can reach 100º. The pressure in the tank will rise rapidly, which will eventually lead to the explosion of the boiler.
Safety valve in the system
- If low-quality, hard water is supplied to the water supply system, after the stopcock, a cleaning filter must be installed. Its presence will save the capacity of the boiler from scale and scale deposits, which will significantly extend its service life.
- Installation of a shut-off valve. Its purpose is to shut off the water supply to the boiler during its maintenance or repair, while water will be supplied to other points.
- In the case when the pressure in the water supply "jumps", experienced craftsmen recommend installing a pressure reducer. If it is already installed at the water inlet to the house or apartment, there is no need to duplicate the installation.
- T-piece insertion into an existing cold water supply pipe.
Hot water outlet (top to bottom):
- Installation of the "American" coupling on the hot water pipe of the boiler.
- Installation of a ball valve for the possibility of draining water from the boiler (if such a valve is already installed in another place, there is no need to duplicate it).
- An insert into the distribution of hot water around an apartment or house.
Attention! All connections of parts should be carried out on linen tow with fum tape or a special paste-sealant.
Tie-in into a reinforced-plastic pipe... The easiest way to embed. In the right place, the pipe is cut with a cutter and, by means of suitable fittings, a tee is mounted on it, from which cold water will be supplied to the boiler. are already losing their popularity. Outwardly, they do not look very aesthetically pleasing, and their service life is not too long.
Tapping into a polypropylene pipe... Such an insert is more time consuming and costly, but at the same time, the most reliable. The T-piece with an "American" coupling for connection is mounted using a special soldering iron. Having cut out a fragment of the pipe in the right place with special scissors, it is necessary to maintain the coaxiality of its two parts. Otherwise, it will not be possible to solder the tee.
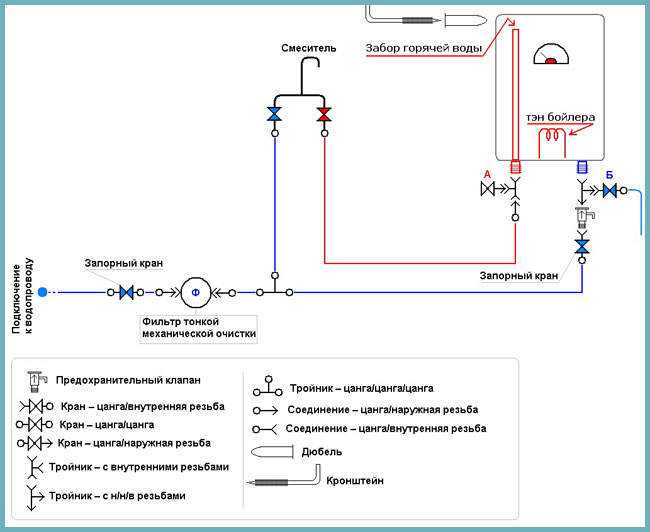
Diagram of connecting the boiler to the water supply
Insert into a metal pipe... Such an insert will require certain skills in working with squeegees and couplings. If it is possible to cut a thread on the cut pipe, the tee is installed using a conventional plumbing squeegee or coupling. If they are located in such a way that it is not possible to use a dish for threading, they resort to using a special clamp with a threaded outlet, popularly called a "vampire". How to work with a "vampire":
- The metal pipe must be thoroughly cleaned of old paint.
- Drill a hole in the pipe in the place of the tie-in. The diameter of the hole in the pipe must match the hole in the coupling.
- The "vampire" coupling is mounted on a metal pipe through a rubber gasket and fixed with the coupling bolts. The holes in the pipe and the coupling must match.


