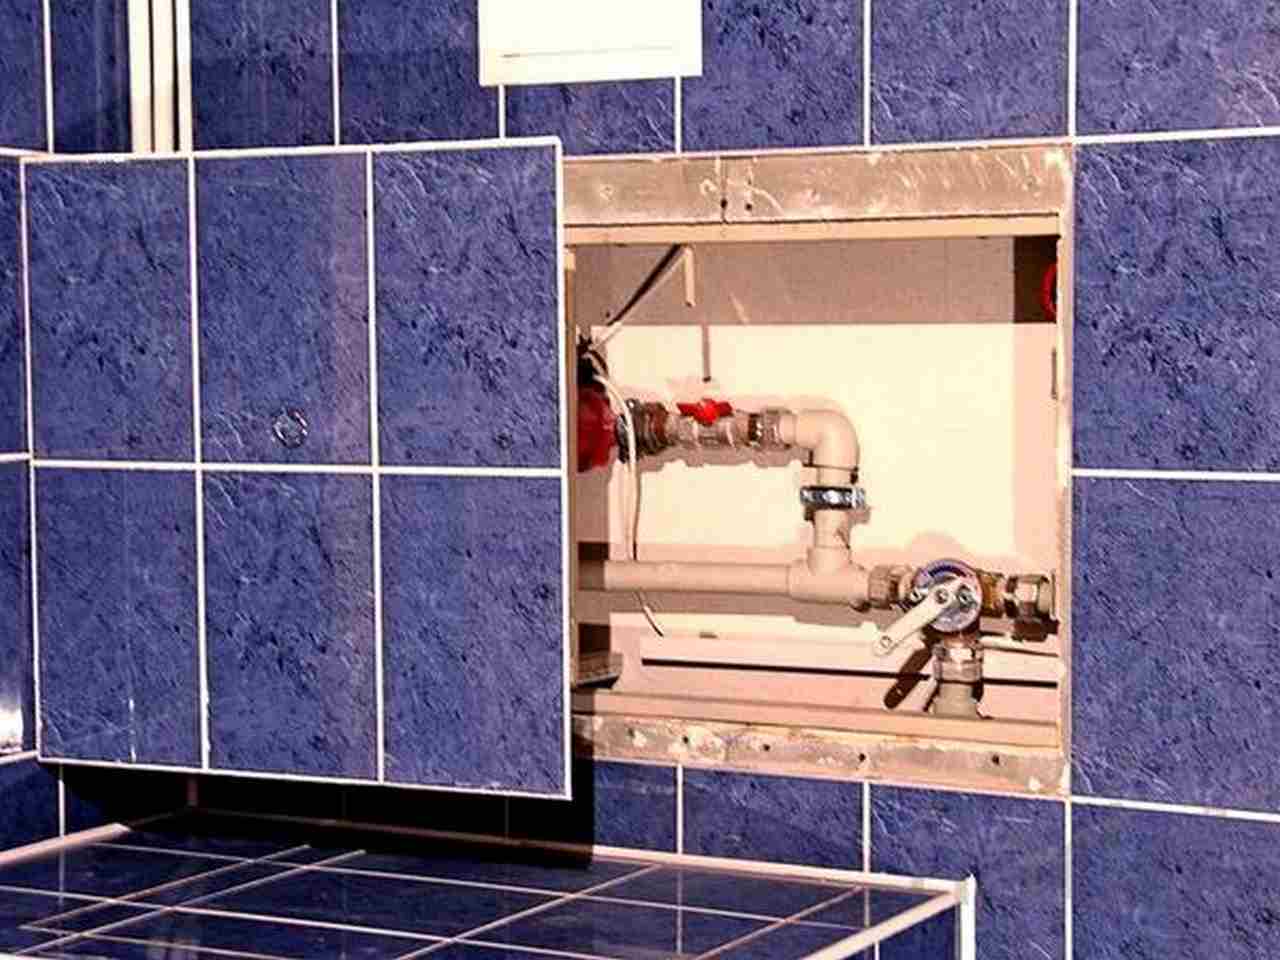
Installing an invisibility hatch under the tile
When the renovation in the bathroom is done according to the latest building technologies, all communications are removed under a layer of decorative coating. In order to gain access to important components of the system, taps, valves and accounting points, inspection hatches are installed under the tile. Undoubtedly, in some cases, you can get by with an external, overhead device with a plastic or metal door.
Plastic hatches are easy to install - some samples just need to be glued with liquid nails to a hole in the surface covering the niche. The appearance of such a design is unlikely to become an ornament or highlight of a modern renovation. The invisible hatch under the tile is the solution that we will talk about today.
Preparatory work
Before you install an inspection hatch under the tile, it is important to correctly determine its type and design. What revision devices are, you can find on our website. Now something else is important: how free is the space at the place of the proposed installation, do you plan to change the decor of the room in the near future. If so, will opening the inspection device door become a problem later on?
If the room is spacious, you can try to mount the invisible hinged hatch under the tiles with your own hands, or with the help of professionals. Immediately stipulate: the door opens to the right or left. But, if necessary, the structure can be deployed in such a way that it will open down, or even up - according to the situation.
In cramped conditions, choose a sliding sunroof. When opened, it will move forward a little, and then move to the side, parallel to the wall.
If communications are laid in an already existing niche equipped during the construction of the building (old apartment buildings), we select the revision device, starting from the size of the niche. We install a frame of profiles to which the frame of the device will be screwed. If the niche differs in size upwards, then its walls must be plastered. As an alternative, fix the frame with wedges, and then fix it to the wall with dowels.
When choosing the size of the hatch, pay attention to the dimensions of the tile. Ideally, for complete "masking", solid, not cut tiles should be glued to the door.
Tools for the job
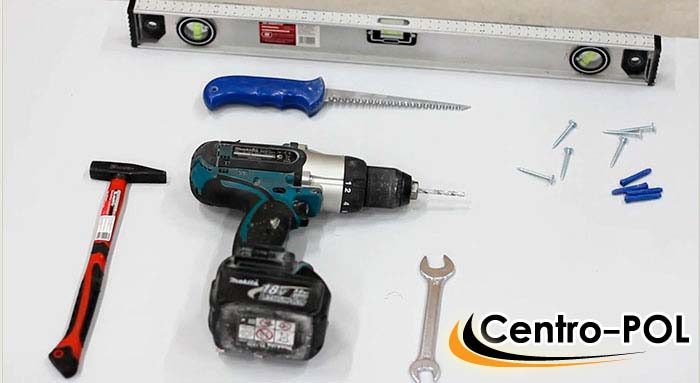
If you have already purchased a ready-made structure for installation in an inspection opening, first of all, you need to prepare the appropriate tools and materials, namely:
- adhesive composition;
- rubber and notched spatulas;
- dividing crosses;
- grout mixture;
- drywall sheets;
- self-tapping screws and dowels;
- building level;
- marking pencil;
- finishing tiles for facing the sash;
- knife for cutting drywall sheets.
Installation work
How to install an invisibility hatch under the tile? Let's break it down into four steps:
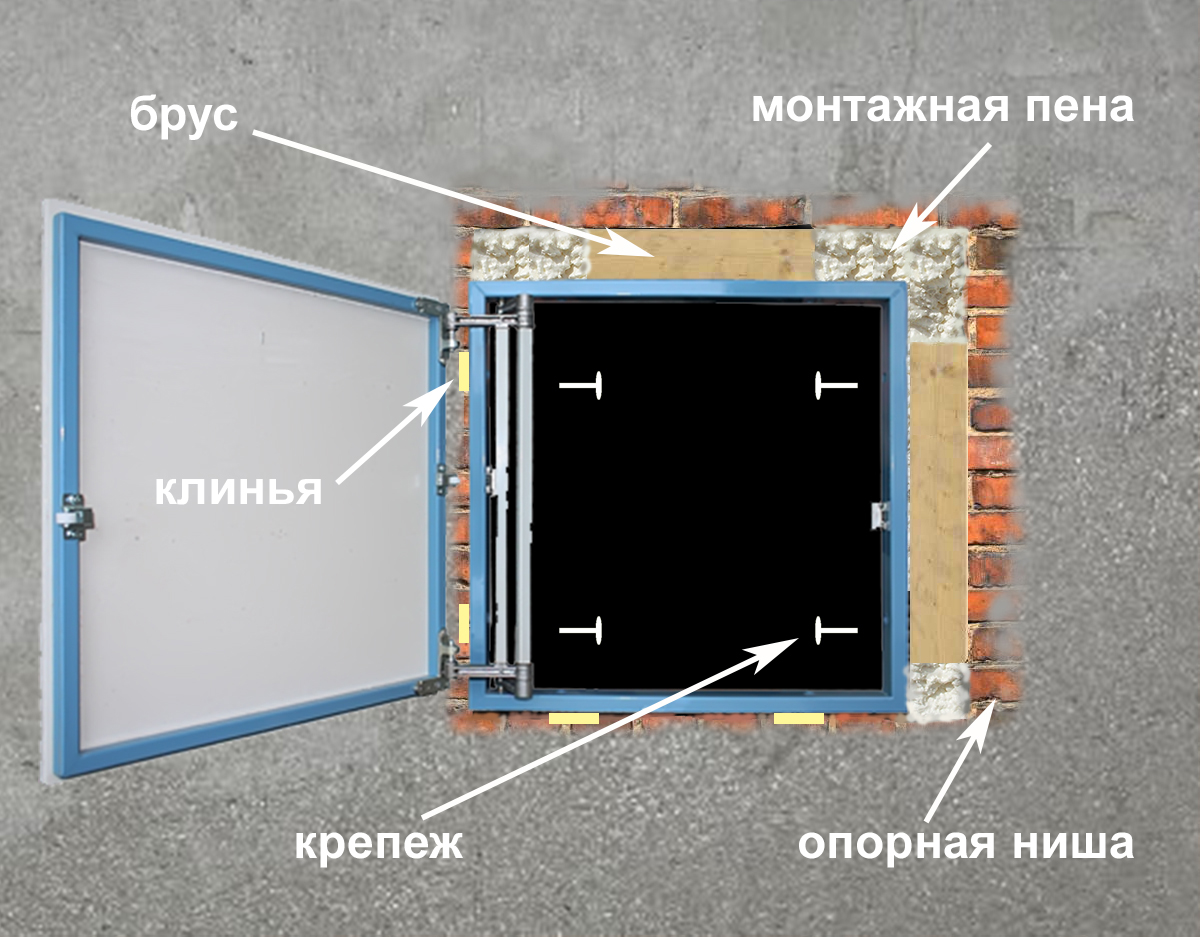
- Base mounting. We assemble a frame from metal profiles. You can make two mortgages - on the sides. But it will be more reliable to fix the future structure from all sides, so it is advisable to install the profiles also from above and below. If the frame is placed tightly in the opening, it can be fixed directly to the wall by filling the gaps with mounting foam.
- Installing the hatch under the tile. Holes are drilled in the frame, through which it is either screwed to the profile frame with long screws, or to the wall with dowels. Light structures can be fixed at three points: 2 on the side of the hinges and 1 on the opposite side. The more massive the door with the decorative elements glued to it, the more attachment points there should be. Heavy devices are fixed in 8 places. The installation of a small-sized sanitary hatch under the tile is assembled, and if the dimensions are large, the door is attached after the frame is installed. The most important thing at this stage is the most accurate match of the levels of the surfaces of the wall and the door on which the tiles will be glued. If the wall is already decorated, then the door should be recessed to the thickness of the decor layer. After making sure that everything is set coaxially, we tighten all the screws and fastening bolts. Adjustment of the invisible hatch under the tile is carried out after the door is hinged. To do this, there are adjusting bolts, which, after adjustment, are fixed with special screws.
If you need to install an invisible hatch under the tile on a niche that will be covered with drywall, we do the following. We install metal profiles on which the sheets will be attached. In the right place, we install the jumpers in such a way that they form a frame on which the invisible hatch will be mounted. We screw the frame with long screws through the holes drilled in it in advance. We fasten drywall to the profiles and align the hatch so that its door is flush with the skin. If the niche is already sheathed, the frame can be screwed directly to the drywall with long screws, after marking and cutting through the window.
- Decorating with tiles. At this stage, we prime all surfaces on which the tiles will be laid. We close the hatch door, having previously hung a load on it from the back side, equal to the weight of the decor that will be pasted. The tile should protrude beyond the dimensions of the door by 5-50 millimeters. The ideal option is 25-30 mm. However, in any case, we must observe the condition - two-thirds of the surface of the tile must be in contact with the base, otherwise it will not hold.
We distribute the adhesive mixture with a comb and stick the tiles on the device, leveling the gaps with plastic crosses. Next, decorate the rest of the wall. After the glue has set, dismantle the counterweight and check the position of the hinges. If necessary, they must be adjusted again.
- Seam grouting. We stir the grout and fill all the seams with a plastic spatula, with the exception of those located along the perimeter of the hidden plumbing hatch. On both sides of this gap, glue masking tape on the tile, as close as possible to the edge. We fill this seam with a special silicone sealant of the same color as the grout.
We apply the sealant in such a way that the gap is filled as much as possible and a tubercle forms on top. When finished, remove this excess with a rubber spatula, remove, starting from the bottom, masking tape and let the grout dry.
The next step - after two days we take a wallpaper knife and carefully, preferably in one motion, cut through the silicone to the full depth. holding the blade at a 45 degree angle. Carefully open the doors and clean the tiles from excess sealant. If there are any difficulties, on our website you can find a video demonstrating the installation of a hidden hatch under the tiles in practice.


