Bicycle and car made of paper. A bicycle and a wheelbarrow made of paper How to make a bicycle out of paper with your own hands
This article contains several master classes on making a bicycle quickly and easily with your own hands from scrap materials with step-by-step photos and videos. This product will serve as an excellent element of home decor and will be the subject of surprise and admiration for all guests.
Making the “Flower Bicycle” composition with your own hands
To create this decorative composition we need:
- A decorative bicycle, which you can purchase in a specialized store, or you can make it yourself, following master classes from the Internet;
- Corrugated paper;
- Styrofoam;
- Toothpicks, glue, glue gun, thread or wire for attaching flowers;
- Decorative elements: tulle, bows, beads, ribbons, homemade beaded flowers, sisal;
First you need to make a small bouquet of flowers from corrugated paper. To do this, you need to cut out a rectangle measuring five by seven centimeters, fold it in half, round one edge and carefully stretch it.
Now you can start making the petals. You need to cut a strip of paper measuring ten by five centimeters and fold it in half twice. Then you need to cut out a petal of the same shape as shown in the photo below, and tuck it a little using an ordinary pen. Next, these petals need to be attached to the bud and secured with wire.
Flowers can be made of any shape and size, and when you have a sufficient number of them, you can begin creating the composition itself. The bottom of the wicker bicycle basket needs to be filled with a piece of foam plastic and flowers made of paper and beads must be secured to it using toothpicks. You can also add green sisal and various elements in the form of decorative bugs and butterflies. Our flower beauty is ready!
Making a bicycle from cocktail straws quickly and easily
To make such a beauty you will need some scrap material and a few hours of free time.
Tools and materials to create this product:
- Straws for cocktails;
- Disposable plastic cup;
- Scissors, toothpicks, cotton swabs, tape;
- Threads, bandage.
For greater clarity, this master class is presented in video photo instructions.
In this master class we will show you how to make an original flower pot with your own hands.
A flowerpot in the shape of a bicycle will be a very unusual decoration for your home or a gift for family and friends.
To create such a beauty with your own hands we will need:
- Wire two to three millimeters wide;
- White tape;
- Four white buttons;
- Moment glue or glue gun.
First, you need to make three circles of different sizes from wire and wrap them with tape. Now you can add curls to them and secure them well.
The same curls should be used to decorate the entire bicycle.
The next step will be to create a basket for our bicycle. It is made using the same technology as the bicycle itself and secured with glue.
All that remains is to make flowers from candies and decorate the product with them.
We create a very cute decorative bicycle with our own hands

To create such a miracle we will need:
- Several cardboard blanks;
- Small wooden stick;
- A piece of thread, toothpick;
- Scissors, glue.
First you need to make a cardboard basket. To do this, you need to glue cardboard strips to the bottom of the product, as shown in the photo below.
And then weave them into a basket.

Using the same method, only without weaving, you need to make three wheels.
Next you need to take a small wooden stick, two strips of cardboard and a thread and use them to make a fork for the future bicycle.
The parts that came out at the end need to be glued together.
The bicycle handlebar is made of cardboard and thread, and is also decorated with some decorative element.
This is what the output should look like:

Let's make a decorative flowerpot-bicycle from twine and aromatic coffee beans

For work we will need:
- Cardboard;
- Straws for cocktails;
- Leg-split;
- Coffee beans;
- Polymer glue;
- Scissors.
Using a compass, you need to draw circles on cardboard, as shown in the photo below, and cut them out using scissors.
Then these blanks must be wrapped with twine.
In the cocktail tube, you need to trim off the excess, leaving about two centimeters from the bend on both sides. You need four of these blanks to make one bicycle wheel. Next, each tube needs to be tightly wrapped with twine.
Now you can assemble the wheels, as shown in the photo below.

Then you need to take two tubes, stretch one, and cut off the top of the other and connect them as in the photo below. Two such blanks need to be wrapped with twine.
The steering wheel must be created by cutting off the upper part of the tube, leaving two centimeters before the bend and three after it. Wrap them with twine.
The next blank for the steering wheel is an eleven-centimeter long tube wrapped with twine.

The wheel should be decorated with coffee beans. It is necessary to insert two blanks into the front wheel and secure them with polymer glue.
You need to insert a straight tube between the rear wheels and secure it with glue.
A piece of tube must be inserted between the upper ones. And wrap the place where they are attached with twine.
The role of a flowerpot here will be played by an empty jar. You can decorate according to your taste.
Video on the topic of the article
At the end of this article there is a selection of thematic videos on how to make a topiary with a bicycle, make a cute cradle for this type of transport, or design your own composition in the steampunk style.
The master class is designed for students in grades 3-4, teachers and parents.
Target: for interior decoration, original packaging for a gift.
Necessary materials:
3. scissors
4. stationery knife
5. ruler
6. cocktail straws
7. glue “Moment”
8. compass
9. double-sided tape
Progress:
1. Cut out 3 circles with a radius of 5 cm from cardboard. Inside each circle with the same center, draw a circle with a radius of 4 cm and carefully cut it out with a stationery knife. We get 3 wheel blanks.
.jpg)
2. Glue thin strips of double-sided tape to each workpiece on both sides, wrap it with twine, and glue it.
.jpg)
3. Take 4 tubes, bend them and cut them so that the resulting corner has 2 cm sides. Each wheel requires 4 corners (12 corners in total).
.jpg)
4. Wrap the resulting corners with twine and glue them.
.jpg)
5. Insert the corners into the wheel blank and glue the joints.
.jpg)
6. We get 3 wheels.
.jpg)
7. Take 3 more tubes. From these we will make a frame for a bicycle (we must make 2 blanks). The length of the first piece is 11 cm, and the second is an angle (insert the tube into the tube and glue it) with sides equal to 20 cm.
.jpg)
8. Wrap the resulting parts with twine and glue them.
.jpg)
9. Take the first part (axle) and insert it into the central holes of the two wheels. We glue the joints.
.jpg)
10. We thread the second part into the third wheel (it will be the front one), clamp it and pull it behind the wheel with twine. We connect the ends of the part and glue them to the axle and two wheels.
.jpg)
11. Take 4 more tubes. Let's make a steering wheel. We cut two from the short end, leaving 3 cm. From the other two, we will leave only the bend, the sides of the corner should be 1.5 cm each. We insert the corners into the short sides of the first blanks.
.jpg)
12. We wrap the resulting parts with twine, connect them together (we wrap the twine tightly in the middle of the long sides) and glue them to the front wheel.
.jpg)
.jpg)
.jpg)
14. Or as a stand for a gift (this is a slightly different bike).
.jpg)
15. You can make a composition from several crafts.
.jpg)
.jpg)
Thank you for your attention!
Decorative bicycle made of twine and tubes. Master class with step-by-step photos
Handicraft master class “Bicycle Pots”
Kotlyarova Olga Yuryevna, teacher of additional education, MAOU DOD "House of Children's Creativity" of the Leninogorsk Municipal District of the Republic of Tatarstan.Master class for senior students, teachers and parents.
Purpose of the master class: interior decoration, souvenir for family and friends.
Friends, I suggest you make a decorative flowerpot for all your loved ones for calendar and family holidays.
I will ride the bike for a long time.
I’ll stop him in the remote meadows.
I’ll pick up flowers and give you a bouquet,
To the girl I love.
I’ll pick up flowers and give you a bouquet,
To the girl I love.
Target: teach how to make flower pots and bicycles from waste materials.
Tasks: expand knowledge in the field of decorative and applied arts, development of creative potential, formation of environmental and aesthetic culture when working with waste material.
Detailed description of the master class “Powerpots - bicycle”.
Necessary materials:
- twine thread
- thick cardboard
- pencil
- cocktail straws
- glue "Titan"
- coffee beans
- scissors

Progress:
1. Take thick cardboard, attach an object that is very similar to a wheel (for example, a reel of adhesive tape), trace it, cut it out. For one wheel you will need 2 pieces of cardboard, they need to be glued together. You need to make 3 of these bases for the wheel.

2. We wrap all the blanks with jute twine.

3. Take a cocktail tube, measure 2 centimeters before and after the bend, cut it off - these will be the bicycle spokes, this is necessary for the stability of the structure. For one wheel you will need 4 blanks. Since there are 3 wheels, 12 pieces need to be made. Then wrap all the pieces with twine.

4. Glue 4 blanks wrapped with twine together using Titan glue, like this.

5. We insert this structure into a circle of cardboard wrapped with twine. The wheel is ready. A bicycle will need 3 of these wheels.

6. Take whole coffee beans and glue one side of the back of a bicycle wheel.

7. Take a cocktail tube, measure 2 centimeters before the bend and 3 centimeters after the bend, cut it off. We will need 2 of these blanks for the steering wheel. Now they need to be connected to each other.

8. We wrap the resulting steering wheel with twine.

9. Take 1 cocktail tube, measure 11 centimeters, such a blank will fasten the rear wheels together.

10. We decorate the edges of the steering wheel that we have and the parts for fastening the rear wheels with small coffee beans.

11. Take one tube, bend it and stretch it where the bend is. You need to cut the tube on the short side, spread a drop of glue and insert the piece left over from the blanks for the wheels into it.


12. We wrap the resulting structure with jute twine. You will need 2 of these blanks.

13. Let's start assembling the bike. We insert a straight tube into the rear wheels using Titan glue.

14. In the front wheel, insert the blanks from points No. 11,12. We glue it for strength. We decorate the front wheel on both sides.

15. We insert a piece of tube 2 centimeters long between the upper tubes and glue it.

16. We wrap what happened with twine.

17. Take a container that will directly serve as a flowerpot (for example, yogurt, butter). Wrap with twine and decorate with coffee beans.

18. Glue the steering wheel and flowerpots. We insert artificial flowers into the flower pots. The flowerpot in the shape of a bicycle is ready.


You can place any flowers you like in the pots, both artificial and real.
To make it I needed:
Bamboo skewers (you can use toothpicks):
- glue (hot gun);
- cardboard;
- tubes made of office paper;
- threads;
- ruler, scissors and pencil.
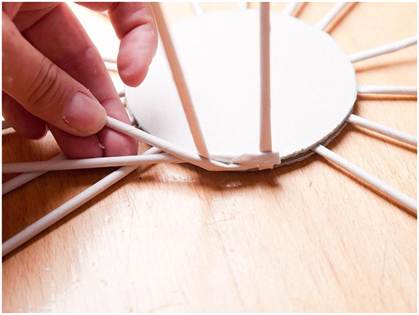
1. I started the process by making wheels. For each wheel, you need to cut out two small circles from cardboard and cut 8 sticks of the same length from toothpicks. Glue the sticks in a circle onto the cardboard circle, and glue the second one on top.

2. Cut out a thin strip-tire from cardboard, it can be decorated with corrugated cardboard, and glue it to the sticks.
3. Next is the steering wheel. Take the wheel and glue tubes of office paper to it on both sides symmetrically (you need to twist them into half a sheet). From above, at a distance of 3-4 cm, tie the tubes together with a thread and separate the ends in the form of a steering wheel.

4. Glue the crossbar for the rear wheels into the steering column (shown in the photo), then bend them parallel to the floor and glue three more tubes across. The remaining two wheels are attached to the middle tube.
5. For strength, it is better to tie all the elements together with rope. You can decorate according to your taste. I wove a basket for a bicycle in which you can put sweets.
In addition, I also add photographs of the car making process.
Craftswomen always want to decorate their home in some way. Embroidery, knitted items, various decorative details. We invite you to familiarize yourself with ways to make a bicycle with your own hands, which can serve as the highlight of your home.
From twine
We will need:
- leg-split;
- cardboard;
- pencil;
- cocktail straws;
- a container for the future pot (from yogurt, for example);
- glue “Titan” or “Moment”;
- coffee beans;
- scissors.
We cut out the bases for the wheels from cardboard using a compass or other round objects. It is necessary to make 6 such blanks, two for each wheel.

Having glued the pieces together in pairs, we wrap them with twine.

We make spokes for wheels from tubes. To do this, measure two centimeters from the fold in both directions. There are four of these parts for each wheel. We wrap them with twine and glue them together with Moment or Titan glue.


Now we place the spokes in the wheels and fasten them with glue.

We decorate the rear wheels with coffee beans, as shown in the photo below.

We take the next tube and cut off 2 centimeters from the fold in one direction and 3 cm in the other. We make another such part. We connect them to each other with the long sides. This will be our steering wheel. We also wrap it with twine.


Cut off a part of the tube without a bend, 11 centimeters long. Wrap it in twine. This blank will connect the rear wheels of the bicycle.

Now we cover the ends of it and the steering wheel with coffee beans, which we set on glue.

We take a new tube, fold it and stretch it. We make a cut on the side of the short part, put a drop of glue and insert it into the segment that remains from previous work.


We need two such blanks. We also wrap them with twine.

We insert these long blanks into the front wheel, as shown below, and decorate the wheel with coffee beans on both sides.

Between the ends that will be at the top, we lay a piece of tube 2 centimeters long, and close this place with twine.


We connect the rear wheels with a jumper.

Now we take the container that we have chosen for the future flowerpot and cover it with twine. We decorate the top edge with coffee beans.

Glue the steering wheel to the top bar and place the planter between the rear wheels.

You can leave the flower pots for all sorts of little things, but with flowers the bike will still look more harmonious.

Instead of a flowerpot, you can make a bicycle with a cradle and place flowers there.

From wire
We will need:
- wire with a diameter of 2-3 mm;
- white tape;
- buttons of the same shade - 4 pieces;
- glue, you can use Moment-Crystal or a heat gun.
We roll three identical circles from the wire, fold them together and wrap them with tape. It turns out to be a wheel. We need to make three wheels, one of which is large, and the other two are the same size.


Using the same principle, we make three curls in each wheel.


We make the frame and steering wheel in the same way.

Our bicycle will come with a basket, so we’ll assemble that too.

We attach the basket between the rear wheels. And now our bike is ready. If we place a composition with candy flowers in it, it will be a wonderful gift. You can see how to make such flowers in the video below.

From a three-core cable

Prepare the following materials and tools:
- three-core cable, always soft - 1.5 meters;
- wooden skewers;
- small blocks of wood;
- cotton wool;
- brown and white paint;
- coffee beans;
- threads;
- newspapers or office paper;
- cardboard;
- drill;
- silicone hot glue;
- screws;
- small flowerpot made of plastic or ceramic;
- satin ribbons and decor as desired.
We cut three sections from a three-core cable: one larger for the front wheel, two smaller for the rear. Pull out the blue wire from the middle. And using a piece from it and glue, we connect each piece of cable into a ring.


Using a drill, make a hole in a wooden block and wheel. Connect using a skewer.

Such holes must be made according to the number of spokes. The result is a design like this.

We connect two wheels. We bend the wooden block in the middle with another piece of cable and secure it with a screw.

We decorate the flowerpot and attach it to the frame of the front wheel with a screw.

We make a steering wheel from the blue middle wire.

All parts must be painted white, and the cable joints must be covered with satin ribbon.

We glue a piece of cable to both rear wheels.

We tie a bow made of ribbon 0.5 cm wide onto the steering wheel.

For the basket, cut out a circle from cardboard and place it between two wheels.

We cut out two more similar circles and attach newspaper tubes to one, these will be our stands. How to make them, see the video below.

Cover with the second circle and lift the racks up. Let's start weaving our basket. When it is ready, we attach it to the prepared platform. You can use glue or screw it on.

Now let's start making our topiary. We attach a ball of crumpled newspaper to the blue wire, folded in half. We cover the newspaper with cotton wool, then tie it with thread and paint it with brown paint.


Cover the ball with coffee beans. We install polystyrene foam or pour plaster into the basket and install our coffee tree. The trunk can be previously covered with tape or thread.

So that the inside of the basket is not visible, we fill it with artificial plants and twigs for decoration.

We also decorate the pot on the steering wheel as desired.
These beautiful compositions can become a decoration for your home or part of a gift. Such bicycles can be decorated in any way you like, for example, in Provence, steampunk style, decorated with beads, rhinestones, ribbons, etc.
Video on the topic of the article


