Connecting the electric stove to the three-phase network. How to connect an electric stove to a household single-phase network - a step-by-step instruction
In this article, we will consider the connection schemes for electric stoves, as well as practical guidance on how to install such a stove in-house. In addition, you can take help, and inexpensively order this service. But if you are used to doing everything yourself this article is for you. After thoroughly reading the article to the end, you will easily cope with this task.
All household appliances consume electricity, and naturally, when it comes to the electric stove, it is clear that the connection of such devices requires a mandatory grounding. At the moment, rosettes and plugs of the RSh-VSh standard are used in the market. These connectors have a grounding contact. These outlets are produced both at 220 V and 380 V. They were designed back in the days of the Soviet Union, and are used, to this day, however, time has made its own adjustments, modifying them for hidden wiring.
Summary of the article.
Preparing to connect the electric stove.
Take your time, before you start work on connecting your electric stove, you need to read the instructions that came with it, namely, to look at the power consumption and the options for wiring. And also be sure that all security requirements and connection rules will be met. To do this you need:
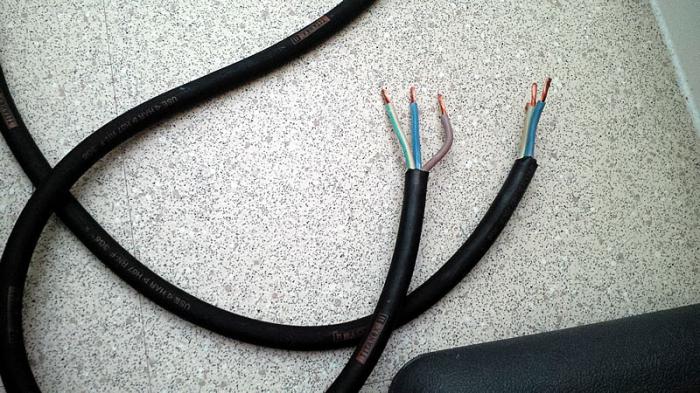
Check the power cable. It should go directly from the electrical panel and have three cores for connection to 220V or five cores for connection to 380V. A grounding conductor must be required, in any case.
Check the circuit breaker. For an electric stove, a separate automaton for 25-40A should be installed in the switchboard, depending on the number of phases in the cable that is connected to the plate. If on 220V, this is usually 32A. If the 380V is usually a 25A automatic.
Check cable cross-section. This item is mandatory for those who have an old house with an old one aluminum wiring respectively. The fact is that in some old houses electrical wiring is not designed for the power of modern plates.
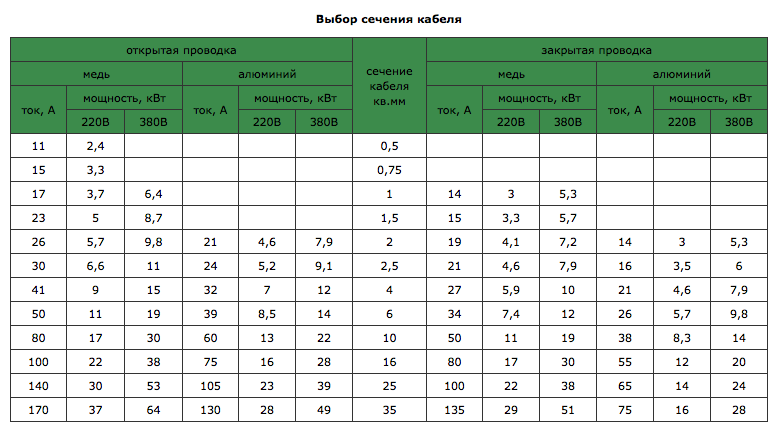
Table 1. To verify the conformity of the cross-section of the supply cable to the consumed power of the electric stove.
|
Cable cross section |
Copper wires |
Aluminum conductors |
||||
|
Current, A |
Electric cooker power, kW. |
Current, A |
Electric cooker power, kW |
|||
|
220V |
380V |
220V |
380V |
|||
|
12,0 |
||||||
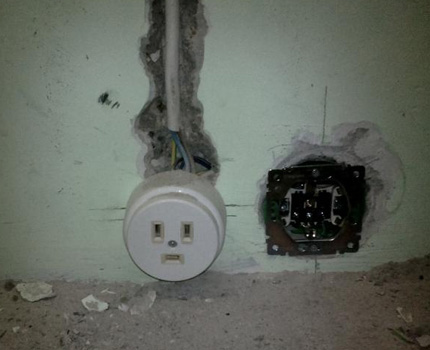
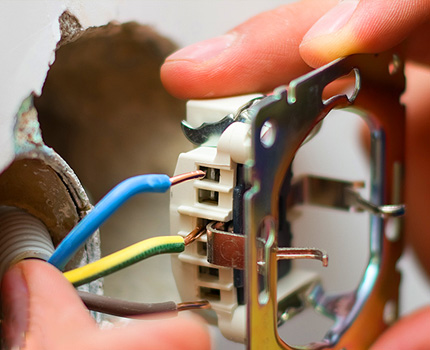
Check and mark the wires. Modern wiring makes this very easy, because the wires of the new sample differ in color, most often the ground wire is in isolation of green or yellow-green colors, zero blue, white, red, brown phase. Posting the old sample presents a difficult task, because all the wires in it are the same color, and therefore, to determine which wire is grounded, you will need to turn off the power supply in the apartment.
Next, using an ohmmeter, you need to check the wires, for this one probe needs to be fixed so that it touches the battery and water pipe, the second wire is checked. Resistance to grounding will be only a couple of tens of Ohms, while the remaining wires will show how much more resistance. In order to somehow distinguish the wires, you should mark them with multi-colored markers or a simple electrical tape, if it is at hand. If you have previously had an electric stove or a socket for it, a check is not required, since there is already everything connected up to you, at your terminals. Without wire testing and 100% detection of zero, ground and phase, the connection is prohibited.
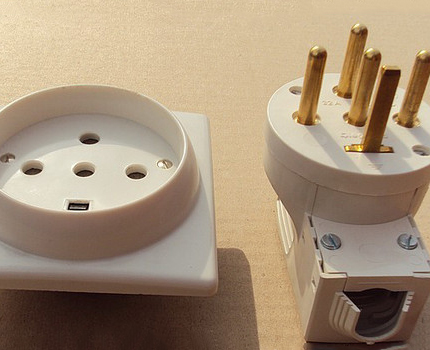
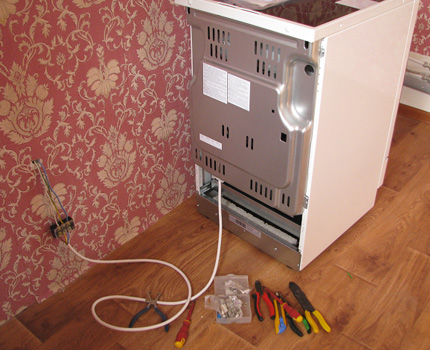
Sockets and cable for connecting the electric stove.
Depending on the chosen connection scheme 220V or 380V, we may need the following materials. Directly the socket itself, and a piece of cable. From the tool set of screwdrivers, knife, multimeter and indicator screwdriver.
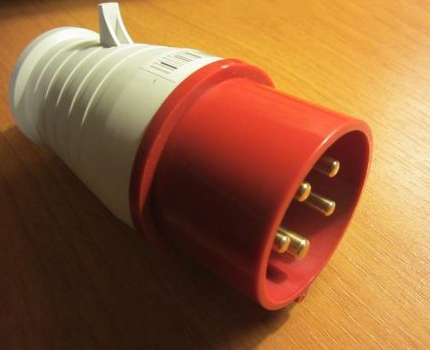
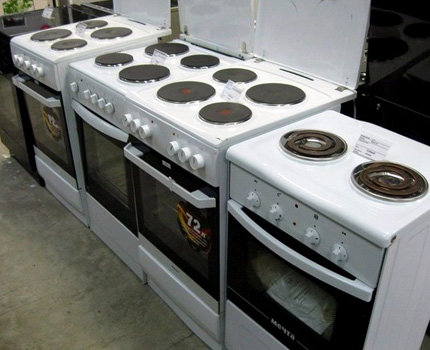
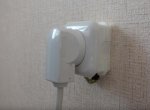
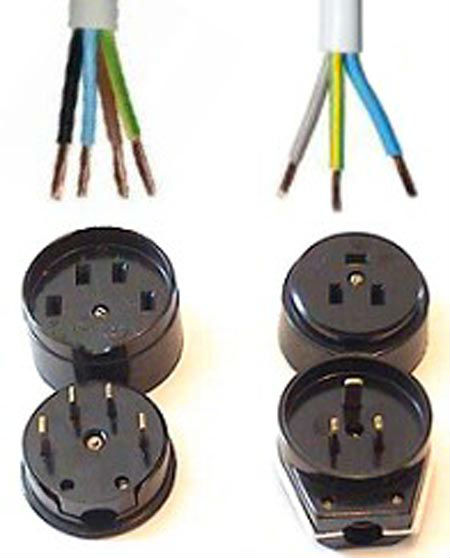
The choice of sockets for connecting the electric stove. The design of the finished pair completely and completely eliminates the possibility of an error in the connection of the electric stove. At the moment, Rosh-Shh sockets are manufactured in Ukraine, and this is bad for their quality. After all, they are designed to work with a power of 7 kW, while most of the electric stoves that are produced today are designed to work with capacities of 8-10 kW. Here we will benefit from the replacement of a pair of plugs and sockets, especially since in our time on the market there are remarkable sets of Belarusian production. They are made in modern design and are suitable both for domestic plates and for European ones, which most often do not have cords and plugs in the connection set.
Figure 1. Sockets for connecting the electric stove.
Belarusian connectors. The main advantage of the Belarusian connectors is the combination of their price and quality. Undoubtedly, they are more expensive than Ukrainian, but much cheaper than European counterparts. In their work, they withstand high power, and are designed to work more than 32A, in addition they are available in the market for both open and closed postings.
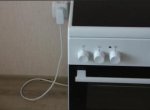
Connection via a box, without an outlet.
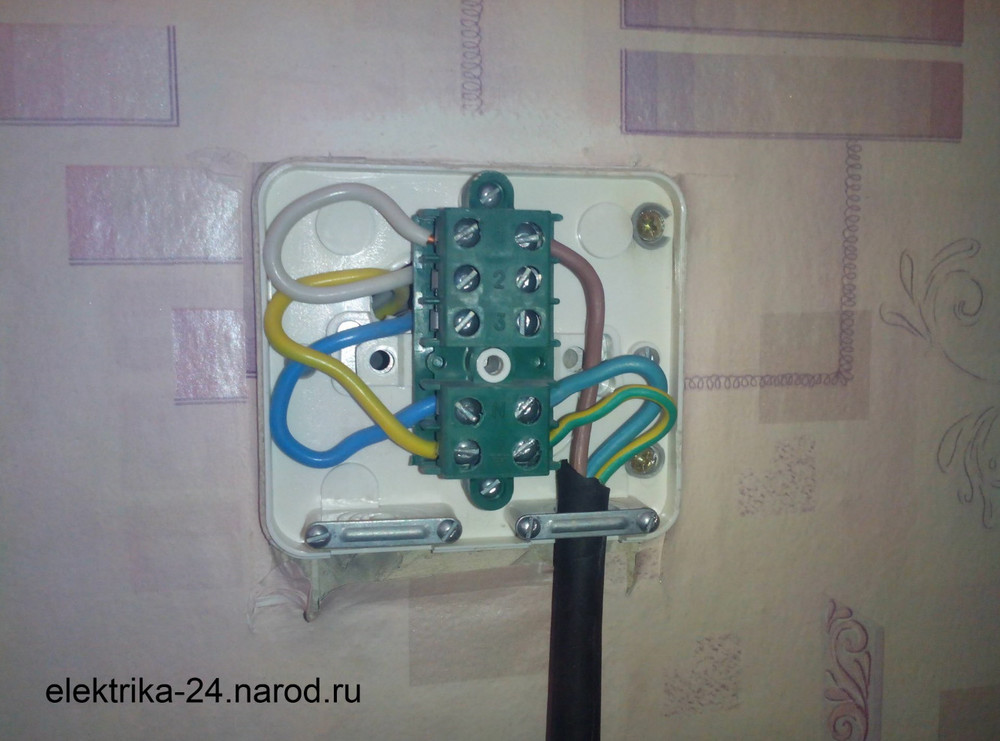
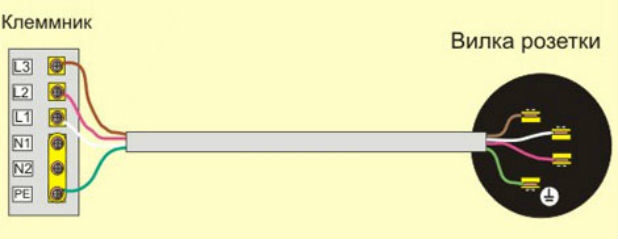
Figure 2. Terminal box for connecting the electric stove.
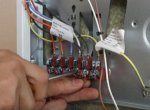
In modern homes, new buildings, special terminal boxes are increasingly used to connect electric stoves. This version of the connection is universal and unlike the sockets it is suitable for connection to both 220V and 380V.
In photo # 2, a three-core cable emerges from the wall and joins the corresponding contacts of the box (the contacts on the box are signed). Out of the box, a flexible (black) cable goes to the electric stove.
Choice of brand and cable section.
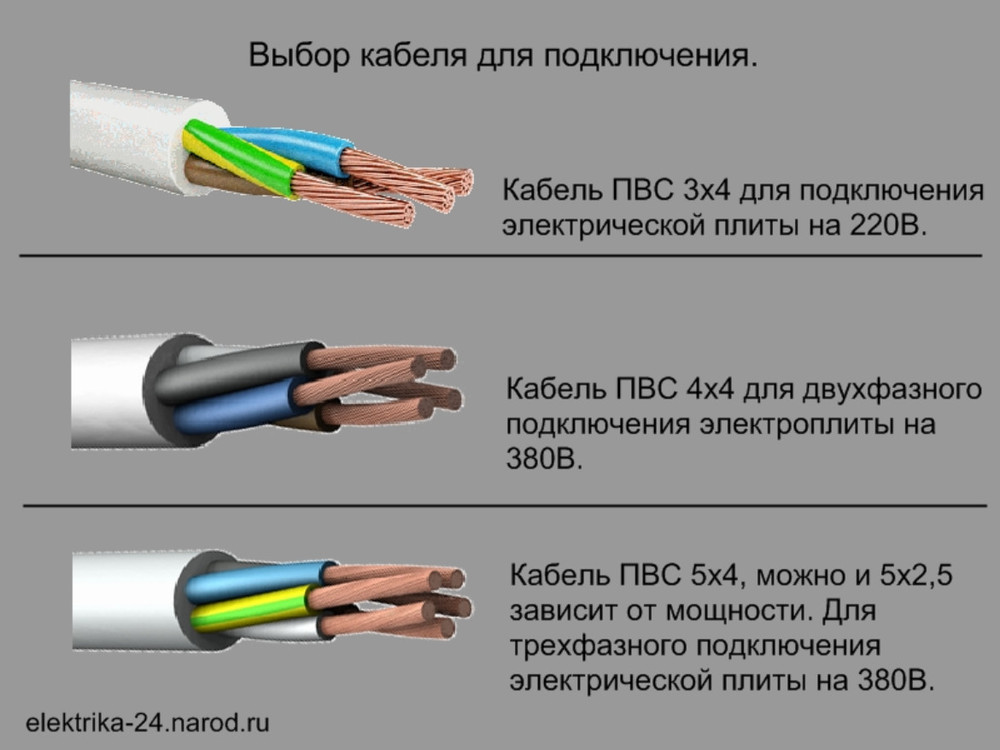
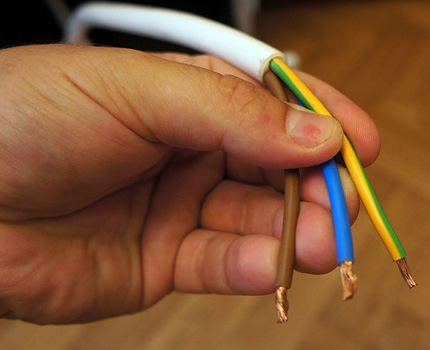
Figure 3. Cable for connecting the electric stove.
Cable selection. To connect an electric stove, we also need a three-core or five-core copper flexible wire length of 1.5-2 meters. I always take a cable of the mark ПВС-3х4 or ПВС-5х4. The first digit indicates the number of cores, the second digit is the wire cross-section.
Wiring diagrams for electric cookers.
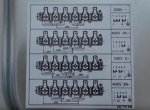
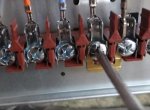
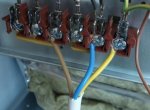
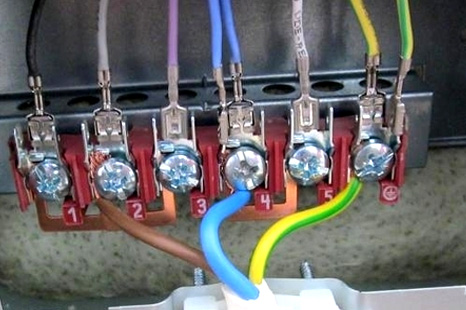
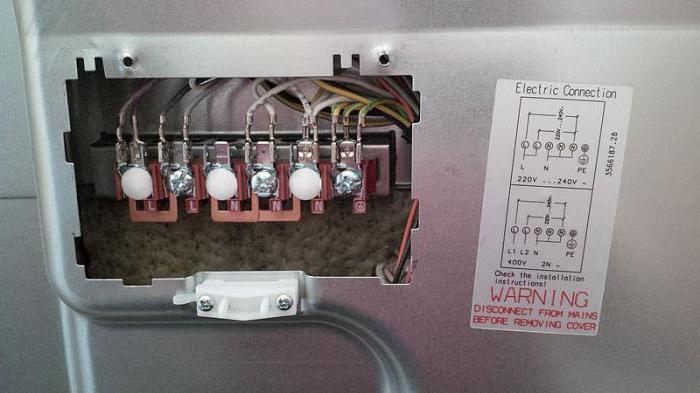
Typically, having removed from the back panel of the terminal cover, you will find not only a row of copper jumpers, but also a circuit of three variants of connection located next to it. They are designed for three-phase, two-phase and single-phase connection to the mains. Next, we will take a closer look at all the existing connection schemes.
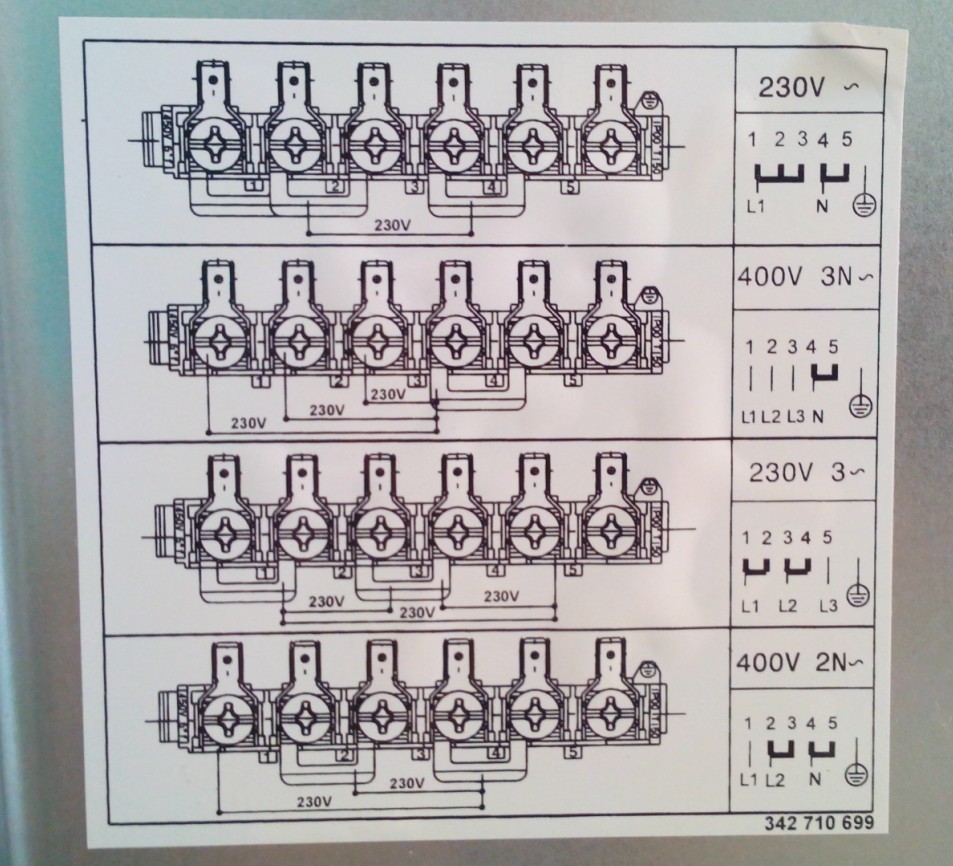
Figure 4. A sticker with options for connecting circuits for an electric stove. It is usually located on the back cover.
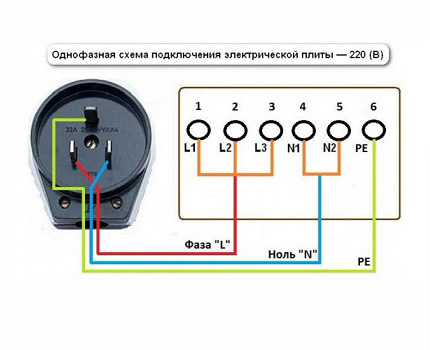
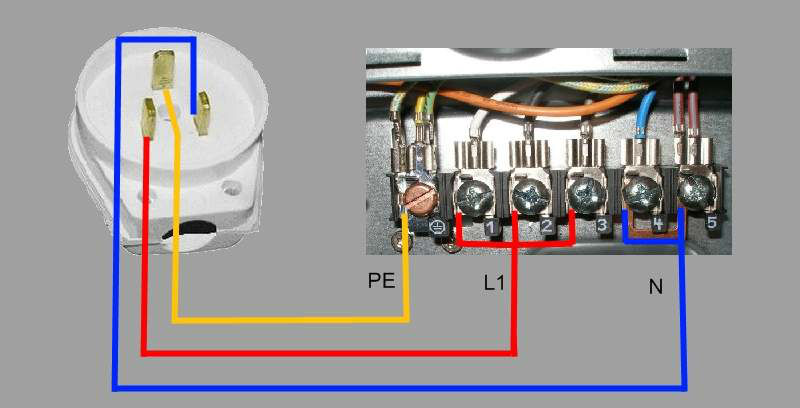
Wiring plan for an electric cooker at 220 V.
The most common option is to connect to a single-phase network. To do this, you need to install all jumpers in accordance with the figure. Namely, we put the two jumpers, which come in the kit, between the terminals 1,2,3 and connect the phase conductor L1 to them. Next, put a jumper between the terminals 4.5 and connect the zero wire N to them. There remains one terminal with the ground symbol, we connect the PE ground wire to it. It is desirable to observe the color marking, that is, to zero to connect the wire of blue color, to the ground yellow, green or yellow-green other colors to the phase contact.
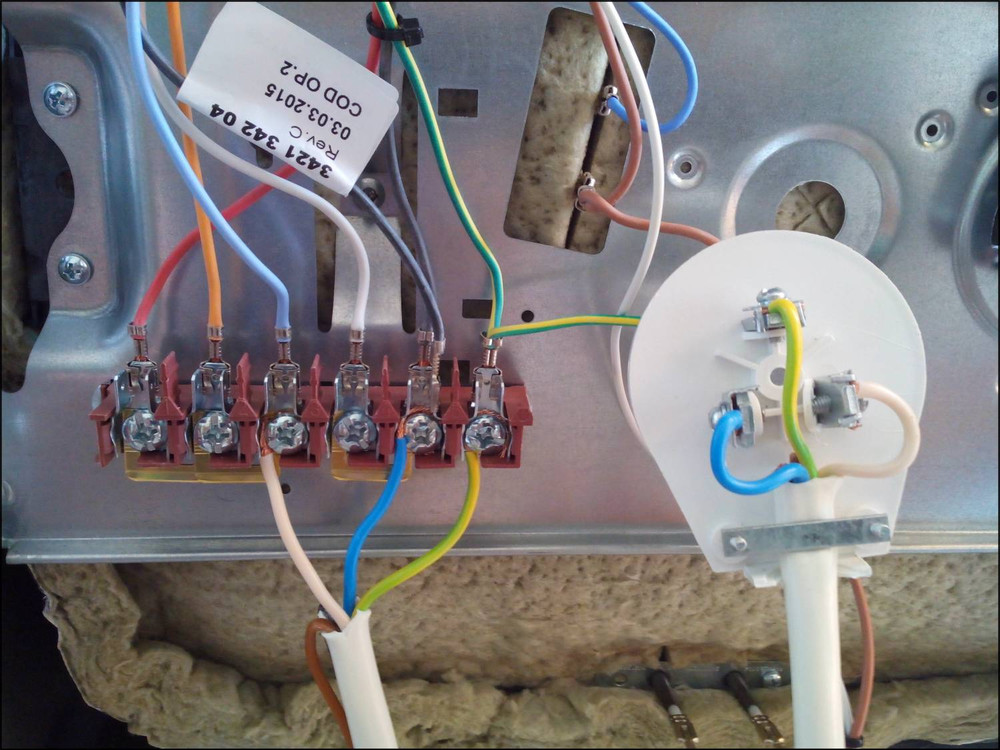
Figure 5.
Note that on different models of plates, the location of the grounding contact can be either on the right or on the left. Therefore, when connecting the ground wire, be sure to check the presence of a ground symbol near the contact.
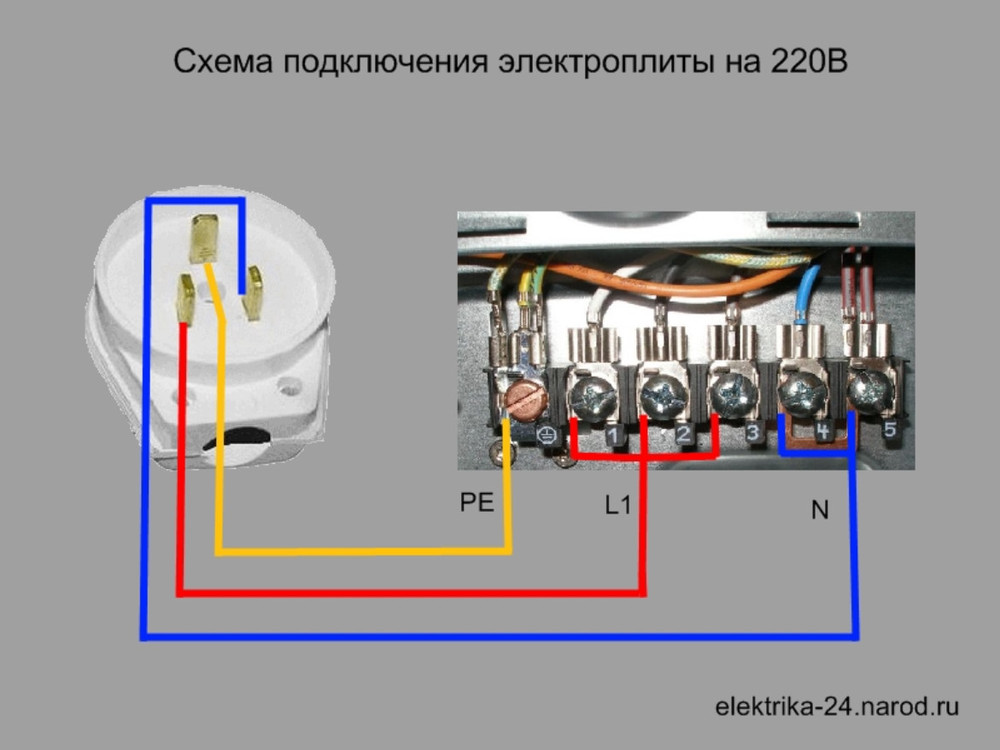
Figure 6.
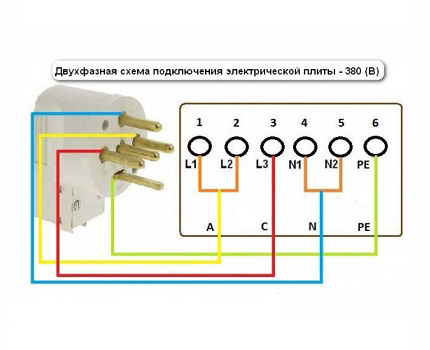
Scheme of connecting an electric stove at 380V.
There are two options for connecting three-phase and two-phase. It is preferable to choose a three-phase version for uniform load distribution. For a three-phase connection, you will need an outlet for 5 pins, and for a two-phase connection, you can purchase a socket for 4 pins.
Three-phase connection.
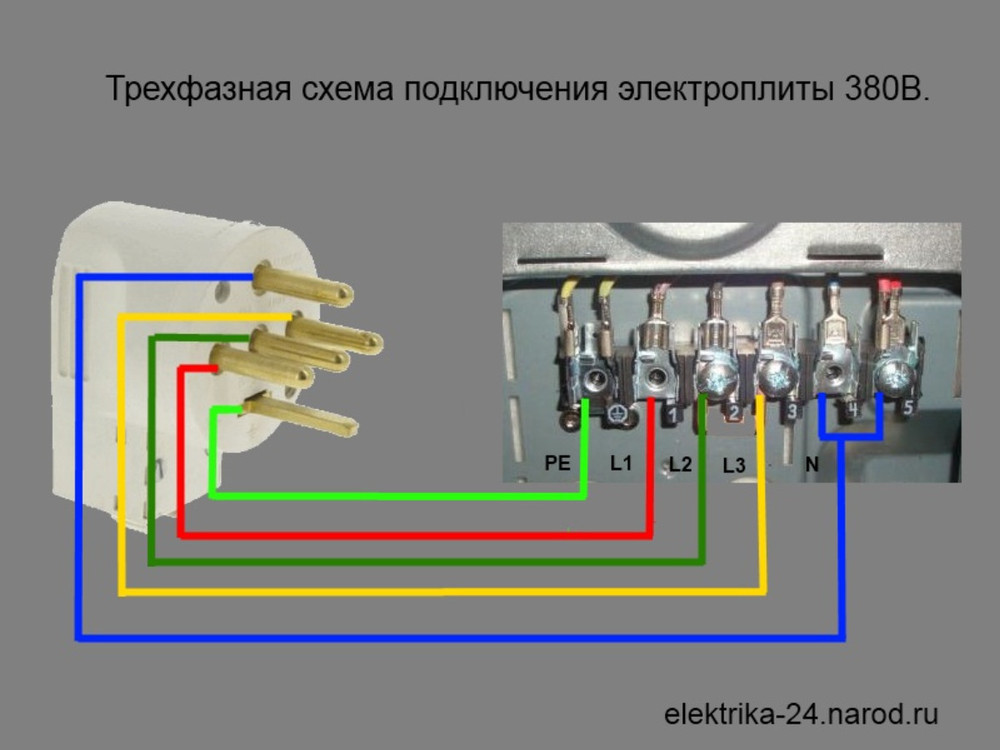
Figure 7. Scheme of connecting an electric stove at 380 V to a three-phase network.
Let us first consider a three-phase connection. Again we look at the circuit and in accordance with it we establish only one jumper between terminals 4,5 and connect the zero wire N. We then connect the phase conductors L1, L2, L3 to terminal 1,2,3. Connect the PE wire to the terminal with the ground symbol.
Two-phase connection.
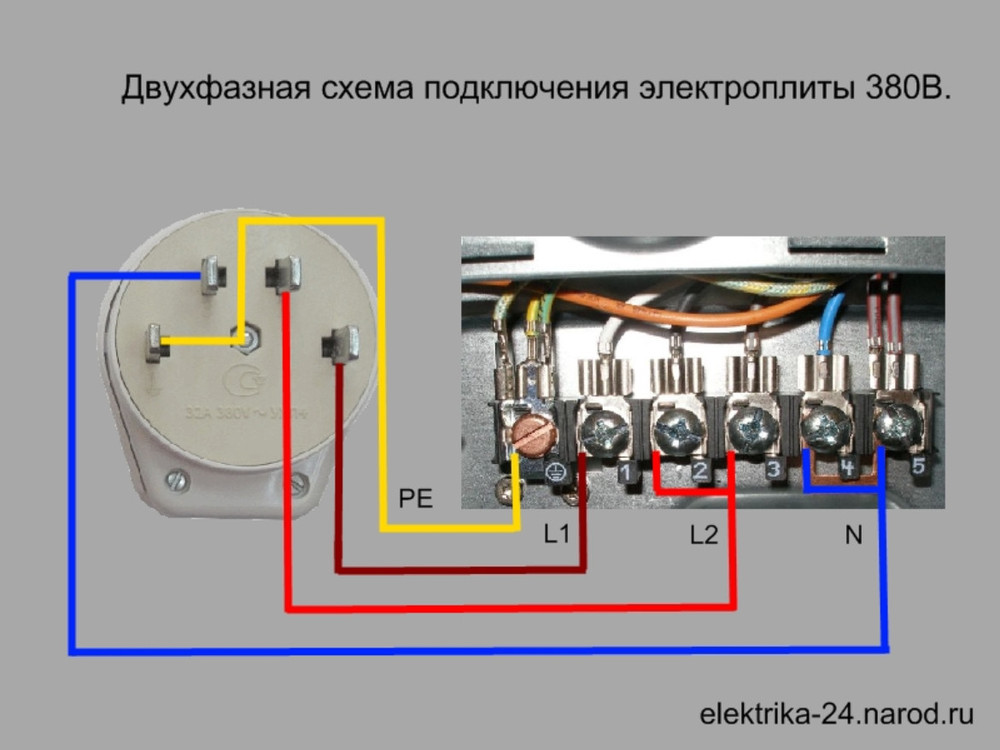
Figure 8. Scheme of connecting an electric stove to 380 V in two phases.
In accordance with the diagram, connect the phase conductor L1 to terminal 1, install a jumper between terminals 2,3 and connect the phase conductor L2 to them. We install a jumper between terminals 4,5 and connect to them a neutral wire N. The PE ground wire is connected to the terminal with the grounding symbol.
Attentive readers probably noticed in the picture that there is another option for connecting to three phases (on some models) without using zero. This option was created for America, in no case do not apply it in Russia. The fact is that in this circuit the mains voltage should be 110V.
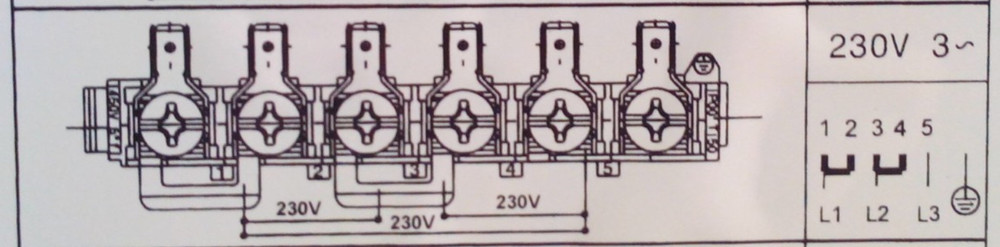
Figure 9. Three-phase connection diagram without using zero.
The final stage, verification.
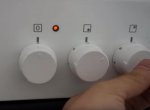
Before you turn on the electric stove in the outlet, you must turn on the machine and check the correct connection on the outlet. Verify with a test screwdriver that the phase wire is at the phase terminal. Check again that the plugs on the plug are connected, right. The resistance between the grounding contact on the plug and the plate body must be zero. After you can connect the plug and slowly put on the plate all modes of operation, in order to ensure that the wiring can withstand the load. That is, the machine does not turn off, and the cable does not heat up. So all good! You've done it!
The cooker, as practice shows, is more of a stationary device, and once you install it, you will not change its place every day or even once a week, and therefore there are schemes for connecting the electric stove directly, without a plug and socket. As a rule, in this case the electric stove is connected through a junction box with a carbolite or ceramic terminal board.
Video instruction for self-connection of electric stove.
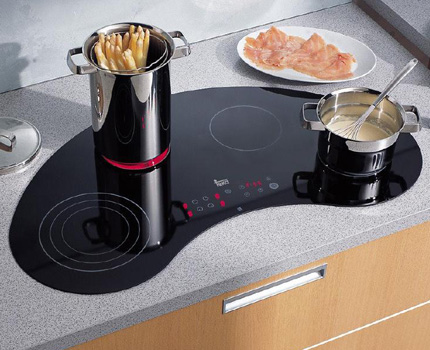
Today, in the world of electric cookers, glass-ceramic electric cookers, plates with induction heating and conventional electric cookers are produced. The connection of the electric stove is not different for all the plates and it is easy for many, without knowledge in the electrician. Electric plates can be connected to single-phase or three-phase networks.
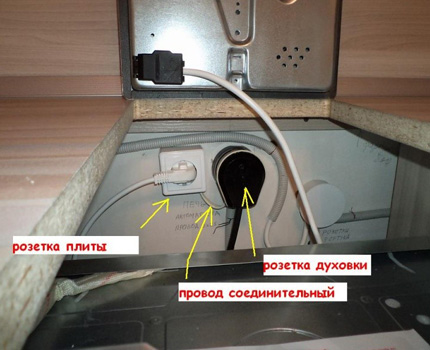
Type of terminal block for connecting the electric cooker
With a plate thickness of up to 3 kW, connect it through a fuse 13A and a plug with a socket also rated at 13A. If the capacity of the electric cooker is more than 3 kW, then it is connected via a separate cable from the input electrical board.
Correct connection of the electric stove with your own hands
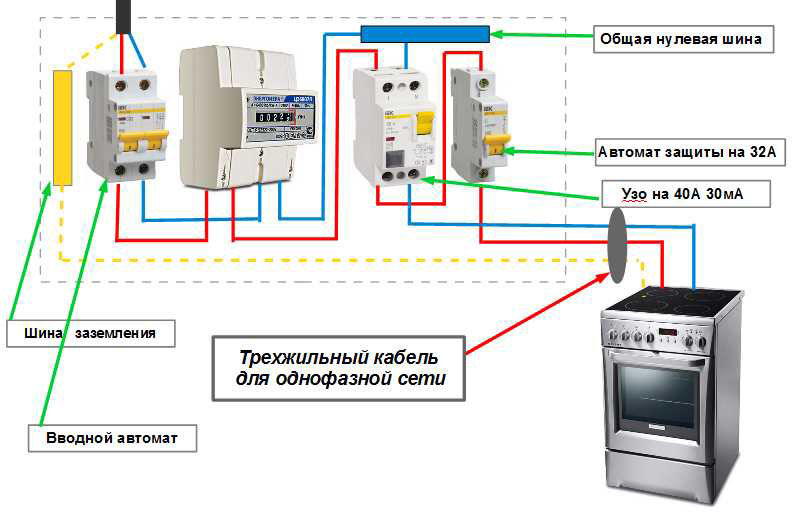
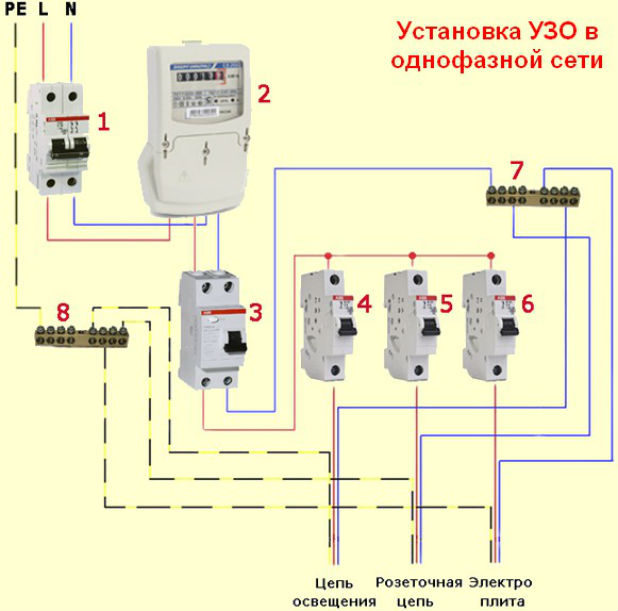
Before connecting, conduct a 3-core cable with a cross-section of 6 mm² from the access panel to the apartment board. For a single-phase network in an apartment panel, the introductory machine should be set at 40A. Another separate machine on the plate is put on 32A.
Next to the machine in the switchboard is installed a device protective shutdown at 32A with a trip current of 30 mA. With a three-phase network, a 3-pole circuit breaker and 16A current are to be placed, a 4-pole three-phase RCD at 25A and a tripping current of 30mA are installed side by side.

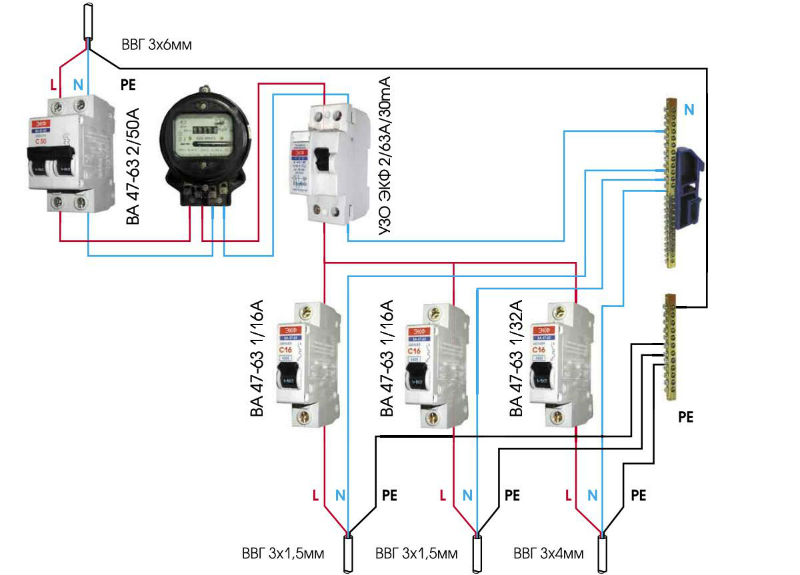
Wiring diagram for connecting an electric cooker to a three-phase network
Which cable and outlet for connecting the electric stove?
In the case of a single-phase network, a socket with a plug is taken at 32A with three contacts - this is the phase, zero and protective earth. If the connection needs to be made to a three-phase network, then use a 5-pin socket with a plug, designed to connect phases L1, L2, L3, zero and protective earth.
For a single-phase network, the cables are supplied with BBG grades - 3x6 - 3-core, copper-6 mm². In the absence of an electric pad on the electric stove, the cable is connected by soldering or by pressing. For a three-phase network, the cross-section of copper conductors of the cable is 2.5 mm² or more.
If the capacity of the electric stove is above 3 kW, the cable is installed through the cable channel from the apartment board to the electrical outlet. Use this cable for other purposes is prohibited. The rules for conducting electrical wiring in wooden house are different.
Options for connecting the electric stove with your own hands
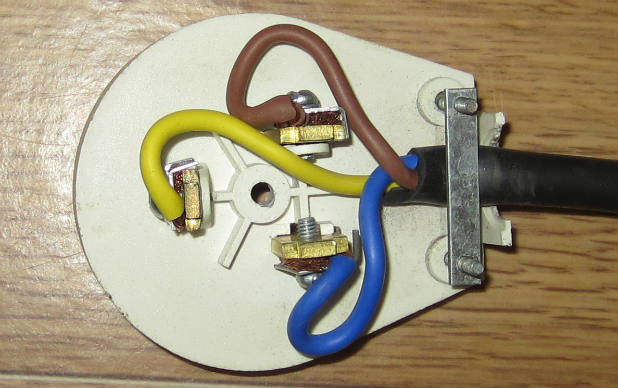
When connecting the power cable for an electric stove, it is necessary to observe the correct color marking of cores . For the neutral wire, blue, or shades of blue, are used, the yellow-green color of the wire is used to mark the protective earth PE. The phase wires can be painted in white, brown, black, as well as in red, gray and other colors.
Connecting an electric stove in a single-phase network
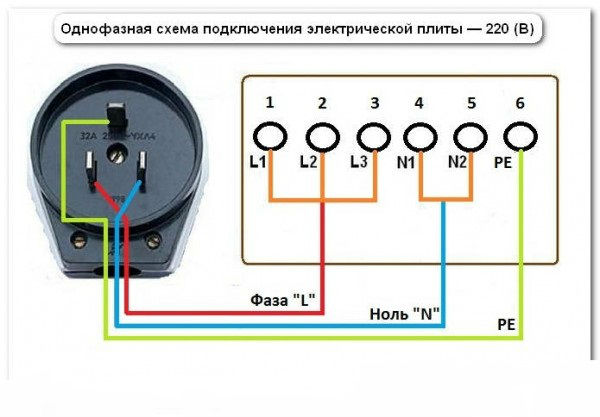
With this connection, all terminals marked L1, L2, L3 on the power supply board of the electric stove are short-circuited, i.e. put a jumper copper wire 6 mm².

Scheme of connecting an electric stove to a single-phase network
Terminals N1 and N2 are also short-circuited by a jumper and connected to the wire N, the PE terminal is connected to the protective ground. The PE terminal is always installed on the appliance body.
Electric stoves can be connected in 2 phases
According to the 2-phase scheme, the connection is made according to the scheme. Between the two phases L1, L2 screw the jumper and connect the phase conductor A, the terminal L3 connect phase C.
Scheme of connecting an electric stove to a two-phase network
Terminals N1, N2 are short-circuited by a jumper, the terminal marked PE is connected to the protective earth (yellow-green wire).
Connection of 3-phase network to the plate
In a three-phase network, phases A, B, C are connected to terminals L1, L2, L3. It is not necessary to look for the correct phase sequence here, phases can be connected in any sequence. The electric stoves can be connected in the electrical systems of systems with common protective grounding TN-S and with separate protective grounding TN-C-S.

Scheme of connecting an electric stove to a three-phase network
If there is no such grounding, then it must be made and output to the PE terminal of the apartment or house electric switchboard. Similar electrical appliances such as an oven, various cooking hobs and a variety of electric cookers are connected in the same way. For different power of electrical appliances, its cable cross-section is calculated.
Buying a new plate brings a special joy to the hostess. Especially if it has a mass of new, as yet uncharted, functions. But the question arises about the connection - there are a lot of nuances to take into account here. For such a powerful consumer of electricity will need a special outlet for the electric stove. Install it on a separate line, designed only for connecting the unit.
The installation of a new plate, especially electrical, is necessarily accompanied by a connection procedure. Sometimes for this type of work an electrician is invited, but more often they cope on their own.
To ensure that the new equipment has been in service for a long time and there have been no problems in the process of operation, you should pay attention to the technical norms for its installation.
Particular attention should be given to the selection and installation of the appropriate power connector. That the opinion that it is enough for an electric stove to install the most common outlet, is mistaken. It will not be able to withstand a high load and, at best, just melt. For powerful electrical appliances, special sockets are used that can withstand 7 kW or more.
When choosing the correct socket for your plate, you need to focus on the maximum value of the rated current
Power outlets on the market differ in color, material of manufacture, form, installation method and withstand load. When buying this device, you must immediately buy the corresponding plug. Often manufacturers of electric cookers complete their equipment with a power plug and socket - it remains only to install them correctly.
According to the material of manufacture, power sockets come from carbolite and high-quality plastic. The first option is black, they are usually cheaper. Plastic are mainly presented in white. They are more expensive, they are of high quality and have an increased level of durability.
According to the installation method, power outlets are isolated:
- for open installation;
- hidden installation.
If it is to be installed behind a plate that is close to the wall, it is better to choose models of a concealed installation, the working mechanism of which hides in the wall.
High-power three-phase socket, used for installation in apartments / houses, which comes in three-phase electrical network
Among the high-power sockets can be found as options with grounding contact, and without grounding. For an electric cooker, you should buy a grounded outlet.
The food in the house can be single-phase, three-phase and rarely two-phase. Proceeding from this feature, it is necessary to choose an outlet having the necessary contacts and laying the appropriate supply cable.
In order to select the correct power connector suitable for the electrical network entering the house, it is necessary to check with the electricians servicing the site, the type of the network and the presence of grounding in advance. Their answers must be unambiguous and clear. Only after this, you can independently start buying and further installing the power outlet.
The power connector of the concealed installation is most often chosen to save space, especially when its installation is planned behind a plate
How is the power outlet
Power connector (socket), which can withstand heavy loads, is used for powerful home appliances. Its ability to transmit large values of rated current through itself, in comparison with conventional household models, is the most important technical characteristic of the product.
To connect the power connector for a single-phase power supply, a three-core cable is used consisting of a phase wire, a zero and an earth of the corresponding section
If simple sockets are designed for 10 A, 16 A, then power - on 25 A, 32 A or more. Their contacts do not heat up when passing such a current.
The high-power electric point, as well as the usual socket, consists of an operating mechanism, an external decorative cover, performing a protective function, and screws. The only difference is the arrangement of the operating mechanism of the power outlet. If you disassemble it, you can see the input terminals inside to connect the supply cable and the output terminals that transmit the electric current to the plug being inserted.
Rules for installing the sockets for electric stoves
The question of connecting the cooker comes at the end of the repair. At this time, already completed the finishing work in the room and laid the supply cable. It only remains to connect the socket and the plate itself. This is ideal. But it happens, when such a question arises even at the very beginning of the repair work. Here it is necessary to act consistently, following the basic rules.
Preparing to install a power outlet
The first step is to determine the location of the electric plate. It's good to immediately choose a model to know its dimensions and, most importantly, the power consumption. It is from this characteristic will depend which wire as the feeder is to be laid.

A power outlet for the cooker or electric hob can be installed at a height of 10 cm from the floor. The main thing that remotely it was away from washing and dishwasher (+)
After identifying with the model of the device and the location of its installation, it is necessary to lay a separate line of supply cable from the panel to the kitchen. To do this, you need to pick up a wire with a cross-section of 6 mm 2. Mandatory brass. Wiring is better to take a quality, corresponding to GOST, because of its quality depends safety and long-term operation.
For the cooker it is important to lay a separate cable so that in the future there is no accident
When choosing a wire and carrying out its packing, it is necessary to be guided by the norms prescribed in the code of rules SP 31-110-2003, item 9.2. According to them, additional outlets, switches or lamps can not be connected to the power line for the electric cooker. For a single-phase network, a three-core wire with a diameter of 6 mm 2 is used, and for a three-phase network, a five-wire wire with a smaller diameter is used.
When installing power connectors in concrete and brick walls, use a hidden installation option
Picking the right wire, you need to protect it. For this purpose, a 32 A circuit breaker is installed in the switchboard. Also, for additional electrical safety, it is necessary to immediately circuit breaker Install a 40 A residual current device.
The RCD and the circuit breaker will help to protect the dwelling from the unfortunate consequences that can occur in case of overvoltage (+)
The next step is to purchase a power outlet with the correct power. Its rated current must necessarily match technical specifications machine. If the house has a three-phase network, then it is more reasonable to buy a three-phase outlet for the installed electric cooker.
When choosing a power outlet, you should consider what type of installation is to be - open or hidden. Also, be sure to buy a plug suitable for a particular outlet. After all, many plugs of foreign production are not suitable domestic plugs. And vice versa.
If the power connector is to be installed inside the kitchen cabinet, then it is more reasonable to take the overhead model
Power outlet: where to place
When choosing the location of the point for connecting powerful kitchen appliances, do not forget about the safety rules. This socket must not be located above the work surface or in a place where access is difficult.
Often, to connect a powerful hob, install the power connector behind the rear wall of the oven located below it. A standard socket for connecting it
- under the sink;
- behind the washing machine;
- dishwasher.
If the plate is installed on the legs, the optimum location of its outlet is 15 cm from the floor. Also, it is important to ensure that the electrical point is away from water and fire. According to technical standards, the cooker should be immediately plugged into the outlet. For the purposes of electrical safety, it is forbidden to plug it into extension cords.

One of the convenient options for its location is behind the stove itself, if the plate can be freely pulled out of the niche and the space allows. Another option is in the locker next to the stove. This arrangement will not worry that the plastic will overheat, and access to it is not difficult.
Correct connection of the power outlet
Having defined the place where you want to install the socket for your brand new plate, and having laid the supply cable there, you can start installing it. This work can be done by yourself or by an electrician.
Having chosen a plate, you need to carefully study the accompanying documentation and equipment. Often the manufacturer provides a power pair from the socket and the plug with the electric stove
If self-installation power outlet, you need to take the appropriate tools, the outlet itself. Then turn off the power to the wire that you want to work with. Be sure to check that the current on this line is really missing.
In the selected place, under the installation of the outlet, a mark must be made and, taking a puncher, make a hole for the glass of the podrozetnik. This is important when installing a power outlet of a hidden type.
Then, the feeder line laid for these purposes is passed through the sub-socket. The protective braid is removed from it, and the liberated multi-colored wires are carefully peeled to 0.8-1 cm. Now they are to be attached to the socket mechanism. Here it is important to connect the yellow-green wire, which is in charge of the ground, to the ground connection of the outlet - the central one.
It will remain to accurately connect the phase and zero to the end contacts and check that all connections do not fall off. Do not tighten too much - you can damage the wires.
By connecting the power connector, as well as the usual one, it is important not to confuse the wires by connecting them to the appropriate terminals
When the quality of the wire connection is checked, it is necessary to tightly fix the receptacle in the wall using an alabaster or gypsum solution. After drying, it remains to fix the screws themselves with screws and screw the upper insulating body of the power outlet.
After installation, it is necessary to check if the socket is working. If everything works, then you can proceed to connect the plate itself.
Power plug connection options
Buying an electric stove, buyers receive a bonus from most manufacturers - a plug with a suitable outlet. These elements should only be connected to the plate and the power cable, respectively.
There are various schemes for connecting. They depend on the supply network, entering a private or multi-apartment building. There are such connections:
- single-phase;
- two-phase;
- three-phase.
Often manufacturers with reverse side the plates apply all three connection schemes. To the house master will only remove the protective cover and, guided by the attached circuit, connect all the wires of the plate to the plug. Sometimes such a scheme is included in the instructions that come with the electric stove. It is necessary to study it carefully and act in accordance with the necessary scheme.

With a three-phase connection scheme you can sort it out on your own. For this, it is necessary to carefully study the circuit itself and not to confuse the wires
Before starting the laying of the supply line separately for the slab, it was necessary to find out which network feeds the house. Proceeding from this, a 5 or 3-wire wire of the optimal diameter was selected. Knowing this nuance, it is necessary to choose your own and act from the proposed connection schemes.
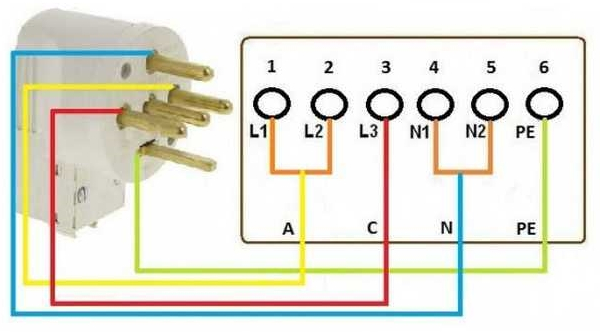
A three-phase network often enters new buildings. When connecting a cooker in the kitchen of such an apartment, follow the three-phase connection diagram. Its essence consists in attaching the contacts of the plate to the five-core wire of the plug:
- the terminals A, B, and C are connected to the terminals L1, L2, L3. In this case, the phase jumpers from the copper wire are not used;
- between the zero terminals N1, N2 a copper jumper is placed and a zero wire is connected to it;
- the grounding yellow-green wire is connected to the PE terminal.
Sometimes there is a variant of a two-phase network in the house / at the dacha, built somewhere at the very beginning of the last century. In order to properly connect a powerful kitchen appliance / cooker in this situation, depending on the phases available, a good copper bridge must be placed between the two terminals of household appliances. For example, between L1 and L2. Then connect phase A to this terminal, and attach the remaining phase C to the terminal L3.
Between the terminals of zero N1, N2 the same high-quality jumper is put and a zero wire is connected. A ground lead is attached to the PE terminal.
A two-phase electrical network supplying the house involves the use of a two-phase connection scheme for powerful electrical appliances
In houses of old construction, a single-phase electrical network usually comes in. Here, in this case, a single-phase connection is used. Here, zero and earth are connected in the same way as the two previous schemes, and copper jumpers are placed between the three terminals of the plate. And then the phase wire is connected.
Copper bridges often come complete with a stove. But, if they were not suddenly found, you can use copper wire 6 mm 2, detaching pieces of the desired size from it. The connection points to the terminals must be carefully crimped to ensure reliable contact with the clamps.
Single-phase network occurs most often. With this connection, it is important to correctly set the copper jumpers between the phase terminals
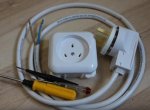
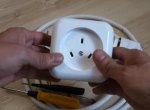
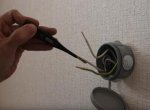
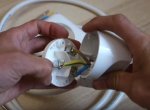
Detailed photoinstruction for connection via single-phase circuit
We should start with the preparation of tools and material.
Image Gallery
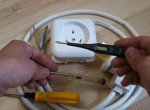
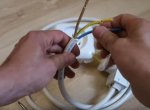
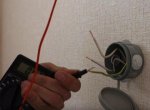
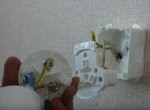
The next stage is the connection of a three-wire wire to an electric stove. It is important to choose the correct circuit, to determine the terminals and not to confuse the wires.
Image Gallery
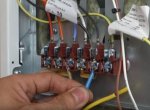
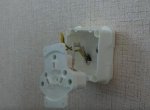
After connecting the cable to the plate, check the wires in the junction box and install a new outlet.
Image Gallery
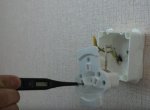
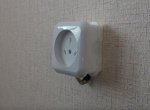
The final and mandatory stage is testing. It is necessary to check the operation of the socket, and at the same time the plates.
Image Gallery
Including the stove, we also check the correctness of the cable connection. If the indicator on the panel lights up, the connection is correct

At this, the installation of the power outlet and the connection of the electric stove are considered complete.
Sometimes it is not possible to install a power outlet for the cooker. But this fact is not an obstacle to its connection. After all, without an electric stove, it's hard to imagine a full-fledged kitchen.
In this case, it is possible to connect the plate directly to the supply cable. Sometimes it is placed in a junction box, and all the wires are connected to the corresponding terminals of the terminal block. Also, it is possible that such a box is not worth it, and the supply cable simply leaves the wall. The meaning of the connection from this will not change - it will be the same.
The connection of the electric plate wire directly to the supply wire can be done by one's own hands
First, you need to unscrew the plug of the electric plate and release the wires that are in it. This is usually 3 wires - ground, phase and zero.
Secondly, you need to disconnect the power line from which you want to work, from the network. Be sure to ensure that electricity is not supplied to protect yourself from electric shock.
Third, unscrew the screw from the protective cover of the junction box. Here you can see the terminal block, to which the wires of the supply cable are connected. In the case where the distribution block is not installed, it will be more convenient to put it. So the connection will be more accurate.
Fourth, the power plugs of the plate must be connected to the corresponding terminals with wires from the junction box. Here it is important not to confuse the colors - the yellow-green earthing lead of the plug is connected to a similar supply wire in the box. Connect the phase and zero wires in the same way.
If there is no power plug provided with the plate, the wire can be connected by yourself
When the connection is complete, the protective cover of the terminal box must be put back and the screw tightened. All - you can check the performance of the electric stove.
It is important not to forget that using this type of connection, the consumer loses the guarantee. In the event of a failure before the expiration of the warranty period, you will have to repair the equipment at your own expense. This is one of the unpleasant moments of this connection.
But there are also positive aspects. So, if in the near future it is planned to replace the old plate, then, working with junction box, it will be easy to connect everything new.
When all work on the connection of the power outlet and the cooker is complete, you must turn it on to ensure that everything works
Video about electrical outlets
A detailed video about installing a power outlet in an overhead way and connecting a power plug to an electric stove:
A visual video about connecting the cable to an electric stove according to the scheme provided by the manufacturer:
Video about the connection of the electric cooker to the power outlet with the plug remaining from the old plate:
You can connect the power outlet without using electricians. To do this, it is necessary to select the correct device, taking into account the power of the equipment, which will be switched on. The main thing is to lay a separate cable specifically for the plate and secure it by installing the breaker and the RCD. The installation process itself does not differ from the installation of an ordinary outlet.
What caused such a seemingly simple question? First, any connection of household appliances characterized by increased en / consumption, implies the installation of a separate line and the attachment of special / sockets. Ordinary, which a lot throughout the apartment, simply will not survive and melt, as well as intra-house electrical / wiring, not designed for large current values.
Secondly, when purchasing such equipment, it is necessary to provide for the inclusion of appropriate protective devices in the circuit. Otherwise, "surprises" are likely in the form of a periodic shutdown of the machine at the input and de-energization of all rooms, incorrect operation (and even failure) of other household electrical appliances. in an apartment to a single-phase network is not difficult, it is only necessary to know certain features and rules. That's about them we'll talk.
Violation of the order of connection is fraught with serious troubles (and this is said softly), up to a fire or death. Everyone knows about this, but, unfortunately, some points from the manufacturer's recommendations are neglected. But not many are aware that their non-compliance (even from a single position) is the reason for the cancellation of the guarantee.
Given the cost of equipment, for some, such an argument will seem more weighty. Therefore, the author recommends that you carefully read two documents before the start of installation - the manufacturer's instructions and the corresponding sections of the PUE (7th edition).
Preparatory activities
What you need from accessories and supplies, it becomes clear in the course of the story. Therefore, on such "small things" as screwdrivers, a probe and the like, it does not make sense to stop. Any el / installation work involves the use of a certain set of household tools.
Inspection of the power shield
First of all, it is necessary to check which maximum current is calculated for the input automaton. The value within 45 ± 5 A is all right; this, as a rule, is sufficient. But if it is less, it is necessary to replace.
Recommendation - in private houses of rooms, as a rule, more than in an apartment. Naturally, in the presence of money and free space, cottages are "equipped" with household appliances not as they are. Products quite a lot. It is recommended not to be too lazy and to calculate the total power consumed by them, and then add the electric stove. Will it survive? Practice shows that he can regularly "knock out". This mostly refers to the homes purchased. Not the fact that the new owner thoroughly knows what and how the previous owner mounted in the shield.
Earthing
This applies to the owners of apartments, as the owners of cottages such a problem is not worth it.
Recommendation - it is better not to delve into this issue yourself, but to invite an electrician from the housing department. Why? Only he knows by what circuit the house is connected. If it is a TN-C system, then "surprises" are possible, since an independent in such an access panel often leads to emergency situations. One of the most common is the so-called zero burnout. The consequences can not be predicted, including for the owner's purse of the electric stove.
Selection and definition of material characteristics
Cable
That will have to pull a new thread - is not discussed. This is especially true of houses that were still built during the Soviet era. Then, in the meantime, there were no electric stoves and other powerful household appliances, so they were not taken into account when calculating intra-apartment wiring.
Core material
Only copper. This is clearly stated, for example, in paragraph 7.1.34 of the IPP. For the sake of justice (and for broadening the horizons), it can be noted that it is allowed to lay aluminum cables, but on condition that the cross-section is not less than 16 "squares". It is clear that for an apartment - not an option.
Number of cores
It's about connecting to a single-phase network. Therefore, at least three - phase, zero, earth. Although it is more reasonable to purchase a 4-core cable. You never know what will happen, but there should always be a reserve. Slightly more expensive, but prudence will not hurt, especially if you consider how troublesome it is to replace the cable in the apartment.
Conductor cross-section
Recommendations are different, and with "an eye" on the power of the electric stove - and 4, and 6 cm². But the advice of "knowledgeable" people is one thing, and regulatory documentation is another. According to paragraph 9.2 of SP No. 31 - 110 of 2003, not less than 6 "squares". How to be? Follow the manufacturer's instructions. It already has initial data on the cross section, taking into account the power consumption of a particular electric stove. If it is small, what's the point of spending money on a more expensive cable?
Those who for some reason do not have an electric plate passport can be recommended to use the data from the table.
Cable brand
About what is best for an apartment (laying inside a private house),. Therefore, it does not make sense to repeat.
Other Schema Elements
- Circuit-breaker (A) - not less than 20.
- RCD. This device is mounted in series with AB (and after), and its rating is "tied" to the current of the automatic device. The value must be one step higher. That is, if for AB it is 20, then for RCD - 25. Accordingly, for 32 - 40.
On a note
The PUE allows not to install the RCD in the power supply circuit of stationary equipment (item 7.1.79). But it is recommended to use it in the scheme. If the reader gets acquainted with the purpose and principle of the operation of such devices, he will understand the usefulness of this observation.
The two above protective devices can be replaced by a single-differential automaton. If there is little place in the power shield - an excellent solution to the problem.
Socket, plug
In principle, the plug on the cable can not be put, and make a direct connection.
But from the point of view of TB and the convenience of operating an electric stove - not the most the best option. For example, how to push it away from the wall while cleaning in the room?
All products (plug, socket) must be selected for the calculated current (indicated in the passport)!
Connection procedure
In principle, how to lay the cable (in the stump on the wall, under the baseboard or facing), the owner is able to solve himself. Remind that you first need to unscrew the fastener on the cover, under which the terminal board is located, turn off the voltage in the shield when installing the outlet and the like, from the author's point of view, is not worth it. But some of the schemes will be useful, and there are almost no comments on them.
Direct cable disconnection is indicated both in the documentation and on the electrical panel's contact panel, with explanatory symbols.
What to consider:
- For single-phase connection, terminals 1,2 and 3 are connected by jumpers. They should be in the sachet with accessories (included in the delivery). The same applies to the terminals of zero (4 and 5). In the figure, everything is well shown.
- If there are no jumpers, they are easy to make. But only from the wire that connects to the electric stove network! If we take a smaller cross section, then it is not a fact that they will withstand.
Electric stoves are increasingly included in the everyday life of urban residents. This is due to the expanded capabilities of such equipment and the ban on the supply and installation gas system in high-rise buildings. Let's consider how to properly connect the electric cooker.
Types of electric stoves
There are several classifications.
According to the material of execution:
- Enameled. in such models there are two types: pancake (cast iron), spiral. There are combined options with connection to gas and electricity.
- Glass-ceramic. The heating element in such plates is a spiral, corrugated tape, halogen lamps.
- Induction. They can be attributed to a subspecies of glass-ceramic plates, but instead of a heating element, an electromagnetic coil is built in.
By design:
- Stand alone. This technique can be equipped with an oven.
- Desktop. Popularity is due to compactness, mobility. Often the connection of an electric cooker of this kind is used in the country. There are models with built-in oven.
- Built-in. This technique has gained immense popularity due to its ergonomics. The existing range allows you to fit such equipment into any interior. Typically, this technique is divided into a cooking surface and an oven.
By the number of contacts: from one to six.
By intensity of use:
- household;
- professional.
By power consumption:
- low-power (with the ability to connect to a 220 V network);
- powerful (connection of an electric plate with own hands to 380 V).
By type of management:
- mechanical;
- sensory.
As you can see, along with the classic models in our time you can buy and "smart" equipment.
Consider how each type of household equipment of such a plan works.
Design features. Principle of operation
Each electric stove has its own design features.
Enameled
The heating element is a spiral made of metal with a high specific resistance. The principle of operation is based on the release of thermal energy as the current passes through the resistive heating element. This is typical for solid (cast-iron) models, and for spiral ones. There is only one difference: in the first variant the heating element is inside the ring.
Glass-ceramic
The principle of operation is the same as in enamel plates, with the only difference that the heating element can be not only a classical spiral, but also a corrugated ribbon, halogen lamps.
Induction
But this technique is different in principle. The heating element is an electromagnetic coil, which, passing a current through itself, creates a field. It, in turn, forms induced high-frequency currents in the dishes. Guidance occurs due to lines of force through the bottom of the dishes. Therefore, for such plates you need specialized kitchen utensils.
Apparently, the principle of operation of induction models differs significantly from other options. Which technique is better?
Advantages and disadvantages
The connection of the electric plate to the network is inevitable regardless of the type. Let's consider each variant from the point of view of merits and lacks at operation.
Enameled
They differ in simplicity of construction, moderate cost and easy repair at a low price. For washing, ordinary, affordable cleaning agents are used. As for the shortcomings, an open spiral - the danger of getting an electric shock at the time of operation, often requires the replacement of a spiral. For cast iron minus - a long time of heating and cooling, respectively, increased electricity costs.
Glass-ceramic
The cooking surface has a high thermal conductivity, which makes it possible to heat dishes and food much faster than the classical version does, and this significantly reduces the cost of electricity. The possibility of setting the exact heating. The heating element is protected by a glass-ceramic coating, which significantly extends its life. Care of the surface is much easier, it has a perfectly flat plane. The price of such a plan is much higher, more expensive and more difficult to repair, abrasives and cleaning powders are contra-indicated for washing, special dishes with a flat, smooth bottom are required for cooking. If the model has low sides, then when it spills food, it can leak to the floor.
Induction models
In terms of energy savings, the most advantageous option. The burners start to heat up only when there is a pan on the stove, if it is removed, an automatic shutdown occurs. Otherwise, this type of technology has the advantages of glass ceramic models, but the price for repairs and the equipment itself is much higher. Moreover, to the dishes one more requirement is required - magnetic properties.
When choosing a particular model, you should pay attention to the technical data, to find out whether it is possible to connect the electric plate to the existing wiring (outlet).
Important characteristics when choosing
Acquiring new equipment, should rely on a number of technical data:
- Dimensions. It is necessary to measure 3 parameters: width, depth, height.
- Power consumption. Depending on the manufacturer, model, availability of the oven, it can range from 1.5 kW to 8 kW. It is better to take a class no lower than "A". Such equipment will save on power consumption. These data are indicated in the passport for the equipment.
- Equipment. The presence of a cable and a plug from the factory. Most often they are absent.
All other parameters are selected based on personal preferences.
 Having identified with the model, perform an audit of the existing electrical wiring. If the power of the equipment does not coincide with the section of the cable, it will be necessary to replace it.
Terms of connection
Modern plates have a lot of power, so before you buy the chosen model, you need to evaluate the existing wiring system. Most often this technique is sold without a plug and wire, because the connection of the plate electric plants are provided in three ways. The required one is selected at the installation site, to which a number of requirements are made.
It is necessary to have a free end of the wire in place of up to 2 meters. This will allow further movement of the equipment for repair work or for washing the floor under it.
Must comply with the declared power consumption. Even better, if there is a reserve. This is especially true for intensive use of cookers and ovens.
The cable must be integral, free of adhesions and joints.
The wiring for the plate is supplied separately, and a separate automaton must be provided in the shield.
Regardless of the model, household appliances are often connected through a power outlet. But first, let's see what cable is needed to connect the electric cooker.
Wire selection
In multi-apartment buildings, single-phase connection of slabs is most often envisaged, so builders leave a free end of the wire with a cross-section of 4 mm 2. Such parameters are suitable for plates with a power not exceeding 13 kW. 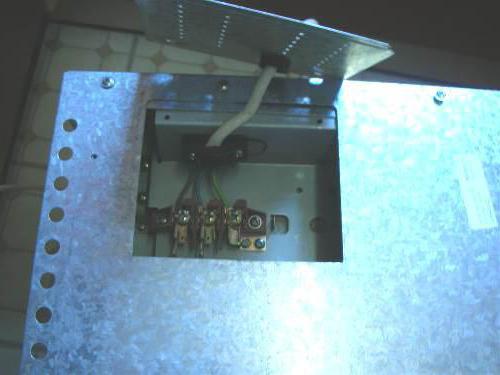
If the wiring is not provided, it is obsolete, then it is necessary to select the correct wire for connecting the electric cooker, which must meet the following parameters.
The veins should only be copper (established by the regulatory document of the PUE 7.1.34).
The number of cores is important. For apartments most often there is a single-phase connection, the cable for it is taken three-core (phase L, zero N, PE ground). In private houses, a three-phase, five-core cable (three phases L1 L2 L3, zero N, PE ground) can be provided.
For a 220 V network, there must be at least 6 square meters. mm, according to SP 31-110-2003 (item 9.2). This is an average value, the value can vary in both directions, depending on the technical data of the plate itself. For three-phase installation, the cable must be a five-core section of at least 2.5 square meters. mm. Determine the cross-section of the cable by using special calculators or tables.
Cable brand is required VVG; VVG-ng; PVA; ShVV. To connect the plate to the network, you can use PVA or KG.
Wire laying must be carried out separately.
It is necessary to have a separate machine in the shield. RCDs for regulatory documents can not be set for household appliances. But considering that the electric stove is an increased source of danger, it is better to provide. The automatic machine for a single-phase installation is selected with a rated current of 32 A (RCD at 40 A), for three-phase - a three-pole automatic machine at 16 A, a RCD of 25 A.
The cable for connecting the electric cooker must be laid in a separate line, it can not be hung with other points (sockets, lighting). Most often, hidden wire is used.
Selection and installation of power outlet
Determining which cable is needed to connect the electric stove, choose a power outlet. 
It must meet the following requirements:
- the rated current of the socket and plug must correspond to the parameters of the machine and the number of wires of the wire;
- the form of the power outlet depends on the method of laying the cable (hidden or open);
- should buy a product made of high-quality non-combustible materials.
Consider a number of points for installing the outlet:
- installation is carried out on a flat, non-flammable surface;
- do not install near hot surfaces, heating system, water supply;
- the connection of the conductors must be done according to the scheme, without confusing the colors;
- screw terminals must firmly fix the contacts;
- after installation, check for a short circuit.
After installation, the sockets begin to install the equipment itself.
Installation and connection of the electric cooker
After delivery of the equipment, it should be unpacked and checked for completeness, no visible discard. Before you start, it is worthwhile to carefully study the instructions and the wiring diagram. Remove unnecessary components, set by level.
Unscrew the panel covering the terminals on the back of the equipment. There are also duplicated three connection schemes.
As already mentioned earlier, rarely do manufacturers supply household models with a wire and power plug. Therefore, the purchase of a cable and a power outlet with a plug is carried out independently. Let's consider three ways how to make connection of an electric gas cooker with your own hands.
Single-phase
With this installation, the phase (red) is connected to terminals L1, L2, L3. Since the wire is three-core, copper pins are installed on the pins (they come complete with equipment). On N1, N2 set a zero (blue) and a copper jumper. PE - earth (green). All the contacts are tightened, the cable is fixed with a special clamp. The lid is installed back. There are 3 contacts in the socket: upper - ground, two lower - phase and zero.
Three-phase
It differs from the previous phase connection. There is a wire for each terminal. Observe the color according to the scheme. All the rest is made analogous to single-phase.
Two-phase
At phase L1, L2 we put a jumper and connect one of the ends of the phase, on L3 - the second. The rest of the installation is similar to the previous two.
After installation, it is necessary to perform a test run according to the instructions on the equipment.
 Connecting the electric cooker independently will not cause difficulties, if you follow the instructions and safety during installation. All work must be carried out with a de-energized system.
Features of mounting of some brands
Connection can be made both on a single-phase circuit, and on three-phase. It all depends on the power supply. All the steps are described above. The connection also does not have any features and is implemented according to the general scheme.
It is worth paying special attention to the warranty obligations. Incorrect installation can lead to equipment failure, and this will be the reason for the refusal of the service center to carry out a free repair. Therefore, if you are not sure of your abilities, it is better to carry out installation by a specialist, who has a special license for such work. In the passport a mark is placed on the connection in case of misunderstanding.
Connecting the gas cooker
The design of this technique makes it possible to use both the electrical network and the gas. There are two versions: with mounting to the gas distribution network and gas bottle. It should be noted that for the use of gas equipment in apartment house, in which such a system is not provided, a special permit will be required. 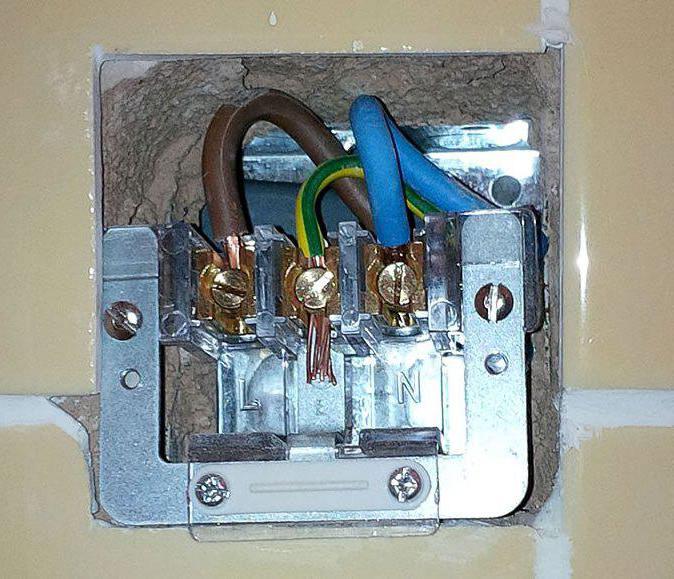
The rest can be noted two important points: connection to the gas distribution network must be performed by a specialist gas supplier company, which places an appropriate mark in the passport. In the future this organization carries out maintenance of the equipment. Installation to the network does not impose special requirements. For a sufficient outlet with 16A grounding.
Conclusion
As you can see, you can independently connect the household electric cooker yourself.
But if you are not confident in your abilities, it is better to contact a specialist. In the future, this will reduce the cost of paid repair of equipment due to improper installation.
So, we found out how to connect the electric (gas) plate with your own hands.